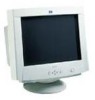

Compaq P710/P910/P1210 Color Monitor User's Guide
Page 2
... Capability 3 Power Management Function 3 DDC 3 Location Considerations 4 Cleaning Your Monitor 4 Unpacking 5 Tilt/Swivel Base 5 Screen Position Adjustment 5 Quick Operation Chart 5 2. SPECIFICATIONS 22" Model 1 19" Model 2 17" Model 3 7. First Edition August 2000. PART NAME... Control Names 1 3. INSTALLATION AND CONNECTION AC Power Connection 1 Signal Cable Connection 1 Connecting to VGA Compatible System .......... 1 Connecting to support or sustain life or good health. 4. OSD(On Screen Display...
... Capability 3 Power Management Function 3 DDC 3 Location Considerations 4 Cleaning Your Monitor 4 Unpacking 5 Tilt/Swivel Base 5 Screen Position Adjustment 5 Quick Operation Chart 5 2. SPECIFICATIONS 22" Model 1 19" Model 2 17" Model 3 7. First Edition August 2000. PART NAME... Control Names 1 3. INSTALLATION AND CONNECTION AC Power Connection 1 Signal Cable Connection 1 Connecting to VGA Compatible System .......... 1 Connecting to support or sustain life or good health. 4. OSD(On Screen Display...
Compaq P710/P910/P1210 Color Monitor User's Guide
Page 3
...• To ensure ease of installation and ongoing use, the monitor features On Screen Display (OSD) of all monitor set-up and adjustment functions. • For use . • The world's standard DIAMONDTRON NF CRT upgraded with improved focus and convergence for super sharp and pure ...x 1200 lines (17" monitor), 1920 x 1440 lines (19" monitor) and 2048 dots x 1536 lines (22" monitor). To save energy, the monitor must be done automatically. • The monitor provides: • fine 0.25mm aperture grille pitch/Maximum address- able resolution of 1920 x 1440 (19") • fine 0.24mm ...
...• To ensure ease of installation and ongoing use, the monitor features On Screen Display (OSD) of all monitor set-up and adjustment functions. • For use . • The world's standard DIAMONDTRON NF CRT upgraded with improved focus and convergence for super sharp and pure ...x 1200 lines (17" monitor), 1920 x 1440 lines (19" monitor) and 2048 dots x 1536 lines (22" monitor). To save energy, the monitor must be done automatically. • The monitor provides: • fine 0.25mm aperture grille pitch/Maximum address- able resolution of 1920 x 1440 (19") • fine 0.24mm ...
Compaq P710/P910/P1210 Color Monitor User's Guide
Page 4
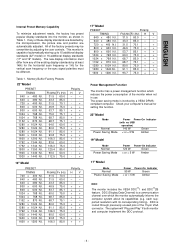
... over which reduces the power consumption of automatically storing up to 15 additional display standards (22" model) or 16 additional display standards (17" and 19" models). DDC is capable of the monitor when not in Table 1. each supported resolution with no USB operation) Normal... 140 W Green Power Saving Mode < or = 5 W Amber 19" Model Mode Normal Power Saving Mode Power Power-On Indicator ...
... over which reduces the power consumption of automatically storing up to 15 additional display standards (22" model) or 16 additional display standards (17" and 19" models). DDC is capable of the monitor when not in Table 1. each supported resolution with no USB operation) Normal... 140 W Green Power Saving Mode < or = 5 W Amber 19" Model Mode Normal Power Saving Mode Power Power-On Indicator ...

Compaq P710/P910/P1210 Color Monitor User's Guide
Page 5
... thinner or any volatile substances to clean the unit as the finish may be permanently marked. • Never leave the monitor in contact with rubber or vinyl for an extended time period. • Do not spray directly on the screen as ...monitor away from the monitor can cause a fire or shock hazard. • Avoid placing the monitor, or any other light sources may drip into any enclosure that does not have adequate ventilation. • Avoid exposing the monitor to clean the monitor screen. CAUTION • Do not use an abrasive cleaner on the display area of the monitor...
... thinner or any volatile substances to clean the unit as the finish may be permanently marked. • Never leave the monitor in contact with rubber or vinyl for an extended time period. • Do not spray directly on the screen as ...monitor away from the monitor can cause a fire or shock hazard. • Avoid placing the monitor, or any other light sources may drip into any enclosure that does not have adequate ventilation. • Avoid exposing the monitor to clean the monitor screen. CAUTION • Do not use an abrasive cleaner on the display area of the monitor...
Compaq P710/P910/P1210 Color Monitor User's Guide
Page 6
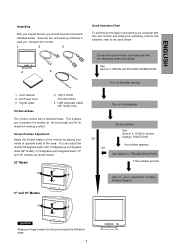
... or 5 degrees down (22" model), or 15 degrees up or 5 degrees down (17" and 19" models) as shown below. 22" Model 10 90 90 5 Turn on the color monitor. 1. INSTALLATION AND CONNECTION Turn on the computer. See Section 4. TROUBLESHOOTING If the problem persists. ENGLISH Unpacking... Position Adjustment Adjust the tilt and rotation of the monitor by placing your computer with the color monitor and setting the necessary controls and switches, refer to position the monitor at opposite sides of the case. OSD(On Screen Display) FUNCTIONS If a problem appears. Call for maximum ...
... or 5 degrees down (22" model), or 15 degrees up or 5 degrees down (17" and 19" models) as shown below. 22" Model 10 90 90 5 Turn on the color monitor. 1. INSTALLATION AND CONNECTION Turn on the computer. See Section 4. TROUBLESHOOTING If the problem persists. ENGLISH Unpacking... Position Adjustment Adjust the tilt and rotation of the monitor by placing your computer with the color monitor and setting the necessary controls and switches, refer to position the monitor at opposite sides of the case. OSD(On Screen Display) FUNCTIONS If a problem appears. Call for maximum ...

Compaq P710/P910/P1210 Color Monitor User's Guide
Page 7
... by number and is in the power management modes. 3. ENGLISH 2 PART NAME Control Names (17" & 19" Models) See figures below for AC power. 2. FRONT REAR D-SUB D-sub 1. POWER SWITCH: A push-on , and illuminates amber when the monitor is described individually. ITEM SELECT BUTTON: Push to select the item icon to select group...
... by number and is in the power management modes. 3. ENGLISH 2 PART NAME Control Names (17" & 19" Models) See figures below for AC power. 2. FRONT REAR D-SUB D-sub 1. POWER SWITCH: A push-on , and illuminates amber when the monitor is described individually. ITEM SELECT BUTTON: Push to select the item icon to select group...

Compaq P710/P910/P1210 Color Monitor User's Guide
Page 8
... switch for AC power. 2. USB UPSTREAM PORT: To connect to USB equipped peripherals, e.g. ENGLISH Control Names (22" Model) See figures below for Monitor Control Function. 11. If only one input is in the power management modes. 3. SIGNAL INPUT CONNECTOR (SIGNAL A):DB9-15P 9. POWER-ON INDICATOR: ...select the item icon. 6. SIGNAL INPUT CONNECTOR (SIGNAL B):DB9-15P 10. POWER SWITCH: A push-on , and illuminates amber when the monitor is used, the monitor will select it automatically. 4. ITEM SELECT BUTTON: Push to adjust the image on the screen. AC POWER CONNECTOR 8.
... switch for AC power. 2. USB UPSTREAM PORT: To connect to USB equipped peripherals, e.g. ENGLISH Control Names (22" Model) See figures below for Monitor Control Function. 11. If only one input is in the power management modes. 3. SIGNAL INPUT CONNECTOR (SIGNAL A):DB9-15P 9. POWER-ON INDICATOR: ...select the item icon. 6. SIGNAL INPUT CONNECTOR (SIGNAL B):DB9-15P 10. POWER SWITCH: A push-on , and illuminates amber when the monitor is used, the monitor will select it automatically. 4. ITEM SELECT BUTTON: Push to adjust the image on the screen. AC POWER CONNECTOR 8.

Compaq P710/P910/P1210 Color Monitor User's Guide
Page 9
... DB9-15P connector for USB communication. Connect the other end of the signal cable to the AC power connector on the back of the monitor. The monitor's auto-sensing power supply can automatically detect 100-120V AC or 220-240V AC and 50 or 60Hz. After using the system, power...The other end is connected to the DB9- 15P receptacle on the back of the monitor. 4. Power off , both the monitor and the computer. 2. ENGLISH 3 INSTALLATION AND CONNECTION 17" and 19" Models On the back of the monitor two kinds of plug-in connections are provided: AC power connector for the AC ...
... DB9-15P connector for USB communication. Connect the other end of the signal cable to the AC power connector on the back of the monitor. The monitor's auto-sensing power supply can automatically detect 100-120V AC or 220-240V AC and 50 or 60Hz. After using the system, power...The other end is connected to the DB9- 15P receptacle on the back of the monitor. 4. Power off , both the monitor and the computer. 2. ENGLISH 3 INSTALLATION AND CONNECTION 17" and 19" Models On the back of the monitor two kinds of plug-in connections are provided: AC power connector for the AC ...

Compaq P710/P910/P1210 Color Monitor User's Guide
Page 11
... USB HUB may be used by following procedure permits your computer to the upstream port of the display monitor. (b) Cycle power of the display monitor off then on the computer. (1) Connect the computer and the display monitor with the following method. • Open "Device Manager" tab in "Universal Serial Bus Controller... for each USB port on . If you can confirm that the USB HUB is successfully enumerated with an USB cable. Power on the display monitor. NOTE If the mark appears with mark and click "Remove" and "Refresh". Select "Generic USB HUB" marked with "Generic USB HUB...
... USB HUB may be used by following procedure permits your computer to the upstream port of the display monitor. (b) Cycle power of the display monitor off then on the computer. (1) Connect the computer and the display monitor with the following method. • Open "Device Manager" tab in "Universal Serial Bus Controller... for each USB port on . If you can confirm that the USB HUB is successfully enumerated with an USB cable. Power on the display monitor. NOTE If the mark appears with mark and click "Remove" and "Refresh". Select "Generic USB HUB" marked with "Generic USB HUB...

Compaq P710/P910/P1210 Color Monitor User's Guide
Page 12
... NOTE When pressing both and buttons simultaneously, moving direction of item selection becomes reverse. - 1 - ENGLISH 4 OSD (On Screen Display) FUNCTIONS How to display the OSD CONTRAST (3) Select the group icon on Main Menu by pressing button. The 22" model OSD can be turned off quickly...how to adjust the screen using the OSD function. (1) Turn on Sub Menu by pressing . to adjust the screen The monitor has an OSD(On Screen Display) function. CONTRAST Main Menu (4) Select the item icon on the monitor. (5) Adjust by pressing the OSD OFF button. (2) Press button screen.
... NOTE When pressing both and buttons simultaneously, moving direction of item selection becomes reverse. - 1 - ENGLISH 4 OSD (On Screen Display) FUNCTIONS How to display the OSD CONTRAST (3) Select the group icon on Main Menu by pressing button. The 22" model OSD can be turned off quickly...how to adjust the screen using the OSD function. (1) Turn on Sub Menu by pressing . to adjust the screen The monitor has an OSD(On Screen Display) function. CONTRAST Main Menu (4) Select the item icon on the monitor. (5) Adjust by pressing the OSD OFF button. (2) Press button screen.

Compaq P710/P910/P1210 Color Monitor User's Guide
Page 13
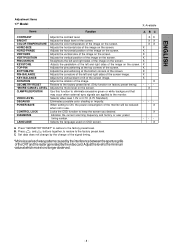
.... DIAGNOSIS Indicates the current scanning frequency, factory or user preset timing number, and - - - - B. Press "ALL RESET" to restore to the monitor. D. XX X KEY-BALANCE Adjusts the vertical slant or tilt of the screen. XXX ZOOM Zooms the screen to the factory preset level.(See "NOTE"...POSITION Adjusts the vertical position of the image on the screen. XX X TOP-PIN Adjusts the pincushioning at the bottom corners of the monitor will be reduced when not in use XX if your computer is used on the screen. XX X PIN-BALANCE Adjusts the curvature of...
.... DIAGNOSIS Indicates the current scanning frequency, factory or user preset timing number, and - - - - B. Press "ALL RESET" to restore to the monitor. D. XX X KEY-BALANCE Adjusts the vertical slant or tilt of the screen. XXX ZOOM Zooms the screen to the factory preset level.(See "NOTE"...POSITION Adjusts the vertical position of the image on the screen. XX X TOP-PIN Adjusts the pincushioning at the bottom corners of the monitor will be reduced when not in use XX if your computer is used on the screen. XX X PIN-BALANCE Adjusts the curvature of...

Compaq P710/P910/P1210 Color Monitor User's Guide
Page 15
... of the moire-clear wave. To lock the OSD function except for power management.) To unlock the OSD function. To restore all items to the monitor. ENG.....English, FRA.....French, ESP.....Spanish, ITA.....Italian, GER.....German, JPN.....Japanese CONTROL LOCK: This is available when the computer has the GTFTM function according...
... of the moire-clear wave. To lock the OSD function except for power management.) To unlock the OSD function. To restore all items to the monitor. ENG.....English, FRA.....French, ESP.....Spanish, ITA.....Italian, GER.....German, JPN.....Japanese CONTROL LOCK: This is available when the computer has the GTFTM function according...

Compaq P710/P910/P1210 Color Monitor User's Guide
Page 16
...sides of the image on the screen. B. NOTE If a non-Factory Preset timing is set for "BRIGHT" and "CONTRAST". ENGLISH Adjustment Items 19" Model Items Function X = Available A BC CONTRAST Adjusts the contrast level. PIN-BALANCE Adjusts the curvature of the left corners of the image...video level 1.0V or 0.7V. (0.7V Standard) DEGAUSS Eliminates possible color shading or impurity. and + buttons together, to restore to the monitor. VERT-SIZE Adjusts the vertical size of the screen. CORNER PURITY (BL) Adjusts the purity of the bottom-left and right sides of ...
...sides of the image on the screen. B. NOTE If a non-Factory Preset timing is set for "BRIGHT" and "CONTRAST". ENGLISH Adjustment Items 19" Model Items Function X = Available A BC CONTRAST Adjusts the contrast level. PIN-BALANCE Adjusts the curvature of the left corners of the image...video level 1.0V or 0.7V. (0.7V Standard) DEGAUSS Eliminates possible color shading or impurity. and + buttons together, to restore to the monitor. VERT-SIZE Adjusts the vertical size of the screen. CORNER PURITY (BL) Adjusts the purity of the bottom-left and right sides of ...

Compaq P710/P910/P1210 Color Monitor User's Guide
Page 18
...bottom-right corner. To clamp the video signal at the front of the H-Sync pulse. To eliminate possible color shading or impurity due to the monitor. VIDEO LEVEL DEGAUSS POWER-SAVE CONTROL LOCK OSD POSITION To select 1.0V of the H-Sync pulse. To move the OSD screen position To move ... top-right corner. CORNER PURITY(TR) To adjust the purity condition on the full screen area. To select the constant power consumption mode. ENGLISH 19" Model Group Item Icon Icon Item Press the Minus Button Press the Plus Button VIDEO HORIZ-STATIC To adjust the horizontal beam alignment on the...
...bottom-right corner. To clamp the video signal at the front of the H-Sync pulse. To eliminate possible color shading or impurity due to the monitor. VIDEO LEVEL DEGAUSS POWER-SAVE CONTROL LOCK OSD POSITION To select 1.0V of the H-Sync pulse. To move the OSD screen position To move ... top-right corner. CORNER PURITY(TR) To adjust the purity condition on the full screen area. To select the constant power consumption mode. ENGLISH 19" Model Group Item Icon Icon Item Press the Minus Button Press the Plus Button VIDEO HORIZ-STATIC To adjust the horizontal beam alignment on the...
Compaq P710/P910/P1210 Color Monitor User's Guide
Page 19
...the screen. LANGUAGE Selects the language used on the screen. X X X X X X X -X -X X -X A. C. BRIGHT Adjusts the black level of the CRT and the raster generated by the video card. HORIZ-SIZE Adjusts the horizontal size of the image on the screen. X VERT-POSITION Adjusts the vertical...the change of the signal timing. *Moire is no longer observed. - 8 - Press and buttons together, to restore to the monitor. COLOR TEMPERATURE Adjusts the color temperature of the image on the screen. CLAMP PULSE POSITION Use this function to eliminate excessive green or ...
...the screen. LANGUAGE Selects the language used on the screen. X X X X X X X -X -X X -X A. C. BRIGHT Adjusts the black level of the CRT and the raster generated by the video card. HORIZ-SIZE Adjusts the horizontal size of the image on the screen. X VERT-POSITION Adjusts the vertical...the change of the signal timing. *Moire is no longer observed. - 8 - Press and buttons together, to restore to the monitor. COLOR TEMPERATURE Adjusts the color temperature of the image on the screen. CLAMP PULSE POSITION Use this function to eliminate excessive green or ...

Compaq P710/P910/P1210 Color Monitor User's Guide
Page 20
... decrease the color temperature. on the screen. To increase the width at the back of the image on , the color temperature is fixed to the monitor. image near the corners of screen image to the left. To make the screen slant to the To make the screen slant to factory preset...
... decrease the color temperature. on the screen. To increase the width at the back of the image on , the color temperature is fixed to the monitor. image near the corners of screen image to the left. To make the screen slant to the To make the screen slant to factory preset...
Compaq P710/P910/P1210 Color Monitor User's Guide
Page 21
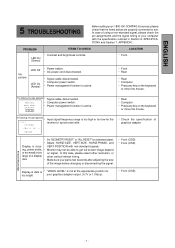
...Make sure you wait a few seconds after adjusting the size of graphics adapter Abnormal picture Display is active. • Front • Rear • Rear • Computer • Press any key on signal. monitor to get full-screen image depend on the keyboard or move the mouse. In case... of using a non-standard signal, please check the pin assignments and the signal timing of a display size • Do "GEOMETRY-RESET" or "ALL RESET...
...Make sure you wait a few seconds after adjusting the size of graphics adapter Abnormal picture Display is active. • Front • Rear • Rear • Computer • Press any key on signal. monitor to get full-screen image depend on the keyboard or move the mouse. In case... of using a non-standard signal, please check the pin assignments and the signal timing of a display size • Do "GEOMETRY-RESET" or "ALL RESET...

Compaq P710/P910/P1210 Color Monitor User's Guide
Page 22
...manual degauss button is used. This will cause localized heating of the screen. up from a cold start and each time the monitor is powered up is caused by the aperture grille stabilization the screen. when power on They are caused by the automatic degaussing ...of Damper Wires Shadow of the screen and maximize the brightness and contrast controls. A B LOCATION - lines are required for all aperture grille CRTs'. Abnormal Picture PROBLEM ITEMS TO CHECK • Thin vertical black lines on the screen. This is normal. Black vertical lines are normal. &#...
...manual degauss button is used. This will cause localized heating of the screen. up from a cold start and each time the monitor is powered up is caused by the aperture grille stabilization the screen. when power on They are caused by the automatic degaussing ...of Damper Wires Shadow of the screen and maximize the brightness and contrast controls. A B LOCATION - lines are required for all aperture grille CRTs'. Abnormal Picture PROBLEM ITEMS TO CHECK • Thin vertical black lines on the screen. This is normal. Black vertical lines are normal. &#...

Compaq P710/P910/P1210 Color Monitor User's Guide
Page 26
... GREEN GROUND 8 BLUE GROUND 9 NC 10 SYNC GROUND 11 GROUND 12 SDA 13 HORIZONTAL SYNC or COMPOSITE SYNC 14 VERTICAL SYNC(VCLK) 15 SCL DDC DISPLAY DATA CHANNEL SDA SERIAL DATA SCL SERIAL CLOCK NC NO-CONNECTION SC-B104 Signal Cable Approx. 1.8m 12345 6 7 8 9 1100 1111 1122 1133 1144... GROUND RED GROUND GREEN GROUND BLUE GROUND NC SYNC GROUND GROUND SDA HORIZONTAL SYNC VERTICAL SYNC(VCLK) SCL DDC DISPLAY DATA CHANNEL SDA SERIAL DATA SCL SERIAL CLOCK NC NO-CONNECTION 7 APPENDIX Monitor Signal Input Connector (DB9-15P) (Female) DB9-15P 543 21 10 9 8 7 6 15 14 13 12 11...
... GREEN GROUND 8 BLUE GROUND 9 NC 10 SYNC GROUND 11 GROUND 12 SDA 13 HORIZONTAL SYNC or COMPOSITE SYNC 14 VERTICAL SYNC(VCLK) 15 SCL DDC DISPLAY DATA CHANNEL SDA SERIAL DATA SCL SERIAL CLOCK NC NO-CONNECTION SC-B104 Signal Cable Approx. 1.8m 12345 6 7 8 9 1100 1111 1122 1133 1144... GROUND RED GROUND GREEN GROUND BLUE GROUND NC SYNC GROUND GROUND SDA HORIZONTAL SYNC VERTICAL SYNC(VCLK) SCL DDC DISPLAY DATA CHANNEL SDA SERIAL DATA SCL SERIAL CLOCK NC NO-CONNECTION 7 APPENDIX Monitor Signal Input Connector (DB9-15P) (Female) DB9-15P 543 21 10 9 8 7 6 15 14 13 12 11...

Compaq P710/P910/P1210 Color Monitor User's Guide
Page 28
... an Energy Star Partner, Compaq Computer Corporation has determined that are the equivalent international standards): ! EN50082-1 (IEC801-2, IEC801-3, IEC801-4) - Product Safety Japanese Notice Energy Star Monitors that this product meets the Energy Star guidelines for energy efficiency. EN55022 (CISPR 22) -
... an Energy Star Partner, Compaq Computer Corporation has determined that are the equivalent international standards): ! EN50082-1 (IEC801-2, IEC801-3, IEC801-4) - Product Safety Japanese Notice Energy Star Monitors that this product meets the Energy Star guidelines for energy efficiency. EN55022 (CISPR 22) -


