P4014n Removing Cartridge - HP LaserJet B W Laser Printer
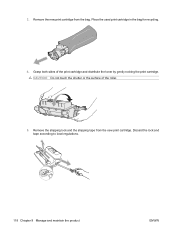
P4014n Removing Cartridge
Related Manual Pages


Similar Questions

How To Reconfigure A Hp P4014 Printer To Take A Cc364x Cartridge
(Posted by fuchirh 9 years ago)

How To Remove The Notice Of A Paper Jam Hp Laserjet P4014n
(Posted by mtapscamil 9 years ago)

Hp Laserjet P4014n How To Remove The Drum
(Posted by luisfgotz 10 years ago)


How To Remove Cartridge From Laserjet P2055dn
(Posted by kanesbig 10 years ago)