HP LaserJet P2015 - User Guide
Page 7
...55 Networking tab ...55 Links ...56 Replace the print cartridge ...57 Redistribute toner ...59 Clean the printer ...60 Clean the print-cartridge area 60 Clean the printer media path 61 Clean the pickup roller (tray 1) ...63 Clean the pickup roller (tray 2) ...66 EconoMode ...72 7 Problem solving Finding the solution ...74 Step 1: Is ... incorrect, or incomplete text 89 Missing graphics or text, or blank pages 89 Page format is different than on another HP LaserJet printer 90 Graphics quality ...90 Printer software problems ...91 Improve print quality ...92 Light print or faded ...92 ENWW v
...55 Networking tab ...55 Links ...56 Replace the print cartridge ...57 Redistribute toner ...59 Clean the printer ...60 Clean the print-cartridge area 60 Clean the printer media path 61 Clean the pickup roller (tray 1) ...63 Clean the pickup roller (tray 2) ...66 EconoMode ...72 7 Problem solving Finding the solution ...74 Step 1: Is ... incorrect, or incomplete text 89 Missing graphics or text, or blank pages 89 Page format is different than on another HP LaserJet printer 90 Graphics quality ...90 Printer software problems ...91 Improve print quality ...92 Light print or faded ...92 ENWW v

HP LaserJet P2015 - User Guide
Page 55
6 Managing and maintenance This chapter provides information on the following topics: ● Printer information pages ● HP ToolboxFX ● Embedded Web server ● Replace the print cartridge ● Redistribute toner ● Clean the printer ● Clean the pickup roller (tray 1) ● Clean the pickup roller (tray 2) ● EconoMode ENWW 45
6 Managing and maintenance This chapter provides information on the following topics: ● Printer information pages ● HP ToolboxFX ● Embedded Web server ● Replace the print cartridge ● Redistribute toner ● Clean the printer ● Clean the pickup roller (tray 1) ● Clean the pickup roller (tray 2) ● EconoMode ENWW 45
HP LaserJet P2015 - User Guide
Page 73
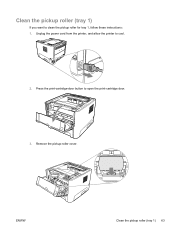
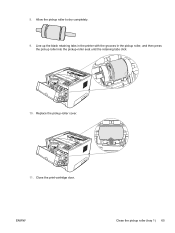
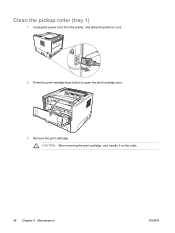
ENWW Clean the pickup roller (tray 1) 63 Remove the pickup-roller cover. Unplug the power cord from the printer, and allow the printer to open the print-cartridge door. 3. Press the print-cartridge-door button to cool. 2. Clean the pickup roller (tray 1) If you want to clean the pickup roller for tray 1, follow these instructions: 1.
ENWW Clean the pickup roller (tray 1) 63 Remove the pickup-roller cover. Unplug the power cord from the printer, and allow the printer to open the print-cartridge door. 3. Press the print-cartridge-door button to cool. 2. Clean the pickup roller (tray 1) If you want to clean the pickup roller for tray 1, follow these instructions: 1.
HP LaserJet P2015 - User Guide
Page 74
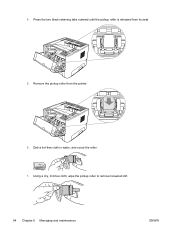
Using a dry, lint-free cloth, wipe the pickup roller to remove loosened dirt. 64 Chapter 6 Managing and maintenance ENWW 4. Dab a lint-free cloth in water, and scrub the roller. 7. Remove the pickup roller from its seat. 5. Press the two black retaining tabs outward until the pickup roller is released from the printer. 6.
Using a dry, lint-free cloth, wipe the pickup roller to remove loosened dirt. 64 Chapter 6 Managing and maintenance ENWW 4. Dab a lint-free cloth in water, and scrub the roller. 7. Remove the pickup roller from its seat. 5. Press the two black retaining tabs outward until the pickup roller is released from the printer. 6.
HP LaserJet P2015 - User Guide
Page 75
ENWW Clean the pickup roller (tray 1) 65 Allow the pickup roller to dry completely. 9. Line up the black retaining tabs in the printer with the grooves in the pickup roller, and then press the pickup roller into the pickup-roller seat until the retaining tabs click. 10. Close the print-cartridge door. Replace the pickup-roller cover. 11. 8.
ENWW Clean the pickup roller (tray 1) 65 Allow the pickup roller to dry completely. 9. Line up the black retaining tabs in the printer with the grooves in the pickup roller, and then press the pickup roller into the pickup-roller seat until the retaining tabs click. 10. Close the print-cartridge door. Replace the pickup-roller cover. 11. 8.
HP LaserJet P2015 - User Guide
Page 76
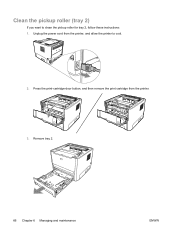
Remove tray 2. 66 Chapter 6 Managing and maintenance ENWW Press the print-cartridge-door button, and then remove the print cartridge from the printer, and allow the printer to clean the pickup roller for tray 2, follow these instructions: 1. Unplug the power cord from the printer. 3. Clean the pickup roller (tray 2) If you want to cool. 2.
Remove tray 2. 66 Chapter 6 Managing and maintenance ENWW Press the print-cartridge-door button, and then remove the print cartridge from the printer, and allow the printer to clean the pickup roller for tray 2, follow these instructions: 1. Unplug the power cord from the printer. 3. Clean the pickup roller (tray 2) If you want to cool. 2.

HP LaserJet P2015 - User Guide
Page 77
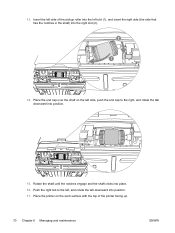
Open the automatic two-sided path door on the work surface with the front of the printer (HP LaserJet P2015d, HP LaserJet P2015dn, and HP LaserJet P2015x printers only). 5. Pull the white tabs outward, and rotate the tabs up . 6. ENWW Clean the pickup roller (tray 2) 67 4. Place the printer on the front of the printer facing up .
Open the automatic two-sided path door on the work surface with the front of the printer (HP LaserJet P2015d, HP LaserJet P2015dn, and HP LaserJet P2015x printers only). 5. Pull the white tabs outward, and rotate the tabs up . 6. ENWW Clean the pickup roller (tray 2) 67 4. Place the printer on the front of the printer facing up .
HP LaserJet P2015 - User Guide
Page 78
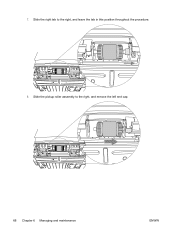
Slide the pickup roller assembly to the right, and leave the tab in this position throughout the procedure. 8. Slide the right tab to the right, and remove the left end cap. 68 Chapter 6 Managing and maintenance ENWW 7.
Slide the pickup roller assembly to the right, and leave the tab in this position throughout the procedure. 8. Slide the right tab to the right, and remove the left end cap. 68 Chapter 6 Managing and maintenance ENWW 7.
HP LaserJet P2015 - User Guide
Page 79
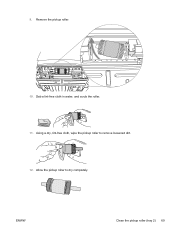
Allow the pickup roller to remove loosened dirt. 12. Dab a lint-free cloth in water, and scrub the roller. 11. Remove the pickup roller. 10. Using a dry, lint-free cloth, wipe the pickup roller to dry completely. ENWW Clean the pickup roller (tray 2) 69 9.
Allow the pickup roller to remove loosened dirt. 12. Dab a lint-free cloth in water, and scrub the roller. 11. Remove the pickup roller. 10. Using a dry, lint-free cloth, wipe the pickup roller to dry completely. ENWW Clean the pickup roller (tray 2) 69 9.
HP LaserJet P2015 - User Guide
Page 80
... right tab to the left side, push the end cap to the right, and rotate the tab downward into the right slot (2). 14. Place the printer on the left , and rotate the tab downward into place. 16. 13. Insert the left slot (1), and insert the right side (the side that has... notches engage and the shaft clicks into position. 17. Place the end cap over the shaft on the work surface with the top of the pickup roller into the left side of the printer facing up. 70 Chapter 6 Managing and maintenance ENWW
... right tab to the left side, push the end cap to the right, and rotate the tab downward into the right slot (2). 14. Place the printer on the left , and rotate the tab downward into place. 16. 13. Insert the left slot (1), and insert the right side (the side that has... notches engage and the shaft clicks into position. 17. Place the end cap over the shaft on the work surface with the top of the pickup roller into the left side of the printer facing up. 70 Chapter 6 Managing and maintenance ENWW
HP LaserJet P2015 - User Guide
Page 81
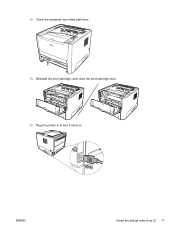
Reinstall the print cartridge, and close the print-cartridge door. 20. ENWW Clean the pickup roller (tray 2) 71 18. Close the automatic two-sided path door. 19. Plug the printer in to turn it back on.
Reinstall the print cartridge, and close the print-cartridge door. 20. ENWW Clean the pickup roller (tray 2) 71 18. Close the automatic two-sided path door. 19. Plug the printer in to turn it back on.
HP LaserJet P2015 - User Guide
Page 97
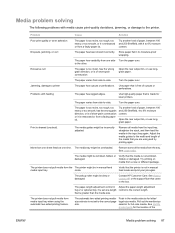
...box. folded, or damaged. Contact HP Customer Care. The paper-length adjustment control in manual feed mode and print your job again. The automatic two-sided printing mediasize selector is set to the correct length. See Identify product parts for laser printers. Open the rear output bin, or...The media tray might be in the media selector for A4-size media. The media might be overloaded. Turn the paper over . The pickup roller might be wrinkled, folded, or Verify that is free of short-grain construction or it is not wrinkled, damaged. mode. Remove some ...
...box. folded, or damaged. Contact HP Customer Care. The paper-length adjustment control in manual feed mode and print your job again. The automatic two-sided printing mediasize selector is set to the correct length. See Identify product parts for laser printers. Open the rear output bin, or...The media tray might be in the media selector for A4-size media. The media might be overloaded. Turn the paper over . The pickup roller might be wrinkled, folded, or Verify that is free of short-grain construction or it is not wrinkled, damaged. mode. Remove some ...
HP LaserJet P2015 - User Guide
Page 122
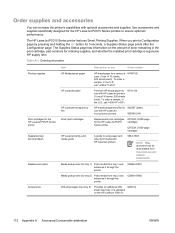
...- Table A-1 Ordering information Printing supplies Item HP Multipurpose paper HP LaserJet paper HP LaserJet transparency film Print cartridges for the HP LaserJet P2015 Series printer Smart print cartridges Supplementary documentation HP LaserJet family print media guide Description or use with HP LaserJet printers (1 box of 10 reams, 500 sheets each ). Replacement parts Accessories Media pickup roller (for the HP LaserJet P2015 Series printers to using paper and other print media...
...- Table A-1 Ordering information Printing supplies Item HP Multipurpose paper HP LaserJet paper HP LaserJet transparency film Print cartridges for the HP LaserJet P2015 Series printer Smart print cartridges Supplementary documentation HP LaserJet family print media guide Description or use with HP LaserJet printers (1 box of 10 reams, 500 sheets each ). Replacement parts Accessories Media pickup roller (for the HP LaserJet P2015 Series printers to using paper and other print media...
HP LaserJet P2015 - User Guide
Page 153
... guidelines for using 20 printing on 30 cleaning media path 61 pickup roller (tray 1) 63 pickup roller (tray 2) 66 printer 60 clearing jams 97 configuration HP LaserJet P2015 printer 2 HP LaserJet P2015d printer 2 HP LaserJet P2015dn printer 3 HP LaserJet P2015n printer 3 HP LaserJet P2015x printer 3 Configuration page 46 connecting to the network 11 conserving toner 114 contacting HP 123 control panel HP ToolboxFX settings 52 status-light patterns 76 crooked pages 87 custom...
... guidelines for using 20 printing on 30 cleaning media path 61 pickup roller (tray 1) 63 pickup roller (tray 2) 66 printer 60 clearing jams 97 configuration HP LaserJet P2015 printer 2 HP LaserJet P2015d printer 2 HP LaserJet P2015dn printer 3 HP LaserJet P2015n printer 3 HP LaserJet P2015x printer 3 Configuration page 46 connecting to the network 11 conserving toner 114 contacting HP 123 control panel HP ToolboxFX settings 52 status-light patterns 76 crooked pages 87 custom...
HP LaserJet P2015 - User Guide
Page 154
... 32 removing jams in 102 output path, straight-through 25 output quality, HP ToolboxFX settings 51 overview, printer 4 P pages, skewed 87 paper HP ToolboxFX settings 51 recommended 19 using 20 paper input trays feeding problems, solving 87 PCL 5e 52 pickup roller (tray 1) 63 pickup roller (tray 2) 66 port, USB location 5 ports, troubleshooting Macintosh 84 postscript level...
... 32 removing jams in 102 output path, straight-through 25 output quality, HP ToolboxFX settings 51 overview, printer 4 P pages, skewed 87 paper HP ToolboxFX settings 51 recommended 19 using 20 paper input trays feeding problems, solving 87 PCL 5e 52 pickup roller (tray 1) 63 pickup roller (tray 2) 66 port, USB location 5 ports, troubleshooting Macintosh 84 postscript level...

Service Manual
Page 6
... pages ...25 Demo page ...25 Configuration page ...25 Supplies Status page ...25 Network Configuration page 25 3 Manage the printer HP ToolboxFX ...28 To view HP ToolboxFX ...28 Status ...29 Alerts ...30 Set up status alerts 30 Set up e-mail alerts 30 Help ...30 Device settings ...31 Device information ... 35 Status tab ...36 Settings tab ...36 Networking tab ...36 Links ...37 4 Maintenance Replace the print cartridge ...40 Redistribute toner ...42 Clean the printer ...43 Clean the print-cartridge area 43 Clean the printer media path 44 Clean the pickup roller (tray 1) ...46 iv ENWW
... pages ...25 Demo page ...25 Configuration page ...25 Supplies Status page ...25 Network Configuration page 25 3 Manage the printer HP ToolboxFX ...28 To view HP ToolboxFX ...28 Status ...29 Alerts ...30 Set up status alerts 30 Set up e-mail alerts 30 Help ...30 Device settings ...31 Device information ... 35 Status tab ...36 Settings tab ...36 Networking tab ...36 Links ...37 4 Maintenance Replace the print cartridge ...40 Redistribute toner ...42 Clean the printer ...43 Clean the print-cartridge area 43 Clean the printer media path 44 Clean the pickup roller (tray 1) ...46 iv ENWW
Service Manual
Page 7
... ...99 Duplex-drive PCA (HP LaserJet P2015d, P2015dn, and P2015x printers only 101 Fuser ...103 Fan ...103 Duplex-drive gears (HP LaserJet P2015d, P2015dn, and P2015x printers only 104 Duplex solenoid (HP LaserJet P2015d, P2015dn, and P2015x printers only 106 Fuser ...107 Interlock assembly ...118 ECU ...119 Main motor ...126 Pickup and feed assemblies ...128 Transfer roller ...128 Registration assembly ...129...
... ...99 Duplex-drive PCA (HP LaserJet P2015d, P2015dn, and P2015x printers only 101 Fuser ...103 Fan ...103 Duplex-drive gears (HP LaserJet P2015d, P2015dn, and P2015x printers only 104 Duplex solenoid (HP LaserJet P2015d, P2015dn, and P2015x printers only 106 Fuser ...107 Interlock assembly ...118 ECU ...119 Main motor ...126 Pickup and feed assemblies ...128 Transfer roller ...128 Registration assembly ...129...

Service Manual
Page 49
4 Maintenance ● Replace the print cartridge ● Redistribute toner ● Clean the printer ● Clean the pickup roller (tray 1) ● Replace the pickup roller (tray 1) ● Clean the pickup roller (tray 2) ● Replace the pickup roller (tray 2) ENWW 39
4 Maintenance ● Replace the print cartridge ● Redistribute toner ● Clean the printer ● Clean the pickup roller (tray 1) ● Replace the pickup roller (tray 1) ● Clean the pickup roller (tray 2) ● Replace the pickup roller (tray 2) ENWW 39
Service Manual
Page 56
Press the print-cartridge-door button to cool. 2. Remove the print cartridge. CAUTION After removing the print cartridge, only handle it on the ends. 46 Chapter 4 Maintenance ENWW Clean the pickup roller (tray 1) 1. Unplug the power cord from the printer, and allow the printer to open the print-cartridge door. 3.
Press the print-cartridge-door button to cool. 2. Remove the print cartridge. CAUTION After removing the print cartridge, only handle it on the ends. 46 Chapter 4 Maintenance ENWW Clean the pickup roller (tray 1) 1. Unplug the power cord from the printer, and allow the printer to open the print-cartridge door. 3.

Service Manual
Page 57
4. Press the two black retaining tabs outward until the pickup roller is released from its seat. ENWW Clean the pickup roller (tray 1) 47 Grasping the pickup-roller cover with thumb and forefinger, squeeze the left side of the pickuproller cover to release the left retaining tab, and then slide the cover to the left when removing it can cause the right retaining tab to the left and up. CAUTION Failure to slide the cover to break. 5.
4. Press the two black retaining tabs outward until the pickup roller is released from its seat. ENWW Clean the pickup roller (tray 1) 47 Grasping the pickup-roller cover with thumb and forefinger, squeeze the left side of the pickuproller cover to release the left retaining tab, and then slide the cover to the left when removing it can cause the right retaining tab to the left and up. CAUTION Failure to slide the cover to break. 5.


