User Guide
Page 4
...prior written permission of features that comes with the device. 2. Windows Vista is subject to -text applications. There are no one can step on the control panel have simple text or icon labels that convey the appropriate action. Accessibility The device provides ...warnings and instructions marked on a stable surface. 7. Visual The device software is accessible for people with a qualified electrician. 3. HP shall not be damaged. 8. Mobility For users with mobility impairments, the device software functions can be executed through the use this material is grounded, ...
...prior written permission of features that comes with the device. 2. Windows Vista is subject to -text applications. There are no one can step on the control panel have simple text or icon labels that convey the appropriate action. Accessibility The device provides ...warnings and instructions marked on a stable surface. 7. Visual The device software is accessible for people with a qualified electrician. 3. HP shall not be damaged. 8. Mobility For users with mobility impairments, the device software functions can be executed through the use this material is grounded, ...
User Guide
Page 5
... 14 Status messages ...14 Warning messages ...15 Error messages ...15 Critical error messages ...15 Change device settings ...15 Use the HP Solution Center (Windows 16 Use the HP photo and imaging software 16 Load originals ...17 Load an original on the scanner glass 17 Select print media ...18 Tips for selecting and using...
... 14 Status messages ...14 Warning messages ...15 Error messages ...15 Critical error messages ...15 Change device settings ...15 Use the HP Solution Center (Windows 16 Use the HP photo and imaging software 16 Load originals ...17 Load an original on the scanner glass 17 Select print media ...18 Tips for selecting and using...
User Guide
Page 6
... program 41 Edit a scanned original ...41 Edit a scanned photo or graphic 42 Edit a scanned document using optical character recognition (OCR) software 42 Change scan settings ...42 Cancel a scan job ...42 7 Configure and manage Manage the device ...43 Monitor the device ...44 Administer...(Windows) ...45 Open the Toolbox ...45 Toolbox tabs ...45 HP Printer Utility (Mac OS 46 Open the HP Printer Utility 46 HP Printer Utility panels 46 HP Instant Support ...47 Security and privacy 47 To gain access to HP Instant Support 47 myPrintMileage ...48 Understand the self-test diagnostic page...
... program 41 Edit a scanned original ...41 Edit a scanned photo or graphic 42 Edit a scanned document using optical character recognition (OCR) software 42 Change scan settings ...42 Cancel a scan job ...42 7 Configure and manage Manage the device ...43 Monitor the device ...44 Administer...(Windows) ...45 Open the Toolbox ...45 Toolbox tabs ...45 HP Printer Utility (Mac OS 46 Open the HP Printer Utility 46 HP Printer Utility panels 46 HP Instant Support ...47 Security and privacy 47 To gain access to HP Instant Support 47 myPrintMileage ...48 Understand the self-test diagnostic page...
User Guide
Page 7
...(Windows 50 Direct connection ...50 Install the software before connecting the device (recommended 50 Connect the device before installing the software 51 Share the device on a locally shared network 51 Configure the device (Mac OS 52 Install the software for a direct connection 52 Share the device... on a locally shared network 52 Uninstall and reinstall the software 53 8 Maintain and troubleshoot Supported ink cartridges ...56 Replace the ink cartridges ...56...
...(Windows 50 Direct connection ...50 Install the software before connecting the device (recommended 50 Connect the device before installing the software 51 Share the device on a locally shared network 51 Configure the device (Mac OS 52 Install the software for a direct connection 52 Share the device... on a locally shared network 52 Uninstall and reinstall the software 53 8 Maintain and troubleshoot Supported ink cartridges ...56 Replace the ink cartridges ...56...
User Guide
Page 8
... defects are apparent 80 Troubleshoot installation issues 81 Hardware installation suggestions 81 Software installation suggestions 82 Clear jams ...83 Clear a jam in the device 83 Tips for avoiding jams ...85 A HP supplies and accessories Order printing supplies online 86 Accessories ...86 Supplies ...86... ...87 B Support and warranty Hewlett-Packard limited warranty statement 89 Obtain electronic support ...90 Obtain HP telephone support 90 Before you call ...90 Support process ...91 HP support by phone ...91 Phone support period 91 Telephone support numbers 91 Placing a call ...93 ...
... defects are apparent 80 Troubleshoot installation issues 81 Hardware installation suggestions 81 Software installation suggestions 82 Clear jams ...83 Clear a jam in the device 83 Tips for avoiding jams ...85 A HP supplies and accessories Order printing supplies online 86 Accessories ...86 Supplies ...86... ...87 B Support and warranty Hewlett-Packard limited warranty statement 89 Obtain electronic support ...90 Obtain HP telephone support 90 Before you call ...90 Support process ...91 HP support by phone ...91 Phone support period 91 Telephone support numbers 91 Placing a call ...93 ...
User Guide
Page 10
... quickly identify, diagnose, and resolve printing problems. For more information, see HP Instant Support. HP Printer Utility (Mac OS) Contains tools to maintenance services. For more information, see Monitor the device. A printed version of the document is typically installed with the device software as an available installation option. The Toolbox is typically installed with...
... quickly identify, diagnose, and resolve printing problems. For more information, see HP Instant Support. HP Printer Utility (Mac OS) Contains tools to maintenance services. For more information, see Monitor the device. A printed version of the document is typically installed with the device software as an available installation option. The Toolbox is typically installed with...
User Guide
Page 11
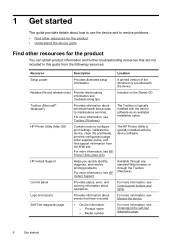
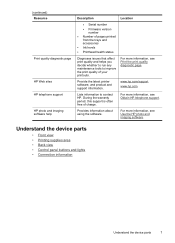
...information, see Obtain HP telephone support. Provide the latest printer software, and product and support information. During the warranty period, this support is often free of charge. Provides information about using the software. www.hp.com/support www.hp.com Lists information... lights • Connection information Understand the device parts 7 (continued) Resource Print quality diagnostic page HP Web sites HP telephone support HP photo and imaging software help Description Location • Serial number • Firmware version number • Number of pages ...
...information, see Obtain HP telephone support. Provide the latest printer software, and product and support information. During the warranty period, this support is often free of charge. Provides information about using the software. www.hp.com/support www.hp.com Lists information... lights • Connection information Understand the device parts 7 (continued) Resource Print quality diagnostic page HP Web sites HP telephone support HP photo and imaging software help Description Location • Serial number • Firmware version number • Number of pages ...
User Guide
Page 14
..., exits a menu, or exits settings. Only print is still supplied. Setup instructions Follow the setup poster guide for best performance Supported software features One computer connected with a USB cable to the rear USB 2.0 high-speed port on at all times, or the other computers. Power:...is turned off, a minimal amount of connected computers for detailed instructions. Up to the device. Connection information Description USB connection Printer sharing Recommended number of power is supported from the Help menu opens a help window on the host computer are supported. The ...
..., exits a menu, or exits settings. Only print is still supplied. Setup instructions Follow the setup poster guide for best performance Supported software features One computer connected with a USB cable to the rear USB 2.0 high-speed port on at all times, or the other computers. Power:...is turned off, a minimal amount of connected computers for detailed instructions. Up to the device. Connection information Description USB connection Printer sharing Recommended number of power is supported from the Help menu opens a help window on the host computer are supported. The ...
User Guide
Page 17
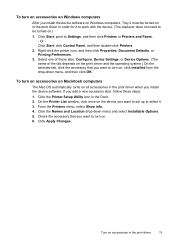
...does not need to be turned on all accessories in the print driver when you install the device software. Click the Names and Location drop-down menu, and then click OK. Select one of the tab depends on , click Installed from the drop-down menu and select Installable Options. 5...., and then click Properties, Document Defaults, or Printing Preferences. 3. Check the accessory that you want to Settings, and then click Printers or Printers and Faxes. - Click Apply Changes. If you add a new accessory later, follow these tabs: Configure, Device Settings, or Device Options. (The name of...
...does not need to be turned on all accessories in the print driver when you install the device software. Click the Names and Location drop-down menu, and then click OK. Select one of the tab depends on , click Installed from the drop-down menu and select Installable Options. 5...., and then click Properties, Document Defaults, or Printing Preferences. 3. Check the accessory that you want to Settings, and then click Printers or Printers and Faxes. - Click Apply Changes. If you add a new accessory later, follow these tabs: Configure, Device Settings, or Device Options. (The name of...

User Guide
Page 18
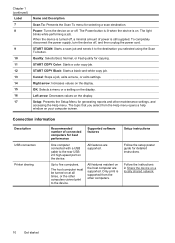
Some destinations require the HP Photosmart Software to be loaded. • Copy menu: Menu options include: • Selecting copy quantities • Reducing/enlarging • Selecting media type and size Control-panel message ... contains the following topics: • Use control panel menus • Control-panel message types • Change device settings • Use the HP Solution Center (Windows) • Use the HP photo and imaging software • Load originals • Select print media • Load media • Configure trays • Print on special and custom-sized...
Some destinations require the HP Photosmart Software to be loaded. • Copy menu: Menu options include: • Selecting copy quantities • Reducing/enlarging • Selecting media type and size Control-panel message ... contains the following topics: • Use control panel menus • Control-panel message types • Change device settings • Use the HP Solution Center (Windows) • Use the HP photo and imaging software • Load originals • Select print media • Load media • Configure trays • Print on special and custom-sized...
User Guide
Page 19
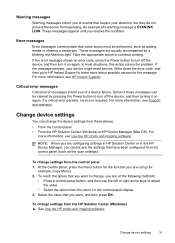
... When you are configuring settings in HP Solution Center or in the HP Device Manager, you of a warning message is required. For more information, see Support and warranty. For more information, see Use the HP photo and imaging software. To change , use one of these places: • From... the control panel. • From the HP Solution Center (Windows) or HP Device Manager (Mac OS). Critical error messages Critical error messages inform...
... When you are configuring settings in HP Solution Center or in the HP Device Manager, you of a warning message is required. For more information, see Support and warranty. For more information, see Use the HP photo and imaging software. To change , use one of these places: • From... the control panel. • From the HP Solution Center (Windows) or HP Device Manager (Mac OS). Critical error messages Critical error messages inform...
User Guide
Page 20
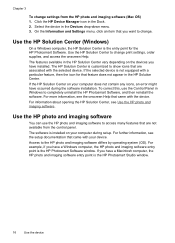
...features that came with a particular feature, then the icon for the HP Photosmart Software. For information about opening the HP Solution Center, see the onscreen Help that are not available from the HP photo and imaging software (Mac OS) 1. Access to change print settings, order supplies, and...For further information, see the setup documentation that are associated with your device. To correct this, use the HP photo and imaging software to change. Click the HP Device Manager icon in Windows to show icons that came with the selected device. Chapter 3 To change settings...
...features that came with a particular feature, then the icon for the HP Photosmart Software. For information about opening the HP Solution Center, see the onscreen Help that are not available from the HP photo and imaging software (Mac OS) 1. Access to change print settings, order supplies, and...For further information, see the setup documentation that are associated with your device. To correct this, use the HP photo and imaging software to change. Click the HP Device Manager icon in Windows to show icons that came with the selected device. Chapter 3 To change settings...
User Guide
Page 21
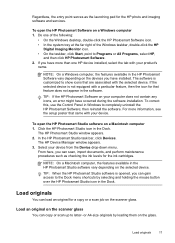
... does not appear in Windows to letter- To correct this, use the Control Panel in the software. For more than one of the following: • On the Windows desktop, double-click the HP Photosmart Software icon. • In the system tray at the far right of the Windows taskbar, double-...them on the selected device. In the HP Photosmart Studio task bar, click Devices. Load originals 17 Do one HP device installed, select the tab with a particular feature, then the icon for a copy or a scan job on your device. TIP: If the HP Photosmart Software on the scanner glass. If the ...
... does not appear in Windows to letter- To correct this, use the Control Panel in the software. For more than one of the following: • On the Windows desktop, double-click the HP Photosmart Software icon. • In the system tray at the far right of the Windows taskbar, double-...them on the selected device. In the HP Photosmart Studio task bar, click Devices. Load originals 17 Do one HP device installed, select the tab with a particular feature, then the icon for a copy or a scan job on your device. TIP: If the HP Photosmart Software on the scanner glass. If the ...
User Guide
Page 30
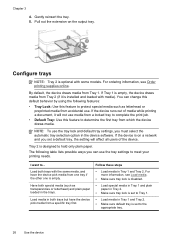
... these steps • Load media in Tray 1 and Tray 2. • Make sure default tray is empty. Chapter 3 4. Load media in the device software. For more information, see Order printing supplies online. NOTE: To use the tray lock and default tray settings, you can use media from a locked tray...as transparencies or letterhead) and plain paper loaded in the trays. Gently reinsert the tray. 5. By default, the device draws media from one tray if the other one is set a default tray, the setting will not use the tray settings to determine the first tray from a specific tray first.
... these steps • Load media in Tray 1 and Tray 2. • Make sure default tray is empty. Chapter 3 4. Load media in the device software. For more information, see Order printing supplies online. NOTE: To use the tray lock and default tray settings, you can use media from a locked tray...as transparencies or letterhead) and plain paper loaded in the trays. Gently reinsert the tray. 5. By default, the device draws media from one tray if the other one is set a default tray, the setting will not use the tray settings to determine the first tray from a specific tray first.
User Guide
Page 32
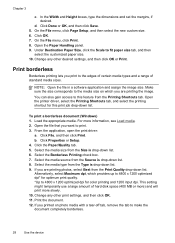
Click Done or OK, and then click Save. 5. NOTE: Open the file in a software application and assign the image size. For more slowly. 10. b. Select the Borderless Printing check box. 7. This setting might temporarily use a large amount of standard ... size corresponds to the media size on photo media with a tear-off tab, remove the tab to this print job drop-down list. 6. Open the printer driver, select the Printing Shortcuts tab, and select the printing shortcut for this feature from the Type is drop-down list. Print borderless Borderless printing...
Click Done or OK, and then click Save. 5. NOTE: Open the file in a software application and assign the image size. For more slowly. 10. b. Select the Borderless Printing check box. 7. This setting might temporarily use a large amount of standard ... size corresponds to the media size on photo media with a tear-off tab, remove the tab to this print job drop-down list. 6. Open the printer driver, select the Printing Shortcuts tab, and select the printing shortcut for this feature from the Type is drop-down list. Print borderless Borderless printing...
User Guide
Page 38
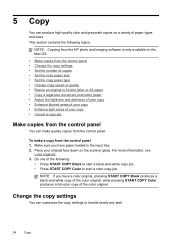
... input tray. 2. Do one of the color original. NOTE: If you have a color original, pressing START COPY Black produces a black-and-white copy of the color original, while pressing START COPY Color produces a full-color copy of the following topics: NOTE: Copying from the HP photo and imaging software is only available on...
... input tray. 2. Do one of the color original. NOTE: If you have a color original, pressing START COPY Black produces a black-and-white copy of the color original, while pressing START COPY Color produces a full-color copy of the following topics: NOTE: Copying from the HP photo and imaging software is only available on...
User Guide
Page 39
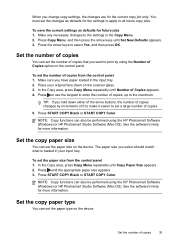
.... You must set the paper size from the control panel 1. NOTE: Copy functions can also be performed using the HP Photosmart Software (Windows) or HP Photosmart Studio Software (Mac OS). To set the changes as defaults for future jobs 1. In the Copy area, press Copy Menu repeatedly..., press Copy Menu repeatedly until the appropriate paper size appears. 3. Press until Number of copies changes by using the HP Photosmart Software (Windows) or HP Photosmart Studio Software (Mac OS). The paper size you select should match what is loaded in the input tray. 2. Set the number...
.... You must set the paper size from the control panel 1. NOTE: Copy functions can also be performed using the HP Photosmart Software (Windows) or HP Photosmart Studio Software (Mac OS). To set the changes as defaults for future jobs 1. In the Copy area, press Copy Menu repeatedly..., press Copy Menu repeatedly until the appropriate paper size appears. 3. Press until Number of copies changes by using the HP Photosmart Software (Windows) or HP Photosmart Studio Software (Mac OS). The paper size you select should match what is loaded in the input tray. 2. Set the number...
User Guide
Page 40
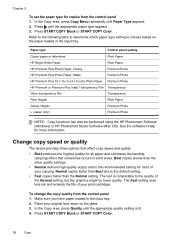
...input tray. Place your print cartridges. In the Copy area, press Copy Menu repeatedly until the appropriate quality setting is lit. 4. See the software's Help for all paper and eliminates the banding (striping) effect that affect copy speed and quality: • Best produces the highest quality ...to determine which paper type setting to the quality of the Normal setting, but the graphics might be performed using the HP Photosmart Software (Windows) or HP Photosmart Studio Software (Mac OS). The Fast setting uses less ink and extends the life of your copying. Change copy speed or ...
...input tray. Place your print cartridges. In the Copy area, press Copy Menu repeatedly until the appropriate quality setting is lit. 4. See the software's Help for all paper and eliminates the banding (striping) effect that affect copy speed and quality: • Best produces the highest quality ...to determine which paper type setting to the quality of the Normal setting, but the graphics might be performed using the HP Photosmart Software (Windows) or HP Photosmart Studio Software (Mac OS). The Fast setting uses less ink and extends the life of your copying. Change copy speed or ...

User Guide
Page 41
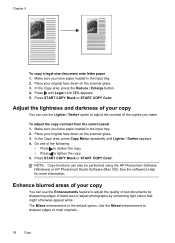
... or text on your original face down on the scanner glass. 3. NOTE: Copy functions can also be performed using the HP Photosmart Software (Windows) or HP Photosmart Studio Software (Mac OS). NOTE: The percentage in the input tray. 2. Press START COPY Black or START COPY Color. TIP: ...Page 91% to fit onto letter or A4 paper 37 NOTE: Copy functions can also be performed using the HP Photosmart Software (Windows) or HP Photosmart Studio Software (Mac OS). See the software's Help for more information. To resize a document from the control panel 1. In the Copy area, press ...
... or text on your original face down on the scanner glass. 3. NOTE: Copy functions can also be performed using the HP Photosmart Software (Windows) or HP Photosmart Studio Software (Mac OS). NOTE: The percentage in the input tray. 2. Press START COPY Black or START COPY Color. TIP: ...Page 91% to fit onto letter or A4 paper 37 NOTE: Copy functions can also be performed using the HP Photosmart Software (Windows) or HP Photosmart Studio Software (Mac OS). See the software's Help for more information. To resize a document from the control panel 1. In the Copy area, press ...
User Guide
Page 42
... area, press the Reduce / Enlarge button. 4. In the Copy area, press Copy Menu repeatedly until Legal > Ltr 72% appears. 5. Do one of the following: • Press to darken the copy. • Press to sharpen edges of black text or adjust photographs by enhancing light colors...NOTE: Copy functions can use the Enhancements feature to adjust the contrast of your copy You can also be performed using the HP Photosmart Software (Windows) or HP Photosmart Studio Software (Mac OS). Press START COPY Black or START COPY Color. Adjust the lightness and darkness of your copy You can use ...
... area, press the Reduce / Enlarge button. 4. In the Copy area, press Copy Menu repeatedly until Legal > Ltr 72% appears. 5. Do one of the following: • Press to darken the copy. • Press to sharpen edges of black text or adjust photographs by enhancing light colors...NOTE: Copy functions can use the Enhancements feature to adjust the contrast of your copy You can also be performed using the HP Photosmart Software (Windows) or HP Photosmart Studio Software (Mac OS). Press START COPY Black or START COPY Color. Adjust the lightness and darkness of your copy You can use ...

