User Guide
Page 8
... Uninstall and reinstall the software 91 8 Maintain and troubleshoot Work with print cartridges...93 Supported print cartridges 93 Handle the print cartridges 94 Replace the print cartridges 94 Align the print cartridges...98 Calibrate color...99 Clean the print cartridges 99 Clean the print cartridge contacts 100 Clean the area around the ink nozzles 101 Use a photo...
... Uninstall and reinstall the software 91 8 Maintain and troubleshoot Work with print cartridges...93 Supported print cartridges 93 Handle the print cartridges 94 Replace the print cartridges 94 Align the print cartridges...98 Calibrate color...99 Clean the print cartridges 99 Clean the print cartridge contacts 100 Clean the area around the ink nozzles 101 Use a photo...

User Guide
Page 9
... 114 Lines or dots are missing from text or graphics 114 Solve paper-feed problems...114 Media is not supported for the printer or tray 114 Media is not picked up from a tray 115 Media is not coming out correctly 115 Pages are skewing...... installation issues 132 Hardware installation suggestions 133 Software installation suggestions 133 Clear paper jams...134 Avoid paper jams...135 A HP supplies Order printing supplies online 137 Supplies...137 Print cartridges...137 HP media...137 B Support and warranty Hewlett-Packard limited warranty statement 139 Obtain electronic support...140 5
... 114 Lines or dots are missing from text or graphics 114 Solve paper-feed problems...114 Media is not supported for the printer or tray 114 Media is not picked up from a tray 115 Media is not coming out correctly 115 Pages are skewing...... installation issues 132 Hardware installation suggestions 133 Software installation suggestions 133 Clear paper jams...134 Avoid paper jams...135 A HP supplies Order printing supplies online 137 Supplies...137 Print cartridges...137 HP media...137 B Support and warranty Hewlett-Packard limited warranty statement 139 Obtain electronic support...140 5

User Guide
Page 10
...140 Support process...140 HP support by phone...141 Phone support period 141 Telephone support numbers 141 Placing a call...142 After the phone support period 143 Additional warranty options 143 Prepare the device for shipment 143 Remove the print cartridges before shipment 143 Remove... model number...157 Environmental product stewardship program 158 Paper use...158 Plastics...158 Material safety data sheets 158 Recycling program...158 HP inkjet supplies recycling program 158 Disposal of the U.S. telephone network: FCC requirements 154 Notice to users of the Canadian telephone...
...140 Support process...140 HP support by phone...141 Phone support period 141 Telephone support numbers 141 Placing a call...142 After the phone support period 143 Additional warranty options 143 Prepare the device for shipment 143 Remove the print cartridges before shipment 143 Remove... model number...157 Environmental product stewardship program 158 Paper use...158 Plastics...158 Material safety data sheets 158 Recycling program...158 HP inkjet supplies recycling program 158 Disposal of the U.S. telephone network: FCC requirements 154 Notice to users of the Canadian telephone...
User Guide
Page 11
...installation option. Provide late-breaking information and troubleshooting tips. Provides status, error, and warning information about print cartridges and access to maintenance services. Get started This guide provides details about how to use the device and to contact... HP. For more information, see Control panel buttons and lights. Provides instructions for the product You can obtain product information and further troubleshooting resources that have occurred. Provide the latest printer software, and product and support information....
...installation option. Provide late-breaking information and troubleshooting tips. Provides status, error, and warning information about print cartridges and access to maintenance services. Get started This guide provides details about how to use the device and to contact... HP. For more information, see Control panel buttons and lights. Provides instructions for the product You can obtain product information and further troubleshooting resources that have occurred. Provide the latest printer software, and product and support information....

User Guide
Page 12
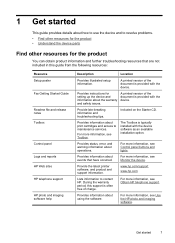
Chapter 1 Understand the device parts • Front view • Printing supplies area • Back view • Control panel buttons and lights • Connection information Front view 1 Automatic document feeder (ADF) 2 Control panel 3 Output tray 4 Output tray extender 5 Input tray 6 Print cartridge door 7 Scanner lid 8 Document feeder tray 9 Scanner glass Printing supplies area 8 Get started
Chapter 1 Understand the device parts • Front view • Printing supplies area • Back view • Control panel buttons and lights • Connection information Front view 1 Automatic document feeder (ADF) 2 Control panel 3 Output tray 4 Output tray extender 5 Input tray 6 Print cartridge door 7 Scanner lid 8 Document feeder tray 9 Scanner glass Printing supplies area 8 Get started

User Guide
Page 13
...a minimal amount of power is on or off , and then unplug the power cord. When the HP All-in -One, turn the device off . The light blinks while performing a job. One-touch speed dial buttons: Access the first five speed dial numbers. Understand the device parts 9 To ...completely disconnect the power supply to the device. Speed Dial: Select a speed dial number. 1 Print-cartridge door 2 Print cartridges Back view 1 Rear door 2 Fax ports...
...a minimal amount of power is on or off , and then unplug the power cord. When the HP All-in -One, turn the device off . The light blinks while performing a job. One-touch speed dial buttons: Access the first five speed dial numbers. Understand the device parts 9 To ...completely disconnect the power supply to the device. Speed Dial: Select a speed dial number. 1 Print-cartridge door 2 Print cartridges Back view 1 Rear door 2 Fax ports...

User Guide
Page 26
... it is free of rips, dust, wrinkles, and curled or bent edges. • Make sure all the paper in the stack is servicing the print cartridges or otherwise engaged in a task, the paper stop inside the device might not be in the base of paper on loading full-size paper and...
... it is free of rips, dust, wrinkles, and curled or bent edges. • Make sure all the paper in the stack is servicing the print cartridges or otherwise engaged in a task, the paper stop inside the device might not be in the base of paper on loading full-size paper and...

User Guide
Page 38
Make sure you use the document feeder tray, place the pages so that sometimes occurs in solid areas. Load your print cartridges. Chapter 4 Refer to the following table to determine which paper type setting to the quality of the Normal setting, but the ...Control panel setting Copier paper or letterhead Plain Paper HP Bright White Paper Plain Paper HP Premium Plus Photo Paper, Glossy Premium Photo HP Premium Plus Photo Paper, Matte Premium Photo HP Premium Plus 10 x 15 cm (4 x 6 inch) Photo Paper Premium Photo HP Premium or Premium Plus Inkjet Transparency Film Transparency ...
Make sure you use the document feeder tray, place the pages so that sometimes occurs in solid areas. Load your print cartridges. Chapter 4 Refer to the following table to determine which paper type setting to the quality of the Normal setting, but the ...Control panel setting Copier paper or letterhead Plain Paper HP Bright White Paper Plain Paper HP Premium Plus Photo Paper, Glossy Premium Photo HP Premium Plus Photo Paper, Matte Premium Photo HP Premium Plus 10 x 15 cm (4 x 6 inch) Photo Paper Premium Photo HP Premium or Premium Plus Inkjet Transparency Film Transparency ...
User Guide
Page 64
... message that full-size paper is a problem sending or receiving a fax. Perform this test after each fax you send and receive. Make sure the print cartridges are correct. Review the report. • If the test passes and you have further questions about the device. You can cause problems faxing. • If...
... message that full-size paper is a problem sending or receiving a fax. Perform this test after each fax you send and receive. Make sure the print cartridges are correct. Review the report. • If the test passes and you have further questions about the device. You can cause problems faxing. • If...

User Guide
Page 67
Windows • Device control panel • Printer driver • Toolbox • Monitor the device • Administer the device Monitor the device This section provides instructions for the device • Configure the device &#... scroll to obtain the following topics. • Manage the device • Use device management tools • Set up faxing for monitoring the device. Click the Cartridge Details button to manage the device. Use this tool... This section contains information about the status of jobs that are an estimate only. 7 Configure and...
Windows • Device control panel • Printer driver • Toolbox • Monitor the device • Administer the device Monitor the device This section provides instructions for the device • Configure the device &#... scroll to obtain the following topics. • Manage the device • Use device management tools • Set up faxing for monitoring the device. Click the Cartridge Details button to manage the device. Use this tool... This section contains information about the status of jobs that are an estimate only. 7 Configure and...
User Guide
Page 69
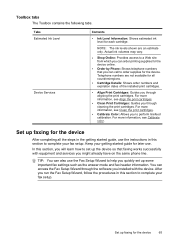
... vary. • Shop Online: Provides access to a Web site from which you can call to help you through aligning the print cartridges. You can also use the instructions in this section to complete your fax setup. Tabs Estimated Ink Level Device Services Contents • ...works successfully with the device. TIP: You can access the Fax Setup Wizard through cleaning the print cartridges. For more information, see Align the print cartridges. • Clean Print Cartridges: Guides you might already have on the same phone line. In this section to complete your fax ...
... vary. • Shop Online: Provides access to a Web site from which you can call to help you through aligning the print cartridges. You can also use the instructions in this section to complete your fax setup. Tabs Estimated Ink Level Device Services Contents • ...works successfully with the device. TIP: You can access the Fax Setup Wizard through cleaning the print cartridges. For more information, see Align the print cartridges. • Clean Print Cartridges: Guides you might already have on the same phone line. In this section to complete your fax ...

User Guide
Page 97
... copy problems • Solve scan problems • Solve fax problems • Troubleshoot installation issues • Clear paper jams • Avoid paper jams Work with print cartridges To ensure the best print quality from the device, you have bidirectional communication, click the Estimated Ink Levels tab, scroll to perform some simple maintenance...
... copy problems • Solve scan problems • Solve fax problems • Troubleshoot installation issues • Clear paper jams • Avoid paper jams Work with print cartridges To ensure the best print quality from the device, you have bidirectional communication, click the Estimated Ink Levels tab, scroll to perform some simple maintenance...

User Guide
Page 98
... troubleshoot You can cause temporary printing problems, or even permanent damage. For more information see www.hp.com/go/inkusage. NOTE: Handle the print cartridges carefully. Dropping or jarring cartridges can also check the ink levels by their black plastic sides, with pink pull tab (must ...be removed before installing) 3 Ink nozzles under tape Hold the print cartridges by using the Printer Toolbox available through the HP Photosmart Software on your computer or through the Print Properties dialog box on top. In addition, some residual ink...
... troubleshoot You can cause temporary printing problems, or even permanent damage. For more information see www.hp.com/go/inkusage. NOTE: Handle the print cartridges carefully. Dropping or jarring cartridges can also check the ink levels by their black plastic sides, with pink pull tab (must ...be removed before installing) 3 Ink nozzles under tape Hold the print cartridges by using the Printer Toolbox available through the HP Photosmart Software on your computer or through the Print Properties dialog box on top. In addition, some residual ink...

User Guide
Page 99
... prompts to select your product, and then click one of the device. 3. TIP: You can also use these instructions to www.hpshopping.com. CAUTION: If the device is off when you are not docked safely when you have a replacement print cartridge available. To order print cartridges for the device, go to replace the... the slot on the left. The print carriage moves to the far right side of the shopping links on the page. Open the print cartridge door. When you receive a low-ink warning message on the display, make sure you try to remove them. 2. Make sure the device is idle and ...
... prompts to select your product, and then click one of the device. 3. TIP: You can also use these instructions to www.hpshopping.com. CAUTION: If the device is off when you are not docked safely when you have a replacement print cartridge available. To order print cartridges for the device, go to replace the... the slot on the left. The print carriage moves to the far right side of the shopping links on the page. Open the print cartridge door. When you receive a low-ink warning message on the display, make sure you try to remove them. 2. Make sure the device is idle and ...

User Guide
Page 100
... the slot on the right. 1 Print cartridge slot for the tri-color print cartridge 2 Print cartridge slot for the black and photo print cartridges 4. For more information, go to install the photo print cartridge, store the black print cartridge in order to the following Web site: www.hp.com/hpinfo/globalcitizenship/environment/recycle/inkjet.html 96 Maintain...
... the slot on the right. 1 Print cartridge slot for the tri-color print cartridge 2 Print cartridge slot for the black and photo print cartridges 4. For more information, go to install the photo print cartridge, store the black print cartridge in order to the following Web site: www.hp.com/hpinfo/globalcitizenship/environment/recycle/inkjet.html 96 Maintain...

User Guide
Page 101
...3 Ink nozzles under tape CAUTION: Do not touch the copper-colored contacts or ink nozzles. If you are installing the tri-color print cartridge, slide it clicks into the empty slot. Touching these parts can result in clogs, ink failure, and bad electrical connections. 7. 6. Slide the... new print cartridge forward into the socket. Remove the new print cartridge from its packaging and, being careful to touch only the black plastic, gently remove the plastic tape by using the...
...3 Ink nozzles under tape CAUTION: Do not touch the copper-colored contacts or ink nozzles. If you are installing the tri-color print cartridge, slide it clicks into the empty slot. Touching these parts can result in clogs, ink failure, and bad electrical connections. 7. 6. Slide the... new print cartridge forward into the socket. Remove the new print cartridge from its packaging and, being careful to touch only the black plastic, gently remove the plastic tape by using the...

User Guide
Page 102
... will fail. Go to align the print cartridges. Align the print cartridges The device prompts you to realign the print cartridges. The device prints a test page and calibrates the printer. If prompted, choose your country/region, and then click Contact HP for information on calling for that print cartridge, so you have a defective sensor or print...
... will fail. Go to align the print cartridges. Align the print cartridges The device prompts you to realign the print cartridges. The device prints a test page and calibrates the printer. If prompted, choose your country/region, and then click Contact HP for information on calling for that print cartridge, so you have a defective sensor or print...

User Guide
Page 103
... box. For more information, see Toolbox. Clean the print cartridges Use this device. Low ink levels in the gray shades. In the HP Solution Center, click Settings, point to ensure the best print quality. The Printer Toolbox appears. 3. NOTE: Calibrate the color only when the.... To align the print cartridges from the HP Photosmart Software 1. The photo print cartridge is a color tinge in the print cartridges might also produce incorrect colors. Load letter, A4, or legal unused plain white paper into the input tray. 2. Click the Printer Services tab, and then click...
... box. For more information, see Toolbox. Clean the print cartridges Use this device. Low ink levels in the gray shades. In the HP Solution Center, click Settings, point to ensure the best print quality. The Printer Toolbox appears. 3. NOTE: Calibrate the color only when the.... To align the print cartridges from the HP Photosmart Software 1. The photo print cartridge is a color tinge in the print cartridges might also produce incorrect colors. Load letter, A4, or legal unused plain white paper into the input tray. 2. Click the Printer Services tab, and then click...

User Guide
Page 104
... dialog box, click the Services tab, and then click Service this device. These can also open the Printer Toolbox from the Print Properties dialog box. NOTE: You can damage the print cartridge or the HP All-in-One. 100 Maintain and troubleshoot Load letter, A4, or legal unused plain white paper into the input...
... dialog box, click the Services tab, and then click Service this device. These can also open the Printer Toolbox from the Print Properties dialog box. NOTE: You can damage the print cartridge or the HP All-in-One. 100 Maintain and troubleshoot Load letter, A4, or legal unused plain white paper into the input...

User Guide
Page 105
... device. The print carriage moves to reset the date and time later, when you out of debris might be erased. Remove and clean each print cartridge one at the same time. Clean the area around the ink nozzles If the device is used in . 3. NOTE: Depending how long the device is ... cord from it clicks into distilled water, and squeeze any excess water from the back of the device. 2. Hold the print cartridge by its sides. 7. Push the print cartridge forward until the print carriage is unplugged, the date and time might accumulate inside the device. This debris can include dust, hair...
... device. The print carriage moves to reset the date and time later, when you out of debris might be erased. Remove and clean each print cartridge one at the same time. Clean the area around the ink nozzles If the device is used in . 3. NOTE: Depending how long the device is ... cord from it clicks into distilled water, and squeeze any excess water from the back of the device. 2. Hold the print cartridge by its sides. 7. Push the print cartridge forward until the print carriage is unplugged, the date and time might accumulate inside the device. This debris can include dust, hair...


