
User Guide
Page 8
......106 Document failed to print...106 Ink Service Capacity Warning 106 Previously used genuine HP cartridge 107 General printer error...107 5 Control-panel lights reference Interpreting control-panel lights 108 A HP supplies Order printing supplies online 114 Supplies...114 Ink cartridges...114 HP media...115 B Support and warranty Obtain electronic support...116 4 The printhead appears to...
......106 Document failed to print...106 Ink Service Capacity Warning 106 Previously used genuine HP cartridge 107 General printer error...107 5 Control-panel lights reference Interpreting control-panel lights 108 A HP supplies Order printing supplies online 114 Supplies...114 Ink cartridges...114 HP media...115 B Support and warranty Obtain electronic support...116 4 The printhead appears to...
User Guide
Page 13
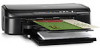
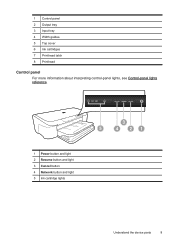
1 Control panel 2 Output tray 3 Input tray 4 Width guides 5 Top cover 6 Ink cartridges 7 Printhead latch 8 Printhead Control panel For more information about interpreting control-panel lights, see Control-panel lights reference. 1 Power button and light 2 Resume button and light 3 Cancel button 4 Network button and light 5 Ink cartridge lights 3 5 4 21 Understand the device parts 9
1 Control panel 2 Output tray 3 Input tray 4 Width guides 5 Top cover 6 Ink cartridges 7 Printhead latch 8 Printhead Control panel For more information about interpreting control-panel lights, see Control-panel lights reference. 1 Power button and light 2 Resume button and light 3 Cancel button 4 Network button and light 5 Ink cartridge lights 3 5 4 21 Understand the device parts 9
User Guide
Page 14
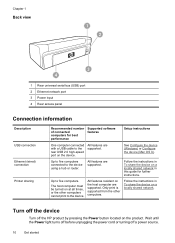
... Follow the instructions in To share the device on the host computer are supported. Wait until the Power light turns off before unplugging the power cord or turning off the HP product by pressing the Power button located on a locally shared network. Chapter 1 Back view 1 2 ...3 4 1 Rear universal serial bus (USB) port 2 Ethernet network port 3 Power input 4 Rear access panel Connection information Description USB connection Ethernet (wired) connection Printer sharing ...
... Follow the instructions in To share the device on the host computer are supported. Wait until the Power light turns off before unplugging the power cord or turning off the HP product by pressing the Power button located on a locally shared network. Chapter 1 Back view 1 2 ...3 4 1 Rear universal serial bus (USB) port 2 Ethernet network port 3 Power input 4 Rear access panel Connection information Description USB connection Ethernet (wired) connection Printer sharing ...
User Guide
Page 17
... blacks and vivid colors. HP Iron-On Transfers HP Iron-on the page. NOTE: At this paper with your product, and then click one of printing affordable professional photos with any inkjet printer. Select print media 13 It is suitable for light or white fabrics) are available... in 8.5 x 11 inch, A4, 10 x 15 cm,(4 x 6 inch). HP Premium Presentation Paper HP Professional Paper These papers are heavyweight for longer lasting...
... blacks and vivid colors. HP Iron-On Transfers HP Iron-on the page. NOTE: At this paper with your product, and then click one of printing affordable professional photos with any inkjet printer. Select print media 13 It is suitable for light or white fabrics) are available... in 8.5 x 11 inch, A4, 10 x 15 cm,(4 x 6 inch). HP Premium Presentation Paper HP Professional Paper These papers are heavyweight for longer lasting...
User Guide
Page 48
... Ink from the cartridges is used . it is unacceptable. You can cause temporary printing problems. • If you improperly turn off the HP Printer, the print carriage might be caused by pressing the (Power button). It could also be inaccurate or unavailable. Cleaning the printhead will use ...some residual ink is left in a number of the cartridges. • Handle ink cartridges carefully. Wait until the Power light turns off before unplugging the power cord or turning off the product by a clogged printhead. When you have to view this information (see...
... Ink from the cartridges is used . it is unacceptable. You can cause temporary printing problems. • If you improperly turn off the HP Printer, the print carriage might be caused by pressing the (Power button). It could also be inaccurate or unavailable. Cleaning the printhead will use ...some residual ink is left in a number of the cartridges. • Handle ink cartridges carefully. Wait until the Power light turns off before unplugging the power cord or turning off the product by a clogged printhead. When you have to view this information (see...
User Guide
Page 52
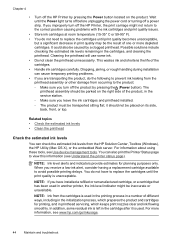
...Diagnostic Page To print a print quality report • Control panel: Press and hold the Resume button and Network button until the ink cartridge lights blink, approximately five seconds, and then release the buttons. Print and evaluate a print quality report Print quality problems can help you determine ... Web server: Click the Settings tab, click Device Services in the left pane, select Print Quality Report from the drop-down list in the HP product. Chapter 4 If you are unhappy with the quality of your prints, a Print Quality Diagnostic page can have many causes: software settings,...
...Diagnostic Page To print a print quality report • Control panel: Press and hold the Resume button and Network button until the ink cartridge lights blink, approximately five seconds, and then release the buttons. Print and evaluate a print quality report Print quality problems can help you determine ... Web server: Click the Settings tab, click Device Services in the left pane, select Print Quality Report from the drop-down list in the HP product. Chapter 4 If you are unhappy with the quality of your prints, a Print Quality Diagnostic page can have many causes: software settings,...
User Guide
Page 58
...correct color-coded slots. For more information, see Control- panel lights reference. • No error messages appear on each one to rotate the image 180 degrees. align the printer. If that does not work, contact HP. The problem might not appear on or blinking, see Understand... the printer status page. 54 Maintain and troubleshoot If lights are on the other cables are properly installed in the ...
...correct color-coded slots. For more information, see Control- panel lights reference. • No error messages appear on each one to rotate the image 180 degrees. align the printer. If that does not work, contact HP. The problem might not appear on or blinking, see Understand... the printer status page. 54 Maintain and troubleshoot If lights are on the other cables are properly installed in the ...
User Guide
Page 60
... for the document do not exceed the printable area of the device. Check the media settings • Make sure you improperly turn off the HP Printer by USB cables) can sometimes cause slight distortions to printouts. Check the margin settings Make sure the margin settings for the media loaded in the ... the color print settings Make sure Print in the file Check the file to minimize the effects of the electromagnetic fields. Wait until the Power light turns off before unplugging the power cord or turning off improperly.
... for the document do not exceed the printable area of the device. Check the media settings • Make sure you improperly turn off the HP Printer by USB cables) can sometimes cause slight distortions to printouts. Check the margin settings Make sure the margin settings for the media loaded in the ... the color print settings Make sure Print in the file Check the file to minimize the effects of the electromagnetic fields. Wait until the Power light turns off before unplugging the power cord or turning off improperly.
User Guide
Page 63
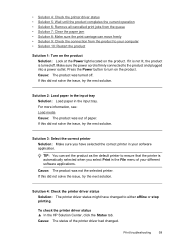
... solution. If it is not lit, the product is turned off . To check the printer driver status ▲ In the HP Solution Center, click the Status tab. • Solution 4: Check the printer driver status • Solution 5: Wait until the product completes the current operation • ...Solution 6: Remove all cancelled print jobs from the product to your computer • Solution 10: Restart the product Solution 1: Turn on the product Solution: Look at the Power light located ...
... solution. If it is not lit, the product is turned off . To check the printer driver status ▲ In the HP Solution Center, click the Status tab. • Solution 4: Check the printer driver status • Solution 5: Wait until the product completes the current operation • ...Solution 6: Remove all cancelled print jobs from the product to your computer • Solution 10: Restart the product Solution 1: Turn on the product Solution: Look at the Power light located ...
User Guide
Page 66
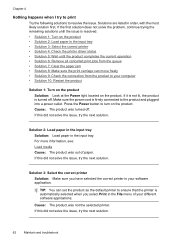
...the following solutions to your computer • Solution 10: Restart the product Solution 1: Turn on the product Solution: Look at the Power light located on the product. Solution 2: Load paper in the input tray Solution: Load paper in the File menu of paper. If the... • Solution 1: Turn on the product • Solution 2: Load paper in the input tray • Solution 3: Select the correct printer • Solution 4: Check the printer driver status • Solution 5: Wait until the product completes the current operation • Solution 6: Remove all cancelled print jobs from the queue...
...the following solutions to your computer • Solution 10: Restart the product Solution 1: Turn on the product Solution: Look at the Power light located on the product. Solution 2: Load paper in the input tray Solution: Load paper in the File menu of paper. If the... • Solution 1: Turn on the product • Solution 2: Load paper in the input tray • Solution 3: Select the correct printer • Solution 4: Check the printer driver status • Solution 5: Wait until the product completes the current operation • Solution 6: Remove all cancelled print jobs from the queue...
User Guide
Page 72
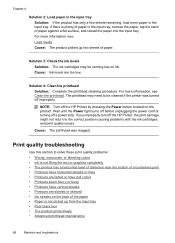
Wait until the Power light turns off before unplugging the power cord or turning off the HP Printer by pressing the Power button located on ink. Cause: The printhead was turned off the HP Printer, the print carriage might not return to solve these print quality problems: • ...information, see Clean the printhead. Solution 4: Clean the printhead Solution: Complete the printhead cleaning procedure. The printhead may be cleaned if the printer was clogged. If you improperly turn off improperly. NOTE: Turn off a power strip. Chapter 4 Solution 2: Load paper in the input...
Wait until the Power light turns off before unplugging the power cord or turning off the HP Printer by pressing the Power button located on ink. Cause: The printhead was turned off the HP Printer, the print carriage might not return to solve these print quality problems: • ...information, see Clean the printhead. Solution 4: Clean the printhead Solution: Complete the printhead cleaning procedure. The printhead may be cleaned if the printer was clogged. If you improperly turn off improperly. NOTE: Turn off a power strip. Chapter 4 Solution 2: Load paper in the input...

User Guide
Page 79
...the problem persists, use the software you installed with the product or another software application to rotate your image 180 degrees so that the light blue, gray, or brown hues in your image do not print at right angles (or perpendicular) to the direction that the paper...; Solution 4: Align the printhead • Solution 5: Clean the printhead • Solution 6: Contact HP support Solution 1: Make sure the paper is loaded correctly Solution: Make sure that the paper moved through the printer. Cause: The defect is more information, see: Load media Cause: The paper was not loaded ...
...the problem persists, use the software you installed with the product or another software application to rotate your image 180 degrees so that the light blue, gray, or brown hues in your image do not print at right angles (or perpendicular) to the direction that the paper...; Solution 4: Align the printhead • Solution 5: Clean the printhead • Solution 6: Contact HP support Solution 1: Make sure the paper is loaded correctly Solution: Make sure that the paper moved through the printer. Cause: The defect is more information, see: Load media Cause: The paper was not loaded ...
User Guide
Page 95
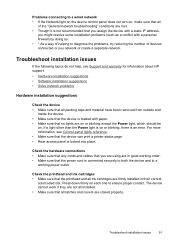
...cables that you are using are in their correct, colorcoded slot. For more information, see Support and warranty for information about HP support. • Hardware installation suggestions • Software installation suggestions • Solve network problems Hardware installation suggestions Check the ... covers are closed properly. Troubleshoot installation issues If the following topics do not help, see Control-panel lights reference. • Make sure that the device can print a printer status page. • Rear access panel is loaded with a personal firewall) by doing so. •...
...cables that you are using are in their correct, colorcoded slot. For more information, see Support and warranty for information about HP support. • Hardware installation suggestions • Software installation suggestions • Solve network problems Hardware installation suggestions Check the ... covers are closed properly. Troubleshoot installation issues If the following topics do not help, see Control-panel lights reference. • Make sure that the device can print a printer status page. • Rear access panel is loaded with a personal firewall) by doing so. •...

User Guide
Page 98
...not wrinkled, folded, or damaged. • Make sure that meets specifications. Problems connecting to a wired network • If the Network light on the device control panel does not turn on, make sure it is not recommended that you assign the device with a static IP...close the dialog boxes. For more information, see Load media. • Clear a jam in the device • Tips for a few seconds. The Power light blinks for avoiding jams 94 Maintain and troubleshoot Clear jams Occasionally, media jams during a job. To reset the device's network settings 1. Press (Network button), ...
...not wrinkled, folded, or damaged. • Make sure that meets specifications. Problems connecting to a wired network • If the Network light on the device control panel does not turn on, make sure it is not recommended that you assign the device with a static IP...close the dialog boxes. For more information, see Load media. • Clear a jam in the device • Tips for a few seconds. The Power light blinks for avoiding jams 94 Maintain and troubleshoot Clear jams Occasionally, media jams during a job. To reset the device's network settings 1. Press (Network button), ...

User Guide
Page 103
Lightly dampen a clean, lint-free cloth and wipe the electrical contact area from the bottom to be cleaned: the plastic ramps on both sides of the ...
Lightly dampen a clean, lint-free cloth and wipe the electrical contact area from the bottom to be cleaned: the plastic ramps on both sides of the ...

User Guide
Page 104
d. Use a fresh, lightly dampened, lint-free cloth to the next step. 100 Maintain and troubleshoot Wipe the previously cleaned areas dry with a dry lint-free cloth before proceeding to wipe the plastic ramps on both sides of the nozzles. Chapter 4 b. Wipe away from the edge between the nozzles and the contacts. Use a fresh, lightly dampened, lint-free cloth to wipe any accumulated ink and debris from the nozzles. c.
d. Use a fresh, lightly dampened, lint-free cloth to the next step. 100 Maintain and troubleshoot Wipe the previously cleaned areas dry with a dry lint-free cloth before proceeding to wipe the plastic ramps on both sides of the nozzles. Chapter 4 b. Wipe away from the edge between the nozzles and the contacts. Use a fresh, lightly dampened, lint-free cloth to wipe any accumulated ink and debris from the nozzles. c.

User Guide
Page 105
Clean the electrical contacts inside the product. Use as many fresh, clean cloths as necessary. Make sure the latch handle is raised, and then reinsert the printhead. 2 1 Errors (Windows) 101 To clean the electrical contacts in the product by wiping with the cloth from top to the next step. 8. b. Clean until no ink shows on the cloth. Wipe the area dry with bottled or distilled water. 7. Lightly dampen a clean, lint-free cloth with a dry lint-free cloth before proceeding to bottom. c. Clean the electrical contacts in the product a.
Clean the electrical contacts inside the product. Use as many fresh, clean cloths as necessary. Make sure the latch handle is raised, and then reinsert the printhead. 2 1 Errors (Windows) 101 To clean the electrical contacts in the product by wiping with the cloth from top to the next step. 8. b. Clean until no ink shows on the cloth. Wipe the area dry with bottled or distilled water. 7. Lightly dampen a clean, lint-free cloth with a dry lint-free cloth before proceeding to bottom. c. Clean the electrical contacts in the product a.

User Guide
Page 112
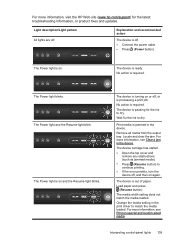
5 Control-panel lights reference The control-panel lights indicate status and are useful for diagnosing printing problems. This section contains information about the lights, what they indicate, and what action to take if necessary. • Interpreting control-panel lights Interpreting control-panel lights 1 Power button and light 2 Resume button and light 3 Cancel button 4 Network button and light 5 Ink cartridge lights 3 5 4 21 108 Control-panel lights reference
5 Control-panel lights reference The control-panel lights indicate status and are useful for diagnosing printing problems. This section contains information about the lights, what they indicate, and what action to take if necessary. • Interpreting control-panel lights Interpreting control-panel lights 1 Power button and light 2 Resume button and light 3 Cancel button 4 Network button and light 5 Ink cartridge lights 3 5 4 21 108 Control-panel lights reference
User Guide
Page 113
... control-panel lights 109 The Power light blinks. The media width setting does not match the media loaded. The device carriage has stalled. • Open the top cover and remove any obstructions (such as jammed media). • Press (Resume button) to match the media loaded. For more information, visit the HP Web site...
... control-panel lights 109 The Power light blinks. The media width setting does not match the media loaded. The device carriage has stalled. • Open the top cover and remove any obstructions (such as jammed media). • Press (Resume button) to match the media loaded. For more information, visit the HP Web site...
User Guide
Page 114
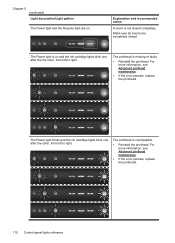
...8226; If the error persists, replace the printhead. The Power light is not closed . Chapter 5 (continued) Light description/Light pattern The Power light and the Resume light are completely closed completely. The Power light blinks and the ink cartridge lights blink one after the other , from left to right. ...For more information, see Advanced printhead maintenance. • If the error persists, replace the printhead. 110 Control-panel lights reference Make sure all covers are on and the ink cartridge lights blink one after the the other , from left to right.
...8226; If the error persists, replace the printhead. The Power light is not closed . Chapter 5 (continued) Light description/Light pattern The Power light and the Resume light are completely closed completely. The Power light blinks and the ink cartridge lights blink one after the other , from left to right. ...For more information, see Advanced printhead maintenance. • If the error persists, replace the printhead. 110 Control-panel lights reference Make sure all covers are on and the ink cartridge lights blink one after the the other , from left to right.


