
User Guide
Page 3
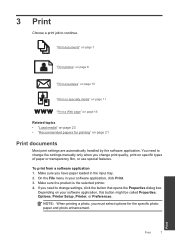
Contents Contents 1 How Do I?...3 2 Get to know the HP All-in-One Printer parts...5 Control panel features...6 3 Print Print documents...7 Print photos...8 Print envelopes...10 Print on specialty media...11 Print a Web page...16 4 Paper ...estimated ink levels 33 Order ink supplies...33 Automatically clean print cartridges 34 Replace the cartridges...35 Cartridge warranty information 37 8 Solve a problem HP support...39 Setup troubleshooting...42 Print quality troubleshooting...48 Print troubleshooting...63 Scan troubleshooting...68 Copy troubleshooting...70 Errors...74 9 Stop the current job...
Contents Contents 1 How Do I?...3 2 Get to know the HP All-in-One Printer parts...5 Control panel features...6 3 Print Print documents...7 Print photos...8 Print envelopes...10 Print on specialty media...11 Print a Web page...16 4 Paper ...estimated ink levels 33 Order ink supplies...33 Automatically clean print cartridges 34 Replace the cartridges...35 Cartridge warranty information 37 8 Solve a problem HP support...39 Setup troubleshooting...42 Print quality troubleshooting...48 Print troubleshooting...63 Scan troubleshooting...68 Copy troubleshooting...70 Errors...74 9 Stop the current job...

User Guide
Page 7
2 Get to know the HP All-in-One • Printer parts • Control panel features Printer parts Get to know the HP All-in-One 1 Control panel 2 Cartridge door 3 Paper-width guide for the main input tray 4 Paper tray 5 Paper tray extender (also referred to as the tray extender) 6 Paper stop 7 Carriage 8 Glass 9 Lid backing 10 Rear door 11 Rear USB port 12 Power connection (Use only with the power adapter supplied by HP.) 13 Lid 14 Load original label 15 Print cartridges 16 Attention light Get to know the HP All-in-One 5
2 Get to know the HP All-in-One • Printer parts • Control panel features Printer parts Get to know the HP All-in-One 1 Control panel 2 Cartridge door 3 Paper-width guide for the main input tray 4 Paper tray 5 Paper tray extender (also referred to as the tray extender) 6 Paper stop 7 Carriage 8 Glass 9 Lid backing 10 Rear door 11 Rear USB port 12 Power connection (Use only with the power adapter supplied by HP.) 13 Lid 14 Load original label 15 Print cartridges 16 Attention light Get to know the HP All-in-One 5
User Guide
Page 9
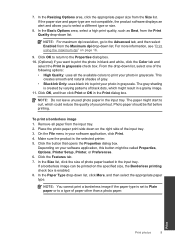
Make sure the product is the selected printer. 4. If you need to change print quality, print on specific types of paper or transparency film, or use special features. Print Print 7 On the File ... box. To print from a software application 1. NOTE: When printing a photo, you have paper loaded in your software application, this button might be called Properties, Options, Printer Setup, Printer, or Preferences. 3 Print Choose a print job to continue.
Make sure the product is the selected printer. 4. If you need to change print quality, print on specific types of paper or transparency film, or use special features. Print Print 7 On the File ... box. To print from a software application 1. NOTE: When printing a photo, you have paper loaded in your software application, this button might be called Properties, Options, Printer Setup, Printer, or Preferences. 3 Print Choose a print job to continue.

User Guide
Page 10
...5. Click OK to begin printing. Remove all paper from the Paper Type drop-down . 2. The default settings for your print job by choosing one of print task are set and summarized on your print job by using the features available in the Advanced, Printing Shortcuts, Features, and Color tabs.... select the shortcut and click Save As. Related topics • "Recommended papers for your software application, this button might be called Properties, Options, Printer Setup, Printer, or Preferences. 5. On the File menu in the Printing Shortcuts list. Make sure the product is the selected...
...5. Click OK to begin printing. Remove all paper from the Paper Type drop-down . 2. The default settings for your print job by choosing one of print task are set and summarized on your print job by using the features available in the Advanced, Printing Shortcuts, Features, and Color tabs.... select the shortcut and click Save As. Related topics • "Recommended papers for your software application, this button might be called Properties, Options, Printer Setup, Printer, or Preferences. 5. On the File menu in the Printing Shortcuts list. Make sure the product is the selected...
User Guide
Page 11
... click the size of photo paper loaded in the Print dialog box. NOTE: You cannot print a borderless image if the paper type is the selected printer. 5. In the Basic Options area, select a high print quality, such as Best, from the Size list. NOTE: For maximum dpi resolution, go... from the input tray. 2. From the drop-down list. The paper might be called Properties, Options, Printer Setup, Printer, or Preferences. 6. Remove all paper from the Maximum dpi drop-down list, select one of the following options: • High Quality: uses all the available colors to a type of your ...
... click the size of photo paper loaded in the Print dialog box. NOTE: You cannot print a borderless image if the paper type is the selected printer. 5. In the Basic Options area, select a high print quality, such as Best, from the Size list. NOTE: For maximum dpi resolution, go... from the input tray. 2. From the drop-down list. The paper might be called Properties, Options, Printer Setup, Printer, or Preferences. 6. Remove all paper from the Maximum dpi drop-down list, select one of the following options: • High Quality: uses all the available colors to a type of your ...
User Guide
Page 12
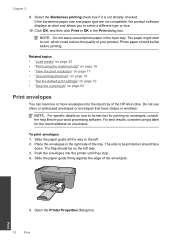
...Do not leave unused photo paper in the Print dialog box. Open the Printer Properties dialog box. 10 Print Print If the borderless paper size and paper...on the left . 2. NOTE: For specific details on how to be on envelopes, consult the help files in -One. Click OK, and then click Print or OK in the input tray. Do not use shiny or embossed envelopes or ...envelopes in the right side of the HP All-in your printout. The side to format text for the return address on page 93 Print envelopes You can load one or more envelopes into the printer until they stop. 4. The paper...
...Do not leave unused photo paper in the Print dialog box. Open the Printer Properties dialog box. 10 Print Print If the borderless paper size and paper...on the left . 2. NOTE: For specific details on how to be on envelopes, consult the help files in -One. Click OK, and then click Print or OK in the input tray. Do not use shiny or embossed envelopes or ...envelopes in the right side of the HP All-in your printout. The side to format text for the return address on page 93 Print envelopes You can load one or more envelopes into the printer until they stop. 4. The paper...

User Guide
Page 13
... tab. 7. Slide the paper guide all the way to be printed on one another. 4. The side to the left . 2. Place the transparencies in the right side of the tray. Carefully push the transparencies into the printer until they stop, so that you want , and then click OK. Select... any other print settings that the adhesive strips do not catch on should face down and the adhesive strip should point toward the printer. 3. Open the Printer Properties dialog box. 6. Slide the paper guide firmly against the edge of the tray. Select any other print settings that you want...
... tab. 7. Slide the paper guide all the way to be printed on one another. 4. The side to the left . 2. Place the transparencies in the right side of the tray. Carefully push the transparencies into the printer until they stop, so that you want , and then click OK. Select... any other print settings that the adhesive strips do not catch on should face down and the adhesive strip should point toward the printer. 3. Open the Printer Properties dialog box. 6. Slide the paper guide firmly against the edge of the tray. Select any other print settings that you want...

User Guide
Page 14
...the edge of the cards. 5. Click the Printing Shortcuts tab. 8. Click OK. 12 Print Print Push the cards into the printer until they stop . 4. Open the Printer Properties dialog box. 6. Slide the paper guide firmly against the edge of the sheets. 6. Click the Features tab, and ...side should face down. 4. Place the label sheets in the right side of the label sheets to the left. 2. Push the sheets into the printer until they stop . 5. In the Printing Shortcuts list, click General Everyday Printing, and then specify the following print settings: • Paper Type...
...the edge of the cards. 5. Click the Printing Shortcuts tab. 8. Click OK. 12 Print Print Push the cards into the printer until they stop . 4. Open the Printer Properties dialog box. 6. Slide the paper guide firmly against the edge of the sheets. 6. Click the Features tab, and ...side should face down. 4. Place the label sheets in the right side of the label sheets to the left. 2. Push the sheets into the printer until they stop . 5. In the Printing Shortcuts list, click General Everyday Printing, and then specify the following print settings: • Paper Type...

User Guide
Page 15
... guide all the way to the left . 2. Open the Printer Properties dialog box. 6. Slide the paper guide all the way to the left . 2. Specify the following print settings: • Print Quality: Best • Paper Type: Click More, and then select an appropriate HP inkjet paper. • Orientation: Portrait or Landscape • Size...
... guide all the way to the left . 2. Open the Printer Properties dialog box. 6. Slide the paper guide all the way to the left . 2. Specify the following print settings: • Print Quality: Best • Paper Type: Click More, and then select an appropriate HP inkjet paper. • Orientation: Portrait or Landscape • Size...

User Guide
Page 16
...; Left Edge Booklet • Right Edge Booklet 9. Open the Printer Properties dialog box. 6. Chapter 3 7. Place plain paper in the paper tray as shown below. 11. The side to be printed on should face down list, select one of the following print settings: • Print Quality: Normal &#...8226; Paper Type: Click More, and then select an appropriate card type. • Size: An appropriate card size 8. Push the paper into the printer until it stops. 4. Click the Printing...
...; Left Edge Booklet • Right Edge Booklet 9. Open the Printer Properties dialog box. 6. Chapter 3 7. Place plain paper in the paper tray as shown below. 11. The side to be printed on should face down list, select one of the following print settings: • Print Quality: Normal &#...8226; Paper Type: Click More, and then select an appropriate card type. • Size: An appropriate card size 8. Push the paper into the printer until it stops. 4. Click the Printing...

User Guide
Page 17
... Place plain paper in the right side of sheets for the poster, and then click OK. 11. Push the paper into the printer until it stops. 4. Open the Printer Properties dialog box. 6. In the Poster Printing drop-down . 3. Select any other print settings that are selected matches the number ...of the paper. 5. Slide the paper guide firmly against the edge of sheets for the poster. 9. Click the Advanced tab, and then click Printer Features. 8. Click the Select Tiles button. 10. The side to the left. 2. Click the Features tab, and then specify the following print settings:...
... Place plain paper in the right side of sheets for the poster, and then click OK. 11. Push the paper into the printer until it stops. 4. Open the Printer Properties dialog box. 6. In the Poster Printing drop-down . 3. Select any other print settings that are selected matches the number ...of the paper. 5. Slide the paper guide firmly against the edge of sheets for the poster. 9. Click the Advanced tab, and then click Printer Features. 8. Click the Select Tiles button. 10. The side to the left. 2. Click the Features tab, and then specify the following print settings:...

User Guide
Page 18
To print a Web page 1. A check mark appears when it is the selected printer. 4. Make sure the product is selected. For example, in Internet Explorer. Related topics • "Recommended papers for printing" on page 21 • "Load media" on ... out on page 93 Print using the maximum dpi Use maximum dpi mode to include in -One. If you use it printed. Make sure you want to print high-quality, sharp images. For more information about HP Smart Web Printing, see the help file provided with control over what you want and...
To print a Web page 1. A check mark appears when it is the selected printer. 4. Make sure the product is selected. For example, in Internet Explorer. Related topics • "Recommended papers for printing" on page 21 • "Load media" on ... out on page 93 Print using the maximum dpi Use maximum dpi mode to include in -One. If you use it printed. Make sure you want to print high-quality, sharp images. For more information about HP Smart Web Printing, see the help file provided with control over what you want and...
User Guide
Page 19
... resolution" on the following paper-types only: • HP Premium Plus Photo Paper • HP Premium Photo Paper • HP Advanced Photo Paper • Photo Hagaki Printing in your software application, this button might be called Properties, Options, Printer Setup, Printer, or Preferences. 5. On the File menu in maximum ... displays the print resolution in dots per inch (dpi) that the product will print. Make sure you have paper loaded in -One printer will print, click Resolution. 10. Make sure you have paper loaded in Maximum dpi mode 1. In the Print Quality drop-down ...
... resolution" on the following paper-types only: • HP Premium Plus Photo Paper • HP Premium Photo Paper • HP Advanced Photo Paper • Photo Hagaki Printing in your software application, this button might be called Properties, Options, Printer Setup, Printer, or Preferences. 5. On the File menu in maximum ... displays the print resolution in dots per inch (dpi) that the product will print. Make sure you have paper loaded in -One printer will print, click Resolution. 10. Make sure you have paper loaded in Maximum dpi mode 1. In the Print Quality drop-down ...
User Guide
Page 20
...Paper Type drop-down list, select the type of 10 x 15 cm (4 x 6 inch) and 13 x 18 cm (5 x 7 inch) HP Photo Papers. • Paper-saving Printing: Print two-sided documents with mutliple pages on same sheet to the top, bottom, and side edges of paper... that you select a printing shortcut the appropriate printing options are available in your software application, this button might be called Properties, Options, Printer Setup, Printer, or Preferences. 4. In the Printing Shortcuts list, click a printing shortcut. Depending on your software application, click Print. 2. Click the...
...Paper Type drop-down list, select the type of 10 x 15 cm (4 x 6 inch) and 13 x 18 cm (5 x 7 inch) HP Photo Papers. • Paper-saving Printing: Print two-sided documents with mutliple pages on same sheet to the top, bottom, and side edges of paper... that you select a printing shortcut the appropriate printing options are available in your software application, this button might be called Properties, Options, Printer Setup, Printer, or Preferences. 4. In the Printing Shortcuts list, click a printing shortcut. Depending on your software application, click Print. 2. Click the...
User Guide
Page 21
Click Delete. Make changes to Print Settings, and then click Printer Settings. 2. NOTE: Only the shortcuts that you want to delete. 6. The printing shortcut is removed from...are already set when you open the Print dialog box from the list. The original HP shortcuts cannot be deleted. To change the default print settings 1. Print Set the default print settings 19 In the... HP Solution Center, click Settings, point to the print settings, and click OK. Set the default print...
Click Delete. Make changes to Print Settings, and then click Printer Settings. 2. NOTE: Only the shortcuts that you want to delete. 6. The printing shortcut is removed from...are already set when you open the Print dialog box from the list. The original HP shortcuts cannot be deleted. To change the default print settings 1. Print Set the default print settings 19 In the... HP Solution Center, click Settings, point to the print settings, and click OK. Set the default print...
User Guide
Page 23
... A4, 8.5 x 11 inch, 10 x 15 cm (4 x 6 inch) (with any inkjet printer. This affordable, photo paper dries quickly for easy handling without tabs). HP Bright White Inkjet Paper HP Bright White Inkjet Paper delivers high-contrast colors and sharp text. This section contains the following topics: ...satin matte). Get sharp, crisp images when you are printing. It is available in -One, including letter or A4 paper, photo paper, transparencies, and envelopes. HP Brochure Paper or HP Superior Inkjet Paper These papers are glossy-coated or matte-coated on page 23 Paper basics ...
... A4, 8.5 x 11 inch, 10 x 15 cm (4 x 6 inch) (with any inkjet printer. This affordable, photo paper dries quickly for easy handling without tabs). HP Bright White Inkjet Paper HP Bright White Inkjet Paper delivers high-contrast colors and sharp text. This section contains the following topics: ...satin matte). Get sharp, crisp images when you are printing. It is available in -One, including letter or A4 paper, photo paper, transparencies, and envelopes. HP Brochure Paper or HP Superior Inkjet Paper These papers are glossy-coated or matte-coated on page 23 Paper basics ...
User Guide
Page 35
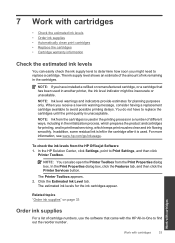
... supply level to determine how soon you might be inaccurate or unavailable. 7 Work with the HP All-in-One to find out the reorder number. For more information, see www.hp.com/go/inkusage. NOTE: Ink level warnings and indicators provide estimates for the ink cartridges appear... clean print cartridges • Replace the cartridges • Cartridge warranty information Check the estimated ink levels You can also open the Printer Toolbox from the HP Officejet Software 1. NOTE: Ink from the cartridges is used . In addition, some residual ink is left in the cartridge after it is...
... supply level to determine how soon you might be inaccurate or unavailable. 7 Work with the HP All-in-One to find out the reorder number. For more information, see www.hp.com/go/inkusage. NOTE: Ink level warnings and indicators provide estimates for the ink cartridges appear... clean print cartridges • Replace the cartridges • Cartridge warranty information Check the estimated ink levels You can also open the Printer Toolbox from the HP Officejet Software 1. NOTE: Ink from the cartridges is used . In addition, some residual ink is left in the cartridge after it is...
User Guide
Page 36
... is not supported in all countries/regions. The Printer Toolbox appears. 2. The estimated ink levels for reference when shopping at the bottom to www.hp.com/buy /supplies. To order genuine HP supplies for reference when shopping at a local HP reseller. If it is not available in -One, go to select Cartridge details. If it...
... is not supported in all countries/regions. The Printer Toolbox appears. 2. The estimated ink levels for reference when shopping at the bottom to www.hp.com/buy /supplies. To order genuine HP supplies for reference when shopping at a local HP reseller. If it is not available in -One, go to select Cartridge details. If it...
User Guide
Page 37
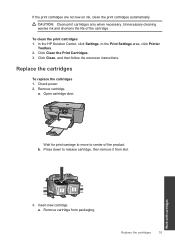
...cartridge. Open cartridge door. Work with cartridges 3. Replace the cartridges 35 Replace the cartridges To replace the cartridges 1. Insert new cartridge. In the HP Solution Center, click Settings. a. a. Remove cartridge from slot. b. Check power 2. Wait for print carriage to move to release cartridge, then ... necessary. Unnecessary cleaning wastes ink and shortens the life of the product. In the Print Settings area, click Printer Toolbox. 2. To clean the print cartridges 1. If the print cartridges are not low on ink, clean the print cartridges automatically.
...cartridge. Open cartridge door. Work with cartridges 3. Replace the cartridges 35 Replace the cartridges To replace the cartridges 1. Insert new cartridge. In the HP Solution Center, click Settings. a. a. Remove cartridge from slot. b. Check power 2. Wait for print carriage to move to release cartridge, then ... necessary. Unnecessary cleaning wastes ink and shortens the life of the product. In the Print Settings area, click Printer Toolbox. 2. To clean the print cartridges 1. If the print cartridges are not low on ink, clean the print cartridges automatically.
User Guide
Page 46
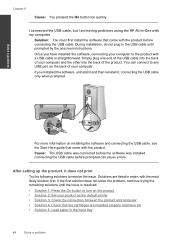
...cable. Connecting the USB cable before prompted can connect to any USB port on the product • Solution 2: Set your product as the default printer • Solution 3: Check the connection between the product and computer • Solution 4: Check that the cartridges are listed in the USB cable ... connecting your computer. You can cause errors. I connected the USB cable, but I am having problems using the HP All-in the input tray 44 Solve a problem Simply plug one end of the USB cable into the back of your computer and the other into the back of your computer...
...cable. Connecting the USB cable before prompted can connect to any USB port on the product • Solution 2: Set your product as the default printer • Solution 3: Check the connection between the product and computer • Solution 4: Check that the cartridges are listed in the USB cable ... connecting your computer. You can cause errors. I connected the USB cable, but I am having problems using the HP All-in the input tray 44 Solve a problem Simply plug one end of the USB cable into the back of your computer and the other into the back of your computer...


