

User Guide
Page 2
...REPRODUCTION, ADAPTATION, OR TRANSLATION OF THIS MATERIAL IS PROHIBITED WITHOUT PRIOR WRITTEN PERMISSION OF HP, EXCEPT AS ALLOWED UNDER THE COPYRIGHT LAWS. and other countries. HP company notices Copyright and License THE INFORMATION CONTAINED HEREIN IS SUBJECT TO CHANGE WITHOUT ...NOTICE. If the product does not operate normally, see Solve a problem in the U.S. ENERGY STAR and the ENERGY STAR mark are wet. - Install the product in the documentation that comes with the printer...
...REPRODUCTION, ADAPTATION, OR TRANSLATION OF THIS MATERIAL IS PROHIBITED WITHOUT PRIOR WRITTEN PERMISSION OF HP, EXCEPT AS ALLOWED UNDER THE COPYRIGHT LAWS. and other countries. HP company notices Copyright and License THE INFORMATION CONTAINED HEREIN IS SUBJECT TO CHANGE WITHOUT ...NOTICE. If the product does not operate normally, see Solve a problem in the U.S. ENERGY STAR and the ENERGY STAR mark are wet. - Install the product in the documentation that comes with the printer...

User Guide
Page 3
... features...3 Tilt the control panel ...3 Control panel display...3 Function buttons ...4 Change printer settings...5 Use HP software...5 Turn printer off ...6 2 Connect your printer...7 Connect to a Wi-Fi network ...7 Check Wi-Fi status...7 Turn on Wi-Fi...7 Connect to a Wi-Fi network using the HP software...8 Connect to a Wi-Fi network using the control panel ...8 Connect to...
... features...3 Tilt the control panel ...3 Control panel display...3 Function buttons ...4 Change printer settings...5 Use HP software...5 Turn printer off ...6 2 Connect your printer...7 Connect to a Wi-Fi network ...7 Check Wi-Fi status...7 Turn on Wi-Fi...7 Connect to a Wi-Fi network using the HP software...8 Connect to a Wi-Fi network using the control panel ...8 Connect to...

User Guide
Page 4
... IPv4 and IPv6 TCP/IP parameters...28 Assign or change the system password...28 Change energy-conservation settings ...29 Update printer...29 Update printer using the control panel ...29 Update printer using the embedded web server (EWS) ...29 5 Print...30 Print from a Windows computer...30 Print from a ...from the computer (Windows) ...38 Send a fax from a phone...38 Send a scheduled fax using the control panel ...39 Send a fax using the printer memory ...39 Send a fax to multiple recipients using group address book 40 Receive a fax ...40 Receive a fax manually...40 Reprint faxes in memory ...
... IPv4 and IPv6 TCP/IP parameters...28 Assign or change the system password...28 Change energy-conservation settings ...29 Update printer...29 Update printer using the control panel ...29 Update printer using the embedded web server (EWS) ...29 5 Print...30 Print from a Windows computer...30 Print from a ...from the computer (Windows) ...38 Send a fax from a phone...38 Send a scheduled fax using the control panel ...39 Send a fax using the printer memory ...39 Send a fax to multiple recipients using group address book 40 Receive a fax ...40 Receive a fax manually...40 Reprint faxes in memory ...

User Guide
Page 5
... correct fax setup for your home or office...56 Case A: Separate fax line (no voice calls received)...57 Case B: Set up the printer with DSL...58 Case C: Set up the printer with a PBX phone system or an ISDN line 59 Case D: Fax with a distinctive ring service on the same line 60 Case...
... correct fax setup for your home or office...56 Case A: Separate fax line (no voice calls received)...57 Case B: Set up the printer with DSL...58 Case C: Set up the printer with a PBX phone system or an ISDN line 59 Case D: Fax with a distinctive ring service on the same line 60 Case...

User Guide
Page 6
... computer dial-up modem and voice mail 76 Run the fax test ...77 8 Manage cartridges ...79 Dynamic Security Enabled Printers ...79 Tips for handling cartridges and printhead...79 Check estimated ink levels ...80 Order cartridges ...80 Replace cartridges ...80 ...Fix Ethernet connection ...107 Restore original network settings ...108 Printer hardware issues ...108 The printer shuts down unexpectedly...108 Printhead alignment fails ...108 Resolve printer failure ...108 Understand printer reports ...109 Print a printer report...109 Printer maintenance ...109 Clean the scanner glass ...109 Clean ...
... computer dial-up modem and voice mail 76 Run the fax test ...77 8 Manage cartridges ...79 Dynamic Security Enabled Printers ...79 Tips for handling cartridges and printhead...79 Check estimated ink levels ...80 Order cartridges ...80 Replace cartridges ...80 ...Fix Ethernet connection ...107 Restore original network settings ...108 Printer hardware issues ...108 The printer shuts down unexpectedly...108 Printhead alignment fails ...108 Resolve printer failure ...108 Understand printer reports ...109 Print a printer report...109 Printer maintenance ...109 Clean the scanner glass ...109 Clean ...

User Guide
Page 7
... Australia wired fax statement...125 Regulatory information for wireless products ...125 Dynamic Security Enabled Printers ...127 Accessibility ...128 Environmental product stewardship program ...128 HP tips for reducing environmental impact...128 Eco-Tips ...128 Paper ...128 Plastics ...129 ... Directive ...130 vii Maintain the printhead and cartridges ...112 Restore settings ...113 HP support ...114 Contact HP...114 Register printer...115 Additional warranty options ...115 10 HP EcoSolutions (HP and the Environment) ...116 Power management...116 Quiet Mode ...116 Optimize printing supplies...
... Australia wired fax statement...125 Regulatory information for wireless products ...125 Dynamic Security Enabled Printers ...127 Accessibility ...128 Environmental product stewardship program ...128 HP tips for reducing environmental impact...128 Eco-Tips ...128 Paper ...128 Plastics ...129 ... Directive ...130 vii Maintain the printhead and cartridges ...112 Restore settings ...113 HP support ...114 Contact HP...114 Register printer...115 Additional warranty options ...115 10 HP EcoSolutions (HP and the Environment) ...116 Power management...116 Quiet Mode ...116 Optimize printing supplies...

User Guide
Page 8
Battery notice for Brazil ...130 Power consumption...130 China Energy Label for Printer, Fax and Copier...130 Disposal of waste equipment by users ...131 Waste disposal for Brazil ...132 The Table of Hazardous Substances/Elements and their Content (China 133 Regulation on the Control of Waste Electrical and Electronic Equipment (Turkey 133 Restriction of hazardous substance (India) ...133 Declaration of the Presence Condition of the Restricted Substances Marking (Taiwan Region 134 viii
Battery notice for Brazil ...130 Power consumption...130 China Energy Label for Printer, Fax and Copier...130 Disposal of waste equipment by users ...131 Waste disposal for Brazil ...132 The Table of Hazardous Substances/Elements and their Content (China 133 Regulation on the Control of Waste Electrical and Electronic Equipment (Turkey 133 Restriction of hazardous substance (India) ...133 Declaration of the Presence Condition of the Restricted Substances Marking (Taiwan Region 134 viii

User Guide
Page 9
Front view Printer parts on the front. Printer views Printer parts and their descriptions. Table 1-1 Printer front view Feature Description 1 Document feeder 2 Document feeder paper-width guides 3 Document feeder tray 4 Document feeder output extension 5 Scanner lid 6 Scanner glass 7 Output tray 8 Output tray extension 9 Input tray / Tray 1 10 Input tray / Tray 2 11 Front USB port Get started Learn about printer parts, control panel features, and other printer functionalities. 1 Get started 1
Front view Printer parts on the front. Printer views Printer parts and their descriptions. Table 1-1 Printer front view Feature Description 1 Document feeder 2 Document feeder paper-width guides 3 Document feeder tray 4 Document feeder output extension 5 Scanner lid 6 Scanner glass 7 Output tray 8 Output tray extension 9 Input tray / Tray 1 10 Input tray / Tray 2 11 Front USB port Get started Learn about printer parts, control panel features, and other printer functionalities. 1 Get started 1

User Guide
Page 10
... door 2 Paper path cover 3 Cartridge access door 4 Printhead 5 Cartridges 6 PIN label NOTE: Cartridges must be kept in the print supplies area. Table 1-1 Printer front view (continued) Feature Description 12 Indicates whether the printer is missing. Rear view Printer parts on . 13 Front door 14 Control panel display Print supplies area Parts in the...
... door 2 Paper path cover 3 Cartridge access door 4 Printhead 5 Cartridges 6 PIN label NOTE: Cartridges must be kept in the print supplies area. Table 1-1 Printer front view (continued) Feature Description 12 Indicates whether the printer is missing. Rear view Printer parts on . 13 Front door 14 Control panel display Print supplies area Parts in the...

User Guide
Page 11
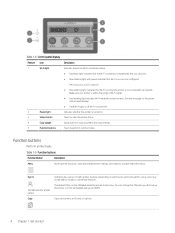
Table 1-3 Printer rear view Feature Description 1 Fax ports / 2 Rear USB port 3 Ethernet network port 4 Rear access door 5 Power connection Control panel features The control panel provides direct interaction, including lights to tilt it downwards. Control panel features 3 Control panel display Check printer status, perform printer tasks, and change printer settings. Tilt the control panel Tilt the control panel for easier viewing. Push the upper part of the control panel to tilt it upwards and push the lower part to indicate status, errors, and more.
Table 1-3 Printer rear view Feature Description 1 Fax ports / 2 Rear USB port 3 Ethernet network port 4 Rear access door 5 Power connection Control panel features The control panel provides direct interaction, including lights to tilt it downwards. Control panel features 3 Control panel display Check printer status, perform printer tasks, and change printer settings. Tilt the control panel Tilt the control panel for easier viewing. Push the upper part of the control panel to tilt it upwards and push the lower part to indicate status, errors, and more.
User Guide
Page 12
... Description 1 Wi-Fi light Indicates the printer Wi-Fi connection status. ● Solid blue light indicates that the Wi-Fi connection is established and you first set by the admin, some users may not be able to modify or use certain features. Sign In (HP OfficeJet Pro 9130b series) Copy Authenticates users to a network...
... Description 1 Wi-Fi light Indicates the printer Wi-Fi connection status. ● Solid blue light indicates that the Wi-Fi connection is established and you first set by the admin, some users may not be able to modify or use certain features. Sign In (HP OfficeJet Pro 9130b series) Copy Authenticates users to a network...

User Guide
Page 13
... size and type, and change printer settings using the HP software or the embedded web server (EWS). 1. Supplies Check the estimated ink levels and cartridge information. You can also change paper settings if needed. Use HP software HP software helps you perform printer tasks from a mobile device or... computer. ● Set up a fax, send a fax, or reprint a received fax. Change printer settings 5 Help Check the contextual help content if it is...
... size and type, and change printer settings using the HP software or the embedded web server (EWS). 1. Supplies Check the estimated ink levels and cartridge information. You can also change paper settings if needed. Use HP software HP software helps you perform printer tasks from a mobile device or... computer. ● Set up a fax, send a fax, or reprint a received fax. Change printer settings 5 Help Check the contextual help content if it is...

User Guide
Page 14
... through email and other applications. ● Manage printer settings, check printer status, print reports, and order supplies. Visit 123.hp.com to set up the HP software. ● HP software supports mobile devices and computers running on certain printers or models. Open the HP software. CAUTION: When turning off the printer, always make sure to follow this procedure...
... through email and other applications. ● Manage printer settings, check printer status, print reports, and order supplies. Visit 123.hp.com to set up the HP software. ● HP software supports mobile devices and computers running on certain printers or models. Open the HP software. CAUTION: When turning off the printer, always make sure to follow this procedure...

User Guide
Page 15
... on and the Wi-Fi network is turned on. Scroll to enter the Wi-Fi network name (SSID) and a Wi-Fi password. While connecting the printer, you run into any problem with Wi-Fi connect, see Restore original network settings. Check Wi-Fi status You can turn on Wi-Fi from... the printer control panel. 1. On the control panel Home screen, touch Menu. 2. Touch Network, and then touch Wi-Fi. 4. Touch View Details. Touch Network, and then touch...
... on and the Wi-Fi network is turned on. Scroll to enter the Wi-Fi network name (SSID) and a Wi-Fi password. While connecting the printer, you run into any problem with Wi-Fi connect, see Restore original network settings. Check Wi-Fi status You can turn on Wi-Fi from... the printer control panel. 1. On the control panel Home screen, touch Menu. 2. Touch Network, and then touch Wi-Fi. 4. Touch View Details. Touch Network, and then touch...

User Guide
Page 16
... is connected to the same Wi-Fi network as the printer. 1. For HP OfficeJet Pro 9130b series, set up the printer using a computer; NOTE: ● HP software uses Bluetooth for a password, enter the default printer PIN available on the label inside the printer access door. ● If the printer has never been configured to connect to a Wi-Fi network...
... is connected to the same Wi-Fi network as the printer. 1. For HP OfficeJet Pro 9130b series, set up the printer using a computer; NOTE: ● HP software uses Bluetooth for a password, enter the default printer PIN available on the label inside the printer access door. ● If the printer has never been configured to connect to a Wi-Fi network...

User Guide
Page 17
...sign in to the router. 2. In HP software, add the printer, and then follow the on -screen instructions to a Wi-Fi network. Open the HP software on -screen instructions to an HP account and register the printer. 3. After setup, you can connect your printer using a USB cable. 2. If ...create or sign in to add or connect the printer. Change the connection type If you have already connected your printer, you can connect your printer to an Ethernet network. Connect your computer to an HP account and register the printer. 4. Connect to an Ethernet network You can change...
...sign in to the router. 2. In HP software, add the printer, and then follow the on -screen instructions to a Wi-Fi network. Open the HP software on -screen instructions to an HP account and register the printer. 3. After setup, you can connect your printer using a USB cable. 2. If ...create or sign in to add or connect the printer. Change the connection type If you have already connected your printer, you can connect your printer to an Ethernet network. Connect your computer to an HP account and register the printer. 4. Connect to an Ethernet network You can change...

User Guide
Page 18
Insert paper with the appropriate paper-size indicators and does not exceed the stack-height marking in Tray 1 Load a stack of the tray. 3. Slide the paper guides to the edges of paper into the tray. Make sure the stack of paper is printing. 1. Open Tray 1. 2. Load paper in the tray. 10 Chapter 3 Load media NOTE: ● Remove any paper before loading a different paper type or size. ● Do not load paper while the printer is aligned with the side to load paper and change media settings. 3 Load media Learn how to be printed facing down.
Insert paper with the appropriate paper-size indicators and does not exceed the stack-height marking in Tray 1 Load a stack of the tray. 3. Slide the paper guides to the edges of paper into the tray. Make sure the stack of paper is printing. 1. Open Tray 1. 2. Load paper in the tray. 10 Chapter 3 Load media NOTE: ● Remove any paper before loading a different paper type or size. ● Do not load paper while the printer is aligned with the side to load paper and change media settings. 3 Load media Learn how to be printed facing down.

User Guide
Page 20
Open Tray 1. 2. Slide the paper guides to the edges of the tray. 12 Chapter 3 Load media 7. NOTE: ● Remove any paper before loading a different paper type or size. ● Do not load paper while the printer is printing. 1. Pull out the output tray extension. Load envelopes in Tray 1 Load envelopes into the tray.
Open Tray 1. 2. Slide the paper guides to the edges of the tray. 12 Chapter 3 Load media 7. NOTE: ● Remove any paper before loading a different paper type or size. ● Do not load paper while the printer is printing. 1. Pull out the output tray extension. Load envelopes in Tray 1 Load envelopes into the tray.

User Guide
Page 23
Slide the paper guides to be printed facing down. Make sure the stack of the tray. 3. Insert paper with the appropriate paper-size indicators and does not exceed the stack-height marking in Tray 1 15 ● Remove any paper before loading a different paper type or size. ● Do not load paper while the printer is aligned with the side to the edges of paper is printing. 1. Load cards and photo paper in the tray. Open Tray 1. 2.
Slide the paper guides to be printed facing down. Make sure the stack of the tray. 3. Insert paper with the appropriate paper-size indicators and does not exceed the stack-height marking in Tray 1 15 ● Remove any paper before loading a different paper type or size. ● Do not load paper while the printer is aligned with the side to the edges of paper is printing. 1. Load cards and photo paper in the tray. Open Tray 1. 2.

User Guide
Page 25
Load paper in Tray 2 17 Change or retain the paper settings on the control panel. Load paper in Tray 2 Load a stack of paper into the tray. Make sure the settings match the paper type and size loaded. 7. Open Tray 2. 6. Pull out the output tray extension. NOTE: ● Tray 2 supports only plain paper in A4, Letter, or Legal size. ● Do not load paper while the printer is printing. 1.
Load paper in Tray 2 17 Change or retain the paper settings on the control panel. Load paper in Tray 2 Load a stack of paper into the tray. Make sure the settings match the paper type and size loaded. 7. Open Tray 2. 6. Pull out the output tray extension. NOTE: ● Tray 2 supports only plain paper in A4, Letter, or Legal size. ● Do not load paper while the printer is printing. 1.


