HP Client Manager 6.1
Page 3
... serial number, computer model number, memory size, operating system, CPU identification, and many more secure client infrastructure. BIOS Flash: HPCM can be used to upgrade the BIOS firmware on those client computers that contain hardware supported by HP to ensure that our customers have ...specified, such as new or missing PCs, memory, battery, disk drives, CPUs, and monitors. System software...
... serial number, computer model number, memory size, operating system, CPU identification, and many more secure client infrastructure. BIOS Flash: HPCM can be used to upgrade the BIOS firmware on those client computers that contain hardware supported by HP to ensure that our customers have ...specified, such as new or missing PCs, memory, battery, disk drives, CPUs, and monitors. System software...
Hard Drive White Paper
Page 5
...microsoft.com/default.aspx?scid=kb;EN-US;283080 - HP Recommendations for Notebook Users • Install HP Notebook LidSwitch Policy, or as an alternative, place the notebook into Standby mode before transporting it from one location to another. • Upgrade to the latest system BIOS, as given in the ...for an extended period of time, e.g., when you are working in applications such as a word processor that executes primarily from electronic memory without having to access the hard drive very often. • Perform the Defrag operation periodically to optimize the reading and writing of...
...microsoft.com/default.aspx?scid=kb;EN-US;283080 - HP Recommendations for Notebook Users • Install HP Notebook LidSwitch Policy, or as an alternative, place the notebook into Standby mode before transporting it from one location to another. • Upgrade to the latest system BIOS, as given in the ...for an extended period of time, e.g., when you are working in applications such as a word processor that executes primarily from electronic memory without having to access the hard drive very often. • Perform the Defrag operation periodically to optimize the reading and writing of...
Hardware Guide
Page 6
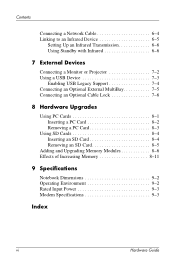
... 7-4 Connecting an Optional External MultiBay 7-5 Connecting an Optional Cable Lock 7-6 8 Hardware Upgrades Using PC Cards 8-1 Inserting a PC Card 8-2 Removing a PC Card 8-3 Using SD Cards 8-4 Inserting an SD Card 8-4 Removing an SD Card 8-5 Adding and Upgrading Memory Modules 8-6 Effects of Increasing Memory 8-11 9 Specifications Notebook Dimensions 9-2 Operating Environment 9-2 Rated Input Power 9-3 Modem Specifications 9-3 Index vi Hardware...
... 7-4 Connecting an Optional External MultiBay 7-5 Connecting an Optional Cable Lock 7-6 8 Hardware Upgrades Using PC Cards 8-1 Inserting a PC Card 8-2 Removing a PC Card 8-3 Using SD Cards 8-4 Inserting an SD Card 8-4 Removing an SD Card 8-5 Adding and Upgrading Memory Modules 8-6 Effects of Increasing Memory 8-11 9 Specifications Notebook Dimensions 9-2 Operating Environment 9-2 Rated Input Power 9-3 Modem Specifications 9-3 Index vi Hardware...
Hardware Guide
Page 92
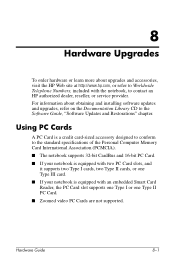
...more about obtaining and installing software updates and upgrades, refer on the Documentation Library CD to contact an HP authorized dealer, reseller, or service provider. For information about upgrades and accessories, visit the HP Web site at http://www.hp.com, or refer to Worldwide Telephone Numbers...-sized accessory designed to conform to the standard specifications of the Personal Computer Memory Card International Association (PCMCIA). ■ The notebook supports 32-bit CardBus and 16-bit PC Card. ■ If your notebook is equipped with two PC Card slots, and it supports two Type ...
...more about obtaining and installing software updates and upgrades, refer on the Documentation Library CD to contact an HP authorized dealer, reseller, or service provider. For information about upgrades and accessories, visit the HP Web site at http://www.hp.com, or refer to Worldwide Telephone Numbers...-sized accessory designed to conform to the standard specifications of the Personal Computer Memory Card International Association (PCMCIA). ■ The notebook supports 32-bit CardBus and 16-bit PC Card. ■ If your notebook is equipped with two PC Card slots, and it supports two Type ...
Hardware Guide
Page 97
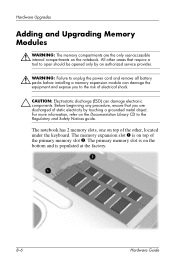
... electrical shock. Ä CAUTION: Electrostatic discharge (ESD) can damage electronic components. The notebook has 2 memory slots, one on top of the primary memory slot 2. The memory expansion slot 1 is populated at the factory. 8-6 Hardware Guide Hardware Upgrades Adding and Upgrading Memory Modules Å WARNING: The memory compartments are discharged of static electricity by an authorized service provider. Å...
... electrical shock. Ä CAUTION: Electrostatic discharge (ESD) can damage electronic components. The notebook has 2 memory slots, one on top of the primary memory slot 2. The memory expansion slot 1 is populated at the factory. 8-6 Hardware Guide Hardware Upgrades Adding and Upgrading Memory Modules Å WARNING: The memory compartments are discharged of static electricity by an authorized service provider. Å...
Hardware Guide
Page 98
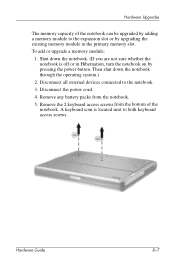
... sure whether the notebook is located next to both keyboard access screws. To add or upgrade a memory module: 1. Disconnect the power cord. 4. A keyboard icon is off or in the primary memory slot. Hardware Guide 8-7 Remove any battery packs from the bottom of the notebook can be upgraded by adding a memory module to the notebook. 3. Hardware Upgrades The memory capacity of...
... sure whether the notebook is located next to both keyboard access screws. To add or upgrade a memory module: 1. Disconnect the power cord. 4. A keyboard icon is off or in the primary memory slot. Hardware Guide 8-7 Remove any battery packs from the bottom of the notebook can be upgraded by adding a memory module to the notebook. 3. Hardware Upgrades The memory capacity of...
Hardware Guide
Page 99
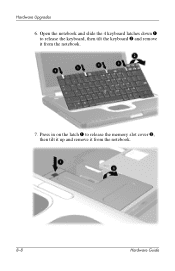
Hardware Upgrades 6. Open the notebook and slide the 4 keyboard latches down 1 to release the memory slot cover 2, then tilt it up and remove it from the notebook. 8-8 Hardware Guide Press in on the latch 1 to release the keyboard, then tilt the keyboard 2 and remove it from the notebook. 7.
Hardware Upgrades 6. Open the notebook and slide the 4 keyboard latches down 1 to release the memory slot cover 2, then tilt it up and remove it from the notebook. 8-8 Hardware Guide Press in on the latch 1 to release the keyboard, then tilt the keyboard 2 and remove it from the notebook. 7.
Hardware Guide
Page 100
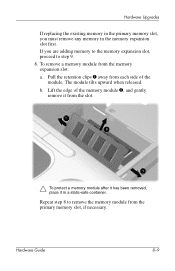
... remove it in a static-safe container. The module tilts upward when released. Hardware Upgrades If replacing the existing memory in the primary memory slot, you are adding memory to the memory expansion slot, proceed to remove the memory module from the memory expansion slot: a. To remove a memory module from the primary memory slot, if necessary. Repeat step 8 to step 9. 8.
... remove it in a static-safe container. The module tilts upward when released. Hardware Upgrades If replacing the existing memory in the primary memory slot, you are adding memory to the memory expansion slot, proceed to remove the memory module from the memory expansion slot: a. To remove a memory module from the primary memory slot, if necessary. Repeat step 8 to step 9. 8.
Hardware Guide
Page 101
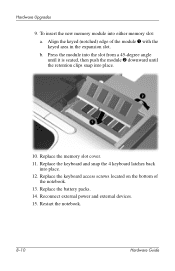
Align the keyed (notched) edge of the notebook. 13. To insert the new memory module into place. 12. b. Replace the battery packs. 14. Reconnect external power and external devices. 15. Replace the keyboard and snap the 4 keyboard latches back into either memory slot: a. Press the module into the slot from a 45-degree angle until... into place. 10. Replace the keyboard access screws located on the bottom of the module 1 with the keyed area in the expansion slot. Restart the notebook. 8-10 Hardware Guide Replace the memory slot cover. 11. Hardware Upgrades 9.
Align the keyed (notched) edge of the notebook. 13. To insert the new memory module into place. 12. b. Replace the battery packs. 14. Reconnect external power and external devices. 15. Replace the keyboard and snap the 4 keyboard latches back into either memory slot: a. Press the module into the slot from a 45-degree angle until... into place. 10. Replace the keyboard access screws located on the bottom of the module 1 with the keyed area in the expansion slot. Restart the notebook. 8-10 Hardware Guide Replace the memory slot cover. 11. Hardware Upgrades 9.
Hardware Guide
Page 102
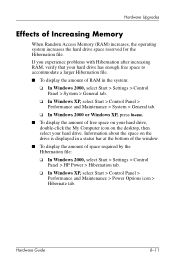
Hardware Upgrades Effects of space required by the Hibernation file: ❏ In Windows 2000, select Start > Settings > Control Panel > HP Power > Hibernation tab. ❏ In Windows XP, select Start > Control Panel > Performance and Maintenance > Power Options icon > Hibernate tab. Information about the space on ... file. ■ To display the amount of RAM in a status bar at the bottom of the window. ■ To display the amount of Increasing Memory When Random Access Memory (RAM) increases, the operating system increases the hard drive space reserved for the Hibernation file.
Hardware Upgrades Effects of space required by the Hibernation file: ❏ In Windows 2000, select Start > Settings > Control Panel > HP Power > Hibernation tab. ❏ In Windows XP, select Start > Control Panel > Performance and Maintenance > Power Options icon > Hibernate tab. Information about the space on ... file. ■ To display the amount of RAM in a status bar at the bottom of the window. ■ To display the amount of Increasing Memory When Random Access Memory (RAM) increases, the operating system increases the hard drive space reserved for the Hibernation file.
Hardware Guide
Page 110
... 1-6, 2-10 Power/Standby 1-6 scroll lock 1-6 Wireless On/Off 1-6 lock, security cable 7-6 low-battery conditions identifying 3-11 resolving 3-12 M media, drive affected by airport security 4-2 memory primary slot 1-5, 8-6 upgrading primary board 8-7 microphone input jack 5-1 microphone jack 1-8 Microsoft logo key 1-4 modem cable 6-1, 6-2 country-specific adapter 6-3 jack 1-9 specifications 9-3 Modem and Networking guide 6-2 Modem Command Guidelines...
... 1-6, 2-10 Power/Standby 1-6 scroll lock 1-6 Wireless On/Off 1-6 lock, security cable 7-6 low-battery conditions identifying 3-11 resolving 3-12 M media, drive affected by airport security 4-2 memory primary slot 1-5, 8-6 upgrading primary board 8-7 microphone input jack 5-1 microphone jack 1-8 Microsoft logo key 1-4 modem cable 6-1, 6-2 country-specific adapter 6-3 jack 1-9 specifications 9-3 Modem and Networking guide 6-2 Modem Command Guidelines...


