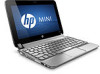
Resolving Start Up and No Boot Problems Checklist
Page 1
... problems when computer does not startup or boot properly. Disconnect the AC power adapter, remove the battery, and then press and hold the power button for at the notebook, contact HP for technical assistance Symptom: LEDs glow, but does not start Count number of a disk drive ... Boot Problems Checklist Print and use recovery disk to recover the computer to help with diagnostics testing Contact HP for technical assistance. Connect a different AC power adapter and remove battery. HP Notebook PCs - If computer does not start If LEDs do not glow when power button is pressed, there is...
... problems when computer does not startup or boot properly. Disconnect the AC power adapter, remove the battery, and then press and hold the power button for at the notebook, contact HP for technical assistance Symptom: LEDs glow, but does not start Count number of a disk drive ... Boot Problems Checklist Print and use recovery disk to recover the computer to help with diagnostics testing Contact HP for technical assistance. Connect a different AC power adapter and remove battery. HP Notebook PCs - If computer does not start If LEDs do not glow when power button is pressed, there is...
Limited warranty and technical support - (1 Year)
Page 3
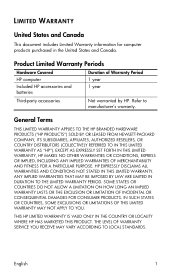
... in the United States and Canada. Product Limited Warranty Periods Hardware Covered HP computer Included HP accessories and batteries Duration of Warranty Period 1 year 1 year Third-party accessories Not warranted by HP. General Terms THIS LIMITED WARRANTY APPLIES TO THE HP BRANDED HARDWARE PRODUCTS ("HP PRODUCTS") SOLD BY OR LEASED FROM HEWLETT-PACKARD COMPANY, ITS SUBSIDIARIES...
... in the United States and Canada. Product Limited Warranty Periods Hardware Covered HP computer Included HP accessories and batteries Duration of Warranty Period 1 year 1 year Third-party accessories Not warranted by HP. General Terms THIS LIMITED WARRANTY APPLIES TO THE HP BRANDED HARDWARE PRODUCTS ("HP PRODUCTS") SOLD BY OR LEASED FROM HEWLETT-PACKARD COMPANY, ITS SUBSIDIARIES...
Limited warranty and technical support - (1 Year)
Page 4
...component or hardware product that manifests a defect in materials and workmanship under this document if a repair to which they are free from HP. HP will, at its discretion, may be required to new. All component parts or hardware products removed under normal use during the Limited Warranty...a refund of the spare part, whichever is your exclusive remedies for the HP Product do not inherit the remaining service period of the purchase or lease date. Rechargeable batteries are your proof of the HP Product to your purchase price or lease payments (less interest) instead of ...
...component or hardware product that manifests a defect in materials and workmanship under this document if a repair to which they are free from HP. HP will, at its discretion, may be required to new. All component parts or hardware products removed under normal use during the Limited Warranty...a refund of the spare part, whichever is your exclusive remedies for the HP Product do not inherit the remaining service period of the purchase or lease date. Rechargeable batteries are your proof of the HP Product to your purchase price or lease payments (less interest) instead of ...
Limited warranty and technical support - (1 Year)
Page 5
... it is not warranted and will be required to you by HP or an agent or employee of HP-that may be uninterrupted or error-free. Your battery is not responsible for your product in battery capacity. HP is only warranted from which the serial number has been removed ... your purchase or lease of enduser replaceable HP or HP approved parts, if available for damage that came with all batteries, the maximum capacity of HP. English 3 As with the HP Product. The battery warranty does not cover changes in the servicing country. Battery life is made in connection with your ...
... it is not warranted and will be required to you by HP or an agent or employee of HP-that may be uninterrupted or error-free. Your battery is not responsible for your product in battery capacity. HP is only warranted from which the serial number has been removed ... your purchase or lease of enduser replaceable HP or HP approved parts, if available for damage that came with all batteries, the maximum capacity of HP. English 3 As with the HP Product. The battery warranty does not cover changes in the servicing country. Battery life is made in connection with your ...
Getting Started - Windows 7
Page 6
... and off 32 Navigating ...33 Selecting ...33 Using TouchPad gestures 33 Scrolling 35 Pinching/Zooming 35 Rotating 36 6 Maintenance ...37 Replacing the battery ...38 Inserting the battery ...38 Removing the battery ...39 Removing or replacing the vanity cover 40 Removing the vanity cover 40 Replacing the vanity cover 40 Replacing the hard drive...
... and off 32 Navigating ...33 Selecting ...33 Using TouchPad gestures 33 Scrolling 35 Pinching/Zooming 35 Rotating 36 6 Maintenance ...37 Replacing the battery ...38 Inserting the battery ...38 Removing the battery ...39 Removing or replacing the vanity cover 40 Removing the vanity cover 40 Replacing the vanity cover 40 Replacing the hard drive...
Getting Started - Windows 7
Page 10
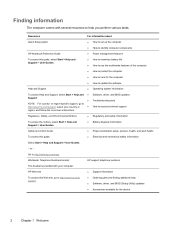
... set up the computer ● Help to identify computer components HP Notebook Reference Guide ● Power management features To access this guide, select Start > Help and Support > User Guides. ● How to maximize battery life ● How to use the multimedia features of the ... Environmental Notices ● Regulatory and safety information To access the notices, select Start > Help and Support > User Guides. ● Battery disposal information Safety & Comfort Guide ● Proper workstation setup, posture, health, and work habits To access this Web site, go to http://...
... set up the computer ● Help to identify computer components HP Notebook Reference Guide ● Power management features To access this guide, select Start > Help and Support > User Guides. ● How to maximize battery life ● How to use the multimedia features of the ... Environmental Notices ● Regulatory and safety information To access the notices, select Start > Help and Support > User Guides. ● Battery disposal information Safety & Comfort Guide ● Proper workstation setup, posture, health, and work habits To access this Web site, go to http://...
Getting Started - Windows 7
Page 19
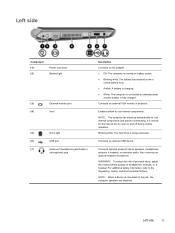
... hard drive is being accessed. Left side 11 NOTE: When a device is connected to external power and the battery is fully charged. Left side Component (1) (2) Power connector Battery light (3) External monitor port (4) Vent (5) Drive light (6) USB port (7) Audio-out (headphone) jack/Audio...microphone) jack Description Connects an AC adapter. ● Off: The computer is running on battery power. ● Blinking white: The battery has reached a low or critical battery level. ● Amber: A battery is charging. ● White: The computer is connected to the jack, the computer ...
... hard drive is being accessed. Left side 11 NOTE: When a device is connected to external power and the battery is fully charged. Left side Component (1) (2) Power connector Battery light (3) External monitor port (4) Vent (5) Drive light (6) USB port (7) Audio-out (headphone) jack/Audio...microphone) jack Description Connects an AC adapter. ● Off: The computer is running on battery power. ● Blinking white: The battery has reached a low or critical battery level. ● Amber: A battery is charging. ● White: The computer is connected to the jack, the computer ...

Getting Started - Windows 7
Page 21
Holds the battery. Bottom 13 Releases the battery from the battery bay. Bottom Component (1) Battery locking latch (2) Battery bay (3) Battery release latch Description Locks the battery into the battery bay.
Holds the battery. Bottom 13 Releases the battery from the battery bay. Bottom Component (1) Battery locking latch (2) Battery bay (3) Battery release latch Description Locks the battery into the battery bay.

Getting Started - Windows 7
Page 27
The state of charge is running on battery power, the icon appears as only a battery. Icon Function Launches the Power Control dialog box to see information about battery capacity: ● When the computer is connected to AC power, the icon appears with an AC power cord. ● When the computer is indicated by the color of the battery icon: ● Green: charged ● Yellow: low ● Red: critically low Launches the QuickWeb software Help. Identifying the QuickWeb LaunchBar 19
The state of charge is running on battery power, the icon appears as only a battery. Icon Function Launches the Power Control dialog box to see information about battery capacity: ● When the computer is connected to AC power, the icon appears with an AC power cord. ● When the computer is indicated by the color of the battery icon: ● Green: charged ● Yellow: low ● Red: critically low Launches the QuickWeb software Help. Identifying the QuickWeb LaunchBar 19
Getting Started - Windows 7
Page 45
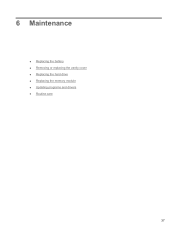
6 Maintenance ● Replacing the battery ● Removing or replacing the vanity cover ● Replacing the hard drive ● Replacing the memory module ● Updating programs and drivers ● Routine care 37
6 Maintenance ● Replacing the battery ● Removing or replacing the vanity cover ● Replacing the hard drive ● Replacing the memory module ● Updating programs and drivers ● Routine care 37

Getting Started - Windows 7
Page 46
Disconnect all external devices connected to lock the battery into the battery bay until the battery release latch (2) clicks. 6. Insert the battery (1) into the battery bay. 38 Chapter 6 Maintenance With the display closed, position the computer upside down the computer. 2. Slide the battery locking latch (3) to the right to the computer. 3. Unplug the power cord from the AC outlet. 4. Replacing the battery Inserting the battery To insert the battery: 1. Save your work and shut down on a flat surface with the battery bay toward you. 5.
Disconnect all external devices connected to lock the battery into the battery bay until the battery release latch (2) clicks. 6. Insert the battery (1) into the battery bay. 38 Chapter 6 Maintenance With the display closed, position the computer upside down the computer. 2. Slide the battery locking latch (3) to the right to the computer. 3. Unplug the power cord from the AC outlet. 4. Replacing the battery Inserting the battery To insert the battery: 1. Save your work and shut down on a flat surface with the battery bay toward you. 5.

Getting Started - Windows 7
Page 47
... for the computer can cause loss of information, save your work and initiate Hibernation or shut down the computer through Windows before removing the battery. 1. Removing the battery To remove the battery: CAUTION: Removing a battery that is unlocked by the red icon that appears in the latch. 6. To prevent loss of information. Slide the...
... for the computer can cause loss of information, save your work and initiate Hibernation or shut down the computer through Windows before removing the battery. 1. Removing the battery To remove the battery: CAUTION: Removing a battery that is unlocked by the red icon that appears in the latch. 6. To prevent loss of information. Slide the...

Getting Started - Windows 7
Page 48
To remove the vanity cover: 1. Remove the battery (1) (see Removing the battery on the front edge of the vanity cover into place. 40 Chapter 6 Maintenance Replacing the vanity cover Replace the vanity cover after accessing the memory ...
To remove the vanity cover: 1. Remove the battery (1) (see Removing the battery on the front edge of the vanity cover into place. 40 Chapter 6 Maintenance Replacing the vanity cover Replace the vanity cover after accessing the memory ...

Getting Started - Windows 7
Page 49
Insert the battery (3) (see Inserting the battery on page 38). 3. Removing or replacing the vanity cover 41
Insert the battery (3) (see Inserting the battery on page 38). 3. Removing or replacing the vanity cover 41
Getting Started - Windows 7
Page 50
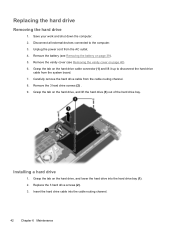
.... 3. Replacing the hard drive Removing the hard drive 1. Unplug the power cord from the cable routing channel. 8. Remove the vanity cover (see Removing the battery on page 40). 6. Remove the 3 hard drive screws (2) . 9. Replace the 3 hard drive screws (2). 3. Carefully remove the hard drive cable from the... AC outlet. 4. Save your work and shut down the computer. 2. Remove the battery (see Removing the vanity cover on page 39). 5. Grasp the tab on the hard drive, and lift the hard drive (3) out of the hard ...
.... 3. Replacing the hard drive Removing the hard drive 1. Unplug the power cord from the cable routing channel. 8. Remove the vanity cover (see Removing the battery on page 40). 6. Remove the 3 hard drive screws (2) . 9. Replace the 3 hard drive screws (2). 3. Carefully remove the hard drive cable from the... AC outlet. 4. Save your work and shut down the computer. 2. Remove the battery (see Removing the vanity cover on page 39). 5. Grasp the tab on the hard drive, and lift the hard drive (3) out of the hard ...

Getting Started - Windows 7
Page 51
Replace the battery (see Replacing the vanity cover on the computer. Grasp the tab on page 38). 7. Reconnect external power and external devices. 8. Turn on page 40). 6. Replace the vanity cover (see Inserting the battery on the hard drive cable connector (3), and then carefully press the hard drive cable connector onto the system board until it snaps into place. 5. 4. Replacing the hard drive 43
Replace the battery (see Replacing the vanity cover on the computer. Grasp the tab on page 38). 7. Reconnect external power and external devices. 8. Turn on page 40). 6. Replace the vanity cover (see Inserting the battery on the hard drive cable connector (3), and then carefully press the hard drive cable connector onto the system board until it snaps into place. 5. 4. Replacing the hard drive 43

Getting Started - Windows 7
Page 52
... electricity by touching a grounded metal object. Remove the vanity cover (see Removing the battery on page 40). 3. CAUTION: To prevent damage to the equipment, unplug the power cord and remove all batteries before installing a memory module. Insert a new memory module: 44 Chapter 6 Maintenance Before... slot. The capacity of the memory module slot. WARNING! Do not touch the components on each side of the memory module. Remove the battery (see Removing the vanity cover on page 39). 2. c. CAUTION: Electrostatic discharge (ESD) can be upgraded by the edges only. To replace...
... electricity by touching a grounded metal object. Remove the vanity cover (see Removing the battery on page 40). 3. CAUTION: To prevent damage to the equipment, unplug the power cord and remove all batteries before installing a memory module. Insert a new memory module: 44 Chapter 6 Maintenance Before... slot. The capacity of the memory module slot. WARNING! Do not touch the components on each side of the memory module. Remove the battery (see Removing the vanity cover on page 39). 2. c. CAUTION: Electrostatic discharge (ESD) can be upgraded by the edges only. To replace...

Getting Started - Windows 7
Page 53
..., be sure that you do not bend the memory module. 5. Do not touch the components on the computer. a. Replacing the memory module 45 Replace the battery (see Replacing the vanity cover on page 38). 7. b. c. Replace the vanity cover (see Inserting the...
..., be sure that you do not bend the memory module. 5. Do not touch the components on the computer. a. Replacing the memory module 45 Replace the battery (see Replacing the vanity cover on page 38). 7. b. c. Replace the vanity cover (see Inserting the...

Getting Started - Windows 7
Page 62
... the bottom of the countries or regions in which the devices have been approved for use. The regulatory label is located inside the battery bay. 54 Chapter 8 Customer support Wireless certification labels are included with the computer: ● Serial number label-Provides important information, ...the computer. ● SIM (subscriber identity module) label (select models only)-Provides the ICCID (Integrated Circuit Card Identifier) of the HP Mobile Broadband Module. You may need the Product Key to update or troubleshoot the operating system. If your computer. The serial number...
... the bottom of the countries or regions in which the devices have been approved for use. The regulatory label is located inside the battery bay. 54 Chapter 8 Customer support Wireless certification labels are included with the computer: ● Serial number label-Provides important information, ...the computer. ● SIM (subscriber identity module) label (select models only)-Provides the ICCID (Integrated Circuit Card Identifier) of the HP Mobile Broadband Module. You may need the Product Key to update or troubleshoot the operating system. If your computer. The serial number...
Getting Started - Windows 7
Page 64
... be found on DC power within the following specifications. The computer operates on DC power, which can operate on the system regulatory label inside the battery bay of the computer. 56 Chapter 9 Specifications The AC power source must be helpful if you plan to -phase voltage not exceeding 240 V ... Norway with phase-to travel internationally with this section may be rated at 100-240 V, 50-60 Hz. Although the computer can be supplied by HP for IT power systems in this computer. Input power Operating voltage and current Rating 19.5 V dc @ 2.05 A - 40W NOTE: This product is ...
... be found on DC power within the following specifications. The computer operates on DC power, which can operate on the system regulatory label inside the battery bay of the computer. 56 Chapter 9 Specifications The AC power source must be helpful if you plan to -phase voltage not exceeding 240 V ... Norway with phase-to travel internationally with this section may be rated at 100-240 V, 50-60 Hz. Although the computer can be supplied by HP for IT power systems in this computer. Input power Operating voltage and current Rating 19.5 V dc @ 2.05 A - 40W NOTE: This product is ...


