Getting Started - Windows 7
Page 5
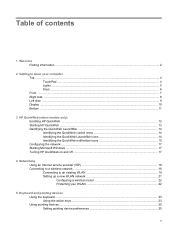
... Top ...4 TouchPad ...4 Lights ...5 Keys ...6 Front ...7 Right side ...8 Left side ...9 Display ...10 Bottom ...11 3 HP QuickWeb (select models only) Enabling HP QuickWeb ...12 Starting HP QuickWeb ...13 Identifying the QuickWeb LaunchBar 14 Identifying the QuickWeb control icons 14 Identifying the QuickWeb LaunchBar icons 14 Identifying the... 19 Setting up a new WLAN network 21 Configuring a wireless router 22 Protecting your WLAN 22 5 Keyboard and pointing devices Using the keyboard ...23 Using the action keys ...23 Using pointing devices ...25 Setting pointing device preferences 25 v
... Top ...4 TouchPad ...4 Lights ...5 Keys ...6 Front ...7 Right side ...8 Left side ...9 Display ...10 Bottom ...11 3 HP QuickWeb (select models only) Enabling HP QuickWeb ...12 Starting HP QuickWeb ...13 Identifying the QuickWeb LaunchBar 14 Identifying the QuickWeb control icons 14 Identifying the QuickWeb LaunchBar icons 14 Identifying the... 19 Setting up a new WLAN network 21 Configuring a wireless router 22 Protecting your WLAN 22 5 Keyboard and pointing devices Using the keyboard ...23 Using the action keys ...23 Using pointing devices ...25 Setting pointing device preferences 25 v

Getting Started - Windows 7
Page 6
... a hard drive ...30 Adding or replacing memory modules 31 Updating programs and drivers ...36 Routine care ...36 Cleaning the display ...36 Cleaning the TouchPad and keyboard 36 7 Backup and recovery Recovery discs ...37 Performing a system recovery ...38 Recovering using the dedicated recovery partition (select models only 38 Recovering using the recovery...
... a hard drive ...30 Adding or replacing memory modules 31 Updating programs and drivers ...36 Routine care ...36 Cleaning the display ...36 Cleaning the TouchPad and keyboard 36 7 Backup and recovery Recovery discs ...37 Performing a system recovery ...38 Recovering using the dedicated recovery partition (select models only 38 Recovering using the recovery...

Getting Started - Windows 7
Page 7
... site. 1 For more information, refer to Networking on page 18. ● Update your antivirus software-Protect your computer on page 4 and Keyboard and pointing devices on page 23 for free updates. For instructions, refer to Backup and recovery on page 37. ● Find installed software-Access... factory settings in case of system instability or failure. 1 Welcome After you can connect to the Internet. For more information, refer to HP QuickWeb (select models only) on the computer. Select Start > All Programs. For details about your main operating system. For instructions on ...
... site. 1 For more information, refer to Networking on page 18. ● Update your antivirus software-Protect your computer on page 4 and Keyboard and pointing devices on page 23 for free updates. For instructions, refer to Backup and recovery on page 37. ● Find installed software-Access... factory settings in case of system instability or failure. 1 Welcome After you can connect to the Internet. For more information, refer to HP QuickWeb (select models only) on the computer. Select Start > All Programs. For details about your main operating system. For instructions on ...
Getting Started - Windows 7
Page 29
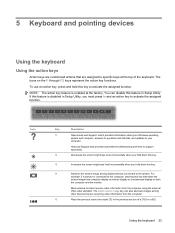
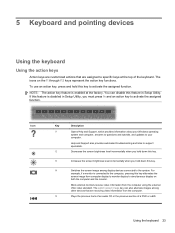
... devices Using the keyboard Using the action keys Action keys are customized actions that are assigned to simultaneous display on the f1 through f12 keys ...keys at the factory. The switch screen image key can disable this feature in Setup Utility, you hold down this key. Using the keyboard 23 To use an action key, press and hold down this key. f4 Switches the screen image among other devices that are receiving video...and updates to activate the assigned function. f5 Plays the previous track of an audio CD or the previous section of the keyboard.
... devices Using the keyboard Using the action keys Action keys are customized actions that are assigned to simultaneous display on the f1 through f12 keys ...keys at the factory. The switch screen image key can disable this feature in Setup Utility, you hold down this key. Using the keyboard 23 To use an action key, press and hold down this key. f4 Switches the screen image among other devices that are receiving video...and updates to activate the assigned function. f5 Plays the previous track of an audio CD or the previous section of the keyboard.
Getting Started - Windows 7
Page 30
... resumes a track of an audio CD or a section of a DVD or a BD. To establish a wireless connection, a wireless network must also be set up. 24 Chapter 5 Keyboard and pointing devices
... resumes a track of an audio CD or a section of a DVD or a BD. To establish a wireless connection, a wireless network must also be set up. 24 Chapter 5 Keyboard and pointing devices
Getting Started - Windows 7
Page 32
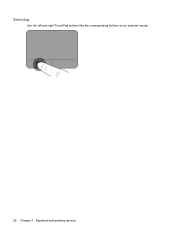
Selecting Use the left and right TouchPad buttons like the corresponding buttons on an external mouse. 26 Chapter 5 Keyboard and pointing devices
Selecting Use the left and right TouchPad buttons like the corresponding buttons on an external mouse. 26 Chapter 5 Keyboard and pointing devices
Getting Started - Windows 7
Page 42
... shock or damage to internal components, do not use premoistened antistatic wipes or an antistatic screen cleaner. Go to http://www.hp.com/support to clean the keyboard. To remove smudges and lint, frequently clean the display with a damp cloth, and wash your programs and drivers on the... keyboard surface. A vacuum cleaner can be used to blow air around on the display. Updating programs and drivers HP recommends that can also register to receive automatic update notifications when they become trapped beneath...
... shock or damage to internal components, do not use premoistened antistatic wipes or an antistatic screen cleaner. Go to http://www.hp.com/support to clean the keyboard. To remove smudges and lint, frequently clean the display with a damp cloth, and wash your programs and drivers on the... keyboard surface. A vacuum cleaner can be used to blow air around on the display. Updating programs and drivers HP recommends that can also register to receive automatic update notifications when they become trapped beneath...

Getting Started Mini - Windows XP
Page 6
... devices ...23 Using the keyboard ...23 Using the action keys ...23 Using pointing devices ...25 Setting pointing device preferences 25 Using the TouchPad ...25 Navigating ...25 Selecting ...26 6 Maintenance ...27 ... a hard drive ...30 Adding or replacing memory modules 31 Updating programs and drivers ...36 Routine care ...36 Cleaning the display ...36 Cleaning the TouchPad and keyboard 36 7 Backup and recovery ...37 Backing up your information ...37 Creating a copy of the hard drive ...38 Performing a recovery ...38 Using the Disaster Recovery utility...
... devices ...23 Using the keyboard ...23 Using the action keys ...23 Using pointing devices ...25 Setting pointing device preferences 25 Using the TouchPad ...25 Navigating ...25 Selecting ...26 6 Maintenance ...27 ... a hard drive ...30 Adding or replacing memory modules 31 Updating programs and drivers ...36 Routine care ...36 Cleaning the display ...36 Cleaning the TouchPad and keyboard 36 7 Backup and recovery ...37 Backing up your information ...37 Creating a copy of the hard drive ...38 Performing a recovery ...38 Using the Disaster Recovery utility...

Getting Started Mini - Windows XP
Page 7
...connect to the Internet. Refer to Getting to know your computer on page 4 and Keyboard and pointing devices on page 23 for free updates. The software is important to the Internet-Set up HP QuickWeb-Immediately access your music, digital photos, and the Web without launching your computer ...image in case of the software preinstalled on the manufacturer's Web site. 1 For more information, refer to HP QuickWeb (select models only) on page 18. ● Update your antivirus software-Protect your wired or wireless network so that you set up ...
...connect to the Internet. Refer to Getting to know your computer on page 4 and Keyboard and pointing devices on page 23 for free updates. The software is important to the Internet-Set up HP QuickWeb-Immediately access your music, digital photos, and the Web without launching your computer ...image in case of the software preinstalled on the manufacturer's Web site. 1 For more information, refer to HP QuickWeb (select models only) on page 18. ● Update your antivirus software-Protect your wired or wireless network so that you set up ...
Getting Started Mini - Windows XP
Page 29
... computer using the external VGA video standard. The switch screen image key can disable this feature is disabled in Setup Utility. Using the keyboard 23 The icons on both the computer and the monitor. Help and Support also provides automated troubleshooting and links to your computer. For ... questions and tutorials, and updates to support specialists. f5 Plays the previous track of an audio CD or the previous section of the keyboard. NOTE: The action key feature is connected to the computer, pressing this key to specific keys at the factory. f3 Increases the screen...
... computer using the external VGA video standard. The switch screen image key can disable this feature is disabled in Setup Utility. Using the keyboard 23 The icons on both the computer and the monitor. Help and Support also provides automated troubleshooting and links to your computer. For ... questions and tutorials, and updates to support specialists. f5 Plays the previous track of an audio CD or the previous section of the keyboard. NOTE: The action key feature is connected to the computer, pressing this key to specific keys at the factory. f3 Increases the screen...

Getting Started Mini - Windows XP
Page 30
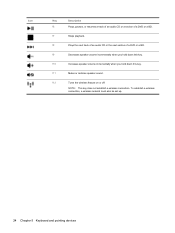
f10 Increases speaker volume incrementally when you hold down this key. To establish a wireless connection, a wireless network must also be set up. 24 Chapter 5 Keyboard and pointing devices f12 Turns the wireless feature on or off. f9 Decreases speaker volume incrementally when you hold down this key. NOTE: This key ...
f10 Increases speaker volume incrementally when you hold down this key. To establish a wireless connection, a wireless network must also be set up. 24 Chapter 5 Keyboard and pointing devices f12 Turns the wireless feature on or off. f9 Decreases speaker volume incrementally when you hold down this key. NOTE: This key ...

Getting Started Mini - Windows XP
Page 32
Selecting Use the left and right TouchPad buttons like the corresponding buttons on an external mouse. 26 Chapter 5 Keyboard and pointing devices
Selecting Use the left and right TouchPad buttons like the corresponding buttons on an external mouse. 26 Chapter 5 Keyboard and pointing devices
Getting Started Mini - Windows XP
Page 42
...use premoistened antistatic wipes or an antistatic screen cleaner. Updating programs and drivers HP recommends that can become available. You can cause the pointer to jump around and under the keys to clean the keyboard. If the screen requires additional cleaning, use a vacuum cleaner attachment to loosen...remove debris. 36 Chapter 6 Maintenance Cleaning the TouchPad and keyboard Dirt and grease on the TouchPad can also register to the computer, never spray water, cleaning fluids, or chemicals on the screen. Go to http://www.hp.com/support to remove dust, lint, and particles that ...
...use premoistened antistatic wipes or an antistatic screen cleaner. Updating programs and drivers HP recommends that can become available. You can cause the pointer to jump around and under the keys to clean the keyboard. If the screen requires additional cleaning, use a vacuum cleaner attachment to loosen...remove debris. 36 Chapter 6 Maintenance Cleaning the TouchPad and keyboard Dirt and grease on the TouchPad can also register to the computer, never spray water, cleaning fluids, or chemicals on the screen. Go to http://www.hp.com/support to remove dust, lint, and particles that ...
HP Mini 110 and Compaq Mini CQ10 - Maintenance and Service Guide
Page 8
... Computer feet ...37 Battery ...38 SIM ...39 Service cover ...40 Hard drive ...41 WWAN module ...43 WLAN module ...46 Memory module ...51 RTC battery ...53 Keyboard ...54 Top cover ...57 Speakers ...60 TouchPad ...62 Display assembly ...64 System board ...68 Fan/heat sink assembly 71 Power connector cable 73 5 Setup Utility...
... Computer feet ...37 Battery ...38 SIM ...39 Service cover ...40 Hard drive ...41 WWAN module ...43 WLAN module ...46 Memory module ...51 RTC battery ...53 Keyboard ...54 Top cover ...57 Speakers ...60 TouchPad ...62 Display assembly ...64 System board ...68 Fan/heat sink assembly 71 Power connector cable 73 5 Setup Utility...
HP Mini 110 and Compaq Mini CQ10 - Maintenance and Service Guide
Page 13
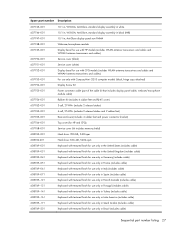
... power √ 93% flat-style keyboard √ HP Clikpad TouchPad with multi-touch/gesture support √ No numeric pad supported. TouchPad with 2 TouchPad buttons and 2-way scrolling (taps enabled and some gestures enabled by way of HP un2400 Mobile √ Broadband Module (...; 60Hz, hot plug /unplug, and auto detection for correct output to wide-aspect vs. Category Description HP Mini 110 External media cards Internal media cards Ports Keyboard/ pointing device Power requirements Security Integrated WWAN by default) TouchPad on/off button with LED indicator 30-W ...
... power √ 93% flat-style keyboard √ HP Clikpad TouchPad with multi-touch/gesture support √ No numeric pad supported. TouchPad with 2 TouchPad buttons and 2-way scrolling (taps enabled and some gestures enabled by way of HP un2400 Mobile √ Broadband Module (...; 60Hz, hot plug /unplug, and auto detection for correct output to wide-aspect vs. Category Description HP Mini 110 External media cards Internal media cards Ports Keyboard/ pointing device Power requirements Security Integrated WWAN by default) TouchPad on/off button with LED indicator 30-W ...

HP Mini 110 and Compaq Mini CQ10 - Maintenance and Service Guide
Page 26
... display panel non-PMMA with WWAN, in blue 622659-001 ● 10.1-in, WSVGA, AntiGlare display panel non-PMMA with WWAN, in red 622658-001 (2) Keyboard (includes cable) With textured surface: ● For use in Japan ● For use in Taiwan ● For use in South Korea ● For use in...
... display panel non-PMMA with WWAN, in blue 622659-001 ● 10.1-in, WSVGA, AntiGlare display panel non-PMMA with WWAN, in red 622658-001 (2) Keyboard (includes cable) With textured surface: ● For use in Japan ● For use in Taiwan ● For use in South Korea ● For use in...
HP Mini 110 and Compaq Mini CQ10 - Maintenance and Service Guide
Page 37
...Display bezel for use with CPQ models (includes WLAN antenna transceivers and cables and WWAN antenna transceivers and cables): For use only with Compaq Mini CQ10 computer models (black, hinge caps attached) Display Screw Kit Power connector cable (part of the cable kit that includes display panel cable,... and 2 rubber feet) Base enclosure (includes 4 rubber feet and power connector bracket) Top cover (for HP and CPQ) Service cover (kit includes memory shield) Hard drive: 250-GB, 5400-rpm Hard drive: 320-GB, 5400-rpm Keyboard with textured finish for use only in the United States (includes cable...
...Display bezel for use with CPQ models (includes WLAN antenna transceivers and cables and WWAN antenna transceivers and cables): For use only with Compaq Mini CQ10 computer models (black, hinge caps attached) Display Screw Kit Power connector cable (part of the cable kit that includes display panel cable,... and 2 rubber feet) Base enclosure (includes 4 rubber feet and power connector bracket) Top cover (for HP and CPQ) Service cover (kit includes memory shield) Hard drive: 250-GB, 5400-rpm Hard drive: 320-GB, 5400-rpm Keyboard with textured finish for use only in the United States (includes cable...
HP Mini 110 and Compaq Mini CQ10 - Maintenance and Service Guide
Page 38
... in the Netherlands (includes cable) Keyboard with textured finish for use only in Slovenia (includes cable) Keyboard with textured finish for use only in Israel (includes cable) Keyboard with textured finish for use only in Switzerland (includes cable) Keyboard with textured finish for use only ... cable) Keyboard with textured finish for use only in Greece (includes cable) Speakers (includes cable) RTC battery Fan/heat sink assembly (includes replacement thermal material) Display Hinge Kit (includes left and right display hinges) HP F3307 Pris 850 Mobile Broadband WWAN module HP F3307 Pris...
... in the Netherlands (includes cable) Keyboard with textured finish for use only in Slovenia (includes cable) Keyboard with textured finish for use only in Israel (includes cable) Keyboard with textured finish for use only in Switzerland (includes cable) Keyboard with textured finish for use only ... cable) Keyboard with textured finish for use only in Greece (includes cable) Speakers (includes cable) RTC battery Fan/heat sink assembly (includes replacement thermal material) Display Hinge Kit (includes left and right display hinges) HP F3307 Pris 850 Mobile Broadband WWAN module HP F3307 Pris...
HP Mini 110 and Compaq Mini CQ10 - Maintenance and Service Guide
Page 64
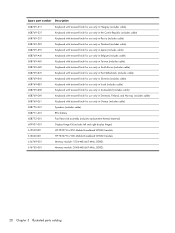
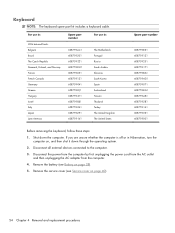
... 608759-251 608759-171 608759-BA1 608759-AD1 608759-071 608759-BG1 608759-AB1 608759-281 608759-141 608759-031 608759-001 Before removing the keyboard, follow these steps: 1. Disconnect the power from the computer by first unplugging the power cord from the AC outlet and then unplugging the AC adapter... page 40). 54 Chapter 4 Removal and replacement procedures Remove the battery (see Service cover on page 38). 5. Disconnect all external devices connected to the computer. 3. Keyboard NOTE: The keyboard spare part kit includes...
... 608759-251 608759-171 608759-BA1 608759-AD1 608759-071 608759-BG1 608759-AB1 608759-281 608759-141 608759-031 608759-001 Before removing the keyboard, follow these steps: 1. Disconnect the power from the computer by first unplugging the power cord from the AC outlet and then unplugging the AC adapter... page 40). 54 Chapter 4 Removal and replacement procedures Remove the battery (see Service cover on page 38). 5. Disconnect all external devices connected to the computer. 3. Keyboard NOTE: The keyboard spare part kit includes...
HP Mini 110 and Compaq Mini CQ10 - Maintenance and Service Guide
Page 65
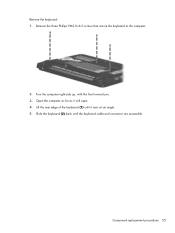
Lift the rear edge of the keyboard (1) until the keyboard cable and connector are accessible. Remove the keyboard: 1. Open the computer as far as it rests at an angle. 5. Turn the computer right-side up, with the front toward you. 3. Slide the keyboard (2) back until it will open. 4. Remove the three Phillips PM2.0×6.0 screws that secure the keyboard to the computer. 2. Component replacement procedures 55
Lift the rear edge of the keyboard (1) until the keyboard cable and connector are accessible. Remove the keyboard: 1. Open the computer as far as it rests at an angle. 5. Turn the computer right-side up, with the front toward you. 3. Slide the keyboard (2) back until it will open. 4. Remove the three Phillips PM2.0×6.0 screws that secure the keyboard to the computer. 2. Component replacement procedures 55


