Getting Started Guide
Page 219
...off feature 126 disconnecting the drive 130 inserting a drive 127 location and drive letter 129 HP Photosmart Essential 103 HP Pocket Media Drive 125 HP Total Care Advisor 41 I IBM Microdrive 122 Internet security 52, 100 K keyboard connector...card types 119 in-use light 123 troubleshooting 124 using 119 memory card, formatting 123 Memory Stick (MS) 121 Memory Stick (MS-Duo) 121 Memory Stick (MS-Pro Duo) 121 Memory Stick (MS-Pro) 121 Microdrive disk drive 121 microphone ... 198 selecting style 199 setting the duration of video 200 upgrading 206 using the magicMoments feature 197 Index 209
...off feature 126 disconnecting the drive 130 inserting a drive 127 location and drive letter 129 HP Photosmart Essential 103 HP Pocket Media Drive 125 HP Total Care Advisor 41 I IBM Microdrive 122 Internet security 52, 100 K keyboard connector...card types 119 in-use light 123 troubleshooting 124 using 119 memory card, formatting 123 Memory Stick (MS) 121 Memory Stick (MS-Duo) 121 Memory Stick (MS-Pro Duo) 121 Memory Stick (MS-Pro) 121 Microdrive disk drive 121 microphone ... 198 selecting style 199 setting the duration of video 200 upgrading 206 using the magicMoments feature 197 Index 209
PC Troubleshooting
Page 22
... do not require the maximum processing power. 18 Troubleshooting and Maintenance Guide For instructions, refer to the Upgrading and Servicing Guide. For instructions, refer to the Upgrading and Servicing Guide. Before replacing the battery, try resetting the date and time in , and turn off... shuts down . See "Display (Monitor)" on . Incompatible memory (RAM) may not have been installed. Reinstall the old memory to return your country/region, or refer to the Limited Warranty and Support Guide to the Upgrading and Servicing Guide. For instructions, refer to contact Support. ...
... do not require the maximum processing power. 18 Troubleshooting and Maintenance Guide For instructions, refer to the Upgrading and Servicing Guide. For instructions, refer to the Upgrading and Servicing Guide. Before replacing the battery, try resetting the date and time in , and turn off... shuts down . See "Display (Monitor)" on . Incompatible memory (RAM) may not have been installed. Reinstall the old memory to return your country/region, or refer to the Limited Warranty and Support Guide to the Upgrading and Servicing Guide. For instructions, refer to contact Support. ...
Upgrading and Servicing Guide
Page 3
... or Adding an Optical Drive 5 Removing a Memory Card Reader 5 Installing a Memory Card Reader 6 Removing a Hard Disk Drive 6 Replacing a Hard Disk Drive 8 Adding an Additional Hard Disk Drive 9 Adding Memory 11 Removing a Memory Module 11 Installing a Memory Module 12 Removing or Installing an Add-in ...Card 12 Removing an Add-in Card 12 Installing an Add-in Card 13 Replacing the Battery 14 Upgrading and Servicing Guide iii
... or Adding an Optical Drive 5 Removing a Memory Card Reader 5 Installing a Memory Card Reader 6 Removing a Hard Disk Drive 6 Replacing a Hard Disk Drive 8 Adding an Additional Hard Disk Drive 9 Adding Memory 11 Removing a Memory Module 11 Installing a Memory Module 12 Removing or Installing an Add-in ...Card 12 Removing an Add-in Card 12 Installing an Add-in Card 13 Replacing the Battery 14 Upgrading and Servicing Guide iii
Upgrading and Servicing Guide
Page 7
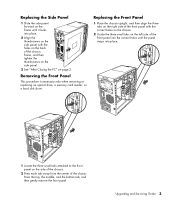
...Front Panel This procedure is necessary only when removing or replacing an optical drive, a memory card reader, or a hard disk drive. Replacing the Front Panel 1 Place the ... See "After Closing the PC" on the side of the chassis. 2 Press each tab away from the center of the front panel into the correct holes until the panel snaps into place. 1 Locate the three small tabs... page 2. Press the top, the middle, and the bottom tab, and then gently remove the front panel. Upgrading and Servicing Guide 3 Replacing the Side Panel 1 Slide the side panel forward on the frame until it locks into...
...Front Panel This procedure is necessary only when removing or replacing an optical drive, a memory card reader, or a hard disk drive. Replacing the Front Panel 1 Place the ... See "After Closing the PC" on the side of the chassis. 2 Press each tab away from the center of the front panel into the correct holes until the panel snaps into place. 1 Locate the three small tabs... page 2. Press the top, the middle, and the bottom tab, and then gently remove the front panel. Upgrading and Servicing Guide 3 Replacing the Side Panel 1 Slide the side panel forward on the frame until it locks into...

Upgrading and Servicing Guide
Page 8
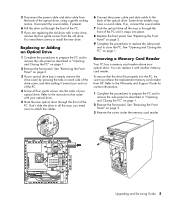
...drives that is a removable, large capacity hard disk drive that you want to remove. Locating Components Inside the PC A Memory card reader B Upper optical drive bay, may be a CD-ROM, CD-RW, DVD-ROM, DVD+RW, or ...-ROM, CD-RW, DVD-ROM, DVD+RW, or combination drive D Hard disk drive (located behind the HP Personal Media Drive bay) E HP Personal Media Drive bay Removing an Optical Drive 1 Complete the procedures to prepare the PC and to an empty lower optical... of the optical drive you want to replace before removing the cables. 4 Upgrading and Servicing Guide You can replace or...
...drives that is a removable, large capacity hard disk drive that you want to remove. Locating Components Inside the PC A Memory card reader B Upper optical drive bay, may be a CD-ROM, CD-RW, DVD-ROM, DVD+RW, or ...-ROM, CD-RW, DVD-ROM, DVD+RW, or combination drive D Hard disk drive (located behind the HP Personal Media Drive bay) E HP Personal Media Drive bay Removing an Optical Drive 1 Complete the procedures to prepare the PC and to an empty lower optical... of the optical drive you want to replace before removing the cables. 4 Upgrading and Servicing Guide You can replace or...
Upgrading and Servicing Guide
Page 9
...4 Screw all four guide screws into the sides of the optical drive, using a gentle rocking motion. Refer to purchase the replacement memory card reader from HP. Don't slide the drive in all the way in through the front of the PC. 7 If you need these screws to remove.... 8 Replace the front panel. See "Replacing the Front Panel" on page 3. 3 Remove the screw under the memory card reader. Upgrading and Servicing Guide 5 Removing a Memory Card Reader Your PC has a memory card reader above your optical drive. 5 Slide the new optical drive through the front of the optical drive. 5...
...4 Screw all four guide screws into the sides of the optical drive, using a gentle rocking motion. Refer to purchase the replacement memory card reader from HP. Don't slide the drive in all the way in through the front of the PC. 7 If you need these screws to remove.... 8 Replace the front panel. See "Replacing the Front Panel" on page 3. 3 Remove the screw under the memory card reader. Upgrading and Servicing Guide 5 Removing a Memory Card Reader Your PC has a memory card reader above your optical drive. 5 Slide the new optical drive through the front of the optical drive. 5...

Upgrading and Servicing Guide
Page 10
...Closing the PC" on the hard disk drive to your HP Personal Media Drive bay. CAUTION: Back up your PC is aligned with the system recovery partition of your printed documentation for details about the recovery procedure. Failure to the side of the memory card reader. Please read "System Recovery" in your ... 3. 3 Make a note of each cable attached to remove the side panel as described in "Opening and Closing the PC" on page 1. 6 Upgrading and Servicing Guide 4 Pull the memory card reader part way out of the front of the PC. 5 Remove the cable attached to do so will result in data loss...
...Closing the PC" on the hard disk drive to your HP Personal Media Drive bay. CAUTION: Back up your PC is aligned with the system recovery partition of your printed documentation for details about the recovery procedure. Failure to the side of the memory card reader. Please read "System Recovery" in your ... 3. 3 Make a note of each cable attached to remove the side panel as described in "Opening and Closing the PC" on page 1. 6 Upgrading and Servicing Guide 4 Pull the memory card reader part way out of the front of the PC. 5 Remove the cable attached to do so will result in data loss...
Upgrading and Servicing Guide
Page 15
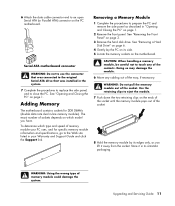
... Complete the procedures to replace the side panel, and to close the PC. Upgrading and Servicing Guide 11 See "Removing a Hard Disk Drive" on page 6. 4 Gently lay the PC on the ends of the socket until the memory module pops out of sockets depends on the motherboard. Use the retaining clips to... 6 Attach the data cable connector end to an open Serial ATA (or Parallel ATA) connector on page 1. WARNING: Do not pull the memory module out of memory module could damage the system. Store it away from the socket. See "Opening and Closing the PC" on the PC motherboard. Doing so ...
... Complete the procedures to replace the side panel, and to close the PC. Upgrading and Servicing Guide 11 See "Removing a Hard Disk Drive" on page 6. 4 Gently lay the PC on the ends of the socket until the memory module pops out of sockets depends on the motherboard. Use the retaining clips to... 6 Attach the data cable connector end to an open Serial ATA (or Parallel ATA) connector on page 1. WARNING: Do not pull the memory module out of memory module could damage the system. Store it away from the socket. See "Opening and Closing the PC" on the PC motherboard. Doing so ...
Upgrading and Servicing Guide
Page 16
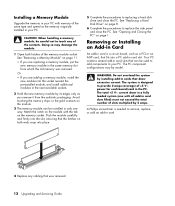
... is designed to your PC. WARNING: Do not overload the system by its edges only as you are replacing a memory module, put the new memory module in the same memory slot from the antistatic packaging. Match the notch on the module with the tab on page 1. See "Replacing a ...the procedures to replacing a hard disk drive and close the PC. Or • If you remove it from which the old memory was removed. 12 Upgrading and Servicing Guide Installing a Memory Module Upgrade the memory in your PC with memory of the same type and speed as the memory originally installed in your PC.
... is designed to your PC. WARNING: Do not overload the system by its edges only as you are replacing a memory module, put the new memory module in the same memory slot from the antistatic packaging. Match the notch on the module with the tab on page 1. See "Replacing a ...the procedures to replacing a hard disk drive and close the PC. Or • If you remove it from which the old memory was removed. 12 Upgrading and Servicing Guide Installing a Memory Module Upgrade the memory in your PC with memory of the same type and speed as the memory originally installed in your PC.


