M260n Memory Upgrade - HP Pavilion Media Center
M260n Memory Upgrade

Related Manual Pages


Similar Questions

What Is The Maximum Hp Pavilion S5120f Memory Upgrade
(Posted by marjfoster 8 years ago)

What Is The Max Memory Upgrade For The Hp Pavilion A100y
(Posted by reshardchipp 10 years ago)

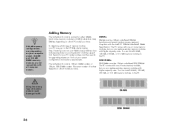
Memory Upgrade
I have the HP s3200n - Pavilion - Slimline. What is the max RAM this computer can take? What memor...
I have the HP s3200n - Pavilion - Slimline. What is the max RAM this computer can take? What memor...
(Posted by photos 12 years ago)