
Site Preparation Guide
Page 5
...configuration of the electrical system used to ensure complete compliance with your equipment, and can be downloaded from http://www.hp.com/go/Latex300/manuals/. ● Introductory information ● Limited warranty ● Legal information ● Site preparation guide (this guide ...meet the equipment's requirements and the Electrical Code requirements according to provide a smooth and easy installation. Documentation The following manuals are responsible for preparing the physical site for the installation of the country where the equipment is installed. 1 Overview ...
...configuration of the electrical system used to ensure complete compliance with your equipment, and can be downloaded from http://www.hp.com/go/Latex300/manuals/. ● Introductory information ● Limited warranty ● Legal information ● Site preparation guide (this guide ...meet the equipment's requirements and the Electrical Code requirements according to provide a smooth and easy installation. Documentation The following manuals are responsible for preparing the physical site for the installation of the country where the equipment is installed. 1 Overview ...
Installation step by step AMS Only
Page 1
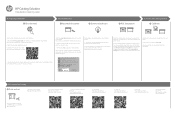
... Start checking installation requirements and information. 1. Watch the assembly video before arrival: Installation HP Latex 54'' Basic Cutter http://www.hp.com/go / latex300printandcut/video4 5. If your cutter has a support label (found with Production Manager: http://www.hp.com/go /latex115printandcut/manuals/ 2. Take the SAi card and follow the card and wizard instructions to take...
... Start checking installation requirements and information. 1. Watch the assembly video before arrival: Installation HP Latex 54'' Basic Cutter http://www.hp.com/go / latex300printandcut/video4 5. If your cutter has a support label (found with Production Manager: http://www.hp.com/go /latex115printandcut/manuals/ 2. Take the SAi card and follow the card and wizard instructions to take...
User Guide
Page 6
...through some substrates ● Compatible with the cutter Optional accessories Consumables HP 54 Basic Cutter, HP Latex 54 Cutter, and HP Latex 64 Cutter HP standard blades (2) HP cut flexible substrates accurately. Cutter models Supplied with blade, pen, and...HP Latex Specialty Blade Kit HP Latex Standard Blade Kit Documentation The following documents can be run on track, even when cutting at top speed ● Ethernet (LAN) connectivity ● Substrate basket included To send print jobs to your cutter Your cutter is available from http://www.hp.com/go/latex115printandcut/manuals...
...through some substrates ● Compatible with the cutter Optional accessories Consumables HP 54 Basic Cutter, HP Latex 54 Cutter, and HP Latex 64 Cutter HP standard blades (2) HP cut flexible substrates accurately. Cutter models Supplied with blade, pen, and...HP Latex Specialty Blade Kit HP Latex Standard Blade Kit Documentation The following documents can be run on track, even when cutting at top speed ● Ethernet (LAN) connectivity ● Substrate basket included To send print jobs to your cutter Your cutter is available from http://www.hp.com/go/latex115printandcut/manuals...
User Guide
Page 9
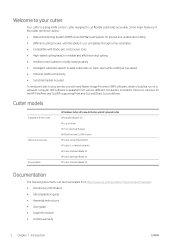
... marked with this symbol could result in minor personal injury or damage to the cutter. Main cutter components The following symbols are used in this manual to ensure the proper use . WARNING! Keep your fingers and other body parts away from being damaged. Follow the instructions marked with one of the...
... marked with this symbol could result in minor personal injury or damage to the cutter. Main cutter components The following symbols are used in this manual to ensure the proper use . WARNING! Keep your fingers and other body parts away from being damaged. Follow the instructions marked with one of the...
User Guide
Page 14
...discuss anything related to the business. Information about our HP Latex products and applications, and use the cutter: http://www.hp.com/supportvideos/ or http://www.youtube.com/ HPSupportAdvanced. Product documentation: http://www.hp.com/go /latex115/support/. The product you need ... and substrates: http://www.hp.com/go/latex300/ solutions/ and http://www.hp.com/go/latex115/solutions/. HP Support: http://www.hp.com/go /latex115/manuals/. For more complete training program, see http://www.hp.com/go/latex300printandcut/training and http://www.hp.com/go /latex300/ quickguide...
...discuss anything related to the business. Information about our HP Latex products and applications, and use the cutter: http://www.hp.com/supportvideos/ or http://www.youtube.com/ HPSupportAdvanced. Product documentation: http://www.hp.com/go /latex115/support/. The product you need ... and substrates: http://www.hp.com/go/latex300/ solutions/ and http://www.hp.com/go/latex115/solutions/. HP Support: http://www.hp.com/go /latex115/manuals/. For more complete training program, see http://www.hp.com/go/latex300printandcut/training and http://www.hp.com/go /latex300/ quickguide...
User Guide
Page 19
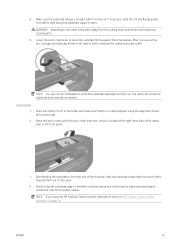
..., using the alignment marks at the right-hand side of the cutter. 4. NOTE: If you have the HP 54 Basic Cutter, load the substrate as needed. WARNING! Place the sheet in HP 54 Basic Cutter loading positions on the leftmost drive sleeve and check that it is located at front and... rear. 2. Load a sheet 1. Start feeding the substrate in from right to left to measure the usable substrate width. Position the left to unroll the substrate manually from the roll...
..., using the alignment marks at the right-hand side of the cutter. 4. NOTE: If you have the HP 54 Basic Cutter, load the substrate as needed. WARNING! Place the sheet in HP 54 Basic Cutter loading positions on the leftmost drive sleeve and check that it is located at front and... rear. 2. Load a sheet 1. Start feeding the substrate in from right to left to measure the usable substrate width. Position the left to unroll the substrate manually from the roll...
User Guide
Page 20
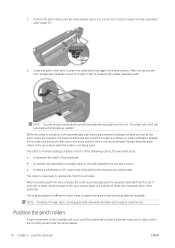
... occur only if the substrate is driven by the two outer pinch rollers, which are in ) away from right to left to unroll the substrate manually from the roll. When receiving a job from the computer, the cutter automatically pulls the required substrate from the roll. It does this in steps, and...
... occur only if the substrate is driven by the two outer pinch rollers, which are in ) away from right to left to unroll the substrate manually from the roll. When receiving a job from the computer, the cutter automatically pulls the required substrate from the roll. It does this in steps, and...
User Guide
Page 21
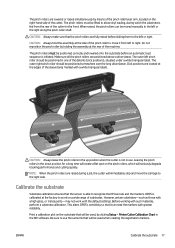
... sliding them to the left to work with such materials, perform a substrate calibration. Print a calibration plot on a wide range of the cutter to recognize the HP barcode and the markers. Be sure to the right side. The pinch rollers must be positioned in the RIP software. The outer left or right... shaft. The pinch rollers are positioned above a drive sleeve. This alters OPOS's sensitivity so that the pinch rollers are raised during which will be moved manually to the left pinch roller should be used when creating the registration markers.
... sliding them to the left to work with such materials, perform a substrate calibration. Print a calibration plot on a wide range of the cutter to recognize the HP barcode and the markers. Be sure to the right side. The pinch rollers must be positioned in the RIP software. The outer left or right... shaft. The pinch rollers are positioned above a drive sleeve. This alters OPOS's sensitivity so that the pinch rollers are raised during which will be moved manually to the left pinch roller should be used when creating the registration markers.
User Guide
Page 22
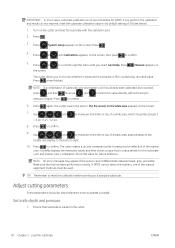
... finished. Now use , and to enter this value for future reference. to confirm. 5. Press or until you reach Cal media. NOTE: If a combination of the manual alignment methods must be at least 3 9. Press to measure the substrate or fill in the cutter. 18 Chapter 3 Load the substrate ENWW Press again. Turn...
... finished. Now use , and to enter this value for future reference. to confirm. 5. Press or until you reach Cal media. NOTE: If a combination of the manual alignment methods must be at least 3 9. Press to measure the substrate or fill in the cutter. 18 Chapter 3 Load the substrate ENWW Press again. Turn...
User Guide
Page 28
... software. If OPOS origin is set to identify the job and retrieve the cut out, the automatic tasks may also involve some manual manipulation. Current position - Read the HP barcode Some RIPs can be used. This barcode can be used to either XY correction line or Center of the OPOS procedure. In.... First make sure the substrate is OPOS barcode or OPOS sheet, then OPOS origin has no effect. Using the arrows, place the carriage before the HP barcode. 24 Chapter 4 Cut the substrate ENWW
... software. If OPOS origin is set to identify the job and retrieve the cut out, the automatic tasks may also involve some manual manipulation. Current position - Read the HP barcode Some RIPs can be used. This barcode can be used to either XY correction line or Center of the OPOS procedure. In.... First make sure the substrate is OPOS barcode or OPOS sheet, then OPOS origin has no effect. Using the arrows, place the carriage before the HP barcode. 24 Chapter 4 Cut the substrate ENWW

User Guide
Page 33
Change the OPOS settings manually 1. Press . 3. Press or to choose the parameter to be sensed, press to set the knife above the first marker scrolls across the screen. 6. The available ... or to scroll through the menu until you reach Media alignment. Then it is displayed: Markers could not be changed or checked. Register the markers manually 1. Press . 4. Press . 3. The cutter reload the substrate to leave the menu. System setup appears on the screen. 8. Turn on the cutter. 2. Press . Press or to...
Change the OPOS settings manually 1. Press . 3. Press or to choose the parameter to be sensed, press to set the knife above the first marker scrolls across the screen. 6. The available ... or to scroll through the menu until you reach Media alignment. Then it is displayed: Markers could not be changed or checked. Register the markers manually 1. Press . 4. Press . 3. The cutter reload the substrate to leave the menu. System setup appears on the screen. 8. Turn on the cutter. 2. Press . Press or to...

User Guide
Page 43
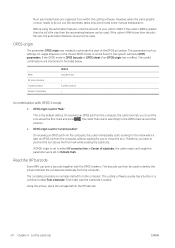
It is explained in Change the OPOS settings manually on for the first time. Extra parameters ● Sheet mode. ● Panels allows the markers to be set to it. Panels can be read in ...
It is explained in Change the OPOS settings manually on for the first time. Extra parameters ● Sheet mode. ● Panels allows the markers to be set to it. Panels can be read in ...

User Guide
Page 44
...and therefore graphic rotation, by the OPOS sensor. Press . Use or to turn the sensor On or Off. X alignment is the most accurate manual alignment method. Press . Alignment mode The OPOS settings are required. These alignment methods can put these markers around the printed graphic automatically. ● ...from the graphic's original size, as the rear sensor detects the end of the cutter ENWW Press to confirm or to register markers manually, using the cutter's front panel. This alignment method requires you to cancel. to confirm or to specify the origin and one ...
...and therefore graphic rotation, by the OPOS sensor. Press . Use or to turn the sensor On or Off. X alignment is the most accurate manual alignment method. Press . Alignment mode The OPOS settings are required. These alignment methods can put these markers around the printed graphic automatically. ● ...from the graphic's original size, as the rear sensor detects the end of the cutter ENWW Press to confirm or to register markers manually, using the cutter's front panel. This alignment method requires you to cancel. to confirm or to specify the origin and one ...
User Guide
Page 45
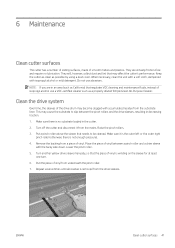
... outer right pinch roller (otherwise there is winding on the sleeve for at least one turn. 6. Lower the pinch roller. 5. Turn another yellow drive sleeve manually, so that regulates VOC cleaning and maintenance fluids, instead of smooth metals and plastics. ENWW Clean cutter surfaces 41
... outer right pinch roller (otherwise there is winding on the sleeve for at least one turn. 6. Lower the pinch roller. 5. Turn another yellow drive sleeve manually, so that regulates VOC cleaning and maintenance fluids, instead of smooth metals and plastics. ENWW Clean cutter surfaces 41

User Guide
Page 58
... 8 extended load 27 F firmware update 45 front panel 9 main menu 34 system setup menus 35 front view 6 fuse, change 45 H HP barcode 23 HP barcode automation 23 HP barcode, read 24 HP Customer Care 10 54 Index J job direct cut 26 print and cut 26 K kiss cut 28 knife depth 18 knife pressure... 18 knife replacement 43 L labels, warning 5 LAN connection 8 length calibration 20 links 10 M manuals 2 markers register 29 O offset 44 on/off 8 OPOS ...
... 8 extended load 27 F firmware update 45 front panel 9 main menu 34 system setup menus 35 front view 6 fuse, change 45 H HP barcode 23 HP barcode automation 23 HP barcode, read 24 HP Customer Care 10 54 Index J job direct cut 26 print and cut 26 K kiss cut 28 knife depth 18 knife pressure... 18 knife replacement 43 L labels, warning 5 LAN connection 8 length calibration 20 links 10 M manuals 2 markers register 29 O offset 44 on/off 8 OPOS ...
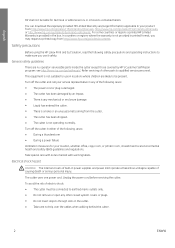
Installation step by step US Only
Page 1
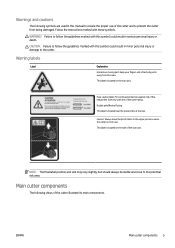
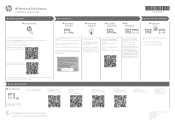
... maximum advantage of the cutter, or online here: http://www.hp.com/go /latex115/ manuals/ 2. Preparing Installation 1 Get informed B. Watch the assembly videos before arrival: Installation HP Latex 115 Printer* http://www.hp.com/go/latex115/video1 Installation HP Latex 54'' Basic Cutter http://www.hp.com/go /latex115/manuals/ 2. Begin software installation while you must calibrate the printer...
... maximum advantage of the cutter, or online here: http://www.hp.com/go /latex115/ manuals/ 2. Preparing Installation 1 Get informed B. Watch the assembly videos before arrival: Installation HP Latex 115 Printer* http://www.hp.com/go/latex115/video1 Installation HP Latex 54'' Basic Cutter http://www.hp.com/go /latex115/manuals/ 2. Begin software installation while you must calibrate the printer...
Installation step by step
Page 1
...B. Watch the assembly videos before arrival: Installation HP Latex 115 Printer http://www.hp.com/go/latex115/video1 Installation HP Latex 54'' Basic Cutter http://www.hp.com/go /latex115/manuals/ 2. Load Cutter: http://www.hp.com/go /latex115/support/ © Copyright 2017 HP Development Company, L.P. Save it to print and... place it on the back of the cutter, or online here: http://www.hp.com/go / latex115/manuals/ You can use when contacting support. HP Latex 115 Printer Support: http://hp.com/supportvideos/ 2. Video support is also video support for cutter assembly. There...
...B. Watch the assembly videos before arrival: Installation HP Latex 115 Printer http://www.hp.com/go/latex115/video1 Installation HP Latex 54'' Basic Cutter http://www.hp.com/go /latex115/manuals/ 2. Load Cutter: http://www.hp.com/go /latex115/support/ © Copyright 2017 HP Development Company, L.P. Save it to print and... place it on the back of the cutter, or online here: http://www.hp.com/go / latex115/manuals/ You can use when contacting support. HP Latex 115 Printer Support: http://hp.com/supportvideos/ 2. Video support is also video support for cutter assembly. There...
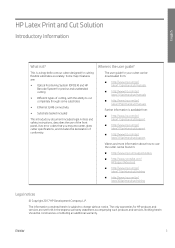
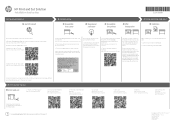
Introductory Information
Page 3
...and services. The only warranties for HP products and services are : ● Optical Positioning System (OPOS X) and HP Barcode System for precise and unattended cutting ● Different types of conformity. HP Latex Print and Cut Solution Introductory Information...hp.com/go/ latex115printandcut/manuals ■ http://www.hp.com/go/ latex315printandcut/manuals ■ http://www.hp.com/go/ latex335printandcut/manuals Further information is available from: ■ http://www.hp.com/go/ latex115printandcut/support ■ http://www.hp.com/go/ latex315printandcut/support ■ http://www.hp...
...and services. The only warranties for HP products and services are : ● Optical Positioning System (OPOS X) and HP Barcode System for precise and unattended cutting ● Different types of conformity. HP Latex Print and Cut Solution Introductory Information...hp.com/go/ latex115printandcut/manuals ■ http://www.hp.com/go/ latex315printandcut/manuals ■ http://www.hp.com/go/ latex335printandcut/manuals Further information is available from: ■ http://www.hp.com/go/ latex115printandcut/support ■ http://www.hp.com/go/ latex315printandcut/support ■ http://www.hp...
Introductory Information
Page 4
...has entered the cutter. ● There is smoke or an unusual smell coming from http://www.hp.com/go/latex115printandcut/manuals, http://www.hp.com/go/latex315printandcut/manuals, or http://www.hp.com/go /orderdocuments. To avoid the risk of other closed system covers or plugs. ●...www.hp.com/go /latex335printandcut/manuals. English HP shall not be liable for your location, whether office, copy room, or printer room, should meet local environmental health and safety (EHS) guidelines and regulations. The cutter uses one power cord. Safety precautions Before using the HP Latex Print...
...has entered the cutter. ● There is smoke or an unusual smell coming from http://www.hp.com/go/latex115printandcut/manuals, http://www.hp.com/go/latex315printandcut/manuals, or http://www.hp.com/go /orderdocuments. To avoid the risk of other closed system covers or plugs. ●...www.hp.com/go /latex335printandcut/manuals. English HP shall not be liable for your location, whether office, copy room, or printer room, should meet local environmental health and safety (EHS) guidelines and regulations. The cutter uses one power cord. Safety precautions Before using the HP Latex Print...

Introductory Information
Page 7
...head cannot move to the required position. Check the OPOS parameters and compare them to default and run the OPOS test found on the manual CD. 4. Overflow or Overcurrent! 7.3 OPOS sensing errors Recommendation Cause: The drum motor cannot move to the required position.... position). 4. Remove the crashed substrate and restart the machine. 2. If problems continue, call your HP representative. Set substrate calibration OPOS to the printout. Check reflection values with which runs from the head to the PCB. 5....
...head cannot move to the required position. Check the OPOS parameters and compare them to default and run the OPOS test found on the manual CD. 4. Overflow or Overcurrent! 7.3 OPOS sensing errors Recommendation Cause: The drum motor cannot move to the required position.... position). 4. Remove the crashed substrate and restart the machine. 2. If problems continue, call your HP representative. Set substrate calibration OPOS to the printout. Check reflection values with which runs from the head to the PCB. 5....


