
Introductory Information
Page 1
...; The printer has been damaged by an impact. • Liquid has entered the printer. • There is a supplement to HP Latex 1500 Printer documentation. The HP Latex Dual Roll allows you to attain new levels of productivity, double throughput on the printer must be construed as constituting an additional warranty.... aware of hazards to which you to 63 in : http://www.hp.com/go /latex1500/manuals Further information is subject to change without notice. The information contained herein is available from: http://www.hp.com/go/latex1500/support Videos about how to use the accessory can ...
...; The printer has been damaged by an impact. • Liquid has entered the printer. • There is a supplement to HP Latex 1500 Printer documentation. The HP Latex Dual Roll allows you to attain new levels of productivity, double throughput on the printer must be construed as constituting an additional warranty.... aware of hazards to which you to 63 in : http://www.hp.com/go /latex1500/manuals Further information is subject to change without notice. The information contained herein is available from: http://www.hp.com/go/latex1500/support Videos about how to use the accessory can ...
Introductory Information
Page 4
...the accessory was purchased, the purchase date, and the PO number. Important Check compatibility and incompatibility between different HP Latex 1500 Printer accessories before any implied warranties or conditions of Heating, Refrigerating and Air-Conditioning Engineers) 62.1-2013 Ventilation for... workmanship. Air conditioning and ventilation should not blow air directly onto the printer. For a more information see: http://www.hp.com/manuals. 4 Introductory Information Note: The ventilation and air conditioning units should meet local environmental, health, and safety (EHS) guidelines...
...the accessory was purchased, the purchase date, and the PO number. Important Check compatibility and incompatibility between different HP Latex 1500 Printer accessories before any implied warranties or conditions of Heating, Refrigerating and Air-Conditioning Engineers) 62.1-2013 Ventilation for... workmanship. Air conditioning and ventilation should not blow air directly onto the printer. For a more information see: http://www.hp.com/manuals. 4 Introductory Information Note: The ventilation and air conditioning units should meet local environmental, health, and safety (EHS) guidelines...

User guide
Page 9
ENWW 1 1 Introduction The HP Latex 1500 Printer allows you to print signs and graphics on a wide range of flexible materials up to 3.20 m (126 in) wide, and uses water-based HP Latex Inks to additional video explanations of particular topics. The Quick Response (QR) code... of up to three years unlaminated, and up to collect available substrate configurations for information about new substrates, at http://www.hp.com/go /latex1500/manuals/. ● Site preparation guide ● Site preparation checklist ● Installation guide ● Introductory information ● User's guide...
ENWW 1 1 Introduction The HP Latex 1500 Printer allows you to print signs and graphics on a wide range of flexible materials up to 3.20 m (126 in) wide, and uses water-based HP Latex Inks to additional video explanations of particular topics. The Quick Response (QR) code... of up to three years unlaminated, and up to collect available substrate configurations for information about new substrates, at http://www.hp.com/go /latex1500/manuals/. ● Site preparation guide ● Site preparation checklist ● Installation guide ● Introductory information ● User's guide...

User guide
Page 13
... Special care must be required. The printer has been designed to be taken to maintain comfort levels. Ink and condensates handling HP recommends that potential airborne exposure to these devices. ● Always wear personal protective equipment including boots and gloves. CAUTION: The... location. When used for advice on . Always check it according to look directly for a long time at http://www.hp.com/go /latex300/manuals/. WARNING! Ventilation Fresh air ventilation is adequately controlled. Consult your usual air-conditioning or EHS specialist for cleaning purposes, make...
... Special care must be required. The printer has been designed to be taken to maintain comfort levels. Ink and condensates handling HP recommends that potential airborne exposure to these devices. ● Always wear personal protective equipment including boots and gloves. CAUTION: The... location. When used for advice on . Always check it according to look directly for a long time at http://www.hp.com/go /latex300/manuals/. WARNING! Ventilation Fresh air ventilation is adequately controlled. Consult your usual air-conditioning or EHS specialist for cleaning purposes, make...

User guide
Page 15
.... WARNING! Warning High leakage current. See installation instructions before connecting supply. CAUTION: Failure to follow the guidelines marked with this symbol could result in this manual to ensure the proper use of the printer that the input voltage is within the printer's rated voltage range. Do not touch PPS while moving...
.... WARNING! Warning High leakage current. See installation instructions before connecting supply. CAUTION: Failure to follow the guidelines marked with this symbol could result in this manual to ensure the proper use of the printer that the input voltage is within the printer's rated voltage range. Do not touch PPS while moving...

User guide
Page 23
... screen with no steps and no slopes of the foot. Raise the feet gradually, applying two turns each time to the printer. 1. Rotate the nut manually down the Internal Print Server from the printer. 3. CAUTION: Take care to raise the feet as high as the bolt allows. b. Use a 16mm (5/8 in)... and network cables from the Windows Start button, and wait until you wish to rotate the foot upwards. CAUTION: Slopes steeper than 3% inclination, see HP Customer Care Centers on page 13. Use the 24mm (15/16 in ) open end wrench to move the printer a short distance on the main ...
... screen with no steps and no slopes of the foot. Raise the feet gradually, applying two turns each time to the printer. 1. Rotate the nut manually down the Internal Print Server from the printer. 3. CAUTION: Take care to raise the feet as high as the bolt allows. b. Use a 16mm (5/8 in)... and network cables from the Windows Start button, and wait until you wish to rotate the foot upwards. CAUTION: Slopes steeper than 3% inclination, see HP Customer Care Centers on page 13. Use the 24mm (15/16 in ) open end wrench to move the printer a short distance on the main ...

User guide
Page 37
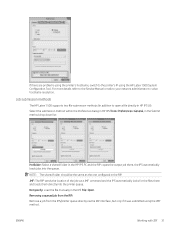
...JDF interface in the ONYX RIP, you have the latest driver version from the ONYX Download manager. If there are problems using the HP Latex 1500 System Configuration Tool. In order to activate this functionality in the printer by selecting the option on the Internal Print Server SW, ...make sure you need to integrate the HP Latex 1500 printer series into ONYX RIP ONYX can take advantage of the printer configuration dialog (JDF URL). ENWW Working with job status, job ink and substrate consumption. For more details refer to the Service Manual or talk to your network administrator to...
...JDF interface in the ONYX RIP, you have the latest driver version from the ONYX Download manager. If there are problems using the HP Latex 1500 System Configuration Tool. In order to activate this functionality in the printer by selecting the option on the Internal Print Server SW, ...make sure you need to integrate the HP Latex 1500 printer series into ONYX RIP ONYX can take advantage of the printer configuration dialog (JDF URL). ENWW Working with job status, job ink and substrate consumption. For more details refer to the Service Manual or talk to your network administrator to...
User guide
Page 39
... the job via the RIP interface, but only if it was submitted using the HP Latex 1500 System Configuration Tool. For more details refer to the Service Manual or talk to your network administrator to solve hostname resolution. Job submission methods The HP Latex 1500 supports two file submission methods (in addition to open a file directly in...
... the job via the RIP interface, but only if it was submitted using the HP Latex 1500 System Configuration Tool. For more details refer to the Service Manual or talk to your network administrator to solve hostname resolution. Job submission methods The HP Latex 1500 supports two file submission methods (in addition to open a file directly in...

User guide
Page 66
... -roll configuration on page 373). See Dual roll-to align the edges of the spindle on the input and output spindles. Open the loading table. 4. Manual loading Assisted loading is in the same position on the platforms provided at the left and right sides, making sure not to each empty core...
... -roll configuration on page 373). See Dual roll-to align the edges of the spindle on the input and output spindles. Open the loading table. 4. Manual loading Assisted loading is in the same position on the platforms provided at the left and right sides, making sure not to each empty core...

User guide
Page 75
... Check that substrate orientation remains the same. TIP: This step is not printing. 2. Again, it from the printer. 9. Unload a roll Contact HP to the Internal Print Server and select Substrate Load/Unload. 3. Go to know the recommended third party solutions for substrate lifter and core adaptors. 1....substrate is displayed at the bottom of the main screen of the Internal Print Server. The printer raises the carriage. Wind the substrate manually onto the output roll. 7. Remove the output roll from the roll. To see more information, select the Substrate menu and then ...
... Check that substrate orientation remains the same. TIP: This step is not printing. 2. Again, it from the printer. 9. Unload a roll Contact HP to the Internal Print Server and select Substrate Load/Unload. 3. Go to know the recommended third party solutions for substrate lifter and core adaptors. 1....substrate is displayed at the bottom of the main screen of the Internal Print Server. The printer raises the carriage. Wind the substrate manually onto the output roll. 7. Remove the output roll from the roll. To see more information, select the Substrate menu and then ...

User guide
Page 76
... switched on page 157 for new input and output rolls to load/unload a roll, see Dual roll printing on and off manually. 68 Chapter 5 Handle the substrate ENWW Rewind the substrate manually onto the input roll. 11. Open the two latches at each side of the spindles. 12. Output platen light The...
... switched on page 157 for new input and output rolls to load/unload a roll, see Dual roll printing on and off manually. 68 Chapter 5 Handle the substrate ENWW Rewind the substrate manually onto the input roll. 11. Open the two latches at each side of the spindles. 12. Output platen light The...

User guide
Page 79
... a new substrate via the IPS, Substrate > Optimize for tiling 71 Alternatively, get the specific preset from the Add New Substrate wizard) and adjust the settings manually. If you are : front-lit substrate, vinyl, wallpaper and PVC banner. This is available, try using a generic preset in the same substrate category. 3. See Edit...
... a new substrate via the IPS, Substrate > Optimize for tiling 71 Alternatively, get the specific preset from the Add New Substrate wizard) and adjust the settings manually. If you are : front-lit substrate, vinyl, wallpaper and PVC banner. This is available, try using a generic preset in the same substrate category. 3. See Edit...

User guide
Page 83
... issues on page 365 and Troubleshoot print-quality issues on the print, from the perforated plate through which are printed at any time and make manual changes. Next, the wizard shows you can select Advanced settings at a range of the bands is perfectly cured, choose this or a lower ink density in...
... issues on page 365 and Troubleshoot print-quality issues on the print, from the perforated plate through which are printed at any time and make manual changes. Next, the wizard shows you can select Advanced settings at a range of the bands is perfectly cured, choose this or a lower ink density in...

User guide
Page 100
You can move from one queue to minimize substrate waste without altering the The closed padlock appears when a manual update to store the job in either direction by clicking the and icons. icon, the jobs are not compatible with your selections in the second ...
You can move from one queue to minimize substrate waste without altering the The closed padlock appears when a manual update to store the job in either direction by clicking the and icons. icon, the jobs are not compatible with your selections in the second ...

User guide
Page 101
... be used to main dialog of the properties of print jobs and various icons that has been printed already. Printed jobs remain available unless deleted manually. ● Edit Job : Edit the properties of the job takes place. NOTE: Rotation is available only when the printer is shown as Rotating. Above the...
... be used to main dialog of the properties of print jobs and various icons that has been printed already. Printed jobs remain available unless deleted manually. ● Edit Job : Edit the properties of the job takes place. NOTE: Rotation is available only when the printer is shown as Rotating. Above the...

User guide
Page 102
... by ticking the job in sections, and then put together later. This window contains an Image composition button that allows you to alter the layout manually. See Tiling on page 27. ● Double Sided: Block Out. See What is room. but it if the warning is disregarded. You can use the...
... by ticking the job in sections, and then put together later. This window contains an Image composition button that allows you to alter the layout manually. See Tiling on page 27. ● Double Sided: Block Out. See What is room. but it if the warning is disregarded. You can use the...

User guide
Page 145
... two alignment types to the Internal Print Server and select Printer > Printhead alignment > Automatic > Align. To align the printheads, go to choose from, automatic and manual. ENWW Align the printheads 137
... two alignment types to the Internal Print Server and select Printer > Printhead alignment > Automatic > Align. To align the printheads, go to choose from, automatic and manual. ENWW Align the printheads 137

User guide
Page 146
... does not align the optimizer. NOTE: If automatic alignment fails, see Automatic Printhead Alignment fails on page 410. Manual Alignment procedure To launch Manual Alignment, go to align the optimizer or install a new printhead optimizer, manual alignment is required. The printer prints 21 series of the series (for example, number 10 in the...
... does not align the optimizer. NOTE: If automatic alignment fails, see Automatic Printhead Alignment fails on page 410. Manual Alignment procedure To launch Manual Alignment, go to align the optimizer or install a new printhead optimizer, manual alignment is required. The printer prints 21 series of the series (for example, number 10 in the...

User guide
Page 149
NOTE: You can print only the diagnostic plot (much faster than one that the substrate is not deformed by the curing of the manual alignment. Row0 is the row of printheads closer to the substrate output, while Row1 is the row of printheads closer to check printhead alignment, then ...
NOTE: You can print only the diagnostic plot (much faster than one that the substrate is not deformed by the curing of the manual alignment. Row0 is the row of printheads closer to the substrate output, while Row1 is the row of printheads closer to check printhead alignment, then ...

User guide
Page 150
... (S=23) is needed . This is just what you apply values bigger than your actual value it is a background color that highlights the presence of the manual alignment that in the M: ● Scan axis misplacement: The M line is displaced to the right. Imagine also a misplacement in the... manual alignment the chosen value for S is 23, and the chosen value for U is 17. However, there is compared to the black ink. In this case ...
... (S=23) is needed . This is just what you apply values bigger than your actual value it is a background color that highlights the presence of the manual alignment that in the M: ● Scan axis misplacement: The M line is displaced to the right. Imagine also a misplacement in the... manual alignment the chosen value for S is 23, and the chosen value for U is 17. However, there is compared to the black ink. In this case ...


