Technical Specifications
Page 1
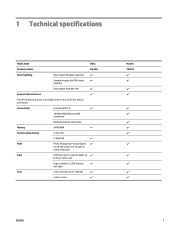
... M26a Product number T0L49A Paper handling Input tray (150-sheet capacity) Standard output bin (100-sheet capacity) Short-paper extender tool Supported print drivers The HP PCLmS print driver is 300 dots per minute (ppm) on A4-size paper and 19 ppm on the in color M26nw T0L50A ENWW 1 Connectivity Hi... Prints 18 pages per inch (dpi) Scan Scan resolution up to A4 or Letter-size Copy resolution is included on Letter-size paper Copy Flatbed scanner supports paper up to 1200 dpi Scans in -box CD as the default print driver.
... M26a Product number T0L49A Paper handling Input tray (150-sheet capacity) Standard output bin (100-sheet capacity) Short-paper extender tool Supported print drivers The HP PCLmS print driver is 300 dots per minute (ppm) on A4-size paper and 19 ppm on the in color M26nw T0L50A ENWW 1 Connectivity Hi... Prints 18 pages per inch (dpi) Scan Scan resolution up to A4 or Letter-size Copy resolution is included on Letter-size paper Copy Flatbed scanner supports paper up to 1200 dpi Scans in -box CD as the default print driver.

User Guide
Page 8
... a cleaning page ...86 Visually inspect the toner cartridge and imaging drum 87 Check paper and the printing environment 87 Use paper that meets HP specifications 87 Check the printer environment 87 Check the EconoMode settings 87 Improve copy and scan image quality ...89 Introduction ...89 Check the... scanner glass for dirt and smudges 89 Check the paper settings ...89 LED control panel ...89 LCD control panel ...90 Optimize for text or pictures...
... a cleaning page ...86 Visually inspect the toner cartridge and imaging drum 87 Check paper and the printing environment 87 Use paper that meets HP specifications 87 Check the printer environment 87 Check the EconoMode settings 87 Improve copy and scan image quality ...89 Introduction ...89 Check the... scanner glass for dirt and smudges 89 Check the paper settings ...89 LED control panel ...89 LCD control panel ...90 Optimize for text or pictures...

User Guide
Page 10
Printer views Printer front view 1 2 3 6 5 4 1 Output bin 2 Scanner 3 Power on/off button 4 Control panel (tilts up for easier viewing and type varies by model) 5 Short-paper extender tool 6 Input tray Printer back view 1 2 3 4 1 Slot for cable-type security lock 2 Hi-Speed USB 2.0 2 Chapter 1 Printer overview ENWW
Printer views Printer front view 1 2 3 6 5 4 1 Output bin 2 Scanner 3 Power on/off button 4 Control panel (tilts up for easier viewing and type varies by model) 5 Short-paper extender tool 6 Input tray Printer back view 1 2 3 4 1 Slot for cable-type security lock 2 Hi-Speed USB 2.0 2 Chapter 1 Printer overview ENWW
User Guide
Page 30
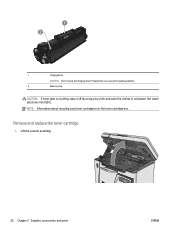
Fingerprints can cause print-quality problems. 2 Memory chip CAUTION: If toner gets on clothing, wipe it off by using a dry cloth and wash the clothes in the toner-cartridge box. Lift the scanner assembly. 22 Chapter 3 Supplies, accessories, and parts ENWW Remove and replace the toner cartridge 1. NOTE: Information about recycling used toner cartridges is in cold water. 1 2 1 Imaging drum CAUTION: Do not touch the imaging drum. Hot water sets toner into fabric.
Fingerprints can cause print-quality problems. 2 Memory chip CAUTION: If toner gets on clothing, wipe it off by using a dry cloth and wash the clothes in the toner-cartridge box. Lift the scanner assembly. 22 Chapter 3 Supplies, accessories, and parts ENWW Remove and replace the toner cartridge 1. NOTE: Information about recycling used toner cartridges is in cold water. 1 2 1 Imaging drum CAUTION: Do not touch the imaging drum. Hot water sets toner into fabric.
User Guide
Page 32
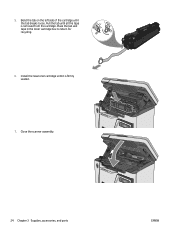
Install the new toner cartridge until all the tape is firmly seated. 7. Pull the tab until it is removed from the cartridge. Close the scanner assembly. 24 Chapter 3 Supplies, accessories, and parts ENWW 5. Place the tab and tape in the toner cartridge box to return for recycling. 6. Bend the tab on the left side of the cartridge until the tab breaks loose.
Install the new toner cartridge until all the tape is firmly seated. 7. Pull the tab until it is removed from the cartridge. Close the scanner assembly. 24 Chapter 3 Supplies, accessories, and parts ENWW 5. Place the tab and tape in the toner cartridge box to return for recycling. 6. Bend the tab on the left side of the cartridge until the tab breaks loose.

User Guide
Page 50
Make a copy NOTE: The steps vary according to the type of copies. 5. Close the scanner. 3. Press the arrow buttons to adjust the number of control panel. 1 2 1 LED control panel 2 LCD control panel LED control panels 1. At the product control panel, ...press the Number of Copies light is on. 4. Press the Start Copy button to start copying. Close the scanner. 3. Press the Start Copy button to start copying. 42 Chapter 5 Copy ENWW At the product control panel, press the Setup button, and make sure that...
Make a copy NOTE: The steps vary according to the type of copies. 5. Close the scanner. 3. Press the arrow buttons to adjust the number of control panel. 1 2 1 LED control panel 2 LCD control panel LED control panels 1. At the product control panel, ...press the Number of Copies light is on. 4. Press the Start Copy button to start copying. Close the scanner. 3. Press the Start Copy button to start copying. 42 Chapter 5 Copy ENWW At the product control panel, press the Setup button, and make sure that...
User Guide
Page 51
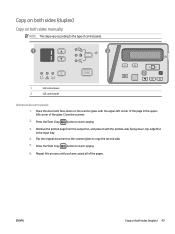
... Start Copy button to copy the second side. 5. ENWW Copy on both sides manually NOTE: The steps vary according to start copying. 6. Close the scanner. 2. Press the Start Copy button to the type of the page in the input tray. 4. Retrieve the printed page from the output bin, and ...place it with the printed-side facing down on the scanner glass with the upper-left corner of control panel. 1 2 1 LED control panel 2 LCD control panel LED and LCD control panels: 1. Copy on both ...
... Start Copy button to copy the second side. 5. ENWW Copy on both sides manually NOTE: The steps vary according to start copying. 6. Close the scanner. 2. Press the Start Copy button to the type of the page in the input tray. 4. Retrieve the printed page from the output bin, and ...place it with the printed-side facing down on the scanner glass with the upper-left corner of control panel. 1 2 1 LED control panel 2 LCD control panel LED and LCD control panels: 1. Copy on both ...
User Guide
Page 54
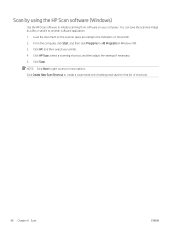
... Programs (or All Programs in the list of shortcuts. 46 Chapter 6 Scan ENWW Click Scan. Scan by using the HP Scan software (Windows) Use the HP Scan software to initiate scanning from software on the printer. 2. You can save it to another software application. 1. NOTE...: Click More to gain access to the indicators on your printer. 4. Click HP Scan, select a scanning shortcut, and then adjust the settings if necessary. 5. Click HP, and then select your computer. Load the document on the scanner glass according to more options.
... Programs (or All Programs in the list of shortcuts. 46 Chapter 6 Scan ENWW Click Scan. Scan by using the HP Scan software (Windows) Use the HP Scan software to initiate scanning from software on the printer. 2. You can save it to another software application. 1. NOTE...: Click More to gain access to the indicators on your printer. 4. Click HP Scan, select a scanning shortcut, and then adjust the settings if necessary. 5. Click HP, and then select your computer. Load the document on the scanner glass according to more options.

User Guide
Page 55
Load the document on the scanner glass according to initiate scanning from software on your computer. 1. ENWW Scan by using the HP Scan software (OS X) 47 Scan by using the HP Scan software (OS X) Use the HP Scan software to the indicators on the printer. 2. From the computer, open HP Easy Scan, which is located inside the Applications folder. 3. When you have scanned all the pages, click File and then Save to save them to scan the document. 4. Follow the on-screen instructions to a file.
Load the document on the scanner glass according to initiate scanning from software on your computer. 1. ENWW Scan by using the HP Scan software (OS X) 47 Scan by using the HP Scan software (OS X) Use the HP Scan software to the indicators on the printer. 2. From the computer, open HP Easy Scan, which is located inside the Applications folder. 3. When you have scanned all the pages, click File and then Save to save them to scan the document. 4. Follow the on-screen instructions to a file.

User Guide
Page 84
Lift the scanner assembly. 3. Remove any loose paper from the input tray. 2. Lift the top cover. 76 Chapter 8 Solve problems ENWW 1.
Lift the scanner assembly. 3. Remove any loose paper from the input tray. 2. Lift the top cover. 76 Chapter 8 Solve problems ENWW 1.
User Guide
Page 86
Lower the top cover. 9. Clear jams in the toner-cartridge area When a jam occurs, the Attention light blinks repeatedly on LED control panels, and a jam message displays on LCD control panels. 78 Chapter 8 Solve problems ENWW 7. Insert the toner cartridge. 8. Lower the scanner assembly.
Lower the top cover. 9. Clear jams in the toner-cartridge area When a jam occurs, the Attention light blinks repeatedly on LED control panels, and a jam message displays on LCD control panels. 78 Chapter 8 Solve problems ENWW 7. Insert the toner cartridge. 8. Lower the scanner assembly.
User Guide
Page 87
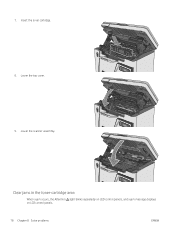
ENWW Clear paper jams 79 1. Lift the scanner assembly. 2. Remove the toner cartridge. Lift the top cover. 3.
ENWW Clear paper jams 79 1. Lift the scanner assembly. 2. Remove the toner cartridge. Lift the top cover. 3.

User Guide
Page 89
Lower the scanner assembly. Remove any visible jammed paper from the output bin area. 6. Clear jams in the output bin When a jam occurs, the Attention on LED control panels, and a jam message displays 1. Lower the top cover. 7. Use both hands to remove jammed paper to avoid tearing the paper. ENWW Clear paper jams 81 light blinks repeatedly on LCD control panels.
Lower the scanner assembly. Remove any visible jammed paper from the output bin area. 6. Clear jams in the output bin When a jam occurs, the Attention on LED control panels, and a jam message displays 1. Lower the top cover. 7. Use both hands to remove jammed paper to avoid tearing the paper. ENWW Clear paper jams 81 light blinks repeatedly on LCD control panels.

User Guide
Page 90
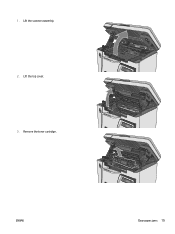
Lift the top cover. 4. Remove the toner cartridge. 82 Chapter 8 Solve problems ENWW Lift the scanner assembly. 3. 2.
Lift the top cover. 4. Remove the toner cartridge. 82 Chapter 8 Solve problems ENWW Lift the scanner assembly. 3. 2.

User Guide
Page 92
Lower the scanner assembly. 84 Chapter 8 Solve problems ENWW Lower the top cover. 8. 7.
Lower the scanner assembly. 84 Chapter 8 Solve problems ENWW Lower the top cover. 8. 7.
User Guide
Page 97
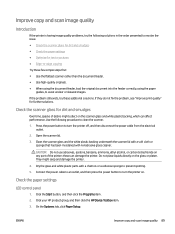
...liquids directly on . Click the Start button, and then click the Programs item. 2. ENWW Improve copy and scan image quality 89 Check the scanner glass for further solutions. CAUTION: Do not use abrasives, acetone, benzene, ammonia, ethyl alcohol, or carbon tetrachloride on any part of debris ...might seep and damage the printer. 4. Dry the glass and white plastic parts with nonabrasive glass cleaner. Click your HP product group, and then click the HP Device Toolbox item. 3. Check the paper settings LED control panel 1. On the Systems tab, click Paper Setup. If they...
...liquids directly on . Click the Start button, and then click the Programs item. 2. ENWW Improve copy and scan image quality 89 Check the scanner glass for further solutions. CAUTION: Do not use abrasives, acetone, benzene, ammonia, ethyl alcohol, or carbon tetrachloride on any part of debris ...might seep and damage the printer. 4. Dry the glass and white plastic parts with nonabrasive glass cleaner. Click your HP product group, and then click the HP Device Toolbox item. 3. Check the paper settings LED control panel 1. On the Systems tab, click Paper Setup. If they...

User Guide
Page 98
... the Optimize menu. 4. There is in the input tray, and then press the OK button. Select Def. Select the Def. Load the document on the scanner glass according to -edge. paper type. 6. On the printer control panel, press the Copy Menu button. 3. Select the name of the paper type that is...
... the Optimize menu. 4. There is in the input tray, and then press the OK button. Select Def. Select the Def. Load the document on the scanner glass according to -edge. paper type. 6. On the printer control panel, press the Copy Menu button. 3. Select the name of the paper type that is...

User Guide
Page 99
Considerations for printing or scanning documents with cropped edges: ● When the original is not cropped. ENWW Improve copy and scan image quality 91 Recopy or scan in this position. ● When the original is the size of the printed output that you want, use the Reduce/Enlarge feature to reduce the image so the copy is smaller than the output size, move the original 4 mm (1/6 inch) away from the corner indicated by the icon on the scanner.
Considerations for printing or scanning documents with cropped edges: ● When the original is not cropped. ENWW Improve copy and scan image quality 91 Recopy or scan in this position. ● When the original is the size of the printed output that you want, use the Reduce/Enlarge feature to reduce the image so the copy is smaller than the output size, move the original 4 mm (1/6 inch) away from the corner indicated by the icon on the scanner.

User Guide
Page 108
... solutions 6 mobile printing, software supported 8 multiple pages per sheet printing (Mac) 35 printing (Windows) 29 N Netscape Navigator, versions supported HP Embedded Web Server 51 network installation 50 networks installing the printer 50 supported 6 number of copies, changing 42 O on/off button, locating ...18 R replacement parts part numbers 20 replacing toner cartridge 21 restoring factory-set defaults 69 S scanner glass cleaning 89 locating 2 scanning from HP Scan software (OS X) 47 from HP Scan software (Windows) 46 settings factory-set defaults, restoring 69 shut down after delay setting...
... solutions 6 mobile printing, software supported 8 multiple pages per sheet printing (Mac) 35 printing (Windows) 29 N Netscape Navigator, versions supported HP Embedded Web Server 51 network installation 50 networks installing the printer 50 supported 6 number of copies, changing 42 O on/off button, locating ...18 R replacement parts part numbers 20 replacing toner cartridge 21 restoring factory-set defaults 69 S scanner glass cleaning 89 locating 2 scanning from HP Scan software (OS X) 47 from HP Scan software (Windows) 46 settings factory-set defaults, restoring 69 shut down after delay setting...


