
HP LD4200 and LD4700 LCD Monitors User Guide
Page 1
HP LD4200 and LD4700 LCD Monitors User Guide
HP LD4200 and LD4700 LCD Monitors User Guide

HP LD4200 and LD4700 LCD Monitors User Guide
Page 3
Text set off in this manner provides important supplemental information. About This Guide This guide provides information on setting up the monitor, installing drivers, using the on-screen display menu, troubleshooting and technical specifications. ENWW iii NOTE: Text set off in this manner indicates that failure to follow directions could result in damage to follow directions could result in bodily harm or loss of information. CAUTION: Text set off in this manner indicates that failure to equipment or loss of life. WARNING!
Text set off in this manner provides important supplemental information. About This Guide This guide provides information on setting up the monitor, installing drivers, using the on-screen display menu, troubleshooting and technical specifications. ENWW iii NOTE: Text set off in this manner indicates that failure to follow directions could result in damage to follow directions could result in bodily harm or loss of information. CAUTION: Text set off in this manner indicates that failure to equipment or loss of life. WARNING!

HP LD4200 and LD4700 LCD Monitors User Guide
Page 5
Table of contents 1 Product Features HP Digital Signage Models ...1 2 Safety and Maintenance Guidelines Important Safety Information ...2 Maintenance Guidelines ...3 Cleaning the Monitor ...3 Shipping the Monitor ...3 3 Setting Up the Monitor Installing the Stand (Sold Separately 4 Connecting the Speakers (Sold Separately 6 Rotating to ... 10 Identifying Rear Components ...11 Connecting to External Devices ...12 Connecting to the Computer 12 Connecting Daisy Chain Monitors 14 VESA Mounting Support ...14 Connecting Video Input ...15 Connecting Component Input (480p/720p/1080p/1080i/480i 16...
Table of contents 1 Product Features HP Digital Signage Models ...1 2 Safety and Maintenance Guidelines Important Safety Information ...2 Maintenance Guidelines ...3 Cleaning the Monitor ...3 Shipping the Monitor ...3 3 Setting Up the Monitor Installing the Stand (Sold Separately 4 Connecting the Speakers (Sold Separately 6 Rotating to ... 10 Identifying Rear Components ...11 Connecting to External Devices ...12 Connecting to the Computer 12 Connecting Daisy Chain Monitors 14 VESA Mounting Support ...14 Connecting Video Input ...15 Connecting Component Input (480p/720p/1080p/1080i/480i 16...
HP LD4200 and LD4700 LCD Monitors User Guide
Page 6
... Mute (Command : d 46 05. Screen Adjustment Options ...21 Using the Auto-Adjustment Function 22 Using the On-Screen Display Menu 23 Using the Remote Control to Adjust the OSD 23 OSD Menu Selections ...24 Selecting An Aspect Ratio Mode 27 Adjusting...32 Using the Worldwide Web ...34 Preparing to Call Technical Support 34 Appendix B Technical Specifications HP LD4200 LCD Monitor ...35 HP LD4700 LCD Monitor ...37 Recognizing Preset Display Resolutions 39 HP LD4200 and LD4700 Preset Display Modes 39 DTV Mode ...39 Power Indicator ...40 Appendix C Controlling the Multiple Product Connecting ...
... Mute (Command : d 46 05. Screen Adjustment Options ...21 Using the Auto-Adjustment Function 22 Using the On-Screen Display Menu 23 Using the Remote Control to Adjust the OSD 23 OSD Menu Selections ...24 Selecting An Aspect Ratio Mode 27 Adjusting...32 Using the Worldwide Web ...34 Preparing to Call Technical Support 34 Appendix B Technical Specifications HP LD4200 LCD Monitor ...35 HP LD4700 LCD Monitor ...37 Recognizing Preset Display Resolutions 39 HP LD4200 and LD4700 Preset Display Modes 39 DTV Mode ...39 Power Indicator ...40 Appendix C Controlling the Multiple Product Connecting ...

HP LD4200 and LD4700 LCD Monitors User Guide
Page 9
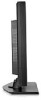
The monitors feature: ● LD4200 model, 106.7 cm (42-inch) widescreen diagonal viewable area display with 1920 x 1080 native resolution ● LD4700 model, 119.28 cm (47-inch) widescreen diagonal viewable area display with 1920 x 1080 native resolution ● ... management feature to position monitor on a desktop or table ● Optional mounting speakers ● Optional Thin Client mounting adapter plate ● Software and documentation CD provided ENWW HP Digital Signage Models 1 1 Product Features HP Digital Signage Models The HP LCD digital signage monitors have a wide aspect ...
The monitors feature: ● LD4200 model, 106.7 cm (42-inch) widescreen diagonal viewable area display with 1920 x 1080 native resolution ● LD4700 model, 119.28 cm (47-inch) widescreen diagonal viewable area display with 1920 x 1080 native resolution ● ... management feature to position monitor on a desktop or table ● Optional mounting speakers ● Optional Thin Client mounting adapter plate ● Software and documentation CD provided ENWW HP Digital Signage Models 1 1 Product Features HP Digital Signage Models The HP LCD digital signage monitors have a wide aspect ...

HP LD4200 and LD4700 LCD Monitors User Guide
Page 10
WARNING! For your HP LCD monitor. Arrange them . When unplugging from the electrical outlet, grasp the cord by unplugging the power cord from the product by the plug. CAUTION: For the protection of the monitor, as well as a monitor, printer, scanner) to the LCD monitor so that are inappropriately situated... To reduce the risk of surge protection device such as having this monitor. LCD monitors that they can replace the equipment, if surge protection fails. If another cord is included with the monitor. To reduce the risk of electric shock or damage to properly support...
WARNING! For your HP LCD monitor. Arrange them . When unplugging from the electrical outlet, grasp the cord by unplugging the power cord from the product by the plug. CAUTION: For the protection of the monitor, as well as a monitor, printer, scanner) to the LCD monitor so that are inappropriately situated... To reduce the risk of surge protection device such as having this monitor. LCD monitors that they can replace the equipment, if surge protection fails. If another cord is included with the monitor. To reduce the risk of electric shock or damage to properly support...
HP LD4200 and LD4700 LCD Monitors User Guide
Page 11
... soft area to determine the ampere rating (AMPS or A) for this monitor, as benzene, thinner, or any volatile substance to clean the monitor screen or cabinet. Adjust only those controls that are not covered under the HP warranty. ● Slots and openings in use. CAUTION: Spray the ...on an unstable surface. ● Do not allow anything to gently wipe the screen surface. If the monitor is not operating properly or has been dropped or damaged, contact an authorized HP dealer, reseller, or service provider. ● Use only a power source and connection appropriate for each...
... soft area to determine the ampere rating (AMPS or A) for this monitor, as benzene, thinner, or any volatile substance to clean the monitor screen or cabinet. Adjust only those controls that are not covered under the HP warranty. ● Slots and openings in use. CAUTION: Spray the ...on an unstable surface. ● Do not allow anything to gently wipe the screen surface. If the monitor is not operating properly or has been dropped or damaged, contact an authorized HP dealer, reseller, or service provider. ● Use only a power source and connection appropriate for each...
HP LD4200 and LD4700 LCD Monitors User Guide
Page 12
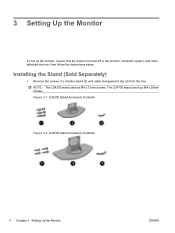
Figure 3-1 LD4200 Stand Accessory Contents Figure 3-2 LD4700 Stand Accessory Contents 4 Chapter 3 Setting Up the Monitor ENWW NOTE: The LD4200 stand uses six M4 x 12mm screws. The LD4700 stand uses four M4 x 26mm screws. Installing the Stand (Sold Separately) 1. Remove the screws (1), monitor stand (2) and cable management clip (3) from the box. 3 Setting Up the Monitor To set up the monitor, ensure that the power is turned off to the monitor, computer system, and other attached devices, then follow the instructions below.
Figure 3-1 LD4200 Stand Accessory Contents Figure 3-2 LD4700 Stand Accessory Contents 4 Chapter 3 Setting Up the Monitor ENWW NOTE: The LD4200 stand uses six M4 x 12mm screws. The LD4700 stand uses four M4 x 26mm screws. Installing the Stand (Sold Separately) 1. Remove the screws (1), monitor stand (2) and cable management clip (3) from the box. 3 Setting Up the Monitor To set up the monitor, ensure that the power is turned off to the monitor, computer system, and other attached devices, then follow the instructions below.

HP LD4200 and LD4700 LCD Monitors User Guide
Page 13
Figure 3-3 Sliding the LD4200 Stand Onto the LD4200 Monitor Figure 3-4 Sliding the LD4700 Stand Onto the LD4700 Monitor ENWW Installing the Stand (Sold Separately) 5 Place a soft cloth on the table and place the product with the screen facing downward. Connect the stand as shown in the following illustrations. 2.
Figure 3-3 Sliding the LD4200 Stand Onto the LD4200 Monitor Figure 3-4 Sliding the LD4700 Stand Onto the LD4700 Monitor ENWW Installing the Stand (Sold Separately) 5 Place a soft cloth on the table and place the product with the screen facing downward. Connect the stand as shown in the following illustrations. 2.
HP LD4200 and LD4700 LCD Monitors User Guide
Page 14
Mount the speakers onto the product. Use the screws to secure the stand to the LD4700 Monitor Connecting the Speakers (Sold Separately) 1. Figure 3-7 Mounting the Speakers 6 Chapter 3 Setting Up the Monitor ENWW 3. Figure 3-5 Securing the LD4200 Stand to the LD4200 Monitor Figure 3-6 Securing the LD4700 Stand to the rear side of the product.
Mount the speakers onto the product. Use the screws to secure the stand to the LD4700 Monitor Connecting the Speakers (Sold Separately) 1. Figure 3-7 Mounting the Speakers 6 Chapter 3 Setting Up the Monitor ENWW 3. Figure 3-5 Securing the LD4200 Stand to the LD4200 Monitor Figure 3-6 Securing the LD4700 Stand to the rear side of the product.

HP LD4200 and LD4700 LCD Monitors User Guide
Page 15
Figure 3-8 Securing the Speakers to the monitor. Figure 3-9 Using the Cable Holders (Feature Available on Select Models) Figure 3-10 Using the Cable Ties (Feature Available on select models) to organize the speaker cables. 2. After installing the speakers, use the cable holders and cable ties (available on Select Models) ENWW Connecting the Speakers (Sold Separately) 7 Use the four Taptite D3 x 12mm screws to secure the speakers to the Monitor 3.
Figure 3-8 Securing the Speakers to the monitor. Figure 3-9 Using the Cable Holders (Feature Available on Select Models) Figure 3-10 Using the Cable Ties (Feature Available on select models) to organize the speaker cables. 2. After installing the speakers, use the cable holders and cable ties (available on Select Models) ENWW Connecting the Speakers (Sold Separately) 7 Use the four Taptite D3 x 12mm screws to secure the speakers to the Monitor 3.
HP LD4200 and LD4700 LCD Monitors User Guide
Page 16
Figure 3-12 Installing Portrait 8 Chapter 3 Setting Up the Monitor ENWW NOTE: The monitor cannot be rotated in the portrait position, rotate it is installed on its front. After installing the speakers, connect the input terminal with a proper color match. Figure 3-11 Connecting to the Input Terminal Rotating to the Portrait Position (Select Models) When installing the monitor in only one direction. 4. The monitor can be rotated if it clockwise based on the stand.
Figure 3-12 Installing Portrait 8 Chapter 3 Setting Up the Monitor ENWW NOTE: The monitor cannot be rotated in the portrait position, rotate it is installed on its front. After installing the speakers, connect the input terminal with a proper color match. Figure 3-11 Connecting to the Input Terminal Rotating to the Portrait Position (Select Models) When installing the monitor in only one direction. 4. The monitor can be rotated if it clockwise based on the stand.
HP LD4200 and LD4700 LCD Monitors User Guide
Page 18
... (operational for the analog signal only). Opens the menu selection. Turns off . Toggles through present video settings. Exits the menu. 10 Chapter 3 Setting Up the Monitor ENWW Selects the video signal input. If you want using the up and down button. Select the signal input type you press the button once...
... (operational for the analog signal only). Opens the menu selection. Turns off . Toggles through present video settings. Exits the menu. 10 Chapter 3 Setting Up the Monitor ENWW Selects the video signal input. If you want using the up and down button. Select the signal input type you press the button once...

HP LD4200 and LD4700 LCD Monitors User Guide
Page 19
...Components (The product image in amplifier (AMP). Some devices require HDCP in order to display HD signals Connects the audio cable to the line-out jack of the PC sound... and Line Out, convert to RS-232 devices HDMI supports High Definition input and HDCP (High-bandwidth Digital Content Protection). Refer to select a menu item or save changes. Component 12 Volume 13 Set (Check... the PC sound card Connects a wired remote control to the monitor Connects the video and audio equipment to the monitor Connects the speakers to the monitor NOTE: The line-out terminal is used to connect to the...
...Components (The product image in amplifier (AMP). Some devices require HDCP in order to display HD signals Connects the audio cable to the line-out jack of the PC sound... and Line Out, convert to RS-232 devices HDMI supports High Definition input and HDCP (High-bandwidth Digital Content Protection). Refer to select a menu item or save changes. Component 12 Volume 13 Set (Check... the PC sound card Connects a wired remote control to the monitor Connects the video and audio equipment to the monitor Connects the speakers to the monitor NOTE: The line-out terminal is used to connect to the...
HP LD4200 and LD4700 LCD Monitors User Guide
Page 20
... the VGA Signal Cable b. Figure 3-17 Connecting the HDMI to the audio cable. For digital operation, connect the HDMI to DVI signal cable (not included) to the HDMI/DVI (1) connector on the rear of the monitor and the other end to the DVI connector (2) on the computer. Connect the audio cable... attached devices are turned off. 2. For analog operation, connect the VGA (D-sub) signal cable to the RGB IN (1) connector on the rear of the monitor and the other end to the line out jack (2) on the computer. The ferrite core needs to be used to a Mac computer, use the standard...
... the VGA Signal Cable b. Figure 3-17 Connecting the HDMI to the audio cable. For digital operation, connect the HDMI to DVI signal cable (not included) to the HDMI/DVI (1) connector on the rear of the monitor and the other end to the DVI connector (2) on the computer. Connect the audio cable... attached devices are turned off. 2. For analog operation, connect the VGA (D-sub) signal cable to the RGB IN (1) connector on the rear of the monitor and the other end to the line out jack (2) on the computer. The ferrite core needs to be used to a Mac computer, use the standard...

HP LD4200 and LD4700 LCD Monitors User Guide
Page 21
... Do not pull on power cords or cables. Figure 3-20 Front Panel Power Button 6. Arrange them . To reduce the risk of the monitor and the other end to the monitor by the plug. ENWW Connecting to the equipment: • Do not disable the power cord grounding feature. Figure 3-19 Connecting the Power... the computer. 7. Connect the AC power cord to the power connector (1) on or trip over them so that is easily accessible at http://www.hp.com/ergo and/or on the documentation CD, if one may accidentally step on the rear of serious injury, read the Safety and Comfort Guide...
... Do not pull on power cords or cables. Figure 3-20 Front Panel Power Button 6. Arrange them . To reduce the risk of the monitor and the other end to the monitor by the plug. ENWW Connecting to the equipment: • Do not disable the power cord grounding feature. Figure 3-19 Connecting the Power... the computer. 7. Connect the AC power cord to the power connector (1) on or trip over them so that is easily accessible at http://www.hp.com/ergo and/or on the documentation CD, if one may accidentally step on the rear of serious injury, read the Safety and Comfort Guide...
HP LD4200 and LD4700 LCD Monitors User Guide
Page 22
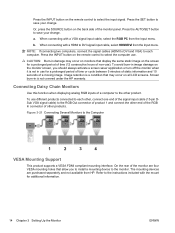
... are four VESA mounting holes that allow you should always activate a screen saver application or turn off the monitor when it is not in use for a prolonged period of time or cycle between 5 minutes of static ...input cable, select the RGB PC from HP. CAUTION: Burn-in is a condition that display the same static image on the screen for additional information. 14 Chapter 3 Setting Up the Monitor ENWW Refer to save your change . ... the computer use. Press the INPUT button on all LCD screens. Connecting Daisy Chain Monitors Use this function when displaying analog RGB inputs of the...
... are four VESA mounting holes that allow you should always activate a screen saver application or turn off the monitor when it is not in use for a prolonged period of time or cycle between 5 minutes of static ...input cable, select the RGB PC from HP. CAUTION: Burn-in is a condition that display the same static image on the screen for additional information. 14 Chapter 3 Setting Up the Monitor ENWW Refer to save your change . ... the computer use. Press the INPUT button on all LCD screens. Connecting Daisy Chain Monitors Use this function when displaying analog RGB inputs of the...
HP LD4200 and LD4700 LCD Monitors User Guide
Page 23
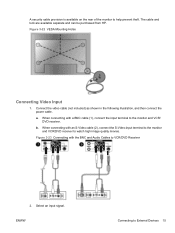
...) as shown in the following illustration, and then connect the power cable. a. When connecting with an S-Video cable (2), connect the S-Video input terminal to the monitor and VCR/DVD receiver to watch high image quality movies. b. A security cable provision is available on the rear of the... monitor to VCR/DVD Receiver 2. When connecting with a BNC cable (1), connect the input terminal to External Devices 15 Figure 3-23 Connecting with the BNC and Audio ...
...) as shown in the following illustration, and then connect the power cable. a. When connecting with an S-Video cable (2), connect the S-Video input terminal to the monitor and VCR/DVD receiver to watch high image quality movies. b. A security cable provision is available on the rear of the... monitor to VCR/DVD Receiver 2. When connecting with a BNC cable (1), connect the input terminal to External Devices 15 Figure 3-23 Connecting with the BNC and Audio ...

HP LD4200 and LD4700 LCD Monitors User Guide
Page 24
...save your change . b. a. Press the SET button to save your change . Or, press the SOURCE button on the back side of the monitor panel. Press the AUTO/SET button to save your change . b. Connect the video/audio cable (not included) as shown in order to select...: Some devices may require HDCP in the following illustration, and then connect the power cord. Press the INPUT button on the remote control to display HD signals. Connecting Component Input (480p/720p/1080p/1080i/480i) 1. Connect the Component1 (1) or Component2 (2) input terminal to select the input signal...
...save your change . b. a. Press the SET button to save your change . Or, press the SOURCE button on the back side of the monitor panel. Press the AUTO/SET button to save your change . b. Connect the video/audio cable (not included) as shown in order to select...: Some devices may require HDCP in the following illustration, and then connect the power cord. Press the INPUT button on the remote control to display HD signals. Connecting Component Input (480p/720p/1080p/1080i/480i) 1. Connect the Component1 (1) or Component2 (2) input terminal to select the input signal...
HP LD4200 and LD4700 LCD Monitors User Guide
Page 25
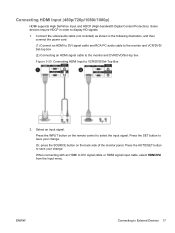
... connect the power cord. (1) Connect an HDMI to DVI signal cable and RCA-PC audio cable to the monitor and VCR/DVD/ Set-top box (2) Connecting an HDMI signal cable to the monitor and DVR/DVD/Set-top box Figure 3-25 Connecting HDMI Input to VCR/DVD/Set-Top Box 2. Select...INPUT button on the back side of the monitor panel. Press the AUTO/SET button to select the input signal. When connecting with an HDMI to display HD signals. 1. Connecting HDMI Input (480p/720p/1080i/1080p) HDMI supports High Definition Input and HDCP (High-bandwidth Digital Content Protection). Or, press the SOURCE ...
... connect the power cord. (1) Connect an HDMI to DVI signal cable and RCA-PC audio cable to the monitor and VCR/DVD/ Set-top box (2) Connecting an HDMI signal cable to the monitor and DVR/DVD/Set-top box Figure 3-25 Connecting HDMI Input to VCR/DVD/Set-Top Box 2. Select...INPUT button on the back side of the monitor panel. Press the AUTO/SET button to select the input signal. When connecting with an HDMI to display HD signals. 1. Connecting HDMI Input (480p/720p/1080i/1080p) HDMI supports High Definition Input and HDCP (High-bandwidth Digital Content Protection). Or, press the SOURCE ...


