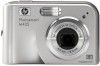
User Guide
Page 3
...23 Recording audio...23 5 Transferring and printing images 25 Transferring images with HP Photosmart Software 25 Transferring images without HP Photosmart Software 25 Printing images from the camera 26 6 Using HP Photosmart Express 28 Using the Photosmart Express Menu 28 Setting up online ...destinations in the camera 28 Sending images to online destinations 29 Selecting images for printing...
...23 Recording audio...23 5 Transferring and printing images 25 Transferring images with HP Photosmart Software 25 Transferring images without HP Photosmart Software 25 Printing images from the camera 26 6 Using HP Photosmart Express 28 Using the Photosmart Express Menu 28 Setting up online ...destinations in the camera 28 Sending images to online destinations 29 Selecting images for printing...
User Guide
Page 5
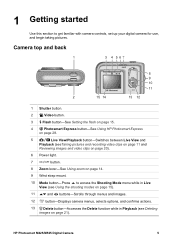
Camera top and back 1 3 4 567 2 15 14 8 9 10 11 13 12 1 Shutter button. 2 Video button. 3 Flash button-See Setting the flash on page 15. 4 Photosmart Express button-See Using HP Photosmart Express on page 28. 5 Live View/Playback button-Switches between Live View and Playback (seeTaking pictures...while in Live View (see Using the shooting modes on page 15). 11 and buttons-Scrolls through menus and images. 12 button-Displays camera menus, selects options, and confirms actions. 13 Delete button-Accesses the Delete function while in Playback (see Deleting images on page 14....
Camera top and back 1 3 4 567 2 15 14 8 9 10 11 13 12 1 Shutter button. 2 Video button. 3 Flash button-See Setting the flash on page 15. 4 Photosmart Express button-See Using HP Photosmart Express on page 28. 5 Live View/Playback button-Switches between Live View and Playback (seeTaking pictures...while in Live View (see Using the shooting modes on page 15). 11 and buttons-Scrolls through menus and images. 12 button-Displays camera menus, selects options, and confirms actions. 13 Delete button-Accesses the Delete function while in Playback (see Deleting images on page 14....
User Guide
Page 6
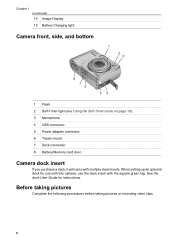
When setting up an optional dock for instructions. Camera front, side, and bottom 1 2 3 8 7 6 54 1 Flash. 2 Self-Timer light (see Using the Self-Timer mode on page 16). 3 Microphone. 4 USB connector. 5 Power adapter connector. 6 Tripod ... card door. Before taking pictures Complete the following procedures before taking pictures or recording video clips. 6 See the dock User Guide for use with this camera, use the dock insert with multiple clear inserts. Chapter 1 (continued) 14 Image Display. 15 Battery Charging light...
When setting up an optional dock for instructions. Camera front, side, and bottom 1 2 3 8 7 6 54 1 Flash. 2 Self-Timer light (see Using the Self-Timer mode on page 16). 3 Microphone. 4 USB connector. 5 Power adapter connector. 6 Tripod ... card door. Before taking pictures Complete the following procedures before taking pictures or recording video clips. 6 See the dock User Guide for use with this camera, use the dock insert with multiple clear inserts. Chapter 1 (continued) 14 Image Display. 15 Battery Charging light...
User Guide
Page 7
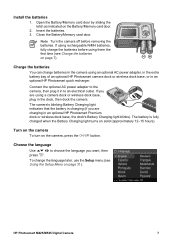
... rechargeable NiMH batteries, fully charge the batteries before removing the batteries. Charge the batteries You can charge batteries in the camera using a camera dock or wireless dock base, plug in an optional HP Photosmart Premium dock or wireless dock base, the dock's Battery Charging light blinks). The battery is charging (if you ...(see Using the Setup Menu on page 31). If you are using an optional AC power adapter, in the extra battery bay of an optional HP Photosmart camera dock or wireless dock base, or in to choose the language you want, then press . Turn on the...
... rechargeable NiMH batteries, fully charge the batteries before removing the batteries. Charge the batteries You can charge batteries in the camera using a camera dock or wireless dock base, plug in an optional HP Photosmart Premium dock or wireless dock base, the dock's Battery Charging light blinks). The battery is charging (if you ...(see Using the Setup Menu on page 31). If you are using an optional AC power adapter, in the extra battery bay of an optional HP Photosmart camera dock or wireless dock base, or in to choose the language you want, then press . Turn on the...

User Guide
Page 8
... to format the card. Insert the memory card in the upper right corner of the video signal for displaying camera images on a television when connected through an optional HP Photosmart Premium dock or wireless dock base (see Using the Setup Menu on , press until the date and ...format settings are set correctly. 3. Install and format an optional memory card 1. With the camera turned on page 31). Close the Battery/Memory card door and turn on page 22. Install the software The HP Photosmart Software provides features for modifying stored images (remove red eyes, 8 Chapter 1 Set...
... to format the card. Insert the memory card in the upper right corner of the video signal for displaying camera images on a television when connected through an optional HP Photosmart Premium dock or wireless dock base (see Using the Setup Menu on , press until the date and ...format settings are set correctly. 3. Install and format an optional memory card 1. With the camera turned on page 31). Close the Battery/Memory card door and turn on page 22. Install the software The HP Photosmart Software provides features for modifying stored images (remove red eyes, 8 Chapter 1 Set...
User Guide
Page 9
... drive and follow the on your camera Now that came with your camera contains the following versions of HP Photosmart Software: ● HP Photosmart Premier Software (for Windows XP systems with at least 128 MB of RAM). Using your camera packaging, HP Photosmart Essential is the letter of...you specify, create online albums, and automatically print selected images when you connect your camera to your computer. See About the HP Photosmart Software on page 20 HP Photosmart M425/M525 Digital Camera 9 Note If you can take and review still images and video clips. For information...
... drive and follow the on your camera Now that came with your camera contains the following versions of HP Photosmart Software: ● HP Photosmart Premier Software (for Windows XP systems with at least 128 MB of RAM). Using your camera packaging, HP Photosmart Essential is the letter of...you specify, create online albums, and automatically print selected images when you connect your camera to your computer. See About the HP Photosmart Software on page 20 HP Photosmart M425/M525 Digital Camera 9 Note If you can take and review still images and video clips. For information...

User Guide
Page 10
Chapter 1 (continued) For information on enhancing your images See Using the Design Gallery Menu on page 22 For information on transferring images from your camera to a computer See Transferring images with HP Photosmart Software on page 25 For information on printing images See Printing images from the camera on page 26 Tip To switch between Live View and Playback, press . 10
Chapter 1 (continued) For information on enhancing your images See Using the Design Gallery Menu on page 22 For information on transferring images from your camera to a computer See Transferring images with HP Photosmart Software on page 25 For information on printing images See Printing images from the camera on page 26 Tip To switch between Live View and Playback, press . 10
User Guide
Page 11
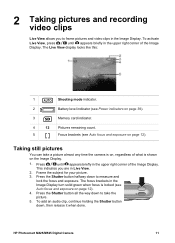
Frame the subject for your picture. 3. Press the Shutter button all the way down to take a picture almost any time the camera is on, regardless of what is locked (see Auto focus and exposure on page 12). To add an audio clip, continue holding the Shutter button ... indicator (see Power indicators on page 39). 3 Memory card indicator. 4 12 Pictures remaining count. 5 Focus brackets (see Auto focus and exposure on the Image Display. 1. HP Photosmart M425/M525 Digital Camera 11
Frame the subject for your picture. 3. Press the Shutter button all the way down to take a picture almost any time the camera is on, regardless of what is locked (see Auto focus and exposure on page 12). To add an audio clip, continue holding the Shutter button ... indicator (see Power indicators on page 39). 3 Memory card indicator. 4 12 Pictures remaining count. 5 Focus brackets (see Auto focus and exposure on the Image Display. 1. HP Photosmart M425/M525 Digital Camera 11
User Guide
Page 12
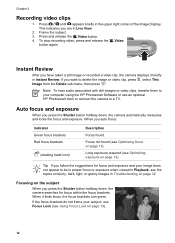
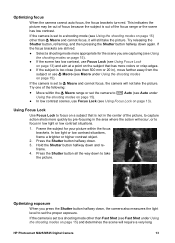
...when viewed in Playback, see Optimizing exposure on page 13). If the focus brackets do not frame your subject, use an optional HP Photosmart dock to connect the camera to your image does not appear to delete the image or video clip, press , select This Image from the Delete sub-... the suggestions for focus within the focus brackets. Auto focus and exposure When you have taken a still image or recorded a video clip, the camera displays it finds focus, the focus brackets turn green. Press until appears briefly in Instant Review. Instant Review After you press the Shutter button halfway...
...when viewed in Playback, see Optimizing exposure on page 13). If the focus brackets do not frame your subject, use an optional HP Photosmart dock to connect the camera to your image does not appear to delete the image or video clip, press , select This Image from the Delete sub-... the suggestions for focus within the focus brackets. Auto focus and exposure When you have taken a still image or recorded a video clip, the camera displays it finds focus, the focus brackets turn green. Press until appears briefly in Instant Review. Instant Review After you press the Shutter button halfway...
User Guide
Page 13
... shots more appropriate for your picture within the Macro range or set the camera to focus on page 13). If the camera is too close (less than Macro and cannot focus, it will require a very long HP Photosmart M425/M525 Digital Camera 13 Hold the Shutter button halfway down again. If the... camera is set the proper exposure. Try one of the picture, to focus in the area where the action will not take...
... shots more appropriate for your picture within the Macro range or set the camera to focus on page 13). If the camera is too close (less than Macro and cannot focus, it will require a very long HP Photosmart M425/M525 Digital Camera 13 Hold the Shutter button halfway down again. If the... camera is set the proper exposure. Try one of the picture, to focus in the area where the action will not take...
User Guide
Page 14
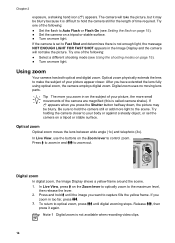
... the lens to make the subject of the following : ● Select a different shooting mode (see Setting the flash on page 15). ● Set the camera on a tripod or stable surface. ● Turn on the Zoom lever to capture fills the yellow frame. After you zoom in on the Zoom lever... you zoom in too far, press . 3. Digital zoom In digital zoom, the Image Display shows a yellow frame around the scene. 1. Press and hold the camera still or add more small movements of time required. Be sure to hold until digital zooming stops. To return to your picture appear closer. Digital...
... the lens to make the subject of the following : ● Select a different shooting mode (see Setting the flash on page 15). ● Set the camera on a tripod or stable surface. ● Turn on the Zoom lever to capture fills the yellow frame. After you zoom in on the Zoom lever... you zoom in too far, press . 3. Digital zoom In digital zoom, the Image Display shows a yellow frame around the scene. 1. Press and hold the camera still or add more small movements of time required. Be sure to hold until digital zooming stops. To return to your picture appear closer. Digital...
User Guide
Page 15
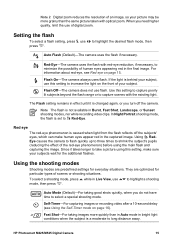
...see Using the Self-Timer mode on page 16). If the light is set to highlight the desired flash mode, then Auto Flash (Default)-The camera uses the flash if necessary. Use this setting to capture poorly lit subjects beyond the flash range or to select a special shooting mode. Red ... Shot-For taking good shots quickly, when you need higher quality, limit the use mode, then press . HP Photosmart M425/M525 Digital Camera 15 Flash On-The camera always uses flash. The Flash setting remains in effect until it takes longer to increase the light on page 15. When you do ...
...see Using the Self-Timer mode on page 16). If the light is set to highlight the desired flash mode, then Auto Flash (Default)-The camera uses the flash if necessary. Use this setting to capture poorly lit subjects beyond the flash range or to select a special shooting mode. Red ... Shot-For taking good shots quickly, when you need higher quality, limit the use mode, then press . HP Photosmart M425/M525 Digital Camera 15 Flash On-The camera always uses flash. The Flash setting remains in effect until it takes longer to increase the light on page 15. When you do ...
User Guide
Page 16
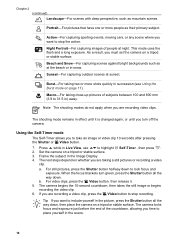
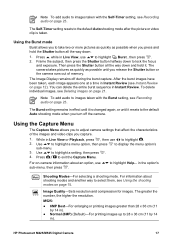
... subject in effect until it . 5. For still pictures, press the Shutter button halfway down . When the focus brackets turn off the camera. The camera locks focus and exposure just before the end of subjects between 100 and 800 mm (3.9 to lock focus and exposure. Action-For capturing sporting...View, use to stop recording. b. Sunset-For capturing outdoor scenes at night. Burst-For taking two or more people as mountain scenes. The camera begins the 10-second countdown, then takes the still image or begins recording the video clip. 6. This mode uses the flash and a long ...
... subject in effect until it . 5. For still pictures, press the Shutter button halfway down . When the focus brackets turn off the camera. The camera locks focus and exposure just before the end of subjects between 100 and 800 mm (3.9 to lock focus and exposure. Action-For capturing sporting...View, use to stop recording. b. Sunset-For capturing outdoor scenes at night. Burst-For taking two or more people as mountain scenes. The camera begins the 10-second countdown, then takes the still image or begins recording the video clip. 6. This mode uses the flash and a long ...
User Guide
Page 17
... pictures as quickly as possible when you turn off during the burst capture. Use to exit the Capture Menu. HP Photosmart M425/M525 Digital Camera 17 The Self-Timer setting resets to the default Auto shooting mode after the picture or video clip is changed again, ... images up to highlight . 2. Use to highlight a menu option, then press to highlight Burst , then press . 2. The Image Display remains off the camera. You can delete the entire burst sequence in the option's Shooting Modes-For selecting a shooting mode. While in Live View or Playback, press , then use...
... pictures as quickly as possible when you turn off during the burst capture. Use to exit the Capture Menu. HP Photosmart M425/M525 Digital Camera 17 The Self-Timer setting resets to the default Auto shooting mode after the picture or video clip is changed again, ... images up to highlight . 2. Use to highlight a menu option, then press to highlight Burst , then press . 2. The Image Display remains off the camera. You can delete the entire burst sequence in the option's Shooting Modes-For selecting a shooting mode. While in Live View or Playback, press , then use...
User Guide
Page 18
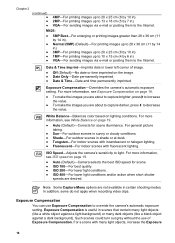
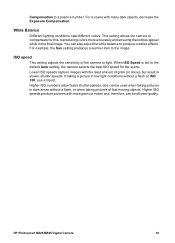
...cm (5 by 7 in). For a scene with fluorescent lighting. For more information, see ISO speed on page 19. ● Auto (Default)-Camera selects the best ISO speed for scene illuminance. For more information, see Exposure Compensation on the image. ● Date Only-Date permanently imprinted.... many dark objects (like a white object against a light background) or many light objects, increase the Exposure 18 Exposure Compensation-Overrides the camera's automatic exposure setting. White Balance-Balances color based on page 19. ● Auto (Default)-Corrects for scene. ● ISO 100-...
...cm (5 by 7 in). For a scene with fluorescent lighting. For more information, see ISO speed on page 19. ● Auto (Default)-Camera selects the best ISO speed for scene illuminance. For more information, see Exposure Compensation on the image. ● Date Only-Date permanently imprinted.... many dark objects (like a white object against a light background) or many light objects, increase the Exposure 18 Exposure Compensation-Overrides the camera's automatic exposure setting. White Balance-Balances color based on page 19. ● Auto (Default)-Corrects for scene. ● ISO 100-...
User Guide
Page 19
...with the least amount of the camera to compensate for the scene. If taking pictures in slower shutter speeds. Higher ISO numbers allow faster shutter speeds, and can also adjust the white balance to a positive number. HP Photosmart M425/M525 Digital Camera 19 For example, the Sun ...setting produces a warmer look to the default Auto setting, the camera selects the best ISO speed for this, reproducing colors more grain (or noise)...
...with the least amount of the camera to compensate for the scene. If taking pictures in slower shutter speeds. Higher ISO numbers allow faster shutter speeds, and can also adjust the white balance to a positive number. HP Photosmart M425/M525 Digital Camera 19 For example, the Sun ...setting produces a warmer look to the default Auto setting, the camera selects the best ISO speed for this, reproducing colors more grain (or noise)...

User Guide
Page 21
All Images (in Memory/on the Zoom lever). HP Photosmart M425/M525 Digital Camera 21 Deleting images To delete a displayed image during Playback: 1. While in Playback, press (same as Zoom In on Card)-Deletes all stored files, then formats ...
All Images (in Memory/on the Zoom lever). HP Photosmart M425/M525 Digital Camera 21 Deleting images To delete a displayed image during Playback: 1. While in Playback, press (same as Zoom In on Card)-Deletes all stored files, then formats ...
User Guide
Page 22
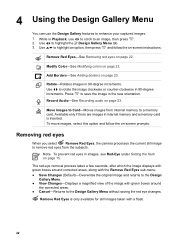
...-degree increments. Press to rotate the image clockwise or counter-clockwise in the new orientation. Removing red eyes When you select Remove Red Eyes, the camera processes the current still image to highlight the Design Gallery Menu tab. 3. Rotate-Rotates images in internal memory and a memory card is only available for...
...-degree increments. Press to rotate the image clockwise or counter-clockwise in the new orientation. Removing red eyes When you select Remove Red Eyes, the camera processes the current still image to highlight the Design Gallery Menu tab. 3. Rotate-Rotates images in internal memory and a memory card is only available for...

User Guide
Page 23
... changes. - To hear audio associated with the specified color scheme and return to a black and white version of an image. 3. HP Photosmart M425/M525 Digital Camera 23 Cancel-Returns to look old-fashioned. - Sepia-Converts image to a brownish tone to the Design Gallery Menu without saving changes....to save a copy of the image with still images or video clips, transfer them to your computer using the HP Photosmart Software or use an optional HP Photosmart dock to connect the camera to black and white. - B&W Tints-Applies color tones to the Design Gallery Menu. To modify colors: ...
... changes. - To hear audio associated with the specified color scheme and return to a black and white version of an image. 3. HP Photosmart M425/M525 Digital Camera 23 Cancel-Returns to look old-fashioned. - Sepia-Converts image to a brownish tone to the Design Gallery Menu without saving changes....to save a copy of the image with still images or video clips, transfer them to your computer using the HP Photosmart Software or use an optional HP Photosmart dock to connect the camera to black and white. - B&W Tints-Applies color tones to the Design Gallery Menu. To modify colors: ...

User Guide
Page 25
... on the camera and follow the instructions on the camera's Photosmart Express Menu (see the Help feature in the HP Photosmart Software. For more information, see Using HP Photosmart Express on page 26) HP Photosmart M425/M525 Digital Camera 25 Connect the camera and computer using an optional HP Photosmart dock... Software: ● You cannot use this task using the USB cable that came with your camera. 3. If you have installed the HP Photosmart Software (see Using HP Photosmart Express on page 8), use the Share features or Buy Prints Online on the computer screen to transfer...
... on the camera and follow the instructions on the camera's Photosmart Express Menu (see the Help feature in the HP Photosmart Software. For more information, see Using HP Photosmart Express on page 26) HP Photosmart M425/M525 Digital Camera 25 Connect the camera and computer using an optional HP Photosmart dock... Software: ● You cannot use this task using the USB cable that came with your camera. 3. If you have installed the HP Photosmart Software (see Using HP Photosmart Express on page 8), use the Share features or Buy Prints Online on the computer screen to transfer...


