
Upgrading and Servicing Guide
Page 3
Table of Contents Start Here...1 Safety Information ...2 Locating Components...2 Opening the Computer ...3 Removing and Replacing a Memory Module 7 Removing a Memory Module ...8 Replacing a Memory Module 10 Removing and Replacing the Hard Disk Drive 14 Removing the Hard Disk Drive 14 Replacing a Hard Disk Drive...17 Table of Contents iii
Table of Contents Start Here...1 Safety Information ...2 Locating Components...2 Opening the Computer ...3 Removing and Replacing a Memory Module 7 Removing a Memory Module ...8 Replacing a Memory Module 10 Removing and Replacing the Hard Disk Drive 14 Removing the Hard Disk Drive 14 Replacing a Hard Disk Drive...17 Table of Contents iii

Upgrading and Servicing Guide
Page 5
...: Always disconnect the HP TouchSmart PC from the power source before attempting to http://www.hp.com/support for replacing or upgrading the memory and the hard disk drive in personal injury or equipment damage. Upgrading and Servicing Guide 1 Start Here Before you open and examine the computer. Hewlett-Packard recommends that you use an antistatic wrist strap and stand on a conductive foam pad when working on the computer.
...: Always disconnect the HP TouchSmart PC from the power source before attempting to http://www.hp.com/support for replacing or upgrading the memory and the hard disk drive in personal injury or equipment damage. Upgrading and Servicing Guide 1 Start Here Before you open and examine the computer. Hewlett-Packard recommends that you use an antistatic wrist strap and stand on a conductive foam pad when working on the computer.

Upgrading and Servicing Guide
Page 6
...: Take care when lifting or moving your system to locate components of the HP TouchSmart PC. WARNING: Please read "Additional Safety Information" in the Limited Warranty, Support, and System Recovery Guide before installing and connecting your computer. A B C H D G E F A: Pocket media drive bay B: Optical disc drive slot C: Back cover D: Computer stand G: Hard drive/memory cover E: Power adapter connector H: Connector cover F: Wireless keyboard and mouse receiver 2 Upgrading and Servicing Guide WARNING: Avoid touching sharp edges inside the computer. The computer is...
...: Take care when lifting or moving your system to locate components of the HP TouchSmart PC. WARNING: Please read "Additional Safety Information" in the Limited Warranty, Support, and System Recovery Guide before installing and connecting your computer. A B C H D G E F A: Pocket media drive bay B: Optical disc drive slot C: Back cover D: Computer stand G: Hard drive/memory cover E: Power adapter connector H: Connector cover F: Wireless keyboard and mouse receiver 2 Upgrading and Servicing Guide WARNING: Avoid touching sharp edges inside the computer. The computer is...

Upgrading and Servicing Guide
Page 7
... and equipment damage, always complete the following steps in order, when opening the HP TouchSmart PC. 1 Remove all media and external devices (CDs, DVDs, memory cards, USB devices, pocket media drive, and external hard disk drives) from the back of the HP TouchSmart PC. A Upgrading and Servicing Guide 3 CAUTION: Static electricity can damage the electronic components of static electricity by briefly touching a grounded metal object. 2 Tap the Windows Vista start button™ , and then tap Shut Down. Ensure that...
... and equipment damage, always complete the following steps in order, when opening the HP TouchSmart PC. 1 Remove all media and external devices (CDs, DVDs, memory cards, USB devices, pocket media drive, and external hard disk drives) from the back of the HP TouchSmart PC. A Upgrading and Servicing Guide 3 CAUTION: Static electricity can damage the electronic components of static electricity by briefly touching a grounded metal object. 2 Tap the Windows Vista start button™ , and then tap Shut Down. Ensure that...

Upgrading and Servicing Guide
Page 14
... of the same type and speed as the module that the key slot on page 8. 2 Align the new memory module with memory of the contacts. CAUTION: When handling a memory module, be installed by using the same procedure listed below. The capacity for both memory modules must match for optimal performance. NOTE: The sockets are keyed. If the module slot does not match the socket, turn the memory module over. 10 Upgrading and Servicing Guide
... of the same type and speed as the module that the key slot on page 8. 2 Align the new memory module with memory of the contacts. CAUTION: When handling a memory module, be installed by using the same procedure listed below. The capacity for both memory modules must match for optimal performance. NOTE: The sockets are keyed. If the module slot does not match the socket, turn the memory module over. 10 Upgrading and Servicing Guide
Upgrading and Servicing Guide
Page 17
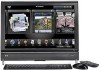
Now, place the computer upright on a flat surface with the stand in a safe and open position. 10° min. 40°max Reconnect power cables and peripherals. Upgrading and Servicing Guide 13 NOTE: If a blank screen is displayed after you replace or add a memory module, the memory is installed incorrectly, or it is the wrong type of memory. 6 Replace the screw that secures the hard disk drive cage to the chassis. You have completed this procedure successfully! Remove and reinstall the memory module.
Now, place the computer upright on a flat surface with the stand in a safe and open position. 10° min. 40°max Reconnect power cables and peripherals. Upgrading and Servicing Guide 13 NOTE: If a blank screen is displayed after you replace or add a memory module, the memory is installed incorrectly, or it is the wrong type of memory. 6 Replace the screw that secures the hard disk drive cage to the chassis. You have completed this procedure successfully! Remove and reinstall the memory module.

Upgrading and Servicing Guide
Page 18
... of the way (B), using recovery discs to the Limited Warranty, Support, and System Recovery Guide included with your HP TouchSmart PC. B A 14 Upgrading and Servicing Guide Removing and Replacing the Hard Disk Drive You can replace or upgrade the hard disk drive. The hard disk drive is a Serial ATA (advanced technology attachment) drive, which uses a narrow data cable. CAUTION: Before removing the hard disk drive, back up and out of personal injury from electrical shock or hot surfaces, disconnect the power cord from the...
... of the way (B), using recovery discs to the Limited Warranty, Support, and System Recovery Guide included with your HP TouchSmart PC. B A 14 Upgrading and Servicing Guide Removing and Replacing the Hard Disk Drive You can replace or upgrade the hard disk drive. The hard disk drive is a Serial ATA (advanced technology attachment) drive, which uses a narrow data cable. CAUTION: Before removing the hard disk drive, back up and out of personal injury from electrical shock or hot surfaces, disconnect the power cord from the...
Warranty and Support Guide
Page 5
... to follow the instructions intended for defective products. UNITS SENT IN FOR SERVICE MAY HAVE THE DATA ERASED FROM THE HARD DRIVE AND THE PROGRAMS RESTORED TO THEIR ORIGINAL STATE. Limitation of HP. Limited Warranty Period The Limited Warranty Period for an HP Hardware Product is made in writing. 5 In the unlikely event that the operation of this Limited...
... to follow the instructions intended for defective products. UNITS SENT IN FOR SERVICE MAY HAVE THE DATA ERASED FROM THE HARD DRIVE AND THE PROGRAMS RESTORED TO THEIR ORIGINAL STATE. Limitation of HP. Limited Warranty Period The Limited Warranty Period for an HP Hardware Product is made in writing. 5 In the unlikely event that the operation of this Limited...
Warranty and Support Guide
Page 6
... through Friday, but may be directed by HP to verify configurations, load most recent firmware, install software patches, run HP diagnostics tests, or use of all countries/regions. In cases where the replacement part must be fixed by HP to provide timely support; (d) ensure that the problem can be fixed using one of these service upgrades, refer to and from your hardware. Failure to return the defective product may...
... through Friday, but may be directed by HP to verify configurations, load most recent firmware, install software patches, run HP diagnostics tests, or use of all countries/regions. In cases where the replacement part must be fixed by HP to provide timely support; (d) ensure that the problem can be fixed using one of these service upgrades, refer to and from your hardware. Failure to return the defective product may...
Warranty and Support Guide
Page 13
... 3 Updating Drivers 4 Microsoft System Restore 5 Software Program and Hardware Driver Reinstallation 6 System Recovery NOTE: If you are as simple as a printer, a hard disk drive, a mouse, or a keyboard. If your computer works improperly or stops because of fixing your problem: 1 Click the Windows Vista start button. 3 Click the Arrow button next to a previous restore point. If you experience a problem that follow provide detailed instructions for your hard disk drive. To restart your computer: 1 Close all open programs and windows...
... 3 Updating Drivers 4 Microsoft System Restore 5 Software Program and Hardware Driver Reinstallation 6 System Recovery NOTE: If you are as simple as a printer, a hard disk drive, a mouse, or a keyboard. If your computer works improperly or stops because of fixing your problem: 1 Click the Windows Vista start button. 3 Click the Arrow button next to a previous restore point. If you experience a problem that follow provide detailed instructions for your hard disk drive. To restart your computer: 1 Close all open programs and windows...

Warranty and Support Guide
Page 14
... Windows Vista start button, All Programs, PC Help & Tools, and then click Recovery Manager. 2 Click Advanced Options, Reinstall software programs that you uninstall a program, be used for example, discs or the Internet). System Recovery - System recovery completely erases and reformats the hard disk drive, deleting all data files you initially installed it . Run the system recovery from where you have a way to reinstall the factory-shipped operating system, software programs, and hardware drivers...
... Windows Vista start button, All Programs, PC Help & Tools, and then click Recovery Manager. 2 Click Advanced Options, Reinstall software programs that you uninstall a program, be used for example, discs or the Internet). System Recovery - System recovery completely erases and reformats the hard disk drive, deleting all data files you initially installed it . Run the system recovery from where you have a way to reinstall the factory-shipped operating system, software programs, and hardware drivers...

Warranty and Support Guide
Page 15
... the monitor, keyboard, and mouse. 3 Turn on the computer. 4 Click the Windows Vista start button, All Programs, PC Help & Tools, and then click Recovery Disc Creation. 3 Follow the onscreen instructions. Disk Drive DVD DVD CD No CD or DVD drive Disc Type DVD-R, DVD+R DVD+R DualLayer CD-R Number of Required Blank Discs 1-3 discs 1-2 discs 7-16 discs Contact HP Support The process takes some of recovery discs is so important, there is correct. To create recovery discs: 1 Close all peripheral devices from HP Support. Starting system recovery from the recovery image...
... the monitor, keyboard, and mouse. 3 Turn on the computer. 4 Click the Windows Vista start button, All Programs, PC Help & Tools, and then click Recovery Disc Creation. 3 Follow the onscreen instructions. Disk Drive DVD DVD CD No CD or DVD drive Disc Type DVD-R, DVD+R DVD+R DualLayer CD-R Number of Required Blank Discs 1-3 discs 1-2 discs 7-16 discs Contact HP Support The process takes some of recovery discs is so important, there is correct. To create recovery discs: 1 Close all peripheral devices from HP Support. Starting system recovery from the recovery image...

Warranty and Support Guide
Page 22
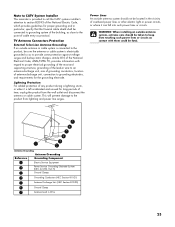
... applicable Industry Canada Terminal Equipment Technical Specifications. Changing the voltage select switch to the incorrect position can damage your safety, always unplug the computer from its power source and from any telecommunications systems (such as telephone lines), networks, or modems before opening the equipment enclosure or touching an uninsulated modem cable, jack, or internal components. • If this product was...
... applicable Industry Canada Terminal Equipment Technical Specifications. Changing the voltage select switch to the incorrect position can damage your safety, always unplug the computer from its power source and from any telecommunications systems (such as telephone lines), networks, or modems before opening the equipment enclosure or touching an uninsulated modem cable, jack, or internal components. • If this product was...
Warranty and Support Guide
Page 23
... keep from touching such power lines or circuits as contact with regard to proper electrical grounding of the mast and supporting structure, grounding of the lead-in particular, specify that the Coaxial cable shield shall be fatal. 7 6 5 4 3 1 2 Antenna Grounding Antenna Grounding Reference Grounding Component 1 Electric Service Equipment 2 Power Service Grounding Electrode System (NEC Art 250, Part H) 3 Ground Clamps...
... keep from touching such power lines or circuits as contact with regard to proper electrical grounding of the mast and supporting structure, grounding of the lead-in particular, specify that the Coaxial cable shield shall be fatal. 7 6 5 4 3 1 2 Antenna Grounding Antenna Grounding Reference Grounding Component 1 Electric Service Equipment 2 Power Service Grounding Electrode System (NEC Art 250, Part H) 3 Ground Clamps...
Getting Started Guide
Page 3
... Synchronizing the wireless keyboard or mouse 12 Turning the HP TouchSmart PC On and Off 13 Turning on the HP TouchSmart PC 13 Turning off the HP TouchSmart PC 13 Changing Power Settings ...14 Connecting to the Internet...14 Setting up a wireless home network 15 Setting up a wired home network 15 Using Bluetooth Devices ...17 Adjusting Screen Brightness...17 Adjusting the Ambient Light ...18 Adding Hardware and Software 18 Upgrading your HP TouchSmart PC hardware 18 Updating your HP TouchSmart software 18 Using the Optical Disc Drive...19 Using the HP Pocket Media Drive 19 Using the...
... Synchronizing the wireless keyboard or mouse 12 Turning the HP TouchSmart PC On and Off 13 Turning on the HP TouchSmart PC 13 Turning off the HP TouchSmart PC 13 Changing Power Settings ...14 Connecting to the Internet...14 Setting up a wireless home network 15 Setting up a wired home network 15 Using Bluetooth Devices ...17 Adjusting Screen Brightness...17 Adjusting the Ambient Light ...18 Adding Hardware and Software 18 Upgrading your HP TouchSmart PC hardware 18 Updating your HP TouchSmart software 18 Using the Optical Disc Drive...19 Using the HP Pocket Media Drive 19 Using the...

Getting Started Guide
Page 6
.... HP TouchSmart PC Getting Started guide (this guide) Upgrading and Servicing Guide NOTE: If this guide is not included with your computer. Upgrade or replace components of the computer hardware. Watching and Recording TV guide Tap the Windows Vista start button™ , tap Help and Support, and then tap the User Guides icon. vi Getting Started Find computer warranty information. Connect a television signal. Connect to use the Microsoft® Windows Vista® operating system. Order parts and find Setup poster...
.... HP TouchSmart PC Getting Started guide (this guide) Upgrading and Servicing Guide NOTE: If this guide is not included with your computer. Upgrade or replace components of the computer hardware. Watching and Recording TV guide Tap the Windows Vista start button™ , tap Help and Support, and then tap the User Guides icon. vi Getting Started Find computer warranty information. Connect a television signal. Connect to use the Microsoft® Windows Vista® operating system. Order parts and find Setup poster...

Getting Started Guide
Page 9
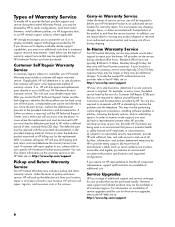
... quick access to Know the HP TouchSmart PC 3 Works with select models only. The diagram shows the internal location of the computer. To turn off your music, photos, videos, or the Web. J Memory card reader Use the built-in memory card reader to easily access photos and other 802.11n WLAN devices.) D Microphone array Use the built-in Sleep mode. E Webcam Create videos and snapshots that you can view, send by tapping Windows Vista start button, tap the Arrow button next to video...
... quick access to Know the HP TouchSmart PC 3 Works with select models only. The diagram shows the internal location of the computer. To turn off your music, photos, videos, or the Web. J Memory card reader Use the built-in memory card reader to easily access photos and other 802.11n WLAN devices.) D Microphone array Use the built-in Sleep mode. E Webcam Create videos and snapshots that you can view, send by tapping Windows Vista start button, tap the Arrow button next to video...

Getting Started Guide
Page 26
... behind the connector cover. You also may need to purchase some cables separately. 1 Connect the coaxial cable from your remote control, keyboard, and mouse. A B C D 20 Getting Started TV tuners and remote controls are included in Windows Media Center are accessible through this program to the S-Video In connector (A), located on the computer. To watch and record TV programs, refer to the computer, your HP TouchSmart PC to...
... behind the connector cover. You also may need to purchase some cables separately. 1 Connect the coaxial cable from your remote control, keyboard, and mouse. A B C D 20 Getting Started TV tuners and remote controls are included in Windows Media Center are accessible through this program to the S-Video In connector (A), located on the computer. To watch and record TV programs, refer to the computer, your HP TouchSmart PC to...
Getting Started Guide
Page 45
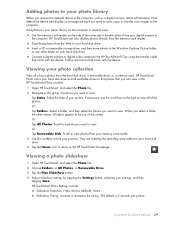
... the memory card reader. Connect a digital camera or digital video camera to the HP TouchSmart PC by the date they were added to your hard disk drive. 4 Tap the House icon to return to find your pictures. Or Tap Folders. Scroll to a photo you want to view. They are listed by using the transfer cable that came with the device. HP TouchSmart Photo Settings include: Slideshow Transition: Fade, Motion (default), None...
... the memory card reader. Connect a digital camera or digital video camera to the HP TouchSmart PC by the date they were added to your hard disk drive. 4 Tap the House icon to return to find your pictures. Or Tap Folders. Scroll to a photo you want to view. They are listed by using the transfer cable that came with the device. HP TouchSmart Photo Settings include: Slideshow Transition: Fade, Motion (default), None...

Getting Started Guide
Page 71
... voice message, creating 54 volume adjusting speaker volume 26 controls 3 Volume Mixer 26 W weather updates, getting 56 webcam capturing video and snapshots 51 features 3 LED 8 setting up a video call 51 using with the microphone 50 Windows Media Center setup wizard 22 using the remote control 23 using to watch and record TV programs 20 Windows Media Player, using with HP TouchSmart 42 Windows Movie Maker, features 62 wired home network LAN connection 6 setting up 15 wireless home network LAN connection 3 setting up 15 working in comfort...
... voice message, creating 54 volume adjusting speaker volume 26 controls 3 Volume Mixer 26 W weather updates, getting 56 webcam capturing video and snapshots 51 features 3 LED 8 setting up a video call 51 using with the microphone 50 Windows Media Center setup wizard 22 using the remote control 23 using to watch and record TV programs 20 Windows Media Player, using with HP TouchSmart 42 Windows Movie Maker, features 62 wired home network LAN connection 6 setting up 15 wireless home network LAN connection 3 setting up 15 working in comfort...


