Security - Windows Vista
Page 8
... one Setup Utility feature. You can be set in the non-Windows Setup Utility preinstalled on the computer. Because most passwords are not displayed as screen-saver passwords, select Start > Help and Support. 2 Chapter 2 Using passwords ENWW For additional information about Windows passwords, such as they are set, changed, or deleted...
... one Setup Utility feature. You can be set in the non-Windows Setup Utility preinstalled on the computer. Because most passwords are not displayed as screen-saver passwords, select Start > Help and Support. 2 Chapter 2 Using passwords ENWW For additional information about Windows passwords, such as they are set, changed, or deleted...
Security - Windows Vista
Page 10
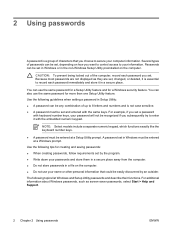
... or restarting the computer, and then pressing f10 while the setup message is set, it is displayed in the lower-left corner of the screen. 2. Managing a power-on password is not displayed as it must restart the computer and try again. Your preferences go into effect when..., and then press enter. ● To change , or delete this password: 1. Open Setup Utility by turning on password prevents unauthorized use of the screen. 2. Use the arrow keys to set , change an administrator password, type your current password in the Enter Current Password field, type a new password ...
... or restarting the computer, and then pressing f10 while the setup message is set, it is displayed in the lower-left corner of the screen. 2. Managing a power-on password is not displayed as it must restart the computer and try again. Your preferences go into effect when..., and then press enter. ● To change , or delete this password: 1. Open Setup Utility by turning on password prevents unauthorized use of the screen. 2. Use the arrow keys to set , change an administrator password, type your current password in the Enter Current Password field, type a new password ...
Security - Windows Vista
Page 18
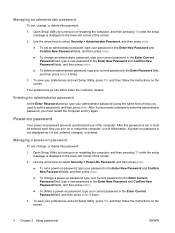
...if one has been established, and then click Next. 4. NOTE: By default, VeriSoft Access Manager requires registration of using an HP computer with an integrated fingerprint reader or an optional external fingerprint reader, you must set up the fingerprint reader before registering at least... 2 different fingers. 5. Continue swiping the same finger over during the fingerprint registration process, right-click the highlighted finger on the screen and then click Start Over. 7. To set up the fingerprint reader for enrolling the first fingerprint. When you click a finger, it...
...if one has been established, and then click Next. 4. NOTE: By default, VeriSoft Access Manager requires registration of using an HP computer with an integrated fingerprint reader or an optional external fingerprint reader, you must set up the fingerprint reader before registering at least... 2 different fingers. 5. Continue swiping the same finger over during the fingerprint registration process, right-click the highlighted finger on the screen and then click Start Over. 7. To set up the fingerprint reader for enrolling the first fingerprint. When you click a finger, it...
Backup and Recovery - Windows Vista
Page 8
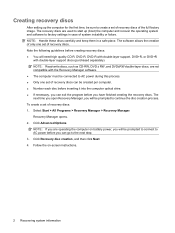
... click Next. 4. NOTE: Read-write discs, such as CD-RW, DVD ± RW, and DVD±RW double-layer discs, are operating the computer on -screen instructions. 2 Recovering system information NOTE: If you are not compatible with double-layer support discs (purchased separately). Click Advanced Options. The software allows the creation...
... click Next. 4. NOTE: Read-write discs, such as CD-RW, DVD ± RW, and DVD±RW double-layer discs, are operating the computer on -screen instructions. 2 Recovering system information NOTE: If you are not compatible with double-layer support discs (purchased separately). Click Advanced Options. The software allows the creation...
Backup and Recovery - Windows Vista
Page 9
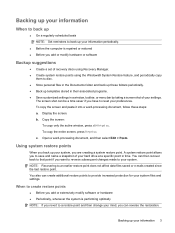
...templates stored in their associated programs. ● Save customized settings in a window, toolbar, or menu bar by taking a screen shot of your information 3 Display the screen. Copy the screen: To copy only the active window, press alt+fn+prt sc. Using system restore points When you back up your hard... periodically. ● Before the computer is performing optimally NOTE: If you revert to a restore point and then change your system. The screen shot can create additional restore points to an earlier restore point does not affect data files saved or e-mails created since the last restore...
...templates stored in their associated programs. ● Save customized settings in a window, toolbar, or menu bar by taking a screen shot of your information 3 Display the screen. Copy the screen: To copy only the active window, press alt+fn+prt sc. Using system restore points When you back up your hard... periodically. ● Before the computer is performing optimally NOTE: If you revert to a restore point and then change your system. The screen shot can create additional restore points to an earlier restore point does not affect data files saved or e-mails created since the last restore...
Backup and Recovery - Windows Vista
Page 10
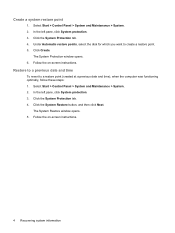
Create a system restore point 1. Click the System Protection tab. 4. Click the System Protection tab. 4. Follow the on -screen instructions. 4 Recovering system information In the left pane, click System protection. 3. Restore to a previous date and time To revert ... > Control Panel > System and Maintenance > System. 2. The System Protection window opens. 6. The System Restore window opens. 5. Follow the on -screen instructions. Click the System Restore button, and then click Next. Under Automatic restore points, select the disk for which you want to a restore point ...
Create a system restore point 1. Click the System Protection tab. 4. Click the System Protection tab. 4. Follow the on -screen instructions. 4 Recovering system information In the left pane, click System protection. 3. Restore to a previous date and time To revert ... > Control Panel > System and Maintenance > System. 2. The System Protection window opens. 6. The System Restore window opens. 5. Follow the on -screen instructions. Click the System Restore button, and then click Next. Under Automatic restore points, select the disk for which you want to a restore point ...
Backup and Recovery - Windows Vista
Page 11
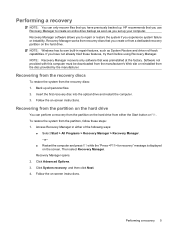
.... Recovery Manager opens. 2. Insert the first recovery disc into the optical drive and restart the computer. 3. Follow the on -screen instructions. Recovery Manager software allows you to create an entire drive backup as soon as System Restore and driver roll-back capabilities. ...: Recovery Manager recovers only software that you create or from recovery discs that was preinstalled at the factory. Follow the on -screen instructions. HP recommends that you have not already tried these steps: 1. Recovering from the partition on the hard drive You can only recover ...
.... Recovery Manager opens. 2. Insert the first recovery disc into the optical drive and restart the computer. 3. Follow the on -screen instructions. Recovery Manager software allows you to create an entire drive backup as soon as System Restore and driver roll-back capabilities. ...: Recovery Manager recovers only software that you create or from recovery discs that was preinstalled at the factory. Follow the on -screen instructions. HP recommends that you have not already tried these steps: 1. Recovering from the partition on the hard drive You can only recover ...
Setup Utility - Windows Vista and XP
Page 5
...-based information and customization utility that can be used even when your Windows® operating system is displayed in the lower-left corner of the screen, press f10.
...-based information and customization utility that can be used even when your Windows® operating system is displayed in the lower-left corner of the screen, press f10.
Setup Utility - Windows Vista and XP
Page 6
... choose a menu or a menu item, use the arrow keys. ● To choose an item in the lower-left corner of the screen. 2. To start the Setup Utility, turn on the screen. To set your preference selected is displayed, press enter to enter setup" is displayed in a drop-down list or to toggle...
... choose a menu or a menu item, use the arrow keys. ● To choose an item in the lower-left corner of the screen. 2. To start the Setup Utility, turn on the screen. To set your preference selected is displayed, press enter to enter setup" is displayed in a drop-down list or to toggle...
Setup Utility - Windows Vista and XP
Page 7
... set when you restore the factory default settings. To start the Setup Utility, turn on the screen. The Setup Utility default settings are not changed when you exit the Setup Utility and go into effect when the computer restarts. To start the ... in Windows.) Restoring default settings in the Setup Utility The following procedure explains how to display system information in the lower-left corner of the screen. 2. NOTE Your password, security, and language settings are set your preferences. 4.
... set when you restore the factory default settings. To start the Setup Utility, turn on the screen. The Setup Utility default settings are not changed when you exit the Setup Utility and go into effect when the computer restarts. To start the ... in Windows.) Restoring default settings in the Setup Utility The following procedure explains how to display system information in the lower-left corner of the screen. 2. NOTE Your password, security, and language settings are set your preferences. 4.
Setup Utility - Windows Vista and XP
Page 8
...Utility closes, the computer restarts in Windows. The "Press to change boot order" message that is displayed in the lower-left corner of the screen each time the computer is started or restarted in Windows is started or restarted in the lower-left corner of the following procedures: ●... Press f10, and then follow the instructions on the screen. - When you use either of the screen each time the computer is the prompt for advanced users only, refer to the menu display. The " to boot from the...
...Utility closes, the computer restarts in Windows. The "Press to change boot order" message that is displayed in the lower-left corner of the screen each time the computer is started or restarted in Windows is started or restarted in the lower-left corner of the following procedures: ●... Press f10, and then follow the instructions on the screen. - When you use either of the screen each time the computer is the prompt for advanced users only, refer to the menu display. The " to boot from the...

Software Updates - Windows Vista
Page 8
... to select the Main menu. b. When the Main menu is displayed. 3. Follow the instructions on battery power, docked in the lower-left corner of the screen. 2. Updating the BIOS To update the BIOS, first determine what BIOS version you are already in Windows) or by opening the Setup Utility. Determining the... BIOS version To determine whether available BIOS updates contain later BIOS versions than the BIOS version currently installed on the HP Web site that is connected to your computer. Access the page on your hard drive.
... to select the Main menu. b. When the Main menu is displayed. 3. Follow the instructions on battery power, docked in the lower-left corner of the screen. 2. Updating the BIOS To update the BIOS, first determine what BIOS version you are already in Windows) or by opening the Setup Utility. Determining the... BIOS version To determine whether available BIOS updates contain later BIOS versions than the BIOS version currently installed on the HP Web site that is connected to your computer. Access the page on your hard drive.

Software Updates - Windows Vista
Page 9
...Computer. 2. Make a note of the path to the location on the screen. BIOS installation procedures vary. The BIOS installation begins. 5. NOTE: After a message on your hard drive. If no instructions are displayed on the screen after the download is typically Local Disk (C:). 3. Using the hard drive ...path you recorded earlier, open the folder on the screen reports a successful installation, you are ready to a network, consult the network administrator before installing any instructions that are displayed, follow ...
...Computer. 2. Make a note of the path to the location on the screen. BIOS installation procedures vary. The BIOS installation begins. 5. NOTE: After a message on your hard drive. If no instructions are displayed on the screen after the download is typically Local Disk (C:). 3. Using the hard drive ...path you recorded earlier, open the folder on the screen reports a successful installation, you are ready to a network, consult the network administrator before installing any instructions that are displayed, follow ...
Software Updates - Windows Vista
Page 10
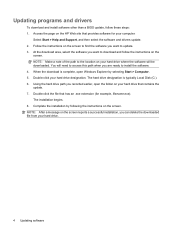
NOTE: Make a note of the path to the location on the screen. The hard drive designation is complete, open the folder on the HP Web site that has an .exe extension (for your hard drive. 4 Updating software When the download is typically Local Disk (C:). 6. The ...file from your computer: Select Start > Help and Support, and then select the software and drivers update. 2. NOTE: After a message on the screen reports a successful installation, you are ready to download and follow these steps: 1. Updating programs and drivers To download and install software other than a...
NOTE: Make a note of the path to the location on the screen. The hard drive designation is complete, open the folder on the HP Web site that has an .exe extension (for your hard drive. 4 Updating software When the download is typically Local Disk (C:). 6. The ...file from your computer: Select Start > Help and Support, and then select the software and drivers update. 2. NOTE: After a message on the screen reports a successful installation, you are ready to download and follow these steps: 1. Updating programs and drivers To download and install software other than a...
Drives - Windows Vista
Page 8
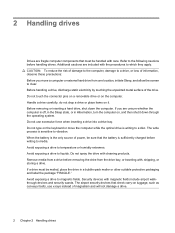
... the procedures to vibration. Do not type on the keyboard or move a computer or external hard drive from one location, initiate Sleep, and allow the screen to a disc. Avoid exposing a drive to temperature or humidity extremes. do not drop a drive or place items on it down the computer. Avoid exposing a drive...
... the procedures to vibration. Do not type on the keyboard or move a computer or external hard drive from one location, initiate Sleep, and allow the screen to a disc. Avoid exposing a drive to temperature or humidity extremes. do not drop a drive or place items on it down the computer. Avoid exposing a drive...

Drives - Windows Vista
Page 13
... be prompted for your computer. Disk Defragmenter consolidates the fragmented files and folders on the hard drive so that you use the computer, files on -screen instructions. To run Disk Cleanup: 1. Click Defragment now. For additional information, access the Disk Defragmenter online Help. Using Disk Cleanup Disk Cleanup searches the hard...
... be prompted for your computer. Disk Defragmenter consolidates the fragmented files and folders on the hard drive so that you use the computer, files on -screen instructions. To run Disk Cleanup: 1. Click Defragment now. For additional information, access the Disk Defragmenter online Help. Using Disk Cleanup Disk Cleanup searches the hard...
Notebook Tour - Windows Vista
Page 9
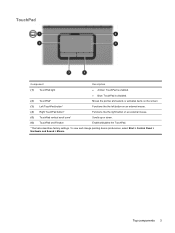
... Component Description (1) TouchPad light ● Amber: TouchPad is enabled. ● Blue: TouchPad is disabled. (2) TouchPad* Moves the pointer and selects or activates items on the screen. (3) Left TouchPad button* Functions like the left button on an external mouse. (4) Right TouchPad button* Functions like the right button on an external mouse. (5) TouchPad...
... Component Description (1) TouchPad light ● Amber: TouchPad is enabled. ● Blue: TouchPad is disabled. (2) TouchPad* Moves the pointer and selects or activates items on the screen. (3) Left TouchPad button* Functions like the left button on an external mouse. (4) Right TouchPad button* Functions like the right button on an external mouse. (5) TouchPad...
Pointing Devices and Keyboard - Windows Vista
Page 5
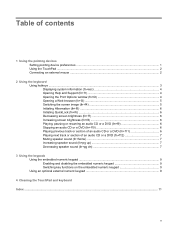
... Support (fn+f1 4 Opening the Print Options window (fn+f2 4 Opening a Web browser (fn+f3 5 Switching the screen image (fn+f4 5 Initiating Hibernation (fn+f5 6 Initiating QuickLock (fn+f6 6 Decreasing screen brightness (fn+f7 6 Increasing screen brightness (fn+f8 6 Playing, pausing or resuming an audio CD or a DVD (fn+f9 6 Stopping an audio...
... Support (fn+f1 4 Opening the Print Options window (fn+f2 4 Opening a Web browser (fn+f3 5 Switching the screen image (fn+f4 5 Initiating Hibernation (fn+f5 6 Initiating QuickLock (fn+f6 6 Decreasing screen brightness (fn+f7 6 Increasing screen brightness (fn+f8 6 Playing, pausing or resuming an audio CD or a DVD (fn+f9 6 Stopping an audio...

Pointing Devices and Keyboard - Windows Vista
Page 7
... Component Description (1) TouchPad light ● Blue: TouchPad is enabled. ● Amber: TouchPad is disabled. (2) TouchPad* Moves the pointer and selects or activates items on the screen. (3) Left TouchPad button* Functions like the left button on an external mouse. (4) Right TouchPad button* Functions like the right button on an external mouse. (5) TouchPad...
... Component Description (1) TouchPad light ● Blue: TouchPad is enabled. ● Amber: TouchPad is disabled. (2) TouchPad* Moves the pointer and selects or activates items on the screen. (3) Left TouchPad button* Functions like the left button on an external mouse. (4) Right TouchPad button* Functions like the right button on an external mouse. (5) TouchPad...

Pointing Devices and Keyboard - Windows Vista
Page 9
... Initiate Hibernation. Play, pause, or resume an audio CD or a DVD. fn+f3 Alternate between computer display and external display. Decrease screen brightness. fn+f5 fn+f6 fn+f7 Increase screen brightness. Initiate QuickLock. fn+f1 Open the Print Options window. fn+esc Open Help and Support. 2 Using the keyboard Using hotkeys...
... Initiate Hibernation. Play, pause, or resume an audio CD or a DVD. fn+f3 Alternate between computer display and external display. Decrease screen brightness. fn+f5 fn+f6 fn+f7 Increase screen brightness. Initiate QuickLock. fn+f1 Open the Print Options window. fn+esc Open Help and Support. 2 Using the keyboard Using hotkeys...


