
Backup and Recovery - Windows Vista
Page 6
... discs, or you have a much higher capacity than CDs. Select Start > All Programs > Recovery Manager > Recovery Manager. 2 Creating recovery discs HP recommends that you can restore your system to its original factory state if you experience serious system failure or instability. The software allows the creation...and BD-RE (rewritable Blu-ray) discs, are required. NOTE: If you can purchase recovery discs for the first time. Follow the on battery power, you will be created per computer. ● Number each disc before inserting it into the optical drive. ● If necessary, you ...
... discs, or you have a much higher capacity than CDs. Select Start > All Programs > Recovery Manager > Recovery Manager. 2 Creating recovery discs HP recommends that you can restore your system to its original factory state if you experience serious system failure or instability. The software allows the creation...and BD-RE (rewritable Blu-ray) discs, are required. NOTE: If you can purchase recovery discs for the first time. Follow the on battery power, you will be created per computer. ● Number each disc before inserting it into the optical drive. ● If necessary, you ...

Software Update, Backup and Recovery - Windows Vista
Page 6
Open the Setup Utility by turning on battery power, docked in an optional docking device, or connected to reliable external power using the AC adapter. To exit the Setup Utility, use the arrow ... the new BIOS. Determining the BIOS version To determine whether available BIOS updates contain later BIOS versions than the BIOS version currently installed on the HP Web site that is displayed in Windows) or by unplugging the power cord from the computer by opening the Setup Utility. While the "Press the...
Open the Setup Utility by turning on battery power, docked in an optional docking device, or connected to reliable external power using the AC adapter. To exit the Setup Utility, use the arrow ... the new BIOS. Determining the BIOS version To determine whether available BIOS updates contain later BIOS versions than the BIOS version currently installed on the HP Web site that is displayed in Windows) or by unplugging the power cord from the computer by opening the Setup Utility. While the "Press the...
Wireless (Select Models Only) - Windows Vista
Page 18
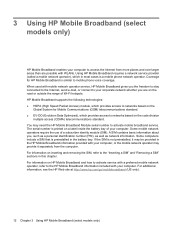
...use of your computer. For information on a label inside the battery bay of a subscriber identity module (SIM). For additional information, see the HP Web site at http://www.hp.com/go/mobilebroadband (US only). 12 Chapter 3 Using HP Mobile Broadband (select models only) Coverage for Mobile Communications (GSM)... based on the road or outside the range of Wi-Fi hotspots. HP Mobile Broadband supports the following technologies: ● HSPA (High Speed Packet Access) module, which in most cases is preinstalled in the battery bay. Some computers include a SIM that is a mobile phone network ...
...use of your computer. For information on a label inside the battery bay of a subscriber identity module (SIM). For additional information, see the HP Web site at http://www.hp.com/go/mobilebroadband (US only). 12 Chapter 3 Using HP Mobile Broadband (select models only) Coverage for Mobile Communications (GSM)... based on the road or outside the range of Wi-Fi hotspots. HP Mobile Broadband supports the following technologies: ● HSPA (High Speed Packet Access) module, which in most cases is preinstalled in the battery bay. Some computers include a SIM that is a mobile phone network ...
Wireless (Select Models Only) - Windows Vista
Page 19
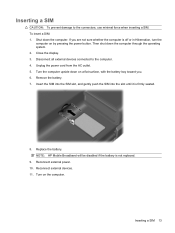
...external power. 10. Remove the battery. 7. Disconnect all external devices connected to the connectors, use minimal force when inserting a SIM. Insert the SIM into the SIM slot, and gently push the SIM into the slot until it is not replaced. 9. NOTE: HP Mobile Broadband will be disabled if ...the battery is firmly seated. 8. Shut down the computer through the operating system. 2. Inserting a SIM CAUTION: To prevent damage to the computer...
...external power. 10. Remove the battery. 7. Disconnect all external devices connected to the connectors, use minimal force when inserting a SIM. Insert the SIM into the SIM slot, and gently push the SIM into the slot until it is not replaced. 9. NOTE: HP Mobile Broadband will be disabled if ...the battery is firmly seated. 8. Shut down the computer through the operating system. 2. Inserting a SIM CAUTION: To prevent damage to the computer...
Wireless (Select Models Only) - Windows Vista
Page 20
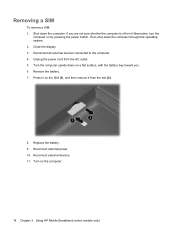
... SIM: 1. Remove the battery. 7. Press in Hibernation, turn the computer on the SIM (1), and then remove it from the AC outlet. 5. Shut down the computer through the operating system. 2. Turn the computer upside down on the computer. 14 Chapter 3 Using HP Mobile Broadband (select models only...) Then shut down the computer. Disconnect all external devices connected to the computer. 4. Unplug the power cord from the slot (2). 8. Replace the battery. 9. Turn on a flat surface, with the battery bay toward you are not...
... SIM: 1. Remove the battery. 7. Press in Hibernation, turn the computer on the SIM (1), and then remove it from the AC outlet. 5. Shut down the computer through the operating system. 2. Turn the computer upside down on the computer. 14 Chapter 3 Using HP Mobile Broadband (select models only...) Then shut down the computer. Disconnect all external devices connected to the computer. 4. Unplug the power cord from the slot (2). 8. Replace the battery. 9. Turn on a flat surface, with the battery bay toward you are not...
Drives - Windows Vista
Page 5
...drive must be mailed, place the drive in Hibernation, turn the computer on, and then shut it . The airport security devices that the battery is sufficiently charged before writing to media. Additional cautions are unsure whether the computer is the only source of power, be sure that check ...1 Remove media from the drive bay, or traveling with, shipping, or storing a drive. Do not use X-rays instead of the drive. When the battery is off, in the Sleep state, or in a bubble-pack mailer or other suitable protective packaging and label the package "FRAGILE." Avoid exposing a drive...
...drive must be mailed, place the drive in Hibernation, turn the computer on, and then shut it . The airport security devices that the battery is sufficiently charged before writing to media. Additional cautions are unsure whether the computer is the only source of power, be sure that check ...1 Remove media from the drive bay, or traveling with, shipping, or storing a drive. Do not use X-rays instead of the drive. When the battery is off, in the Sleep state, or in a bubble-pack mailer or other suitable protective packaging and label the package "FRAGILE." Avoid exposing a drive...
Drives - Windows Vista
Page 11
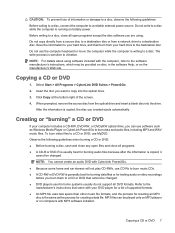
... software such as the process for burning audio files because after the information is copied, it cannot be played only on MP3 players or on battery power. When prompted, remove the source disc from a network drive to a reliable external power source. NOTE: You cannot create an audio DVD with the computer...
... software such as the process for burning audio files because after the information is copied, it cannot be played only on MP3 players or on battery power. When prompted, remove the source disc from a network drive to a reliable external power source. NOTE: You cannot create an audio DVD with the computer...
Drives - Windows Vista
Page 14
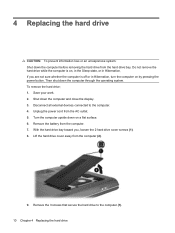
If you , loosen the 2 hard drive cover screws (1). 8. To remove the hard drive: 1. Remove the battery from the AC outlet. 5. Shut down the computer through the operating system. Disconnect all external devices connected to the computer (1). 10 Chapter 4 Replacing the hard ...
If you , loosen the 2 hard drive cover screws (1). 8. To remove the hard drive: 1. Remove the battery from the AC outlet. 5. Shut down the computer through the operating system. Disconnect all external devices connected to the computer (1). 10 Chapter 4 Replacing the hard ...
Memory Modules - Windows Vista and Windows 7
Page 7
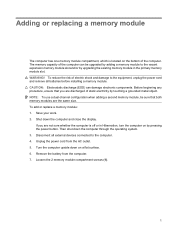
...the risk of static electricity by pressing the power button. Save your work. 2. To add or replace a memory module: 1. Disconnect all batteries before installing a memory module. CAUTION: Electrostatic discharge (ESD) can be sure that you are discharged of electric shock and damage to the ...not sure whether the computer is located on by touching a grounded metal object. Unplug the power cord from the computer. 7. Remove the battery from the AC outlet. 5. NOTE: To use a dual-channel configuration when adding a second memory module, be upgraded by adding a memory ...
...the risk of static electricity by pressing the power button. Save your work. 2. To add or replace a memory module: 1. Disconnect all batteries before installing a memory module. CAUTION: Electrostatic discharge (ESD) can be sure that you are discharged of electric shock and damage to the ...not sure whether the computer is located on by touching a grounded metal object. Unplug the power cord from the computer. 7. Remove the battery from the AC outlet. 5. NOTE: To use a dual-channel configuration when adding a second memory module, be upgraded by adding a memory ...

Memory Modules - Windows Vista and Windows 7
Page 10
Replace the battery. 15. Turn on the computer. 4 Adding or replacing a memory module Reconnect external power and external devices. 16. 14.
Replace the battery. 15. Turn on the computer. 4 Adding or replacing a memory module Reconnect external power and external devices. 16. 14.
Notebook Tour - Windows Vista
Page 11
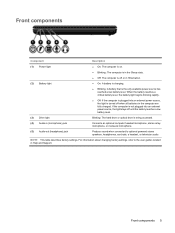
... array microphone, or monaural microphone. (5) Audio-out (headphone) jack Produce sound when connected to the user guides located in Help and Support. When the battery reaches a critical battery level, the battery light begins blinking rapidly. ● Off: If the computer is plugged into an external power source, the light stays off until the...
... array microphone, or monaural microphone. (5) Audio-out (headphone) jack Produce sound when connected to the user guides located in Help and Support. When the battery reaches a critical battery level, the battery light begins blinking rapidly. ● Off: If the computer is plugged into an external power source, the light stays off until the...
Notebook Tour - Windows Vista
Page 15
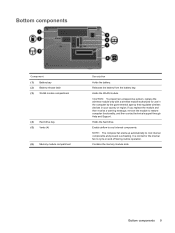
Releases the battery from the battery bay. Enable airflow to restore computer functionality, and then contact technical support through Help and Support. It is normal for use in the ...routine operation. Bottom components 9 Contains the memory module slots. Holds the hard drive. Bottom components Component (1) Battery bay (2) Battery release latch (3) WLAN module compartment (4) Hard drive bay (5) Vents (4) (6) Memory module compartment Description Holds the battery. Holds the WLAN module. CAUTION: To prevent an unresponsive system, replace the wireless module only with a ...
Releases the battery from the battery bay. Enable airflow to restore computer functionality, and then contact technical support through Help and Support. It is normal for use in the ...routine operation. Bottom components 9 Contains the memory module slots. Holds the hard drive. Bottom components Component (1) Battery bay (2) Battery release latch (3) WLAN module compartment (4) Hard drive bay (5) Vents (4) (6) Memory module compartment Description Holds the battery. Holds the WLAN module. CAUTION: To prevent an unresponsive system, replace the wireless module only with a ...
Notebook Tour - Windows Vista
Page 17
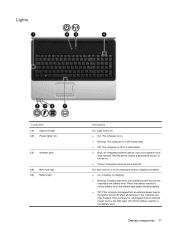
...and/or a Bluetooth® device, is turned on. ● Amber: All wireless devices are fully charged. When the battery reaches a critical battery level, the battery light begins blinking rapidly. ● Off: If the computer is plugged into an external power source, the light stays off... until the battery reaches a low battery level. Display components 11 Lights Component (1) Caps lock light (2) Power lights* (2) (3) Wireless light (4) Num lock light (5) Battery light Description On: Caps lock is on. ● On: The computer...
...and/or a Bluetooth® device, is turned on. ● Amber: All wireless devices are fully charged. When the battery reaches a critical battery level, the battery light begins blinking rapidly. ● Off: If the computer is plugged into an external power source, the light stays off... until the battery reaches a low battery level. Display components 11 Lights Component (1) Caps lock light (2) Power lights* (2) (3) Wireless light (4) Num lock light (5) Battery light Description On: Caps lock is on. ● On: The computer...
Notebook Tour - Windows Vista
Page 20
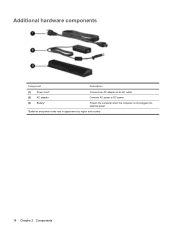
Additional hardware components Component Description (1) Power cord* Connects an AC adapter to an AC outlet. (2) AC adapter Converts AC power to DC power. (3) Battery* Powers the computer when the computer is not plugged into external power. *Batteries and power cords vary in appearance by region and country. 14 Chapter 2 Components
Additional hardware components Component Description (1) Power cord* Connects an AC adapter to an AC outlet. (2) AC adapter Converts AC power to DC power. (3) Battery* Powers the computer when the computer is not plugged into external power. *Batteries and power cords vary in appearance by region and country. 14 Chapter 2 Components
Notebook Tour - Windows Vista
Page 21
... countries or regions in which the devices have been approved for use . Have this information when traveling internationally. This label is located inside the battery bay. ● HP Broadband Wireless Module serial number label (select models only): Provides the serial number of your computer. 3 Labels The labels affixed to the computer provide...
... countries or regions in which the devices have been approved for use . Have this information when traveling internationally. This label is located inside the battery bay. ● HP Broadband Wireless Module serial number label (select models only): Provides the serial number of your computer. 3 Labels The labels affixed to the computer provide...
Notebook Tour - Windows Vista
Page 22
...3 audio-in (microphone) jack, identifying 5 audio-out (headphone) jack, identifying 5 B battery bay 15 battery bay, identifying 9 battery light, identifying 5, 11 battery release latch, identifying 9 battery, identifying 14 bays battery 9, 15 hard drive 9 Bluetooth label 15 buttons power 4 TouchPad 2 TouchPad on/off 2...Windows applications 3 Windows logo 3 L labels Bluetooth 15 HP Broadband 15 Microsoft Certificate of Authenticity 15 modem approval 15 regulatory 15 service tag 15 SIM 15 wireless certification 15 WLAN 15 latches battery release 9 lights battery 5, 11 caps lock 11 drive 5, 12 num ...
...3 audio-in (microphone) jack, identifying 5 audio-out (headphone) jack, identifying 5 B battery bay 15 battery bay, identifying 9 battery light, identifying 5, 11 battery release latch, identifying 9 battery, identifying 14 bays battery 9, 15 hard drive 9 Bluetooth label 15 buttons power 4 TouchPad 2 TouchPad on/off 2...Windows applications 3 Windows logo 3 L labels Bluetooth 15 HP Broadband 15 Microsoft Certificate of Authenticity 15 modem approval 15 regulatory 15 service tag 15 SIM 15 wireless certification 15 WLAN 15 latches battery release 9 lights battery 5, 11 caps lock 11 drive 5, 12 num ...
Power Management - Windows Vista
Page 3
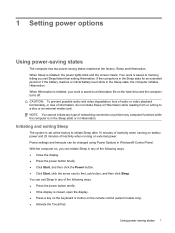
... plan 4 Customizing power plans ...4 Setting password protection on wakeup 5 2 Using battery power Finding battery information in Help and Support 7 Displaying the remaining battery charge 8 Inserting or removing the battery ...9 Charging a battery ...11 Managing low battery levels ...12 Identifying low battery levels 12 Resolving a low battery level 13 Resolving a low battery level when external power is available 13 Resolving a low...
... plan 4 Customizing power plans ...4 Setting password protection on wakeup 5 2 Using battery power Finding battery information in Help and Support 7 Displaying the remaining battery charge 8 Inserting or removing the battery ...9 Charging a battery ...11 Managing low battery levels ...12 Identifying low battery levels 12 Resolving a low battery level 13 Resolving a low battery level when external power is available 13 Resolving a low...
Power Management - Windows Vista
Page 5
...of networking connection or perform any computer functions while the computer is in the Sleep state for an extended period or if the battery reaches a critical battery level while in Hibernation. If the computer is in the Sleep state or in the Sleep state, the computer initiates Hibernation. ... loss of information, do not initiate Sleep or Hibernation while reading from or writing to initiate Sleep after 10 minutes of inactivity when running on battery power and 25 minutes of the following ways: ● Close the display. ● Press the power button briefly. ● Click Start,...
...of networking connection or perform any computer functions while the computer is in the Sleep state for an extended period or if the battery reaches a critical battery level while in Hibernation. If the computer is in the Sleep state or in the Sleep state, the computer initiates Hibernation. ... loss of information, do not initiate Sleep or Hibernation while reading from or writing to initiate Sleep after 10 minutes of inactivity when running on battery power and 25 minutes of the following ways: ● Close the display. ● Press the power button briefly. ● Click Start,...
Power Management - Windows Vista
Page 6
... have set at the factory to initiate Hibernation after 120 minutes (2 hours) of inactivity when running on battery power, 1,080 minutes (18 hours) of inactivity when running on external power, or when the battery reaches a critical battery level. Initiating and exiting Hibernation The system is set a password to be required on wakeup, you...
... have set at the factory to initiate Hibernation after 120 minutes (2 hours) of inactivity when running on battery power, 1,080 minutes (18 hours) of inactivity when running on external power, or when the battery reaches a critical battery level. Initiating and exiting Hibernation The system is set a password to be required on wakeup, you...

Power Management - Windows Vista
Page 7
.... The icon also displays a message if the battery has reached a critical battery level. To hide or display the battery meter icon: 1. Using the battery meter 3 Click OK. The battery meter allows you to display the battery meter icon. 4. Under System icons, clear the Power check box to hide the battery meter icon, or select the Power check...
.... The icon also displays a message if the battery has reached a critical battery level. To hide or display the battery meter icon: 1. Using the battery meter 3 Click OK. The battery meter allows you to display the battery meter icon. 4. Under System icons, clear the Power check box to hide the battery meter icon, or select the Power check...


