Notebook Essentials - Windows 7
Page 20
... result in use , or when the computer has reached a low battery level. To change these and other power settings, click Start, click Control Panel, click System and Security, and then click Power Options. ■ The computer may not be displayed on the computer screen or the external display, or on but not responding to the Shut down button. ■ Press and hold the power button for the...
... result in use , or when the computer has reached a low battery level. To change these and other power settings, click Start, click Control Panel, click System and Security, and then click Power Options. ■ The computer may not be displayed on the computer screen or the external display, or on but not responding to the Shut down button. ■ Press and hold the power button for the...
Notebook Essentials - Windows 7
Page 21
... the correct drivers are connecting to a corporate network, contact the IT administrator. ■ Select Start, click Control Panel, click Network and Internet, click Network and Sharing Center, click Troubleshoot problems, and then follow these suggestions if an external device does not function as pillows or rugs or clothing, during operation. If the light is amber, turn the power off during operation. The wireless network connection is not working If a wireless network connection is not working Follow these...
... the correct drivers are connecting to a corporate network, contact the IT administrator. ■ Select Start, click Control Panel, click Network and Internet, click Network and Sharing Center, click Troubleshoot problems, and then follow these suggestions if an external device does not function as pillows or rugs or clothing, during operation. If the light is amber, turn the power off during operation. The wireless network connection is not working If a wireless network connection is not working Follow these...
Notebook Essentials - Windows 7
Page 33
...dial-up Internet access 6 display cleaning 25 switching image 14 Notebook Essentials E electric shock 5 emergency shutdown procedures 12, 14 environmental specifications 23 external devices, troubleshooting 15 F firewalls 4 full system recovery 17 H hardware identifying 1, 2 installing 11 Help and Support 1 Hibernation 14 HP Recovery Manager 17 humidity specifications 23 I IEC 60950 compliance 5, 15 image, switching, among display devices 14 Internet broadband access 6 choosing an ISP 6 choosing type of access 6 connecting to 6 dial-up access 6 wireless access 6 Internet Service Provider (ISP...
...dial-up Internet access 6 display cleaning 25 switching image 14 Notebook Essentials E electric shock 5 emergency shutdown procedures 12, 14 environmental specifications 23 external devices, troubleshooting 15 F firewalls 4 full system recovery 17 H hardware identifying 1, 2 installing 11 Help and Support 1 Hibernation 14 HP Recovery Manager 17 humidity specifications 23 I IEC 60950 compliance 5, 15 image, switching, among display devices 14 Internet broadband access 6 choosing an ISP 6 choosing type of access 6 connecting to 6 dial-up access 6 wireless access 6 Internet Service Provider (ISP...
Notebook PC User Guide - Windows 7
Page 17
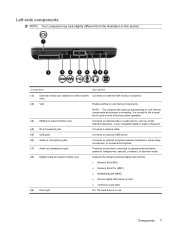
... (network) jack (5) USB ports (6) Audio-in (microphone) jack Connects an optional video or audio device, such as a highdefinition television, or any compatible digital or audio component. Left-side components NOTE: Your computer may look slightly different from the illustration in use. NOTE: The computer fan starts up automatically to cool internal components. only) (2) Vent Enables airflow to cool internal components and prevent overheating. Connects an optional USB device. Supports the following optional digital card formats: ● Memory Stick...
... (network) jack (5) USB ports (6) Audio-in (microphone) jack Connects an optional video or audio device, such as a highdefinition television, or any compatible digital or audio component. Left-side components NOTE: Your computer may look slightly different from the illustration in use. NOTE: The computer fan starts up automatically to cool internal components. only) (2) Vent Enables airflow to cool internal components and prevent overheating. Connects an optional USB device. Supports the following optional digital card formats: ● Memory Stick...
Notebook PC User Guide - Windows 7
Page 30
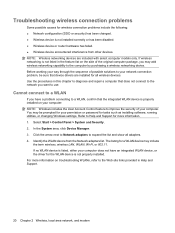
... and Support for the WLAN device is not installed correctly or has been disabled. ● Wireless device or router hardware has failed. ● Wireless device encountered interference from the Network adapters list. Identify the WLAN device from other devices. Troubleshooting wireless connection problems Some possible causes for tasks such as installing software, running utilities, or changing Windows settings. For more information. 1. You may include the term wireless, wireless LAN, WLAN, Wi-Fi, or 802.11. Before working your...
... and Support for the WLAN device is not installed correctly or has been disabled. ● Wireless device or router hardware has failed. ● Wireless device encountered interference from the Network adapters list. Identify the WLAN device from other devices. Troubleshooting wireless connection problems Some possible causes for tasks such as installing software, running utilities, or changing Windows settings. For more information. 1. You may include the term wireless, wireless LAN, WLAN, Wi-Fi, or 802.11. Before working your...
Notebook PC User Guide - Windows 7
Page 86
... the device drivers does not correct the problem, you want a specific SoftPaq, enter the SoftPaq number in the following sections. Click the option for software and driver downloads, enter your drivers using the procedures in the Search box, press enter, and follow the instructions provided. If you may be able to save all open a window containing additional information. 6. Click the Windows 7 operating system. 5. 5. Windows scans your system for installed hardware and installs default drivers for hardware changes...
... the device drivers does not correct the problem, you want a specific SoftPaq, enter the SoftPaq number in the following sections. Click the option for software and driver downloads, enter your drivers using the procedures in the Search box, press enter, and follow the instructions provided. If you may be able to save all open a window containing additional information. 6. Click the Windows 7 operating system. 5. 5. Windows scans your system for installed hardware and installs default drivers for hardware changes...
Notebook PC User Guide - Windows 7
Page 111
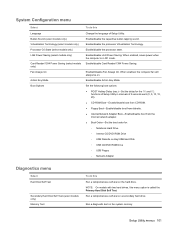
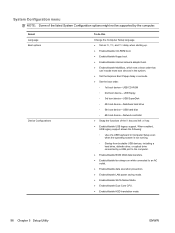
.... Setup Utility menus 101 Enable/disable Action Key Mode. When enabled, the computer fan will always be on a secondary hard drive. Run a diagnostic test on Key/USB Hard Disk ◦ USB CD/DVD ROM Drive ◦ USB Floppy ◦ Network Adapter Diagnostics menu Select Hard Disk Self Test Secondary Hard Disk Self Test (select models only) Memory Test To do this Change the language of Setup Utility. Enable/disable the capacitive button tapping sound. Enable/disable the processor Virtualization Technology. Enable/disable Card Reader/1394 Power Saving. System Configuration menu...
.... Setup Utility menus 101 Enable/disable Action Key Mode. When enabled, the computer fan will always be on a secondary hard drive. Run a diagnostic test on Key/USB Hard Disk ◦ USB CD/DVD ROM Drive ◦ USB Floppy ◦ Network Adapter Diagnostics menu Select Hard Disk Self Test Secondary Hard Disk Self Test (select models only) Memory Test To do this Change the language of Setup Utility. Enable/disable the capacitive button tapping sound. Enable/disable the processor Virtualization Technology. Enable/disable Card Reader/1394 Power Saving. System Configuration menu...
Notebook PC User Guide - Windows 7
Page 112
... BIOS update by identifying the BIOS version currently installed on the system ROM. Install the updates. 102 Appendix B Software updates Refer to improve the security of the software provided with the hardware devices, and provides for more information. 2. NOTE: Windows includes the User Account Control feature to Help and Support for data transfer among hardware devices, including the time and date. Prepare for tasks such as installing software, running utilities, or changing Windows settings...
... BIOS update by identifying the BIOS version currently installed on the system ROM. Install the updates. 102 Appendix B Software updates Refer to improve the security of the software provided with the hardware devices, and provides for more information. 2. NOTE: Windows includes the User Account Control feature to Help and Support for data transfer among hardware devices, including the time and date. Prepare for tasks such as installing software, running utilities, or changing Windows settings...
Notebook PC User Guide - Windows 7
Page 114
... BIOS update will need this path when you are ready to download. 3. b. You will be downloaded. Do not shut down after the BIOS has successfully updated. Make a note of the path to the location on your selection to reliable external power using the AC adapter. NOTE: If you recorded earlier, open the folder on battery power or connected to a network, consult the network administrator before installing any software updates, especially system BIOS updates. The hard drive...
... BIOS update will need this path when you are ready to download. 3. b. You will be downloaded. Do not shut down after the BIOS has successfully updated. Make a note of the path to the location on your selection to reliable external power using the AC adapter. NOTE: If you recorded earlier, open the folder on battery power or connected to a network, consult the network administrator before installing any software updates, especially system BIOS updates. The hard drive...

Notebook PC User Guide - Windows 7
Page 115
... displayed, click an updated driver to your computer model number in the Search box, press enter, and then follow these steps: To use the HP Web site: 1. Proceed to http://www.hp.com/support, and then select your hard drive. If prompted to do this, click Download only to save the file to open a window containing additional information. 6. If you may be able to install the updated driver. Open...
... displayed, click an updated driver to your computer model number in the Search box, press enter, and then follow these steps: To use the HP Web site: 1. Proceed to http://www.hp.com/support, and then select your hard drive. If prompted to do this, click Download only to save the file to open a window containing additional information. 6. If you may be able to install the updated driver. Open...

Notebook PC User Guide - Windows 7
Page 122
... Bluetooth label 12 boot options 101 112 Index boot order 101 button sound 101 buttons power 4 TouchPad 2 TouchPad off indicator 28 TouchPad right/left 28 C cables LAN 27 modem 23 security 96 USB 84 calibrating battery 57 caps lock light, identifying 3 Card Reader Power Saving 101 CD burning 72 copying 71 playing 68 removing 73 CD drive 78 Certificate of Authenticity label 12 changing the language of Setup Utility 98 charging batteries 55, 57 checking audio functions 40 compartments memory module 8 components additional hardware...
... Bluetooth label 12 boot options 101 112 Index boot order 101 button sound 101 buttons power 4 TouchPad 2 TouchPad off indicator 28 TouchPad right/left 28 C cables LAN 27 modem 23 security 96 USB 84 calibrating battery 57 caps lock light, identifying 3 Card Reader Power Saving 101 CD burning 72 copying 71 playing 68 removing 73 CD drive 78 Certificate of Authenticity label 12 changing the language of Setup Utility 98 charging batteries 55, 57 checking audio functions 40 compartments memory module 8 components additional hardware...
Notebook PC User Guide - Windows 7
Page 123
...-on password 94 entering an administrator password 93 esc key, identifying 5 exiting Setup Utility 100 external audio devices, connecting 40 external drive 78 external monitor port, identifying 7 F f11 111 fan always on 101 firewall 17 firewall software 95 fn key, identifying 5 full system recovery 106 G graphics modes, switching 62 H hard drive installing 82 removing 80 replacing 80 hard drive bay, identifying 8 hard drive self test 101 HDMI connecting 42 HDMI port 42 HDMI port, identifying 7 headphone (audio-out) jack 36 headphones 36 Hibernation exiting 47 initiated during critical battery...
...-on password 94 entering an administrator password 93 esc key, identifying 5 exiting Setup Utility 100 external audio devices, connecting 40 external drive 78 external monitor port, identifying 7 F f11 111 fan always on 101 firewall 17 firewall software 95 fn key, identifying 5 full system recovery 106 G graphics modes, switching 62 H hard drive installing 82 removing 80 replacing 80 hard drive bay, identifying 8 hard drive self test 101 HDMI connecting 42 HDMI port 42 HDMI port, identifying 7 headphone (audio-out) jack 36 headphones 36 Hibernation exiting 47 initiated during critical battery...
Notebook PC User Guide - Windows 7
Page 125
... driver problems 73 DVD movie play 74 external display 75 HP device drivers 76 modem 26 optical disc tray 73 Windows device drivers 77 wireless connection problems 20 turning off the computer 63 U unresponsive system 63 USB cable, connecting 84 USB devices connecting 84 description 84 removing 85 USB hubs 84 USB port, identifying 6, 7 USB ports, identifying 84 using Setup Utility 98 using system restore 110 V vents, identifying 7, 8 video, using 41 Virtualization Technology 101 volume down action key 36 volume mute action key 36 volume up action key 36 volume, adjusting 37 W webcam adjusting...
... driver problems 73 DVD movie play 74 external display 75 HP device drivers 76 modem 26 optical disc tray 73 Windows device drivers 77 wireless connection problems 20 turning off the computer 63 U unresponsive system 63 USB cable, connecting 84 USB devices connecting 84 description 84 removing 85 USB hubs 84 USB port, identifying 6, 7 USB ports, identifying 84 using Setup Utility 98 using system restore 110 V vents, identifying 7, 8 video, using 41 Virtualization Technology 101 volume down action key 36 volume mute action key 36 volume up action key 36 volume, adjusting 37 W webcam adjusting...
Service Guide
Page 83
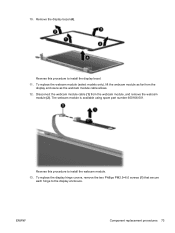
... webcam module cable (1) from the display enclosure as far from the webcam module, and remove the webcam module (2). The webcam module is available using spare part number 600166-001. To replace the webcam module (select models only), lift the webcam module as the webcam module cable allows. 12. Reverse this procedure to install the display bezel. 11. To replace the display hinge covers, remove the two Phillips PM2.5×6.0 screws (1) that secure each hinge to install the webcam module. 13. ENWW Component replacement...
... webcam module cable (1) from the display enclosure as far from the webcam module, and remove the webcam module (2). The webcam module is available using spare part number 600166-001. To replace the webcam module (select models only), lift the webcam module as the webcam module cable allows. 12. Reverse this procedure to install the display bezel. 11. To replace the display hinge covers, remove the two Phillips PM2.5×6.0 screws (1) that secure each hinge to install the webcam module. 13. ENWW Component replacement...

Service Guide
Page 103
... boot order for: ◦ Notebook Hard Drive ◦ Internal CD/DVD ROM Drive ◦ USB Diskette on Key/USB Hard Disk ◦ USB CD/DVD ROM Drive ◦ USB Floppy ◦ Network Adapter Diagnostics menu Select Hard Disk Self Test Secondary Hard Disk Self Test (select models only) Memory Test To do this Change the language of Setup Utility. Run a diagnostic test on . NOTE: On models with two hard drives, this Run a comprehensive self-test on a secondary hard drive. Enable/disable the capacitive button tapping sound. Enable/disable LAN Power Saving. When enabled, the computer fan...
... boot order for: ◦ Notebook Hard Drive ◦ Internal CD/DVD ROM Drive ◦ USB Diskette on Key/USB Hard Disk ◦ USB CD/DVD ROM Drive ◦ USB Floppy ◦ Network Adapter Diagnostics menu Select Hard Disk Self Test Secondary Hard Disk Self Test (select models only) Memory Test To do this Change the language of Setup Utility. Run a diagnostic test on . NOTE: On models with two hard drives, this Run a comprehensive self-test on a secondary hard drive. Enable/disable the capacitive button tapping sound. Enable/disable LAN Power Saving. When enabled, the computer fan...
Service Guide
Page 108
... ● Set the boot order. ◦ 1st boot device-USB CD-ROM ◦ 2nd boot device-USB floppy ◦ 3rd boot device-USB SuperDisk ◦ 4th boot device-Notebook hard drive ◦ 5th boot device-USB hard disk ◦ 6th boot device-Network controller ● Swap the functions of the listed System Configuration options might not be supported by a USB port to the computer. ● Enable/disable BIOS DMA data transfers. ● Enable/disable fan always on while connected to an AC outlet. ● Enable/disable data execution prevention. ● Enable/disable LAN power saving mode...
... ● Set the boot order. ◦ 1st boot device-USB CD-ROM ◦ 2nd boot device-USB floppy ◦ 3rd boot device-USB SuperDisk ◦ 4th boot device-Notebook hard drive ◦ 5th boot device-USB hard disk ◦ 6th boot device-Network controller ● Swap the functions of the listed System Configuration options might not be supported by a USB port to the computer. ● Enable/disable BIOS DMA data transfers. ● Enable/disable fan always on while connected to an AC outlet. ● Enable/disable data execution prevention. ● Enable/disable LAN power saving mode...
Service Guide
Page 116
... : ● Resources by type ● Resources by connection To view resource settings in Windows XP: 1. Select Start > My Computer, or double-click My Computer on the computer. Only users who have expert knowledge of computer hardware and hardware configurations should change the resource settings in Windows 7 and Windows Vista: 1. If two devices require the same resource and create a device conflict, manually change resource settings. On the left, click Device Manager. 4. Under System...
... : ● Resources by type ● Resources by connection To view resource settings in Windows XP: 1. Select Start > My Computer, or double-click My Computer on the computer. Only users who have expert knowledge of computer hardware and hardware configurations should change the resource settings in Windows 7 and Windows Vista: 1. If two devices require the same resource and create a device conflict, manually change resource settings. On the left, click Device Manager. 4. Under System...
Service Guide
Page 141
...-ray Disc ROM LightScribe with SuperMulti DVD±R/RW DoubleLayer spare part number 30, 50 Blu-ray ROM with LightScribe DVD ±R/RW SuperMulti DL Drive specifications 105 boot options 93, 98 boot order 93, 98 button sound 93 buttons power 10 TouchPad right/left 8 C cables, service considerations 40 camera module removal 73 spare part number 73 camera, product description 3 caps lock light, identifying 9 Card Reader Power Saving 93 changing the language of Setup Utility 89 chipset, product description 2 compartments memory module 15 components additional hardware 17...
...-ray Disc ROM LightScribe with SuperMulti DVD±R/RW DoubleLayer spare part number 30, 50 Blu-ray ROM with LightScribe DVD ±R/RW SuperMulti DL Drive specifications 105 boot options 93, 98 boot order 93, 98 button sound 93 buttons power 10 TouchPad right/left 8 C cables, service considerations 40 camera module removal 73 spare part number 73 camera, product description 3 caps lock light, identifying 9 Card Reader Power Saving 93 changing the language of Setup Utility 89 chipset, product description 2 compartments memory module 15 components additional hardware 17...
Service Guide
Page 142
... (network 14 K keyboard product description 5 removal 57 spare part numbers 21, 57 keys Calculator 11 esc 11 fn 11 function 11 Media application 11 Print 11 Send e-mail 11 Web browser 11 Windows applications 11 Windows logo 11 L LAN Power Saving 93 language support 93 latch, battery release 15 legacy support, USB 94, 98 light power 9 lights caps lock 9 Digital Media Slot 14 webcam 12 wireless 9 M Main menu 92 mass storage devices, spare part numbers 30 memory module product description 2 removal...
... (network 14 K keyboard product description 5 removal 57 spare part numbers 21, 57 keys Calculator 11 esc 11 fn 11 function 11 Media application 11 Print 11 Send e-mail 11 Web browser 11 Windows applications 11 Windows logo 11 L LAN Power Saving 93 language support 93 latch, battery release 15 legacy support, USB 94, 98 light power 9 lights caps lock 9 Digital Media Slot 14 webcam 12 wireless 9 M Main menu 92 mass storage devices, spare part numbers 30 memory module product description 2 removal...
Service Guide
Page 143
... 3 external media cards 4 graphics 2 hard drives 3 keyboard 5 memory module 2 microphone 3 modem module 3 operating system 5 optical drives 3 pointing devices 5 ports 4 power requirements 5 processors 1 product name 1 security 5 serviceability 5 wireless 4 product name 1 R recovering a program or driver 107 recovering from the dedicated recovery partition 112 recovering from the recovery discs 112 recovery discs 107, 108 Recovery Manager 107, 111 recovery partition 107 recovery, system 111 removal/replacement preliminaries 39 procedures 44 restore points 111 restoring default settings 91...
... 3 external media cards 4 graphics 2 hard drives 3 keyboard 5 memory module 2 microphone 3 modem module 3 operating system 5 optical drives 3 pointing devices 5 ports 4 power requirements 5 processors 1 product name 1 security 5 serviceability 5 wireless 4 product name 1 R recovering a program or driver 107 recovering from the dedicated recovery partition 112 recovering from the recovery discs 112 recovery discs 107, 108 Recovery Manager 107, 111 recovery partition 107 recovery, system 111 removal/replacement preliminaries 39 procedures 44 restore points 111 restoring default settings 91...


