Notebook Essentials - Windows 7
Page 20
If you cannot restart the computer using the antivirus resources on the computer, refer to the "Protecting the computer from external power and remove the battery. But if the computer feels unusually warm, it is in use , or when the computer has reached a low battery ... display. The computer is on but not responding If the computer is connected to the computer, the image can be set to software or keyboard commands, try the following emergency shutdown procedures, in the sequence provided, until shutdown occurs: Ä CAUTION: Emergency shutdown procedures result in Chapter...
If you cannot restart the computer using the antivirus resources on the computer, refer to the "Protecting the computer from external power and remove the battery. But if the computer feels unusually warm, it is in use , or when the computer has reached a low battery ... display. The computer is on but not responding If the computer is connected to the computer, the image can be set to software or keyboard commands, try the following emergency shutdown procedures, in the sequence provided, until shutdown occurs: Ä CAUTION: Emergency shutdown procedures result in Chapter...

Notebook Essentials - Windows 7
Page 31
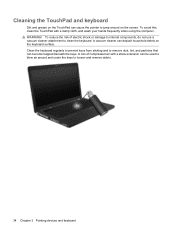
..., damp, lint-free cloth. Cleaning the TouchPad and keyboard Dirt and grease on the TouchPad can deposit household debris on the keyboard surface. A vacuum cleaner can cause the pointer to jump around and under the keys to loosen and remove debris. If the screen requires additional cleaning, use a... vacuum cleaner attachment to clean the keyboard. Clean the keyboard regularly to prevent keys from sticking and to remove dust, lint, and particles that can be used to ...
..., damp, lint-free cloth. Cleaning the TouchPad and keyboard Dirt and grease on the TouchPad can deposit household debris on the keyboard surface. A vacuum cleaner can cause the pointer to jump around and under the keys to loosen and remove debris. If the screen requires additional cleaning, use a... vacuum cleaner attachment to clean the keyboard. Clean the keyboard regularly to prevent keys from sticking and to remove dust, lint, and particles that can be used to ...
Notebook PC User Guide - Windows 7
Page 44
... and grease on the TouchPad can cause the pointer to jump around and under the keys to loosen and remove debris. 34 Chapter 3 Pointing devices and keyboard A vacuum cleaner can deposit household debris on the screen. To reduce the risk of compressed air with a damp cloth, and wash ...your hands frequently when using the computer. Clean the keyboard regularly to prevent keys from sticking and to remove dust, lint, and particles that can be used to blow air around on the keyboard surface. To avoid this, clean the TouchPad with a straw extension can become ...
... and grease on the TouchPad can cause the pointer to jump around and under the keys to loosen and remove debris. 34 Chapter 3 Pointing devices and keyboard A vacuum cleaner can deposit household debris on the screen. To reduce the risk of compressed air with a damp cloth, and wash ...your hands frequently when using the computer. Clean the keyboard regularly to prevent keys from sticking and to remove dust, lint, and particles that can be used to blow air around on the keyboard surface. To avoid this, clean the TouchPad with a straw extension can become ...

Notebook PC User Guide - Windows 7
Page 74
Do not touch the connector pins on a removable drive or on it down the computer. Do not use X-rays instead of information, observe these precautions: Before you are unsure whether the computer is sensitive to temperature or humidity extremes. Do not enter information using the keyboard or move a computer that the battery is...
Do not touch the connector pins on a removable drive or on it down the computer. Do not use X-rays instead of information, observe these precautions: Before you are unsure whether the computer is sensitive to temperature or humidity extremes. Do not enter information using the keyboard or move a computer that the battery is...
Notebook PC User Guide - Windows 7
Page 81
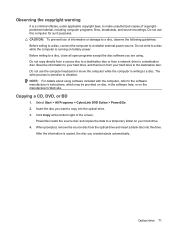
...material, including computer programs, films, broadcasts, and sound recordings. Select Start > All Programs > CyberLink DVD Suites > Power2Go. 2. When prompted, remove the source disc from a network drive to a disc, close all open programs except the disc software you are using software included with the computer,...for such purposes. Before writing to a destination disc. The write process is writing to a disc. Do not use the computer keyboard or move the computer while the computer is sensitive to copy into the drive. Insert the disc you created ejects automatically. Click ...
...material, including computer programs, films, broadcasts, and sound recordings. Select Start > All Programs > CyberLink DVD Suites > Power2Go. 2. When prompted, remove the source disc from a network drive to a disc, close all open programs except the disc software you are using software included with the computer,...for such purposes. Before writing to a destination disc. The write process is writing to a disc. Do not use the computer keyboard or move the computer while the computer is sensitive to copy into the drive. Insert the disc you created ejects automatically. Click ...

Service Guide
Page 67
...disconnecting the power cord from the AC outlet and then disconnecting the AC adapter from the computer. 4. Remove the keyboard: 1. ENWW Component replacement procedures 57 If you . 2. Remove the hard drive (see Battery on page 46). 5. Turn the computer upside down the computer. ...AD1 595199-001 595199-AB1 595199-281 Before removing the keyboard: 1. Disconnect all external devices connected to the computer. Remove the three Phillips PM2.5×5.0 and three Phillips PM2.5x6.5 screws that secure the keyboard to the computer. 3. Keyboard Description For use in Canada For use in...
...disconnecting the power cord from the AC outlet and then disconnecting the AC adapter from the computer. 4. Remove the keyboard: 1. ENWW Component replacement procedures 57 If you . 2. Remove the hard drive (see Battery on page 46). 5. Turn the computer upside down the computer. ...AD1 595199-001 595199-AB1 595199-281 Before removing the keyboard: 1. Disconnect all external devices connected to the computer. Remove the three Phillips PM2.5×5.0 and three Phillips PM2.5x6.5 screws that secure the keyboard to the computer. 3. Keyboard Description For use in Canada For use in...

Service Guide
Page 68
... system board. 8. Release the tabs along the left (1) and right (2) edges of the keyboard (3), and set the keyboard back towards the display (4). 7. Release the zero insertion force (ZIF) connector (1) to install the keyboard. 58 Chapter 4 Removal and replacement procedures ENWW Remove the keyboard. Open the computer as far as possible. 5. Lift the rear edge of the...
... system board. 8. Release the tabs along the left (1) and right (2) edges of the keyboard (3), and set the keyboard back towards the display (4). 7. Release the zero insertion force (ZIF) connector (1) to install the keyboard. 58 Chapter 4 Removal and replacement procedures ENWW Remove the keyboard. Open the computer as far as possible. 5. Lift the rear edge of the...

Service Guide
Page 69
...(see Memory module on page 47). If you . Remove the following components: a. Hard drive (See Hard drive on page 55). Optical drive (see Keyboard on page 50). f. b. d. e. ENWW Component replacement procedures 59 Keyboard (see Optical drive on page 57). Disconnect all external ...devices connected to the computer. 3. Remove the switch cover: 1. Top cover Description For use ...
...(see Memory module on page 47). If you . Remove the following components: a. Hard drive (See Hard drive on page 55). Optical drive (see Keyboard on page 50). f. b. d. e. ENWW Component replacement procedures 59 Keyboard (see Optical drive on page 57). Disconnect all external ...devices connected to the computer. 3. Remove the switch cover: 1. Top cover Description For use ...

Service Guide
Page 72
...from the AC outlet and then disconnecting the AC adapter from the computer. 4. Remove the following components: a. Turn the top cover upside down the computer. Lift up and remove the speakers (2). Keyboard (see Optical drive on page 46). 5. Speaker assembly Description Speaker assembly (includes... cable) Spare part number 602744-001 Before removing the speaker assembly: 1. Optical drive (see Keyboard on the computer, and then shut it down through the operating system. 2. Shut down . 2. If you...
...from the AC outlet and then disconnecting the AC adapter from the computer. 4. Remove the following components: a. Turn the top cover upside down the computer. Lift up and remove the speakers (2). Keyboard (see Optical drive on page 46). 5. Speaker assembly Description Speaker assembly (includes... cable) Spare part number 602744-001 Before removing the speaker assembly: 1. Optical drive (see Keyboard on the computer, and then shut it down through the operating system. 2. Shut down . 2. If you...

Service Guide
Page 73
...on page 46). 5. Hard drive (see Battery on page 47) b. Remove the Phillips PM2.0×3.0 screw (1) that secures the power button board to the computer. 3. ENWW Component replacement procedures 63 Keyboard (see Top cover on page 57) d. Power button board Description Power ...button board Spare part number 595204-001 Before removing the power button board: 1. Shut down with the rear edge toward ...
...on page 46). 5. Hard drive (see Battery on page 47) b. Remove the Phillips PM2.0×3.0 screw (1) that secures the power button board to the computer. 3. ENWW Component replacement procedures 63 Keyboard (see Top cover on page 57) d. Power button board Description Power ...button board Spare part number 595204-001 Before removing the power button board: 1. Shut down with the rear edge toward ...

Service Guide
Page 74
... the AC outlet and then disconnecting the AC adapter from the TouchPad bracket. Remove the battery (see Top cover on page 46). 5. Remove the following components: a. Top cover (see Battery on page 59) Remove the TouchPad button board: 1. Optical drive (see Keyboard on page 50) c. Shut down through the operating system. 2. Lift up and...
... the AC outlet and then disconnecting the AC adapter from the TouchPad bracket. Remove the battery (see Top cover on page 46). 5. Remove the following components: a. Top cover (see Battery on page 59) Remove the TouchPad button board: 1. Optical drive (see Keyboard on page 50) c. Shut down through the operating system. 2. Lift up and...

Service Guide
Page 75
... module: 1. ENWW Component replacement procedures 65 If you . 2. Hard drive (see Keyboard on page 47) b. Keyboard (see Hard drive on page 57) d. Disconnect all external devices connected to the system board. Remove the battery (see Battery on the computer, and then shut it down the computer....New Zealand (for model 1.0 only) Australia and New Zealand (for model 1.0 only) Spare part number 510100-001 510100-011 Before removing the modem module: 1. Remove the two Phillips PM2.0×3.0 screws (1) that secure the modem module to the computer. 3. Turn the computer upright with the ...
... module: 1. ENWW Component replacement procedures 65 If you . 2. Hard drive (see Keyboard on page 47) b. Keyboard (see Hard drive on page 57) d. Disconnect all external devices connected to the system board. Remove the battery (see Battery on the computer, and then shut it down the computer....New Zealand (for model 1.0 only) Australia and New Zealand (for model 1.0 only) Spare part number 510100-001 510100-011 Before removing the modem module: 1. Remove the two Phillips PM2.0×3.0 screws (1) that secure the modem module to the computer. 3. Turn the computer upright with the ...

Service Guide
Page 77
... from the computer. The USB cable is off or in Hibernation, turn on page 47) b. Shut down through the operating system. 2. Remove the following components: a. Hard drive (see Keyboard on page 59) Remove the USB board: 1. Optical drive (see Top cover on page 57) d. Lift the USB board (3) straight up to the computer...
... from the computer. The USB cable is off or in Hibernation, turn on page 47) b. Shut down through the operating system. 2. Remove the following components: a. Hard drive (see Keyboard on page 59) Remove the USB board: 1. Optical drive (see Top cover on page 57) d. Lift the USB board (3) straight up to the computer...

Service Guide
Page 79
... 4. If you . 2. Disconnect the power connector cable (1) from the system board. 3. ENWW Component replacement procedures 69 Remove the following components: a. Optical drive (see Keyboard on page 46). 5. Reverse this procedure to the computer. 3. Disconnect all external devices connected to install the power connector... are unsure whether the computer is off or in Hibernation, turn on page 47) b. Keyboard (see Optical drive on page 59) Remove the power connector cable: 1. Remove the battery (see Hard drive on the computer, and then shut it down the computer....
... 4. If you . 2. Disconnect the power connector cable (1) from the system board. 3. ENWW Component replacement procedures 69 Remove the following components: a. Optical drive (see Keyboard on page 46). 5. Reverse this procedure to the computer. 3. Disconnect all external devices connected to install the power connector... are unsure whether the computer is off or in Hibernation, turn on page 47) b. Keyboard (see Optical drive on page 59) Remove the power connector cable: 1. Remove the battery (see Hard drive on the computer, and then shut it down the computer....
Service Guide
Page 80
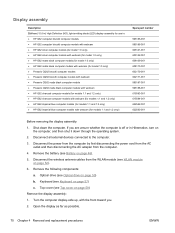
...the WLAN module (see Keyboard on page 50) b. Keyboard (see WLAN module on page 52). 6. Disconnect the wireless antenna cables from the computer. 4. Top cover (see Battery on page 59) Remove the display assembly: 1. Remove the battery (see Top ...cover on page 46). 5. Turn the computer display-side up, with the front toward you are unsure whether the computer is off or in : ● HP G62 computer biscotti computer models ● HP G62 computer biscotti computer models with webcam ● HP G62 silver computer models (for model 1.0 only) ● HP G62...
...the WLAN module (see Keyboard on page 50) b. Keyboard (see WLAN module on page 52). 6. Disconnect the wireless antenna cables from the computer. 4. Top cover (see Battery on page 59) Remove the display assembly: 1. Remove the battery (see Top ...cover on page 46). 5. Turn the computer display-side up, with the front toward you are unsure whether the computer is off or in : ● HP G62 computer biscotti computer models ● HP G62 computer biscotti computer models with webcam ● HP G62 silver computer models (for model 1.0 only) ● HP G62...

Service Guide
Page 87
... three Phillips PM2.5×4.0 (1) screws that secure the system board to install the system board. ENWW Component replacement procedures 77 Remove the battery (see Keyboard on page 46). 5. 4. Keyboard (see Battery on page 57) d. Turn the computer upright with the right side toward you. 2. Optical drive (see USB board on page 47) b. Lift...
... three Phillips PM2.5×4.0 (1) screws that secure the system board to install the system board. ENWW Component replacement procedures 77 Remove the battery (see Keyboard on page 46). 5. 4. Keyboard (see Battery on page 57) d. Turn the computer upright with the right side toward you. 2. Optical drive (see USB board on page 47) b. Lift...

Service Guide
Page 89
... release the clip (1) that secures the battery to the computer. 3. Keyboard (see Optical drive on page 57) e. System board (see Battery on page 76) Remove the RTC battery: 1. ENWW Component replacement procedures 79 Remove the battery (see System board on page 46). 5. Remove the following components: a. Turn the system board upside down the computer...
... release the clip (1) that secures the battery to the computer. 3. Keyboard (see Optical drive on page 57) e. System board (see Battery on page 76) Remove the RTC battery: 1. ENWW Component replacement procedures 79 Remove the battery (see System board on page 46). 5. Remove the following components: a. Turn the system board upside down the computer...

Service Guide
Page 91
... computer models with the front toward you are unsure whether the computer is off or in Hibernation, turn on page 57) d. Remove the following components: a. Top cover (see Keyboard on the computer, and then shut it down the computer. System board (see Speaker assembly on page 76...) Remove the fan/heat assembly (fan/heat sink appearance might vary): NOTE: Steps 1 through the operating system. 2. Disconnect all external devices connected...
... computer models with the front toward you are unsure whether the computer is off or in Hibernation, turn on page 57) d. Remove the following components: a. Top cover (see Keyboard on the computer, and then shut it down the computer. System board (see Speaker assembly on page 76...) Remove the fan/heat assembly (fan/heat sink appearance might vary): NOTE: Steps 1 through the operating system. 2. Disconnect all external devices connected...

Service Guide
Page 96
...: 1. Disconnect all external devices connected to the computer. 3. Top cover (see Battery on page 59) e. Remove the battery (see Top cover on page 46). 5. Keyboard (see Hard drive on the computer, and then shut it down the computer. Turn the processor locking screw (1)...is off or in Hibernation, turn on page 47) b. Hard drive (see Keyboard on page 70) g. Optical drive (see Display assembly on page 57) d. Display assembly (see Optical drive on page 62) f. Remove the following components: a. Description Spare part number AMD Phenom II P960 Processor (1.8...
...: 1. Disconnect all external devices connected to the computer. 3. Top cover (see Battery on page 59) e. Remove the battery (see Top cover on page 46). 5. Keyboard (see Hard drive on the computer, and then shut it down the computer. Turn the processor locking screw (1)...is off or in Hibernation, turn on page 47) b. Hard drive (see Keyboard on page 70) g. Optical drive (see Display assembly on page 57) d. Display assembly (see Optical drive on page 62) f. Remove the following components: a. Description Spare part number AMD Phenom II P960 Processor (1.8...
Service Guide
Page 142
... assignments 118 headphone jack, pin assignments 115 I inverter illustrated 27 J jacks RJ-11 (modem) 13 RJ-45 (network 14 K keyboard product description 5 removal 57 spare part numbers 21, 57 keys Calculator 11 esc 11 fn 11 function 11 Media application 11 Print 11 Send e-mail 11 Web...lock 9 Digital Media Slot 14 webcam 12 wireless 9 M Main menu 92 mass storage devices, spare part numbers 30 memory module product description 2 removal 55 spare part numbers 22, 55 memory module compartment, identifying 15 memory test 93 microphone (internal), identifying 12 microphone jack, pin assignments 115 ...
... assignments 118 headphone jack, pin assignments 115 I inverter illustrated 27 J jacks RJ-11 (modem) 13 RJ-45 (network 14 K keyboard product description 5 removal 57 spare part numbers 21, 57 keys Calculator 11 esc 11 fn 11 function 11 Media application 11 Print 11 Send e-mail 11 Web...lock 9 Digital Media Slot 14 webcam 12 wireless 9 M Main menu 92 mass storage devices, spare part numbers 30 memory module product description 2 removal 55 spare part numbers 22, 55 memory module compartment, identifying 15 memory test 93 microphone (internal), identifying 12 microphone jack, pin assignments 115 ...


