
Notebook PC User Guide - Windows 7
Page 9
8 Adding or replacing a memory module 9 Security Protecting the computer ...91 Using passwords ...92 Setting passwords in Windows 92 Setting passwords in Setup Utility 92 Administrator password 93 Managing an ...
8 Adding or replacing a memory module 9 Security Protecting the computer ...91 Using passwords ...92 Setting passwords in Windows 92 Setting passwords in Setup Utility 92 Administrator password 93 Managing an ...
Notebook PC User Guide - Windows 7
Page 17
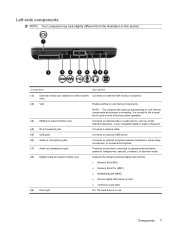
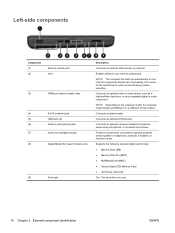
...: Your computer may look slightly different from the illustration in use. Supports the following optional digital card formats: ● Memory Stick (MS) ● Memory Stick Pro (MSP) ● MultiMediaCard (MMC) ● Secure Digital (SD) Memory Card ● xD-Picture Card (XD) On: The hard drive is normal for the internal fan to optional...
...: Your computer may look slightly different from the illustration in use. Supports the following optional digital card formats: ● Memory Stick (MS) ● Memory Stick Pro (MSP) ● MultiMediaCard (MMC) ● Secure Digital (SD) Memory Card ● xD-Picture Card (XD) On: The hard drive is normal for the internal fan to optional...

Notebook PC User Guide - Windows 7
Page 18
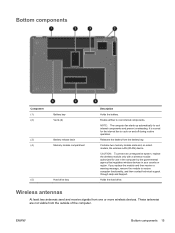
Enables airflow to cool internal components and prevent overheating. Bottom components Component (1) Battery bay (2) Vents (4) (3) Battery release latch (4) Memory module compartment (5) Hard drive bay Description Holds the battery. Holds the hard drive. 8 Chapter 1 Features NOTE: The computer fan starts up automatically to cool internal components. Releases the battery from the battery bay. It is normal for the internal fan to cycle on and off during routine operation. Contains the two memory module slots.
Enables airflow to cool internal components and prevent overheating. Bottom components Component (1) Battery bay (2) Vents (4) (3) Battery release latch (4) Memory module compartment (5) Hard drive bay Description Holds the battery. Holds the hard drive. 8 Chapter 1 Features NOTE: The computer fan starts up automatically to cool internal components. Releases the battery from the battery bay. It is normal for the internal fan to cycle on and off during routine operation. Contains the two memory module slots.
Notebook PC User Guide - Windows 7
Page 22
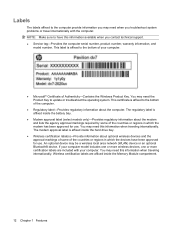
... certificate is affixed to the bottom of your computer model includes one or more wireless devices, one or more certification labels are affixed inside the Memory Module compartment. 12 Chapter 1 Features
... certificate is affixed to the bottom of your computer model includes one or more wireless devices, one or more certification labels are affixed inside the Memory Module compartment. 12 Chapter 1 Features

Notebook PC User Guide - Windows 7
Page 56
When Sleep is saved to memory, letting you exit Sleep faster than exiting Hibernation. If the computer is in the Sleep state for an extended period or if the battery reaches a ...
When Sleep is saved to memory, letting you exit Sleep faster than exiting Hibernation. If the computer is in the Sleep state for an extended period or if the battery reaches a ...
Notebook PC User Guide - Windows 7
Page 96
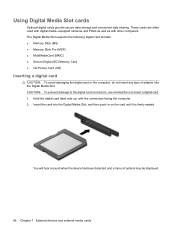
..., use minimal force to insert a digital card. 1. The Digital Media Slot supports the following digital card formats: ● Memory Stick (MS) ● Memory Stick Pro (MSP) ● MultiMediaCard (MMC) ● Secure Digital (SD) Memory Card ● xD-Picture Card (XD) Inserting a digital card CAUTION: To avoid damaging the digital card or the computer...
..., use minimal force to insert a digital card. 1. The Digital Media Slot supports the following digital card formats: ● Memory Stick (MS) ● Memory Stick Pro (MSP) ● MultiMediaCard (MMC) ● Secure Digital (SD) Memory Card ● xD-Picture Card (XD) Inserting a digital card CAUTION: To avoid damaging the digital card or the computer...

Notebook PC User Guide - Windows 7
Page 98
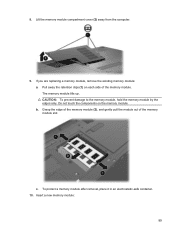
...damage to the equipment, unplug the power cord and remove all external devices connected to the vacant expansion memory module slot or by upgrading the existing memory module in Hibernation, turn the computer on by touching a grounded metal object. Unplug the power cord ...upside down on the bottom of static electricity by pressing the power button. Loosen the memory module compartment screws (1). 88 Chapter 8 Adding or replacing a memory module Disconnect all batteries before installing a memory module. Save your work. 2. CAUTION: Electrostatic discharge (ESD) can be sure that...
...damage to the equipment, unplug the power cord and remove all external devices connected to the vacant expansion memory module slot or by upgrading the existing memory module in Hibernation, turn the computer on by touching a grounded metal object. Unplug the power cord ...upside down on the bottom of static electricity by pressing the power button. Loosen the memory module compartment screws (1). 88 Chapter 8 Adding or replacing a memory module Disconnect all batteries before installing a memory module. Save your work. 2. CAUTION: Electrostatic discharge (ESD) can be sure that...
Notebook PC User Guide - Windows 7
Page 99
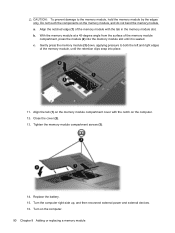
... not touch the components on each side of the memory module slot. If you are replacing a memory module, remove the existing memory module: a. c. Lift the memory module compartment cover (2) away from the computer. 9. Grasp the edge of the memory module (2), and gently pull the module out of the memory module. b. The memory module tilts up. Insert a new...
... not touch the components on each side of the memory module slot. If you are replacing a memory module, remove the existing memory module: a. c. Lift the memory module compartment cover (2) away from the computer. 9. Grasp the edge of the memory module (2), and gently pull the module out of the memory module. b. The memory module tilts up. Insert a new...
Notebook PC User Guide - Windows 7
Page 100
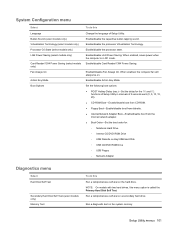
...8 Adding or replacing a memory module With the memory module at a 45-degree angle from the surface of the memory module with the notch on the memory module compartment cover with the tab in the memory module slot. a. Align the notched edge (1) of the memory module compartment, press the ...module (2) into the memory module slot until the retention clips snap into place. 11. Turn on the memory module, and do not bend the memory module. b. Gently press the memory module (3) down, applying pressure to the memory module, hold the memory module by...
...8 Adding or replacing a memory module With the memory module at a 45-degree angle from the surface of the memory module with the notch on the memory module compartment cover with the tab in the memory module slot. a. Align the notched edge (1) of the memory module compartment, press the ...module (2) into the memory module slot until the retention clips snap into place. 11. Turn on the memory module, and do not bend the memory module. b. Gently press the memory module (3) down, applying pressure to the memory module, hold the memory module by...

Notebook PC User Guide - Windows 7
Page 110
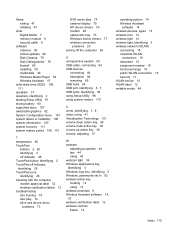
... do this ● View and change the system time and date. ● View identification information about the computer. ● View specification information about the processor, memory size, system BIOS, and keyboard controller version (select models only).
... do this ● View and change the system time and date. ● View identification information about the computer. ● View specification information about the processor, memory size, system BIOS, and keyboard controller version (select models only).
Notebook PC User Guide - Windows 7
Page 111
... ROM Drive ◦ USB Floppy ◦ Network Adapter Diagnostics menu Select Hard Disk Self Test Secondary Hard Disk Self Test (select models only) Memory Test To do this Change the language of 5 seconds each (0, 5, 10, 15, 20). ● CD-ROM Boot―Enable/disable boot...mode. Enable/disable the processor Virtualization Technology. Run a diagnostic test on a secondary hard drive. Run a comprehensive self-test on the system memory. Enable/disable Card Reader/1394 Power Saving. When enabled, the computer fan will always be on the hard drive. When enabled, saves power...
... ROM Drive ◦ USB Floppy ◦ Network Adapter Diagnostics menu Select Hard Disk Self Test Secondary Hard Disk Self Test (select models only) Memory Test To do this Change the language of 5 seconds each (0, 5, 10, 15, 20). ● CD-ROM Boot―Enable/disable boot...mode. Enable/disable the processor Virtualization Technology. Run a diagnostic test on a secondary hard drive. Run a comprehensive self-test on the system memory. Enable/disable Card Reader/1394 Power Saving. When enabled, the computer fan will always be on the hard drive. When enabled, saves power...

Notebook PC User Guide - Windows 7
Page 122
... 73 CD drive 78 Certificate of Authenticity label 12 changing the language of Setup Utility 98 charging batteries 55, 57 checking audio functions 40 compartments memory module 8 components additional hardware 11 bottom 8 display 9 left-side 7 right-side 6 top 2 connecting to a WLAN 18 connection, external power 51 connector, power...
... 73 CD drive 78 Certificate of Authenticity label 12 changing the language of Setup Utility 98 charging batteries 55, 57 checking audio functions 40 compartments memory module 8 components additional hardware 11 bottom 8 display 9 left-side 7 right-side 6 top 2 connecting to a WLAN 18 connection, external power 51 connector, power...
Notebook PC User Guide - Windows 7
Page 125
Sleep exiting 47 initiating 47 slots Digital Media 7 memory module 8 security cable 6 software antivirus 95 critical updates 96 Disk Cleanup 79 Disk Defragmenter 79 firewall 95 installing 39 multimedia 39 Windows Media Player 39 ... 12 wireless certification labels 12 troubleshooting disc burning 75 disc play 74 drive and device driver problems 73 DVD movie play 74 external display 75 HP device drivers 76 modem 26 optical disc tray 73 Windows device drivers 77 wireless connection problems 20 turning off the computer 63 U unresponsive system 63...
Sleep exiting 47 initiating 47 slots Digital Media 7 memory module 8 security cable 6 software antivirus 95 critical updates 96 Disk Cleanup 79 Disk Defragmenter 79 firewall 95 installing 39 multimedia 39 Windows Media Player 39 ... 12 wireless certification labels 12 troubleshooting disc burning 75 disc play 74 drive and device driver problems 73 DVD movie play 74 external display 75 HP device drivers 76 modem 26 optical disc tray 73 Windows device drivers 77 wireless connection problems 20 turning off the computer 63 U unresponsive system 63...
HP Notebook Hard Drives & Solid State Drives Identifying, Preventing, Diagnosing and Recovering from Drive Failures Care and Mai
Page 7
... the reading and writing of the hard drive reading/writing heads is important to optimize the performance of HP Client Automation and HP Client Manager 7.0 from electronic memory (such as 512e drives - Hard Drive Mounting Bracket Be sure the hard drive is moved to support... higher capacities. Client Management Interface HP has integrated SMART health monitoring into our management console portfolio. eight times larger than...
... the reading and writing of the hard drive reading/writing heads is important to optimize the performance of HP Client Automation and HP Client Manager 7.0 from electronic memory (such as 512e drives - Hard Drive Mounting Bracket Be sure the hard drive is moved to support... higher capacities. Client Management Interface HP has integrated SMART health monitoring into our management console portfolio. eight times larger than...
Service Guide
Page 3
... on page 20, Mass storage devices on page 30, Sequential part number listing on page 33, Hard drive on page 47. ● Added newly supported memory modules to spare parts listings in the following locations: Computer major components on page 20, Sequential part number listing on page 33..., Memory module on page 55. ● Added newly supported processors to spare parts listings in the following locations: Computer major components on page 20, Sequential part ...
... on page 20, Mass storage devices on page 30, Sequential part number listing on page 33, Hard drive on page 47. ● Added newly supported memory modules to spare parts listings in the following locations: Computer major components on page 20, Sequential part number listing on page 33..., Memory module on page 55. ● Added newly supported processors to spare parts listings in the following locations: Computer major components on page 20, Sequential part ...
Service Guide
Page 8
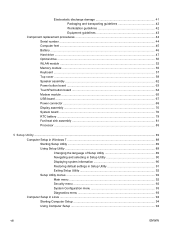
... 42 Equipment guidelines 43 Component replacement procedures 44 Serial number ...44 Computer feet ...45 Battery ...46 Hard drive ...47 Optical drive ...50 WLAN module ...52 Memory module ...55 Keyboard ...57 Top cover ...59 Speaker assembly ...62 Power button board ...63 TouchPad button board ...64 Modem module ...65 USB board ...67 Power...
... 42 Equipment guidelines 43 Component replacement procedures 44 Serial number ...44 Computer feet ...45 Battery ...46 Hard drive ...47 Optical drive ...50 WLAN module ...52 Memory module ...55 Keyboard ...57 Top cover ...59 Speaker assembly ...62 Power button board ...63 TouchPad button board ...64 Modem module ...65 USB board ...67 Power...
Service Guide
Page 12
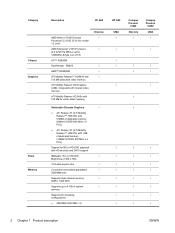
... Processor (2.4 GHZ 512 MB L2 cache 1066MHz)-Single core 25 W ATI™ RS880M Southbridge - Category Chipset Graphics Panel Memory Description HP G62 AMD Athlon II P360 Discrete Processor 2.3 GHZ 35 W (for BD or HD-DVD playback with HD decoder and DX10 support...8730; 2 customer-accessible/upgradable √ SODIMM slots Supports dual-channel memory √ DDR3, 1066 MHz Supports up to 8 GB of system √ memory Supports the following configurations: ● 4096 MB (2048 MB × 2) HP G62 UMA √ Compaq Presario CQ62 Discrete √ Compaq Presario CQ62 UMA...
... Processor (2.4 GHZ 512 MB L2 cache 1066MHz)-Single core 25 W ATI™ RS880M Southbridge - Category Chipset Graphics Panel Memory Description HP G62 AMD Athlon II P360 Discrete Processor 2.3 GHZ 35 W (for BD or HD-DVD playback with HD decoder and DX10 support...8730; 2 customer-accessible/upgradable √ SODIMM slots Supports dual-channel memory √ DDR3, 1066 MHz Supports up to 8 GB of system √ memory Supports the following configurations: ● 4096 MB (2048 MB × 2) HP G62 UMA √ Compaq Presario CQ62 Discrete √ Compaq Presario CQ62 UMA...

Service Guide
Page 15
Category Description HP G62 Keyboard/pointing Full-size keyboard, 39.62-cm(15.6- devices in) with numeric keypad TouchPad with 2 buttons and 2-way scroll (taps enabled as default) Power ...) Windows 7 Home Basic (32 & 64 bit) Free DOS Serviceability End-user replaceable parts: AC adapter Battery (system) Hard drive Memory module Optical drive Mini-card devices Discrete √ √ √ √ √ HP G62 UMA √ Compaq Presario CQ62 Discrete √ √ √ √ √ √ Compaq Presario CQ62 UMA √ √ √...
Category Description HP G62 Keyboard/pointing Full-size keyboard, 39.62-cm(15.6- devices in) with numeric keypad TouchPad with 2 buttons and 2-way scroll (taps enabled as default) Power ...) Windows 7 Home Basic (32 & 64 bit) Free DOS Serviceability End-user replaceable parts: AC adapter Battery (system) Hard drive Memory module Optical drive Mini-card devices Discrete √ √ √ √ √ HP G62 UMA √ Compaq Presario CQ62 Discrete √ √ √ √ √ √ Compaq Presario CQ62 UMA √ √ √...
Service Guide
Page 24
... optional computer headset microphone, stereo array microphone, or monaural microphone. Supports the following optional digital card formats: ● Memory Stick (MS) ● Memory Stick Pro (MSP) ● MultiMediaCard (MMC) ● Secure Digital (SD) Memory Card ● xD-Picture Card (XD) On-The hard drive is normal for the internal fan to cool internal...
... optional computer headset microphone, stereo array microphone, or monaural microphone. Supports the following optional digital card formats: ● Memory Stick (MS) ● Memory Stick Pro (MSP) ● MultiMediaCard (MMC) ● Secure Digital (SD) Memory Card ● xD-Picture Card (XD) On-The hard drive is normal for the internal fan to cool internal...
Service Guide
Page 25
Bottom components Component (1) (2) Battery bay Vents (4) (3) Battery release latch (4) Memory module compartment (5) Hard drive bay Description Holds the battery. These antennas are not visible from one or more wireless devices. It is normal for use ... a warning message, remove the module to cool internal components and prevent overheating. Releases the battery from the battery bay. ENWW Bottom components 15 Contains two memory module slots and, on and off during routine operation.
Bottom components Component (1) (2) Battery bay Vents (4) (3) Battery release latch (4) Memory module compartment (5) Hard drive bay Description Holds the battery. These antennas are not visible from one or more wireless devices. It is normal for use ... a warning message, remove the module to cool internal components and prevent overheating. Releases the battery from the battery bay. ENWW Bottom components 15 Contains two memory module slots and, on and off during routine operation.


