Notebook PC User Guide - Windows 7
Page 7
... the computer cannot exit Hibernation 57 Calibrating a battery ...57 Step 1: Fully charge the battery 57 Step 2: Disable Hibernation and Sleep 57 Step 3: Discharge the battery 59 Step 4: Fully recharge the battery 59 Step 5: Reenable Hibernation and Sleep 60 Conserving battery power 60 Storing a battery ...60 Disposing of a used battery 61 Replacing the battery ...61 Switching between graphics modes (select...
... the computer cannot exit Hibernation 57 Calibrating a battery ...57 Step 1: Fully charge the battery 57 Step 2: Disable Hibernation and Sleep 57 Step 3: Discharge the battery 59 Step 4: Fully recharge the battery 59 Step 5: Reenable Hibernation and Sleep 60 Conserving battery power 60 Storing a battery ...60 Disposing of a used battery 61 Replacing the battery ...61 Switching between graphics modes (select...

Notebook PC User Guide - Windows 7
Page 60
... Power management To reduce potential safety issues, use only the AC adapter provided with the computer, a replacement AC adapter provided by HP, or a compatible AC adapter purchased from HP. ● Approved AC adapter ● Optional expansion product Connect the computer to external AC power under...! Using external AC power External AC power is automatically decreased to save battery life. Do not charge the computer battery while you are onboard aircraft. ● When you are charging or calibrating a battery ● When you are installing or modifying system software ● When...
... Power management To reduce potential safety issues, use only the AC adapter provided with the computer, a replacement AC adapter provided by HP, or a compatible AC adapter purchased from HP. ● Approved AC adapter ● Optional expansion product Connect the computer to external AC power under...! Using external AC power External AC power is automatically decreased to save battery life. Do not charge the computer battery while you are onboard aircraft. ● When you are charging or calibrating a battery ● When you are installing or modifying system software ● When...
Notebook PC User Guide - Windows 7
Page 62
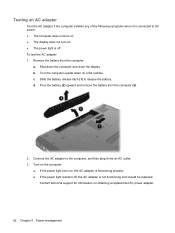
...flat surface. Connect the AC adapter to the computer, and then plug it is connected to release the battery. Contact technical support for information on , the AC adapter is not functioning and should be replaced. a. d. Shut down on . ● The power light is off , the AC adapter is ...functioning properly. ● If the power light remains off . Turn on the computer. ● If the power light turns on obtaining a replacement AC power adapter. 52 Chapter 5 Power management Turn the computer upside down the computer and close the display. To test the AC adapter: 1....
...flat surface. Connect the AC adapter to the computer, and then plug it is connected to release the battery. Contact technical support for information on , the AC adapter is not functioning and should be replaced. a. d. Shut down on . ● The power light is off , the AC adapter is ...functioning properly. ● If the power light remains off . Turn on the computer. ● If the power light turns on obtaining a replacement AC power adapter. 52 Chapter 5 Power management Turn the computer upside down the computer and close the display. To test the AC adapter: 1....

Notebook PC User Guide - Windows 7
Page 63
... disconnect AC power. To reduce potential safety issues, use only the battery provided with the computer, a replacement battery provided by HP, or a compatible battery purchased from external power. Connect the AC adapter to function properly. 2. NOTE: The computer must be connected to external power for Battery Check to the computer. Select Start > Help and Support > Troubleshooting...
... disconnect AC power. To reduce potential safety issues, use only the battery provided with the computer, a replacement battery provided by HP, or a compatible battery purchased from external power. Connect the AC adapter to function properly. 2. NOTE: The computer must be connected to external power for Battery Check to the computer. Select Start > Help and Support > Troubleshooting...

Notebook PC User Guide - Windows 7
Page 71
... on the computer, display brightness, external devices connected to the HP Web site for more information about ordering a replacement battery. If the battery is not charging properly, or when the battery storage capacity has reached a weak condition. Using battery power 61 For additional information, refer to replace the battery when an internal cell is possibly covered by an...
... on the computer, display brightness, external devices connected to the HP Web site for more information about ordering a replacement battery. If the battery is not charging properly, or when the battery storage capacity has reached a weak condition. Using battery power 61 For additional information, refer to replace the battery when an internal cell is possibly covered by an...

Notebook PC User Guide - Windows 7
Page 73
Shut down the computer under any of the following conditions: ● When you need to replace the battery or access components inside the computer ● When you are unable to use the preceding shutdown procedures, try the following emergency procedures in Hibernation... hardware device that does not connect to a USB port ● When the computer will be unused and disconnected from external power, and then remove the battery. Save your work and close all open programs. 2. Click Start. 3. Shutting down . The Shut down command closes all open programs, including the operating ...
Shut down the computer under any of the following conditions: ● When you need to replace the battery or access components inside the computer ● When you are unable to use the preceding shutdown procedures, try the following emergency procedures in Hibernation... hardware device that does not connect to a USB port ● When the computer will be unused and disconnected from external power, and then remove the battery. Save your work and close all open programs. 2. Click Start. 3. Shutting down . The Shut down command closes all open programs, including the operating ...

Notebook PC User Guide - Windows 7
Page 90
...your work. 2. Turn the computer upside down the computer and close the display. 3. Unplug the power cord from the computer. 7. Remove the battery from the AC outlet. 5. To remove the hard drive: 1. With the hard drive bay toward you are not sure whether the computer is...external devices connected to the computer. 4. Then shut down the computer before removing the hard drive from the computer (1). 80 Chapter 6 Drives Replacing the hard drive CAUTION: To prevent information loss or an unresponsive system: Shut down the computer through the operating system. Lift the hard drive...
...your work. 2. Turn the computer upside down the computer and close the display. 3. Unplug the power cord from the computer. 7. Remove the battery from the AC outlet. 5. To remove the hard drive: 1. With the hard drive bay toward you are not sure whether the computer is...external devices connected to the computer. 4. Then shut down the computer before removing the hard drive from the computer (1). 80 Chapter 6 Drives Replacing the hard drive CAUTION: To prevent information loss or an unresponsive system: Shut down the computer through the operating system. Lift the hard drive...

Notebook PC User Guide - Windows 7
Page 93
Reconnect any external devices. Tighten the hard drive cover screws (3). 6. Replace the battery. 7. Replacing the hard drive 83 5. Reconnect power to the computer. 9. Turn the computer right-side up. 8.
Reconnect any external devices. Tighten the hard drive cover screws (3). 6. Replace the battery. 7. Replacing the hard drive 83 5. Reconnect power to the computer. 9. Turn the computer right-side up. 8.

Notebook PC User Guide - Windows 7
Page 98
...1. Shut down the computer through the operating system. 3. Then shut down the computer and close the display. 8 Adding or replacing a memory module The computer has one memory module compartment, which is off or in the primary memory module slot. CAUTION: ...the equipment, unplug the power cord and remove all batteries before installing a memory module. If you are the same size. Remove the battery from the AC outlet. 5. WARNING! Loosen the memory module compartment screws (1). 88 Chapter 8 Adding or replacing a memory module Unplug the power cord from the computer...
...1. Shut down the computer through the operating system. 3. Then shut down the computer and close the display. 8 Adding or replacing a memory module The computer has one memory module compartment, which is off or in the primary memory module slot. CAUTION: ...the equipment, unplug the power cord and remove all batteries before installing a memory module. If you are the same size. Remove the battery from the AC outlet. 5. WARNING! Loosen the memory module compartment screws (1). 88 Chapter 8 Adding or replacing a memory module Unplug the power cord from the computer...
Notebook PC User Guide - Windows 7
Page 100
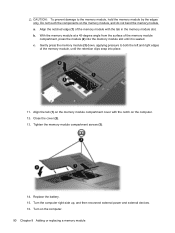
...-side up, and then reconnect external power and external devices. 16. Align the notched edge (1) of the memory module, until it is seated. Replace the battery. 15. Gently press the memory module (3) down, applying pressure to the memory module, hold the memory module by the edges only. Tighten the... right edges of the memory module with the notch on the computer. 12. Do not touch the components on the computer. 90 Chapter 8 Adding or replacing a memory module a. c. With the memory module at a 45-degree angle from the surface of the memory module compartment, press the module (2) into...
...-side up, and then reconnect external power and external devices. 16. Align the notched edge (1) of the memory module, until it is seated. Replace the battery. 15. Gently press the memory module (3) down, applying pressure to the memory module, hold the memory module by the edges only. Tighten the... right edges of the memory module with the notch on the computer. 12. Do not touch the components on the computer. 90 Chapter 8 Adding or replacing a memory module a. c. With the memory module at a 45-degree angle from the surface of the memory module compartment, press the module (2) into...

Notebook PC User Guide - Windows 7
Page 122
...56 disposing 61 inserting 54 low battery levels 56 recharging 59 removing 54 replacing 61 storing 60 battery bay 12 battery bay, identifying 8 Battery Check 53 battery power 53 battery release latch 54 battery release latch, identifying 8 battery temperature 60 battery, identifying 11 bays battery 8, 12 hard drive 8 BD ... copying 71 playing 68 removing 73 CD drive 78 Certificate of Authenticity label 12 changing the language of Setup Utility 98 charging batteries 55, 57 checking audio functions 40 compartments memory module 8 components additional hardware 11 bottom 8 display 9 left-side 7 right...
...56 disposing 61 inserting 54 low battery levels 56 recharging 59 removing 54 replacing 61 storing 60 battery bay 12 battery bay, identifying 8 Battery Check 53 battery power 53 battery release latch 54 battery release latch, identifying 8 battery temperature 60 battery, identifying 11 bays battery 8, 12 hard drive 8 BD ... copying 71 playing 68 removing 73 CD drive 78 Certificate of Authenticity label 12 changing the language of Setup Utility 98 charging batteries 55, 57 checking audio functions 40 compartments memory module 8 components additional hardware 11 bottom 8 display 9 left-side 7 right...
Notebook PC User Guide - Windows 7
Page 123
... warning 71 cord, power 11 corporate WLAN connection 18 country-specific modem cable adapter 24 critical battery level 56 critical updates, software 96 CyberLink PowerDVD 39 D device drivers HP drivers 76 Windows drivers 77 Diagnostics menu 101 digital card defined 86 inserting 86 removing 87 stopping...firewall 17 firewall software 95 fn key, identifying 5 full system recovery 106 G graphics modes, switching 62 H hard drive installing 82 removing 80 replacing 80 hard drive bay, identifying 8 hard drive self test 101 HDMI connecting 42 HDMI port 42 HDMI port, identifying 7 headphone (audio-out...
... warning 71 cord, power 11 corporate WLAN connection 18 country-specific modem cable adapter 24 critical battery level 56 critical updates, software 96 CyberLink PowerDVD 39 D device drivers HP drivers 76 Windows drivers 77 Diagnostics menu 101 digital card defined 86 inserting 86 removing 87 stopping...firewall 17 firewall software 95 fn key, identifying 5 full system recovery 106 G graphics modes, switching 62 H hard drive installing 82 removing 80 replacing 80 hard drive bay, identifying 8 hard drive self test 101 HDMI connecting 42 HDMI port 42 HDMI port, identifying 7 headphone (audio-out...
Service Guide
Page 8
Electrostatic discharge damage 41 Packaging and transporting guidelines 42 Workstation guidelines 42 Equipment guidelines 43 Component replacement procedures 44 Serial number ...44 Computer feet ...45 Battery ...46 Hard drive ...47 Optical drive ...50 WLAN module ...52 Memory module ...55 Keyboard ...57 Top cover... ...63 TouchPad button board ...64 Modem module ...65 USB board ...67 Power connector ...69 Display assembly ...70 System board ...76 RTC battery ...79 Fan/heat sink assembly ...81 Processor ...85 5 Setup Utility ...89 Computer Setup in Windows 7 ...89 Starting Setup Utility ...89...
Electrostatic discharge damage 41 Packaging and transporting guidelines 42 Workstation guidelines 42 Equipment guidelines 43 Component replacement procedures 44 Serial number ...44 Computer feet ...45 Battery ...46 Hard drive ...47 Optical drive ...50 WLAN module ...52 Memory module ...55 Keyboard ...57 Top cover... ...63 TouchPad button board ...64 Modem module ...65 USB board ...67 Power connector ...69 Display assembly ...70 System board ...76 RTC battery ...79 Fan/heat sink assembly ...81 Processor ...85 5 Setup Utility ...89 Computer Setup in Windows 7 ...89 Starting Setup Utility ...89...

Service Guide
Page 15
... 7 Home Premium (32 & 64 bit) Windows 7 Home Basic (32 & 64 bit) Free DOS Serviceability End-user replaceable parts: AC adapter Battery (system) Hard drive Memory module Optical drive Mini-card devices Discrete √ √ √ √ √ HP G62 UMA √ Compaq Presario CQ62 Discrete √ √ √ √ √ √ Compaq Presario CQ62...
... 7 Home Premium (32 & 64 bit) Windows 7 Home Basic (32 & 64 bit) Free DOS Serviceability End-user replaceable parts: AC adapter Battery (system) Hard drive Memory module Optical drive Mini-card devices Discrete √ √ √ √ √ HP G62 UMA √ Compaq Presario CQ62 Discrete √ √ √ √ √ √ Compaq Presario CQ62...
Service Guide
Page 25
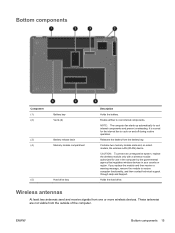
... two memory module slots and, on and off during routine operation. Holds the hard drive. CAUTION: To prevent an unresponsive system, replace the wireless module only with a wireless module authorized for the internal fan to cool internal components. It is normal for use in the... computer by the governmental agency that regulates wireless devices in your country or region. Releases the battery from the battery bay. If you replace the module and then receive a warning message, remove the module to cool internal components and prevent overheating. NOTE: The...
... two memory module slots and, on and off during routine operation. Holds the hard drive. CAUTION: To prevent an unresponsive system, replace the wireless module only with a wireless module authorized for the internal fan to cool internal components. It is normal for use in the... computer by the governmental agency that regulates wireless devices in your country or region. Releases the battery from the battery bay. If you replace the module and then receive a warning message, remove the module to cool internal components and prevent overheating. NOTE: The...
Service Guide
Page 32
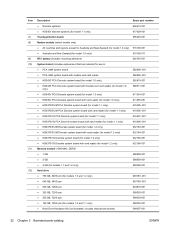
... for Australia and New Zealand (for model 1.0 only) 510100-001 ● Australia and New Zealand (for model 1.0 only) 510100-011 RTC battery (includes mounting adhesive) 602745-001 System board (includes replacement thermal material) for use in: ● PCA UMA system board 592808-001 ● PCA UMA system board with modem and card...
... for Australia and New Zealand (for model 1.0 only) 510100-001 ● Australia and New Zealand (for model 1.0 only) 510100-011 RTC battery (includes mounting adhesive) 602745-001 System board (includes replacement thermal material) for use in: ● PCA UMA system board 592808-001 ● PCA UMA system board with modem and card...

Service Guide
Page 54
.... (1) Product name (2) Serial number (3) Product number (4) Warranty period (5) Model description (select models) 44 Chapter 4 Removal and replacement procedures ENWW There are as many as 75 screws, in the battery bay of each screw size and location during removal and replacement. Make special note of the computer, provides important information that must be removed...
.... (1) Product name (2) Serial number (3) Product number (4) Warranty period (5) Model description (select models) 44 Chapter 4 Removal and replacement procedures ENWW There are as many as 75 screws, in the battery bay of each screw size and location during removal and replacement. Make special note of the computer, provides important information that must be removed...

Service Guide
Page 56
...the AC outlet and then disconnecting the AC adapter from the computer. The battery release latch automatically locks the battery into the battery bay and pivot the front edge downward until the battery is off or in Hibernation, turn on a flat surface. 2. If you...battery. 3. Slide the battery release latch (1) to the computer. 3. To insert the battery, insert the rear edge of the computer (3). Remove the battery: 1. Turn the computer upside down on the computer, and then shut it out of the battery into place. 46 Chapter 4 Removal and replacement procedures ENWW Battery...
...the AC outlet and then disconnecting the AC adapter from the computer. The battery release latch automatically locks the battery into the battery bay and pivot the front edge downward until the battery is off or in Hibernation, turn on a flat surface. 2. If you...battery. 3. Slide the battery release latch (1) to the computer. 3. To insert the battery, insert the rear edge of the computer (3). Remove the battery: 1. Turn the computer upside down on the computer, and then shut it out of the battery into place. 46 Chapter 4 Removal and replacement procedures ENWW Battery...
Service Guide
Page 57
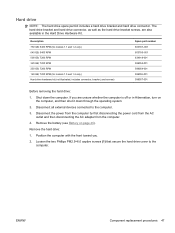
... the two Phillips PM2.5×6.0 captive screws (1) that secure the hard drive cover to the computer. 3. Remove the battery (see Battery on the computer, and then shut it down the computer. ENWW Component replacement procedures 47 Shut down through the operating system. 2. Disconnect the power from the computer by first disconnecting the power...
... the two Phillips PM2.5×6.0 captive screws (1) that secure the hard drive cover to the computer. 3. Remove the battery (see Battery on the computer, and then shut it down the computer. ENWW Component replacement procedures 47 Shut down through the operating system. 2. Disconnect the power from the computer by first disconnecting the power...

Service Guide
Page 60
...for use with the front toward you are unsure whether the computer is off or in the hard drive bay. 50 Chapter 4 Removal and replacement procedures ENWW Description DVD±RW and CD-RW SuperMulti Double-Layer Combo Drive with LightScribe for use with: ● Biscotti computer models &#...If you . 2. Optical drive NOTE: The optical drive spare part kit includes an optical drive bezel and optical drive bracket. Remove the hard drive (see Battery on the computer, and then shut it down the computer. Insert a thin tool, such as a screw driver (1), into the release access slot in ...
...for use with the front toward you are unsure whether the computer is off or in the hard drive bay. 50 Chapter 4 Removal and replacement procedures ENWW Description DVD±RW and CD-RW SuperMulti Double-Layer Combo Drive with LightScribe for use with: ● Biscotti computer models &#...If you . 2. Optical drive NOTE: The optical drive spare part kit includes an optical drive bezel and optical drive bracket. Remove the hard drive (see Battery on the computer, and then shut it down the computer. Insert a thin tool, such as a screw driver (1), into the release access slot in ...


