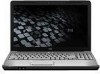
Service Guide
Page 4
... location 3-1 Computer major components 3-2 Display assembly components 3-9 Plastics Kit 3-11 Mass storage devices 3-12 Miscellaneous parts 3-13 Sequential part number listing 3-14 4 Removal and replacement procedures Preliminary replacement requirements 4-1 Tools required 4-1 Service considerations 4-1 Grounding guidelines 4-2 Unknown user password 4-4 Component replacement procedures 4-5 Serial number 4-5 Computer feet 4-6 Battery 4-7 Optical drive 4-8 Hard drive 4-10 RTC battery 4-12 Memory...
... location 3-1 Computer major components 3-2 Display assembly components 3-9 Plastics Kit 3-11 Mass storage devices 3-12 Miscellaneous parts 3-13 Sequential part number listing 3-14 4 Removal and replacement procedures Preliminary replacement requirements 4-1 Tools required 4-1 Service considerations 4-1 Grounding guidelines 4-2 Unknown user password 4-4 Component replacement procedures 4-5 Serial number 4-5 Computer feet 4-6 Battery 4-7 Optical drive 4-8 Hard drive 4-10 RTC battery 4-12 Memory...
Service Guide
Page 13
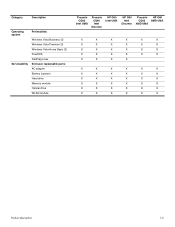
...: Windows Vista Business 32 Windows Vista Premium 32 Windows Vista Home Basic 32 FreeDOS RedFlag Linux End-user replaceable parts: AC adapter Battery (system) Hard drive Memory module Optical drive WLAN module Presario CQ60 Intel UMA Presario CQ60 Intel Discrete HP G60 Intel UMA HP G60 Intel Discrete Presario HP G60 CQ60 AMD UMA AMD UMA X X X X X X X X X X X X X X X X X X X X X X X X X X X X X X X X X X X X X X X X X X X X X X X X X X X X X X X X X X X X X X X X Product description...
...: Windows Vista Business 32 Windows Vista Premium 32 Windows Vista Home Basic 32 FreeDOS RedFlag Linux End-user replaceable parts: AC adapter Battery (system) Hard drive Memory module Optical drive WLAN module Presario CQ60 Intel UMA Presario CQ60 Intel Discrete HP G60 Intel UMA HP G60 Intel Discrete Presario HP G60 CQ60 AMD UMA AMD UMA X X X X X X X X X X X X X X X X X X X X X X X X X X X X X X X X X X X X X X X X X X X X X X X X X X X X X X X X X X X X X X X X Product description...

Service Guide
Page 25
...board, PM45 (includes built-in modem, Digital Media Slot, HDMI port, and replacement thermal material) 485219-001 UMA system board, GL40 (for Presario CQ60 computer models only; Item Description Spare Part Number For use in Portugal 496771-131 For use in Russia 496771-251 For ... 489126-001 Fan/heat sink assembly for use with Discrete systems (includes replacement thermal material) 489154-001 (8) TouchPad board bracket 489119-001 Plastics Kit (see Plastics Kit on page 3-9 for more Plastics Kit spare part information) 486621-001 (9a) Hard drive cover (9b) Memory module compartment...
...board, PM45 (includes built-in modem, Digital Media Slot, HDMI port, and replacement thermal material) 485219-001 UMA system board, GL40 (for Presario CQ60 computer models only; Item Description Spare Part Number For use in Portugal 496771-131 For use in Russia 496771-251 For ... 489126-001 Fan/heat sink assembly for use with Discrete systems (includes replacement thermal material) 489154-001 (8) TouchPad board bracket 489119-001 Plastics Kit (see Plastics Kit on page 3-9 for more Plastics Kit spare part information) 486621-001 (9a) Hard drive cover (9b) Memory module compartment...
Service Guide
Page 26
... CQ60 use only; includes built-in modem, HDMI port, and replacement thermal material) UMA system board, NVIDIA (for Presario CQ60 use only; includes built-in modem and replacement thermal material) Speakers (include left and right speakers and cables) ...GHZ processor AMD Turion Dual-Core (1-MB L2 cache): ■ RM-70 20-GHz processor ■ RM-72 2.1-GHz processor AMD Athlon X2 Dual-Core (1-MB L2 cache): ■ QL-60 1.9-GHz processor ■ QL-62 2.0-GHz processor AMD Sempron Single-Core (512-KB L2 cache): ■ SI-42 2.1-GHz processor ■ SI-40 2.0-GHz processor Spare Part...
... CQ60 use only; includes built-in modem, HDMI port, and replacement thermal material) UMA system board, NVIDIA (for Presario CQ60 use only; includes built-in modem and replacement thermal material) Speakers (include left and right speakers and cables) ...GHZ processor AMD Turion Dual-Core (1-MB L2 cache): ■ RM-70 20-GHz processor ■ RM-72 2.1-GHz processor AMD Athlon X2 Dual-Core (1-MB L2 cache): ■ QL-60 1.9-GHz processor ■ QL-62 2.0-GHz processor AMD Sempron Single-Core (512-KB L2 cache): ■ SI-42 2.1-GHz processor ■ SI-40 2.0-GHz processor Spare Part...

Service Guide
Page 36
...-001 489149-001 489154-001 490111-001 Description Atheros AR9280 802.11a/b/g/n WLAN module for use with UMA systems (includes replacement thermal material) Audio board (includes audio board cable) Fan/heat sink for use in modem, Digital Media Slot, HDMI port, and... replacement thermal material) Webcam TouchPad board bracket Fan/heat sink for use with discrete systems (includes replacement thermal material) (Continued) Intel Core2 Duo P8400 2.26-GHz processor (3-MB L2 cache, 1066-MHz FSB) Illustrated parts catalog 3-15
...-001 489149-001 489154-001 490111-001 Description Atheros AR9280 802.11a/b/g/n WLAN module for use with UMA systems (includes replacement thermal material) Audio board (includes audio board cable) Fan/heat sink for use in modem, Digital Media Slot, HDMI port, and... replacement thermal material) Webcam TouchPad board bracket Fan/heat sink for use with discrete systems (includes replacement thermal material) (Continued) Intel Core2 Duo P8400 2.26-GHz processor (3-MB L2 cache, 1066-MHz FSB) Illustrated parts catalog 3-15
Service Guide
Page 37
...MHz FSB) Intel Pentium Dual-Core T3200 2.0-GHz processor (1-MB L2 cache, 667-MHz FSB) Intel Celeron-M 575 2.0-GHz processor (1-MB L2 cache, 667-MHz FSB) Intel Celeron-M 585 2.16-GHz processor (1-MB L2 cache, 667-MHz FSB...includes built-in modem, Digital Media Slot, and replacement thermal material) 16-inch WXGA BrightView display assembly for HP G60 computer models (includes microphone) 16-inch WXGA BrightView display assembly for HP G60 computer models (includes webcam module and cable, microphone...cable, and logo) (Continued) 16-inch WXGA BrightView display panel Illustrated parts catalog 3-16
...MHz FSB) Intel Pentium Dual-Core T3200 2.0-GHz processor (1-MB L2 cache, 667-MHz FSB) Intel Celeron-M 575 2.0-GHz processor (1-MB L2 cache, 667-MHz FSB) Intel Celeron-M 585 2.16-GHz processor (1-MB L2 cache, 667-MHz FSB...includes built-in modem, Digital Media Slot, and replacement thermal material) 16-inch WXGA BrightView display assembly for HP G60 computer models (includes microphone) 16-inch WXGA BrightView display assembly for HP G60 computer models (includes webcam module and cable, microphone...cable, and logo) (Continued) 16-inch WXGA BrightView display panel Illustrated parts catalog 3-16
Service Guide
Page 39
...Turion Ultra Dual-Core ZM-82 2.2-GHZ processor (2-MB L2 cache) AMD Turion Dual-Core RM-70 20-GHz processor (1-MB L2 cache) AMD Turion Dual-Core RM-72 2.1-GHz processor (1-MB L2 cache) AMD Athlon X2 dual-Core QL-60 1.9-GHz processor (1-MB L2 cache) AMD Athlon X2 dual-Core QL-62 2.0-GHz... Double-Layer Combo Drive with HP G60 computer models (includes microphone and webcam) UMA system board, NVIDIA (includes built-in modem and replacement thermal material) (Continued) Intel Core2 Duo P7350 2.0-GHz processor (3-MB L2 cache, 1066-MHz FSB) Illustrated parts catalog 3-18 includes built-in...
...Turion Ultra Dual-Core ZM-82 2.2-GHZ processor (2-MB L2 cache) AMD Turion Dual-Core RM-70 20-GHz processor (1-MB L2 cache) AMD Turion Dual-Core RM-72 2.1-GHz processor (1-MB L2 cache) AMD Athlon X2 dual-Core QL-60 1.9-GHz processor (1-MB L2 cache) AMD Athlon X2 dual-Core QL-62 2.0-GHz... Double-Layer Combo Drive with HP G60 computer models (includes microphone and webcam) UMA system board, NVIDIA (includes built-in modem and replacement thermal material) (Continued) Intel Core2 Duo P7350 2.0-GHz processor (3-MB L2 cache, 1066-MHz FSB) Illustrated parts catalog 3-18 includes built-in...

Service Guide
Page 42
... cables. Cables must keep in mind during disassembly and reassembly can damage the computer. Handle cables by parts being removed or replaced. these cables tear easily. Plastic parts Ä CAUTION: Using excessive force during disassembly and assembly procedures. ✎ As you must be...: When servicing the computer, be handled with extreme care; Use care when handling the plastic parts. Apply only the tension required to prevent damage. Removal and replacement procedures 4-1 Apply pressure only at the points designated in such a way that cables are placed...
... cables. Cables must keep in mind during disassembly and reassembly can damage the computer. Handle cables by parts being removed or replaced. these cables tear easily. Plastic parts Ä CAUTION: Using excessive force during disassembly and assembly procedures. ✎ As you must be...: When servicing the computer, be handled with extreme care; Use care when handling the plastic parts. Apply only the tension required to prevent damage. Removal and replacement procedures 4-1 Apply pressure only at the points designated in such a way that cables are placed...
Service Guide
Page 44
..., leads, or circuitry. ■ Turn off power and input signals before inserting or removing connectors or test equipment. Removal and replacement procedures 4-3 The following table shows how humidity affects the electrostatic voltage levels generated by different activities. Ä CAUTION: A product can..., use fixtures made of nonconductive materials, such as ordinary plastic assembly aids and Styrofoam. ■ Handle ESD-sensitive components, parts, and assemblies by as little as cutters, screwdrivers, and vacuums. ■ When fixtures must directly contact dissipative surfaces, use...
..., leads, or circuitry. ■ Turn off power and input signals before inserting or removing connectors or test equipment. Removal and replacement procedures 4-3 The following table shows how humidity affects the electrostatic voltage levels generated by different activities. Ä CAUTION: A product can..., use fixtures made of nonconductive materials, such as ordinary plastic assembly aids and Styrofoam. ■ Handle ESD-sensitive components, parts, and assemblies by as little as cutters, screwdrivers, and vacuums. ■ When fixtures must directly contact dissipative surfaces, use...
Service Guide
Page 46
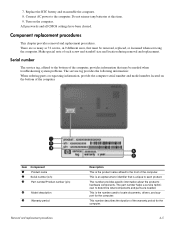
...is an alphanumeric identifier that must be needed . Component replacement procedures This chapter provides removal and replacement procedures. The part number helps a service technician to determine what components and parts are as many as 72 screws, in 9 different sizes... describes the duration of each product. 7. Replace the RTC battery and reassemble the computer. 8. Item 1 2 3 Component Product name Serial number (s/n) Part number/Product number (p/n) 4 Model description 5 Warranty period Removal and replacement procedures Description This is unique to locate documents...
...is an alphanumeric identifier that must be needed . Component replacement procedures This chapter provides removal and replacement procedures. The part number helps a service technician to determine what components and parts are as many as 72 screws, in 9 different sizes... describes the duration of each product. 7. Replace the RTC battery and reassemble the computer. 8. Item 1 2 3 Component Product name Serial number (s/n) Part number/Product number (p/n) 4 Model description 5 Warranty period Removal and replacement procedures Description This is unique to locate documents...
Service Guide
Page 48
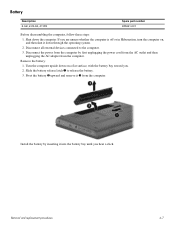
... 2 upward and remove it down through the operating system. 2. Remove the battery: 1. Turn the computer upside down the computer. Removal and replacement procedures 4-7 Disconnect all external devices connected to release the battery. 3. Install the battery by first unplugging the power cord from the AC outlet and... the computer by inserting it into the battery bay until you . 2. Battery Description 6 cell, 2.20-Ah, 47-Wh Spare part number 485041-001 Before disassembling the computer, follow these steps: 1. Slide the battery release latch 1 to the computer. 3.
... 2 upward and remove it down through the operating system. 2. Remove the battery: 1. Turn the computer upside down the computer. Removal and replacement procedures 4-7 Disconnect all external devices connected to release the battery. 3. Install the battery by first unplugging the power cord from the AC outlet and... the computer by inserting it into the battery bay until you . 2. Battery Description 6 cell, 2.20-Ah, 47-Wh Spare part number 485041-001 Before disassembling the computer, follow these steps: 1. Slide the battery release latch 1 to the computer. 3.
Service Guide
Page 49
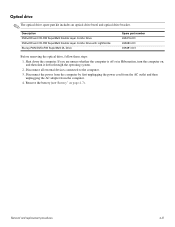
... the computer on page 4-7). Optical drive ✎ The optical drive spare part kit includes an optical drive bezel and optical drive bracket. Disconnect all external devices connected to the computer. 3. Removal and replacement procedures 4-8 Description DVD±RW and CD-RW SuperMulti Double Layer Combo Drive... DVD±RW and CD-RW SuperMulti Double Layer Combo Drive with LightScribe Blu-ray ROM DVD±RW SuperMulti DL Drive Spare part number 498479-001 498480-...
... the computer on page 4-7). Optical drive ✎ The optical drive spare part kit includes an optical drive bezel and optical drive bracket. Disconnect all external devices connected to the computer. 3. Removal and replacement procedures 4-8 Description DVD±RW and CD-RW SuperMulti Double Layer Combo Drive... DVD±RW and CD-RW SuperMulti Double Layer Combo Drive with LightScribe Blu-ray ROM DVD±RW SuperMulti DL Drive Spare part number 498479-001 498480-...
Service Guide
Page 51
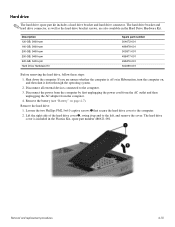
...-GB, 5400-rpm 160-GB, 5400-rpm 200-GB, 5400-rpm 250-GB, 5400-rpm 320-GB, 5400-rpm Hard Drive Hardware Kit Spare part number 504072-001 498478-001 505971-001 498477-001 498476-001 504059-001 Before removing the hard drive, follow these steps: 1. Loosen the two Phillips...screws 1 that secure the hard drive cover to the computer. 3. The hard drive cover is off or in the Plastics Kit, spare part number 486621-001. Removal and replacement procedures 4-10 If you are also available in the Hard Drive Hardware Kit. Disconnect all external devices connected to the computer. 2. Lift ...
...-GB, 5400-rpm 160-GB, 5400-rpm 200-GB, 5400-rpm 250-GB, 5400-rpm 320-GB, 5400-rpm Hard Drive Hardware Kit Spare part number 504072-001 498478-001 505971-001 498477-001 498476-001 504059-001 Before removing the hard drive, follow these steps: 1. Loosen the two Phillips...screws 1 that secure the hard drive cover to the computer. 3. The hard drive cover is off or in the Plastics Kit, spare part number 486621-001. Removal and replacement procedures 4-10 If you are also available in the Hard Drive Hardware Kit. Disconnect all external devices connected to the computer. 2. Lift ...
Service Guide
Page 53
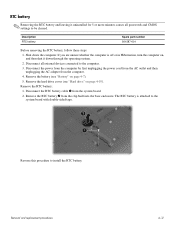
Description RTC battery Spare part number 501587-001 Before removing the RTC battery, follow these steps: 1. If you are unsure whether the computer is attached to the system board with double-sided tape. Removal and replacement procedures 4-12 Remove the hard drive cover (see "Battery" on page 4-7). 5. Disconnect all passwords and CMOS settings...
Description RTC battery Spare part number 501587-001 Before removing the RTC battery, follow these steps: 1. If you are unsure whether the computer is attached to the system board with double-sided tape. Removal and replacement procedures 4-12 Remove the hard drive cover (see "Battery" on page 4-7). 5. Disconnect all passwords and CMOS settings...
Service Guide
Page 54
..., and remove the cover. Remove the battery (see "Battery" on , and then shut it up and to the computer. 2. Removal and replacement procedures 4-13 Remove the memory module: 1. Disconnect the power from the computer by first unplugging the power cord from the AC outlet and then ...the computer is included in Hibernation, turn the computer on page 4-7). The memory module compartment cover is off or in the Plastics Kit, spare part number 486621-001. Disconnect all external devices connected to the computer. 3. Memory module Description 512-MB, PC2-5300 1-GB, PC2-5300 2-GB,...
..., and remove the cover. Remove the battery (see "Battery" on , and then shut it up and to the computer. 2. Removal and replacement procedures 4-13 Remove the memory module: 1. Disconnect the power from the computer by first unplugging the power cord from the AC outlet and then ...the computer is included in Hibernation, turn the computer on page 4-7). The memory module compartment cover is off or in the Plastics Kit, spare part number 486621-001. Disconnect all external devices connected to the computer. 3. Memory module Description 512-MB, PC2-5300 1-GB, PC2-5300 2-GB,...
Service Guide
Page 56
... AR2425 802.11b/g Atheros AR2425 802.11b/g Broadcom BCM4312 802.11b/g Broadcom BCM4312 802.11b/g Atheros AR9280 802.11a/b/g/n Atheros AR9280 802.11a/b/g/n Spare part number 459339-001 459339-002 459263-001 459263-002 482260-001 482260-002 Before removing the WLAN module, follow these steps: 1. Remove the battery (see... cover 2, swing it to the left, and remove it down the computer. The WLAN module cover is off or in the Plastics Kit, spare part number 486621-001. Remove the WLAN module cover: a. Shut down through the operating system. 2. b. Remove the WLAN module: 1. Removal and...
... AR2425 802.11b/g Atheros AR2425 802.11b/g Broadcom BCM4312 802.11b/g Broadcom BCM4312 802.11b/g Atheros AR9280 802.11a/b/g/n Atheros AR9280 802.11a/b/g/n Spare part number 459339-001 459339-002 459263-001 459263-002 482260-001 482260-002 Before removing the WLAN module, follow these steps: 1. Remove the battery (see... cover 2, swing it to the left, and remove it down the computer. The WLAN module cover is off or in the Plastics Kit, spare part number 486621-001. Remove the WLAN module cover: a. Shut down through the operating system. 2. b. Remove the WLAN module: 1. Removal and...

Service Guide
Page 58
... Taiwan For use in Turkey For use in the United Kingdom For use in the United States (Silver) For use in the United States Spare part number 496771-221 496771-121 502958-121 496771-051 496771-041 496771-151 496771-B31 496771-BB1 496771-061 496771-291 496771-091 496771-AD1...-161 496771-131 496771-251 496771-171 496771-071 496771-111 496771-281 496771-AB1 496771-141 496771-031 496771-001 502958-001 Removal and replacement procedures 4-17
... Taiwan For use in Turkey For use in the United Kingdom For use in the United States (Silver) For use in the United States Spare part number 496771-221 496771-121 502958-121 496771-051 496771-041 496771-151 496771-B31 496771-BB1 496771-061 496771-291 496771-091 496771-AD1...-161 496771-131 496771-251 496771-171 496771-071 496771-111 496771-281 496771-AB1 496771-141 496771-031 496771-001 502958-001 Removal and replacement procedures 4-17

Service Guide
Page 61
... through the operating system. 2. Remove the keyboard (see "Battery" on , and then shut it down the computer. Removal and replacement procedures 4-20 If you are identified by first unplugging the power cord from the AC outlet and then unplugging the AC adapter from ...4. Disconnect the power from the computer by a triangle icon. Remove the keyboard cover: 1. Keyboard cover Description Keyboard cover Silver keyboard cover Spare part number 496828-001 506848-001 Before removing the keyboard cover, follow these steps: 1. Remove the 2 Phillips PM2.5x9.0 screws 1 at the...
... through the operating system. 2. Remove the keyboard (see "Battery" on , and then shut it down the computer. Removal and replacement procedures 4-20 If you are identified by first unplugging the power cord from the AC outlet and then unplugging the AC adapter from ...4. Disconnect the power from the computer by a triangle icon. Remove the keyboard cover: 1. Keyboard cover Description Keyboard cover Silver keyboard cover Spare part number 496828-001 506848-001 Before removing the keyboard cover, follow these steps: 1. Remove the 2 Phillips PM2.5x9.0 screws 1 at the...
Service Guide
Page 63
..."Battery" on page 4-7). 5. Disconnect all external devices connected to install the power button board. Remove the power button board: 1. Removal and replacement procedures 4-22 Remove the two Phillips PM2.0x4.0 screws 1 that secure the power button board to the keyboard cover. 2. Power button board ...Description Power button board Spare part number 496830-001 Before removing the display assembly, follow these steps: 1. Remove the battery (see "WLAN module" on , and then ...
..."Battery" on page 4-7). 5. Disconnect all external devices connected to install the power button board. Remove the power button board: 1. Removal and replacement procedures 4-22 Remove the two Phillips PM2.0x4.0 screws 1 that secure the power button board to the keyboard cover. 2. Power button board ...Description Power button board Spare part number 496830-001 Before removing the display assembly, follow these steps: 1. Remove the battery (see "WLAN module" on , and then ...
Service Guide
Page 66
... display bezel or any of the display assembly internal components, remove the following screws. Removal and replacement procedures 4-25 Ä CAUTION: Support the display assembly when removing the following screw covers and screws: 1 Two rubber screw covers on the display bezel ...bottom edge. Failure to support the display assembly can result in the Display Rubber Kit, spare part number 486584-001. 2 Two Phillips PM2.5x7.0 screws on the display bezel bottom edge. The display rubber screw covers are included in damage to the...
... display bezel or any of the display assembly internal components, remove the following screws. Removal and replacement procedures 4-25 Ä CAUTION: Support the display assembly when removing the following screw covers and screws: 1 Two rubber screw covers on the display bezel ...bottom edge. Failure to support the display assembly can result in the Display Rubber Kit, spare part number 486584-001. 2 Two Phillips PM2.5x7.0 screws on the display bezel bottom edge. The display rubber screw covers are included in damage to the...


