Drives - Windows Vista
Page 9
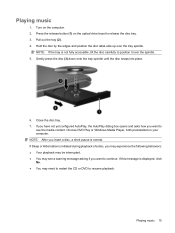
... can store 50 GB, almost 6 times the storage of data ● High-definition video ● Video games Playing a CD or DVD 1. Turn on the drive bezel to position it over the tray spindle. NOTE: If the tray is a high-density optical disc format for the storage of a single-layer DVD at...
... can store 50 GB, almost 6 times the storage of data ● High-definition video ● Video games Playing a CD or DVD 1. Turn on the drive bezel to position it over the tray spindle. NOTE: If the tray is a high-density optical disc format for the storage of a single-layer DVD at...
Drives - Windows Vista
Page 12
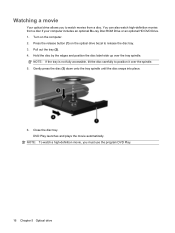
... the drive that contains the blank optical disc. 7. Removing an optical disc (CD or DVD) 1. Hold the disc by gently pressing down on the drive bezel to release the disc tray, and then gently pull out the tray (2) until it . 3. It is not fully accessible, tilt the disc carefully as directed...
... the drive that contains the blank optical disc. 7. Removing an optical disc (CD or DVD) 1. Hold the disc by gently pressing down on the drive bezel to release the disc tray, and then gently pull out the tray (2) until it . 3. It is not fully accessible, tilt the disc carefully as directed...
Drives - Windows Vista
Page 17
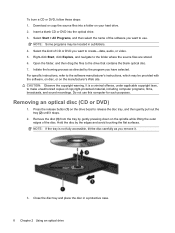
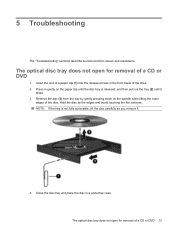
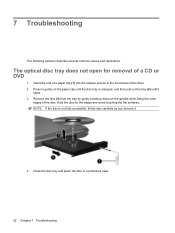
... . 4. The optical disc tray does not open for removal of a CD or DVD 13 Close the disc tray and place the disc in the front bezel of the disc. Press in gently on the spindle while lifting the outer edges of the drive. 2. The optical disc tray does not open for...
... . 4. The optical disc tray does not open for removal of a CD or DVD 13 Close the disc tray and place the disc in the front bezel of the disc. Press in gently on the spindle while lifting the outer edges of the drive. 2. The optical disc tray does not open for...
Multimedia - Windows Vista
Page 19
... asking if you insert a disc, a short pause is not fully accessible, tilt the disc carefully to continue. Press the release button (1) on the optical drive bezel to resume playback. NOTE: After you want to use the media content. Hold the disc by the edges and position the disc label-side up...
... asking if you insert a disc, a short pause is not fully accessible, tilt the disc carefully to continue. Press the release button (1) on the optical drive bezel to resume playback. NOTE: After you want to use the media content. Hold the disc by the edges and position the disc label-side up...
Multimedia - Windows Vista
Page 20
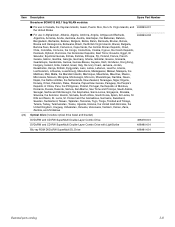
... over the spindle. 5. Watching a movie Your optical drive allows you must use the program DVD Play. 16 Chapter 5 Optical drive Turn on the optical drive bezel to watch high-definition movies from a disc. Gently press the disc (3) down onto the tray spindle until the disc snaps into place. 6. Press the release...
... over the spindle. 5. Watching a movie Your optical drive allows you must use the program DVD Play. 16 Chapter 5 Optical drive Turn on the optical drive bezel to watch high-definition movies from a disc. Gently press the disc (3) down onto the tray spindle until the disc snaps into place. 6. Press the release...

Multimedia - Windows Vista
Page 23
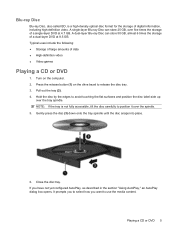
Removing an optical disc (CD or DVD) 1. Remove the disc (3) from the tray by the edges and avoid touching the flat surfaces. Removing an optical disc (CD or DVD) 19 Close the disc tray and place the disc in a protective case. Hold the disc by gently pressing down on the drive bezel to release the disc tray, and then gently pull out the tray (2) until it . 3. NOTE: If the tray is not fully accessible, tilt the disc carefully as you remove it stops. 2. Press the release button (1) on the spindle while lifting the outer edges of the disc.
Removing an optical disc (CD or DVD) 1. Remove the disc (3) from the tray by the edges and avoid touching the flat surfaces. Removing an optical disc (CD or DVD) 19 Close the disc tray and place the disc in a protective case. Hold the disc by gently pressing down on the drive bezel to release the disc tray, and then gently pull out the tray (2) until it . 3. NOTE: If the tray is not fully accessible, tilt the disc carefully as you remove it stops. 2. Press the release button (1) on the spindle while lifting the outer edges of the disc.
Multimedia - Windows Vista
Page 26
... gently on the spindle while lifting the outer edges of the disc. Insert the end of a paper clip (1) into the release access in the front bezel of a CD or DVD 1. Press in a protective case. 22 Chapter 7 Troubleshooting 7 Troubleshooting The following sections describe several common issues and resolutions. Hold the disc by...
... gently on the spindle while lifting the outer edges of the disc. Insert the end of a paper clip (1) into the release access in the front bezel of a CD or DVD 1. Press in a protective case. 22 Chapter 7 Troubleshooting 7 Troubleshooting The following sections describe several common issues and resolutions. Hold the disc by...
Service Guide
Page 29
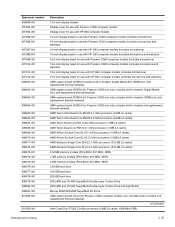
..., Ukraine, the United Arab Emirates, the United Kingdom, Uruguay, Uzbekistan, Vanuatu, Venezuela, Vietnam, Yemen, Zaire, Zambia, and Zimbabwe 459263-002 Optical drive (includes optical drive bezel and bracket) DVD±RW and CD-RW SuperMulti Double-Layer Combo Drive 498479-001 DVD±RW and CD-RW SuperMulti Double-Layer Combo...
..., Ukraine, the United Arab Emirates, the United Kingdom, Uruguay, Uzbekistan, Vanuatu, Venezuela, Vietnam, Yemen, Zaire, Zambia, and Zimbabwe 459263-002 Optical drive (includes optical drive bezel and bracket) DVD±RW and CD-RW SuperMulti Double-Layer Combo Drive 498479-001 DVD±RW and CD-RW SuperMulti Double-Layer Combo...

Service Guide
Page 30
... For use only with 15.6-inch HP G60 display bezels (includes microphone) 497101-001 For use only with 15.6-inch HP G60 display bezels (includes microphone and webcam) 497102-001 For use only with 15.6-inch silver HP G60 display bezels (includes microphone) 502956-001 For use only with 15.6-inch silver HP G60 display bezels (includes microphone and webcam) 502957-001...
... For use only with 15.6-inch HP G60 display bezels (includes microphone) 497101-001 For use only with 15.6-inch HP G60 display bezels (includes microphone and webcam) 497102-001 For use only with 15.6-inch silver HP G60 display bezels (includes microphone) 502956-001 For use only with 15.6-inch silver HP G60 display bezels (includes microphone and webcam) 502957-001...

Service Guide
Page 31
... cable (includes receiver and cable) (9) Display enclosure (includes logo) For use only with HP G60 computer models For use only with silver HP G60 computer models For use only with Presario CQ60 computer models Display Rubber Kit (not illustrated, includes display bezel rubber screw covers) Display Screw Kit (not illustrated, included in the display assembly...
... cable (includes receiver and cable) (9) Display enclosure (includes logo) For use only with HP G60 computer models For use only with silver HP G60 computer models For use only with Presario CQ60 computer models Display Rubber Kit (not illustrated, includes display bezel rubber screw covers) Display Screw Kit (not illustrated, included in the display assembly...
Service Guide
Page 33
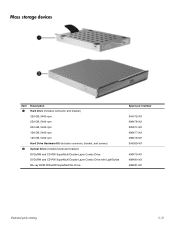
...-rpm 200-GB, 5400-rpm 160-GB, 5400-rpm 120-GB, 5400-rpm Hard Drive Hardware Kit (includes connector, bracket, and screws) 2 Optical drive (includes bezel and bracket) DVD±RW and CD-RW SuperMulti Double-Layer Combo Drive DVD±RW and CD-RW SuperMulti Double-Layer Combo Drive with...
...-rpm 200-GB, 5400-rpm 160-GB, 5400-rpm 120-GB, 5400-rpm Hard Drive Hardware Kit (includes connector, bracket, and screws) 2 Optical drive (includes bezel and bracket) DVD±RW and CD-RW SuperMulti Double-Layer Combo Drive DVD±RW and CD-RW SuperMulti Double-Layer Combo Drive with...

Service Guide
Page 36
..., HDMI port, and replacement thermal material) Display inverter Display Hinge Kit (includes left and right display hinges) Display antenna cable Display Rubber Kit (includes display bezel rubber screw covers) Plastics Kit Screw Kit Rubber Feet Kit (includes 6 rubber feet) USB board Audio board Discrete system board, PM45 (includes built-in modem...
..., HDMI port, and replacement thermal material) Display inverter Display Hinge Kit (includes left and right display hinges) Display antenna cable Display Rubber Kit (includes display bezel rubber screw covers) Plastics Kit Screw Kit Rubber Feet Kit (includes 6 rubber feet) USB board Audio board Discrete system board, PM45 (includes built-in modem...
Service Guide
Page 39
... models (includes microphone and webcam) 16-inch display bezel for use with HP G60 computer models (includes microphone) 16-inch display bezel for use with HP G60 computer models (includes microphone and webcam) 15.6-inch display bezel for use with Presario CQ60 computer models (includes microphone) 15.6-inch display bezel for use with Presario CQ60 computer models (includes...
... models (includes microphone and webcam) 16-inch display bezel for use with HP G60 computer models (includes microphone) 16-inch display bezel for use with HP G60 computer models (includes microphone and webcam) 15.6-inch display bezel for use with Presario CQ60 computer models (includes microphone) 15.6-inch display bezel for use with Presario CQ60 computer models (includes...
Service Guide
Page 49
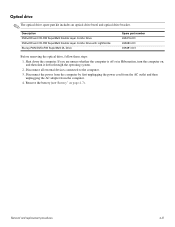
... the AC outlet and then unplugging the AC adapter from the computer. 4. Optical drive ✎ The optical drive spare part kit includes an optical drive bezel and optical drive bracket.
... the AC outlet and then unplugging the AC adapter from the computer. 4. Optical drive ✎ The optical drive spare part kit includes an optical drive bezel and optical drive bracket.
Service Guide
Page 50
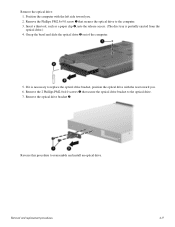
... . 6. Remove the 2 Phillips PM2.0×4.0 screws 1 that secures the optical drive to reassemble and install an optical drive. Remove the optical drive bracket 2. Grasp the bezel and slide the optical drive 3 out of the computer. 5. Remove the optical drive: 1. Removal and replacement procedures 4-9 Insert a thin tool, such as a paper clip 2, into...
... . 6. Remove the 2 Phillips PM2.0×4.0 screws 1 that secures the optical drive to reassemble and install an optical drive. Remove the optical drive bracket 2. Grasp the bezel and slide the optical drive 3 out of the computer. 5. Remove the optical drive: 1. Removal and replacement procedures 4-9 Insert a thin tool, such as a paper clip 2, into...
Service Guide
Page 66
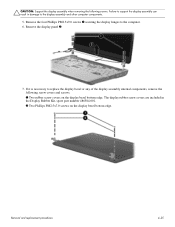
... assembly can result in the Display Rubber Kit, spare part number 486584-001. 2 Two Phillips PM2.5x7.0 screws on the display bezel bottom edge. Failure to replace the display bezel or any of the display assembly internal components, remove the following screws. The display rubber screw covers are included in damage to... the computer. 6. Ä CAUTION: Support the display assembly when removing the following screw covers and screws: 1 Two rubber screw covers on the display bezel bottom edge. Remove the display panel 2. 7.
... assembly can result in the Display Rubber Kit, spare part number 486584-001. 2 Two Phillips PM2.5x7.0 screws on the display bezel bottom edge. Failure to replace the display bezel or any of the display assembly internal components, remove the following screws. The display rubber screw covers are included in damage to... the computer. 6. Ä CAUTION: Support the display assembly when removing the following screw covers and screws: 1 Two rubber screw covers on the display bezel bottom edge. Remove the display panel 2. 7.
Service Guide
Page 67
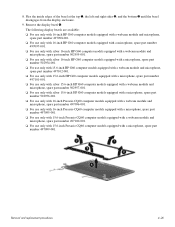
... and replacement procedures 4-26 The following display bezels are available: ❏ For use only with 16-inch HP G60 computer models equipped with a webcam module and microphone, spare part number 497098-001. ❏ For use only with 16-inch HP G60 computer models equipped with a microphone, spare ..., spare part number 497102-001. ❏ For use only with 15.6-inch HP G60 computer models equipped with a microphone, spare part number 497101-001. ❏ For use only with silver 15.6-inch HP G60 computer models equipped with a webcam module and microphone, spare part number 502957-001...
... and replacement procedures 4-26 The following display bezels are available: ❏ For use only with 16-inch HP G60 computer models equipped with a webcam module and microphone, spare part number 497098-001. ❏ For use only with 16-inch HP G60 computer models equipped with a microphone, spare ..., spare part number 497102-001. ❏ For use only with 15.6-inch HP G60 computer models equipped with a microphone, spare part number 497101-001. ❏ For use only with silver 15.6-inch HP G60 computer models equipped with a webcam module and microphone, spare part number 502957-001...
Service Guide
Page 111
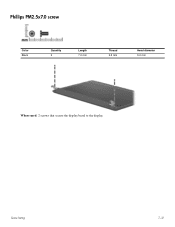
Phillips PM2.5x7.0 screw Color Black Quantity 2 Length 7.0 mm Thread 2.5 mm Head diameter 5.0 mm Where used: 2 screws that secure the display bezel to the display Screw listing 7-12
Phillips PM2.5x7.0 screw Color Black Quantity 2 Length 7.0 mm Thread 2.5 mm Head diameter 5.0 mm Where used: 2 screws that secure the display bezel to the display Screw listing 7-12

Service Guide
Page 129
Recycling 11-2 Perform the following steps to the display assembly. 2. Remove the display bezel 3. Lift up and out on the left and right inside edges 1 and the top and bottom inside edges 2 of the display bezel until the bezel disengages from the display assembly. 3. Remove all screw covers 1 and screws 2 that secure the display bezel to disassemble the display assembly: 1.
Recycling 11-2 Perform the following steps to the display assembly. 2. Remove the display bezel 3. Lift up and out on the left and right inside edges 1 and the top and bottom inside edges 2 of the display bezel until the bezel disengages from the display assembly. 3. Remove all screw covers 1 and screws 2 that secure the display bezel to disassemble the display assembly: 1.
Service Guide
Page 134
... power 2-7 service consideration 4-1 creating recovery discs 8-1 creating recovery points 8-3 D Diagnostics menu 5-4 Digital Media Slot 2-7 display assembly removal 4-24 spare part number 3-3, 3-16, 3-19, 4-23 display bezel 3-9 removal 4-25 spare part number 3-9 Index-1
... power 2-7 service consideration 4-1 creating recovery discs 8-1 creating recovery points 8-3 D Diagnostics menu 5-4 Digital Media Slot 2-7 display assembly removal 4-24 spare part number 3-3, 3-16, 3-19, 4-23 display bezel 3-9 removal 4-25 spare part number 3-9 Index-1


