User Guide - v216 LCD Monitor
Page 5
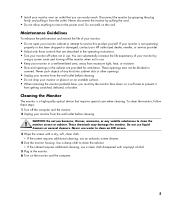
... base, you can substantially increase the life expectancy of your monitor: • Do not open your monitor cabinet or attempt to clean an LCD screen. 3 Wipe the screen with a dry, soft, clean cloth. • If the screen requires additional cleaning, use a clean cloth dampened with isopropyl alcohol. 5 Plug in the monitor. 6 Turn on the cord. • Install your monitor near an outlet that you must not be blocked or covered...
... base, you can substantially increase the life expectancy of your monitor: • Do not open your monitor cabinet or attempt to clean an LCD screen. 3 Wipe the screen with a dry, soft, clean cloth. • If the screen requires additional cleaning, use a clean cloth dampened with isopropyl alcohol. 5 Plug in the monitor. 6 Turn on the cord. • Install your monitor near an outlet that you must not be blocked or covered...
User Guide - v216 LCD Monitor
Page 10
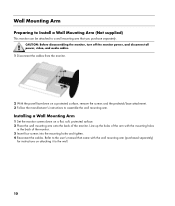
... disassembling the monitor, turn off the monitor power, and disconnect all power, video, and audio cables. 1 Disconnect the cables from the monitor. 2 With the panel face-down on attaching it to assemble the wall mounting arm. Installing a Wall Mounting Arm 1 Set the monitor screen down on a protected surface, remove the screws and the pedestal/base attachment. 3 Follow the manufacturer's instructions to the wall. 10 Refer to the user's manual that you purchase separately. Wall Mounting Arm Preparing to Install a Wall Mounting Arm (Not supplied...
... disassembling the monitor, turn off the monitor power, and disconnect all power, video, and audio cables. 1 Disconnect the cables from the monitor. 2 With the panel face-down on attaching it to assemble the wall mounting arm. Installing a Wall Mounting Arm 1 Set the monitor screen down on a protected surface, remove the screws and the pedestal/base attachment. 3 Follow the manufacturer's instructions to the wall. 10 Refer to the user's manual that you purchase separately. Wall Mounting Arm Preparing to Install a Wall Mounting Arm (Not supplied...
User Guide - v216 LCD Monitor
Page 11
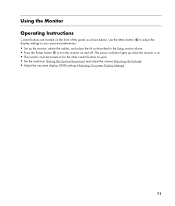
... off. Use the Menu button (C) to adjust the display settings to your personal preferences: • Set up when the monitor is on. • The monitor must be turned on for the other control buttons to turn the monitor on the front of the panel, as described in the Setup section above. • Press the Power button (F) to work. • Set the resolution (Setting the Optimal Resolution) and adjust the volume (Adjusting the Volume). • Adjust the onscreen display (OSD) settings (Adjusting On-screen Display Settings). 11...
... off. Use the Menu button (C) to adjust the display settings to your personal preferences: • Set up when the monitor is on. • The monitor must be turned on for the other control buttons to turn the monitor on the front of the panel, as described in the Setup section above. • Press the Power button (F) to work. • Set the resolution (Setting the Optimal Resolution) and adjust the volume (Adjusting the Volume). • Adjust the onscreen display (OSD) settings (Adjusting On-screen Display Settings). 11...
User Guide - v216 LCD Monitor
Page 12
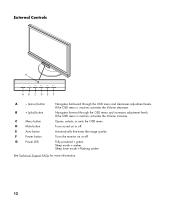
...Controls G Menu Mute Auto Power A B C D E F A - (minus) button B + (plus) button C Menu button D Mute button E Auto button F Power button G Power LED Navigates backward through the OSD menu and increases adjustment levels. If the OSD menu is inactive, activates the Volume decrease. Opens, selects, or exits the OSD menu. Navigates forward through the OSD menu and decreases adjustment levels. Turns sound on or off . Turns the monitor on or off . Automatically fine-tunes the image quality. Fully powered = green Sleep mode = amber Sleep timer mode = flashing...
...Controls G Menu Mute Auto Power A B C D E F A - (minus) button B + (plus) button C Menu button D Mute button E Auto button F Power button G Power LED Navigates backward through the OSD menu and increases adjustment levels. If the OSD menu is inactive, activates the Volume decrease. Opens, selects, or exits the OSD menu. Navigates forward through the OSD menu and decreases adjustment levels. Turns sound on or off . Turns the monitor on or off . Automatically fine-tunes the image quality. Fully powered = green Sleep mode = amber Sleep timer mode = flashing...

User Guide - v216 LCD Monitor
Page 13
.... Turn the monitor on but the OSD menu is connected to 1680 x 1050. Settings Setting the Optimal Resolution The recommended resolution for this resolution, complete the setup procedure and make sure that the monitor is inactive, press the volume increase and decrease (plus and minus) buttons to adjust volume to the desired level. Adjusting the Volume While the monitor is turned on and do the following: 1 Click the Windows Start Button®, and then click Control Panel...
.... Turn the monitor on but the OSD menu is connected to 1680 x 1050. Settings Setting the Optimal Resolution The recommended resolution for this resolution, complete the setup procedure and make sure that the monitor is inactive, press the volume increase and decrease (plus and minus) buttons to adjust volume to the desired level. Adjusting the Volume While the monitor is turned on and do the following: 1 Click the Windows Start Button®, and then click Control Panel...
User Guide - v216 LCD Monitor
Page 18
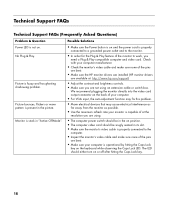
...://www.hp.com/support) • Adjust the contrast and brightness controls. • Make sure you need a Plug & Play compatible computer and video card. The LED should be snugly seated in "Active Off-Mode". Technical Support FAQs Technical Support FAQs (Frequently Asked Questions) Problem & Question Power LED is not on or off after hitting the Caps Lock key. 18 Monitor is stuck in its slot. • Make sure the monitor's video cable is properly connected to work, you...
...://www.hp.com/support) • Adjust the contrast and brightness controls. • Make sure you need a Plug & Play compatible computer and video card. The LED should be snugly seated in "Active Off-Mode". Technical Support FAQs Technical Support FAQs (Frequently Asked Questions) Problem & Question Power LED is not on or off after hitting the Caps Lock key. 18 Monitor is stuck in its slot. • Make sure the monitor's video cable is properly connected to work, you...

User Guide - v216 LCD Monitor
Page 19
.... • Adjust horizontal and vertical screen position. • For VGA input, the auto-adjustment function may fix this problem. • Adjust RGB color or select color temperature. Technical Support FAQs (Frequently Asked Questions) (continued) Problem & Question Possible Solutions Missing one of the pins are bent. • Make sure the monitor's video cable is properly connected to the Web site for the graphics card. For HP and Compaq systems, you can download the latest graphics driver for...
.... • Adjust horizontal and vertical screen position. • For VGA input, the auto-adjustment function may fix this problem. • Adjust RGB color or select color temperature. Technical Support FAQs (Frequently Asked Questions) (continued) Problem & Question Possible Solutions Missing one of the pins are bent. • Make sure the monitor's video cable is properly connected to the Web site for the graphics card. For HP and Compaq systems, you can download the latest graphics driver for...
User Guide - v216 LCD Monitor
Page 20
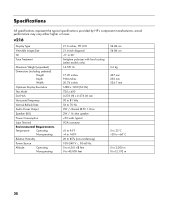
Specifications All specifications represent the typical specifications provided by HP's component manufacturers; v216 Display Type Viewable Image Size Tilt Face Treatment Maximum Weight (unpacked) Dimensions (including pedestal) Height Depth Width Optimum Display Resolution Text Mode Dot Pitch Horizontal Frequency Vertical Refresh Rate Audio Power Output Speaker (R/L) Power Consumption Input Terminal Environmental Requirements Temperature: Operating Non-operating Relative Humidity Power Source Altitude: Operating Non-operating 21.6 inches, TFT LCD 21.6-inch diagonal -5&#...
Specifications All specifications represent the typical specifications provided by HP's component manufacturers; v216 Display Type Viewable Image Size Tilt Face Treatment Maximum Weight (unpacked) Dimensions (including pedestal) Height Depth Width Optimum Display Resolution Text Mode Dot Pitch Horizontal Frequency Vertical Refresh Rate Audio Power Output Speaker (R/L) Power Consumption Input Terminal Environmental Requirements Temperature: Operating Non-operating Relative Humidity Power Source Altitude: Operating Non-operating 21.6 inches, TFT LCD 21.6-inch diagonal -5&#...
User Guide - v216 LCD Monitor
Page 22
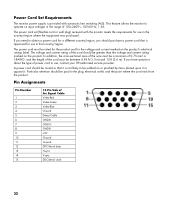
... current rating of the Signal Cable Video-Red Video-Green Video-Blue Ground Detect Cable GND-R GND-G GND-B +5V Ground Ground DDC-Serial data H-sync V-sync DDC-Serial clock 22 Particular attention should be paid to use in that it . Pin Assignments Pin Number 1 2 3 4 5 6 7 8 9 10 11 12 13 14 15 15-Pin Side of the cord should be greater than the voltage and current rating marked on input voltages...
... current rating of the Signal Cable Video-Red Video-Green Video-Blue Ground Detect Cable GND-R GND-G GND-B +5V Ground Ground DDC-Serial data H-sync V-sync DDC-Serial clock 22 Particular attention should be paid to use in that it . Pin Assignments Pin Number 1 2 3 4 5 6 7 8 9 10 11 12 13 14 15 15-Pin Side of the cord should be greater than the voltage and current rating marked on input voltages...
User Guide - v216 LCD Monitor
Page 23
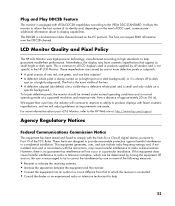
... the HP Web site at a supported resolution and response rate, from that to which can be viewed under normal operating conditions and in a residential installation. These imperfections are designed to the VESA DDC STANDARD. LCD Monitor Quality and Pixel Policy The HP LCD Monitor uses high-precision technology, manufactured according to high standards, to radio communications. Nevertheless, the display may cause harmful interference to help . 23...
... the HP Web site at a supported resolution and response rate, from that to which can be viewed under normal operating conditions and in a residential installation. These imperfections are designed to the VESA DDC STANDARD. LCD Monitor Quality and Pixel Policy The HP LCD Monitor uses high-precision technology, manufactured according to high standards, to radio communications. Nevertheless, the display may cause harmful interference to help . 23...
User's Guide - HP f2105 LCD Monitor
Page 5
...Features HP LCD Flat Panel Monitor 1-1 2 Safety and Maintenance Guidelines Important Safety Information 2-1 Safety Precautions 2-2 Maintenance Guidelines 2-3 Cleaning the Monitor 2-4 Shipping the Monitor 2-5 Preparing the Monitor for Shipping 2-5 3 Setting Up the Monitor Before You Begin 3-1 Installing the Monitor 3-2 Placing the Monitor on a Desktop 3-2 Wall Mounting the Monitor 3-5 Reinstalling the Pedestal Base 3-7 Back and Side-Panel Connectors 3-8 Connecting the Monitor to the PC 3-9 Cable Management 3-15 Connecting USB Devices to the Monitor . . . . . 3-16 User's Guide v
...Features HP LCD Flat Panel Monitor 1-1 2 Safety and Maintenance Guidelines Important Safety Information 2-1 Safety Precautions 2-2 Maintenance Guidelines 2-3 Cleaning the Monitor 2-4 Shipping the Monitor 2-5 Preparing the Monitor for Shipping 2-5 3 Setting Up the Monitor Before You Begin 3-1 Installing the Monitor 3-2 Placing the Monitor on a Desktop 3-2 Wall Mounting the Monitor 3-5 Reinstalling the Pedestal Base 3-7 Back and Side-Panel Connectors 3-8 Connecting the Monitor to the PC 3-9 Cable Management 3-15 Connecting USB Devices to the Monitor . . . . . 3-16 User's Guide v
User's Guide - HP f2105 LCD Monitor
Page 6
... Using the Auto-Adjustment Function 4-3 Front-Panel Buttons 4-5 Using the Onscreen Display 4-7 Adjusting Monitor Settings 4-8 Main Menu 4-8 Advanced Menu 4-9 Selecting the Video Input Connectors 4-12 Identifying Monitor Conditions 4-13 Adjusting Screen Quality 4-14 Setting Optimal Display Resolution 4-14 Enhancing the Video Function 4-15 Optimizing Analog Video 4-17 Entering User Modes 4-18 Power-Saver Feature 4-19 A Troubleshooting Solving Common Problems A-1 Using the World Wide Web A-4 Preparing to Call Technical Support A-4 Locating the Rating Label A-4 vi User's Guide
... Using the Auto-Adjustment Function 4-3 Front-Panel Buttons 4-5 Using the Onscreen Display 4-7 Adjusting Monitor Settings 4-8 Main Menu 4-8 Advanced Menu 4-9 Selecting the Video Input Connectors 4-12 Identifying Monitor Conditions 4-13 Adjusting Screen Quality 4-14 Setting Optimal Display Resolution 4-14 Enhancing the Video Function 4-15 Optimizing Analog Video 4-17 Entering User Modes 4-18 Power-Saver Feature 4-19 A Troubleshooting Solving Common Problems A-1 Using the World Wide Web A-4 Preparing to Call Technical Support A-4 Locating the Rating Label A-4 vi User's Guide
User's Guide - HP f2105 LCD Monitor
Page 10
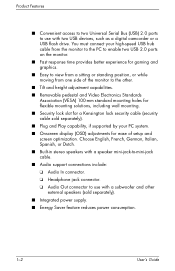
...-jack cable. ■ Audio support connections include: ❏ Audio In connector. ❏ Headphone jack connector. ❏ Audio Out connector to the other external speakers (sold separately). ■ Plug and Play capability, if supported by your PC system. ■ Onscreen display (OSD) adjustments for a Kensington lock security cable (security cable sold separately). ■ Integrated power supply. ■ Energy Saver feature reduces power consumption. 1-2 User's Guide You must connect your high-speed USB hub cable from the monitor to...
...-jack cable. ■ Audio support connections include: ❏ Audio In connector. ❏ Headphone jack connector. ❏ Audio Out connector to the other external speakers (sold separately). ■ Plug and Play capability, if supported by your PC system. ■ Onscreen display (OSD) adjustments for a Kensington lock security cable (security cable sold separately). ■ Integrated power supply. ■ Energy Saver feature reduces power consumption. 1-2 User's Guide You must connect your high-speed USB hub cable from the monitor to...
User's Guide - HP f2105 LCD Monitor
Page 40
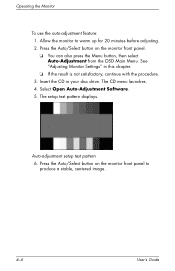
... Open Auto-Adjustment Software. 5. Auto-adjustment setup test pattern 6. Press the Auto/Select button on the monitor front panel to warm up for 20 minutes before adjusting. 2. Operating the Monitor To use the auto-adjustment feature: 1. Allow the monitor to produce a stable, centered image. 4-4 User's Guide Press the Auto/Select button on the monitor front panel. ❏ You can also press the Menu button, then select Auto-Adjustment from the OSD Main Menu. The setup test pattern displays. The CD menu launches. 4. See "Adjusting Monitor Settings...
... Open Auto-Adjustment Software. 5. Auto-adjustment setup test pattern 6. Press the Auto/Select button on the monitor front panel to warm up for 20 minutes before adjusting. 2. Operating the Monitor To use the auto-adjustment feature: 1. Allow the monitor to produce a stable, centered image. 4-4 User's Guide Press the Auto/Select button on the monitor front panel. ❏ You can also press the Menu button, then select Auto-Adjustment from the OSD Main Menu. The setup test pattern displays. The CD menu launches. 4. See "Adjusting Monitor Settings...
User's Guide - HP f2105 LCD Monitor
Page 49
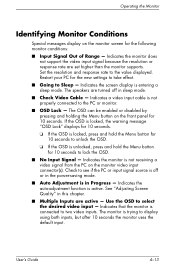
... support the video input signal because the resolution or response rate are active - The OSD can be enabled or disabled by pressing and holding the Menu button on the monitor video input connector(s). Check to display using both inputs, but after 10 seconds the monitor uses the default input. Indicates that the monitor is in the power-saving mode. ■ Auto Adjustment is connected to lock the OSD. ■ No Input Signal - The monitor is unlocked, press and hold the Menu button for 10 seconds to unlock the OSD...
... support the video input signal because the resolution or response rate are active - The OSD can be enabled or disabled by pressing and holding the Menu button on the monitor video input connector(s). Check to display using both inputs, but after 10 seconds the monitor uses the default input. Indicates that the monitor is in the power-saving mode. ■ Auto Adjustment is connected to lock the OSD. ■ No Input Signal - The monitor is unlocked, press and hold the Menu button for 10 seconds to unlock the OSD...
User's Guide - HP f2105 LCD Monitor
Page 50
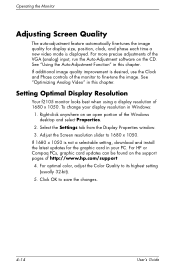
Operating the Monitor Adjusting Screen Quality The auto-adjustment feature automatically fine-tunes the image quality for display size, position, clock, and phase each time a new video mode is not a selectable setting, download and install the latest updates for the graphic card in your display resolution in Windows: 1. If 1680 x 1050 is displayed. For HP or Compaq PCs, graphic card updates can be found on the CD. Adjust the Screen resolution slider to its highest setting (usually 32...
Operating the Monitor Adjusting Screen Quality The auto-adjustment feature automatically fine-tunes the image quality for display size, position, clock, and phase each time a new video mode is not a selectable setting, download and install the latest updates for the graphic card in your display resolution in Windows: 1. If 1680 x 1050 is displayed. For HP or Compaq PCs, graphic card updates can be found on the CD. Adjust the Screen resolution slider to its highest setting (usually 32...

User's Guide - HP f2105 LCD Monitor
Page 51
... removes the stretching effect. User's Guide 4-15 Select Image Control from the OSD Advanced Menu. The monitor includes a custom scaling feature that allows you to enhance the video performance by changing the screen's aspect ratio (the ratio of the monitor to display 4:3 (standard broadcast) and 16:9 (wide-screen) formats. You can use the Custom Scaling feature: 1. Press the Menu button on the front panel of the picture's width to its height...
... removes the stretching effect. User's Guide 4-15 Select Image Control from the OSD Advanced Menu. The monitor includes a custom scaling feature that allows you to enhance the video performance by changing the screen's aspect ratio (the ratio of the monitor to display 4:3 (standard broadcast) and 16:9 (wide-screen) formats. You can use the Custom Scaling feature: 1. Press the Menu button on the front panel of the picture's width to its height...

User's Guide - HP f2105 LCD Monitor
Page 53
This format optimizes the image for 16:9 format sources such as a standard analog monitor. When this occurs, black video borders may provide formats other than 16:9. User's Guide 4-17 Operating the Monitor ❏ Fill to Aspect Ratio is active. 5. To keep the new setting select Save, otherwise select Cancel. 6. This display format adjusts the horizontal and vertical size of the screen, but the image is highlighted, press the Menu button to confirm the...
This format optimizes the image for 16:9 format sources such as a standard analog monitor. When this occurs, black video borders may provide formats other than 16:9. User's Guide 4-17 Operating the Monitor ❏ Fill to Aspect Ratio is active. 5. To keep the new setting select Save, otherwise select Cancel. 6. This display format adjusts the horizontal and vertical size of the screen, but the image is highlighted, press the Menu button to confirm the...
User's Guide - HP f2105 LCD Monitor
Page 54
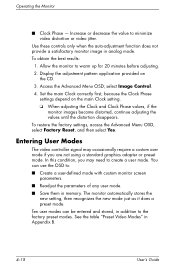
To obtain the best results: 1. Access the Advanced Menu OSD; Ten user modes can use the OSD to: ■ Create a user-defined mode with custom monitor screen parameters. ■ Readjust the parameters of any user mode. ■ Save them in addition to create a user mode. See the table "Preset Video Modes" in analog mode. Operating the Monitor ■ Clock Phase - In this condition, you are not using a standard graphics adapter or preset mode. Set the main...
To obtain the best results: 1. Access the Advanced Menu OSD; Ten user modes can use the OSD to: ■ Create a user-defined mode with custom monitor screen parameters. ■ Readjust the parameters of any user mode. ■ Save them in addition to create a user mode. See the table "Preset Video Modes" in analog mode. Operating the Monitor ■ Clock Phase - In this condition, you are not using a standard graphics adapter or preset mode. Set the main...

User's Guide - HP f2105 LCD Monitor
Page 58
... connect the DVI-D signal cable to adjust the horizontal or vertical position of Range" displays on the PC. USB 2.0 ports are for select models only. Video resolution and response rate are set higher than what your PC so that the PC power is not properly connected between the monitor and the PC. Solution Press the Menu button to the monitor and the PC. Restart your monitor supports. Monitor video cable is not centered. Select Image Control/ Horizontal Position or Vertical Position to the DVI connector on screen. Troubleshooting Problem Image...
... connect the DVI-D signal cable to adjust the horizontal or vertical position of Range" displays on the PC. USB 2.0 ports are for select models only. Video resolution and response rate are set higher than what your PC so that the PC power is not properly connected between the monitor and the PC. Solution Press the Menu button to the monitor and the PC. Restart your monitor supports. Monitor video cable is not centered. Select Image Control/ Horizontal Position or Vertical Position to the DVI connector on screen. Troubleshooting Problem Image...


