User Guide
Page 5
... ...10 HP Watermark and Image Retention Policy 10 Connecting USB Devices ...10 Removing the Monitor Pedestal Base 11 Mounting the Monitor ...12 Locating the Rating Labels ...12 Installing a Cable Lock ...13 3 Finding More Information ...14 Reference Guides ...14 Product Support ...14 Appendix A Technical Specifications ...15 EliteDisplay E190i ...15 Recognizing Preset Display Resolutions 16 EliteDisplay E190i ...16...
... ...10 HP Watermark and Image Retention Policy 10 Connecting USB Devices ...10 Removing the Monitor Pedestal Base 11 Mounting the Monitor ...12 Locating the Rating Labels ...12 Installing a Cable Lock ...13 3 Finding More Information ...14 Reference Guides ...14 Product Support ...14 Appendix A Technical Specifications ...15 EliteDisplay E190i ...15 Recognizing Preset Display Resolutions 16 EliteDisplay E190i ...16...
User Guide
Page 7
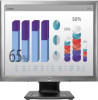
1 Product Features HP LCD Monitors The LCD (liquid crystal display) monitors have an active matrix, thin-film transistor (TFT) panel. The monitor's features include: ● EliteDisplay E190i model, 47.99 cm (18.89-inch) diagonal viewable area display with 1280 x 1024 resolution, plus full-screen ...upstream port (connects to the computer) and two downstream ports (connects to USB devices) ● USB cable provided to connect the monitor's USB hub to the USB connector on the computer ● Supports an optional HP speaker bar ● Plug and play capability if supported by the system &#...
1 Product Features HP LCD Monitors The LCD (liquid crystal display) monitors have an active matrix, thin-film transistor (TFT) panel. The monitor's features include: ● EliteDisplay E190i model, 47.99 cm (18.89-inch) diagonal viewable area display with 1280 x 1024 resolution, plus full-screen ...upstream port (connects to the computer) and two downstream ports (connects to USB devices) ● USB cable provided to connect the monitor's USB hub to the USB connector on the computer ● Supports an optional HP speaker bar ● Plug and play capability if supported by the system &#...
User Guide
Page 10
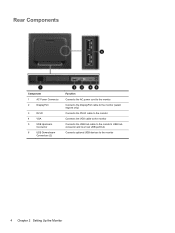
Rear Components Component 1 AC Power Connector 2 DisplayPort 3 DVI-D 4 VGA 5 USB Upstream Connector 6 USB Downstream Connectors (2) Function Connects the AC power cord to the monitor Connects the DisplayPort cable to the monitor (select regions only) Connects the DVI-D cable to the monitor Connects the VGA cable to the monitor Connects the USB hub cable to the monitor's USB hub connector and to a host USB port/hub Connects optional USB devices to the monitor 4 Chapter 2 Setting Up the Monitor
Rear Components Component 1 AC Power Connector 2 DisplayPort 3 DVI-D 4 VGA 5 USB Upstream Connector 6 USB Downstream Connectors (2) Function Connects the AC power cord to the monitor Connects the DisplayPort cable to the monitor (select regions only) Connects the DVI-D cable to the monitor Connects the VGA cable to the monitor Connects the USB hub cable to the monitor's USB hub connector and to a host USB port/hub Connects optional USB devices to the monitor 4 Chapter 2 Setting Up the Monitor
User Guide
Page 11
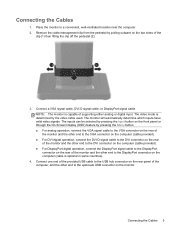
...DisplayPort digital operation, connect the DisplayPort signal cable to the DisplayPort connector on the rear of the monitor and the other end to the upstream USB connector on the monitor. NOTE: The monitor is optional in a convenient, well-ventilated location near the computer. 2. The video mode is ...determined by pulling outward on the two sides of the computer, and the other end to the USB hub connector on the computer (cable is capable of supporting either analog or digital input. The monitor will automatically determine which inputs have ...
...DisplayPort digital operation, connect the DisplayPort signal cable to the DisplayPort connector on the rear of the monitor and the other end to the upstream USB connector on the monitor. NOTE: The monitor is optional in a convenient, well-ventilated location near the computer. 2. The video mode is ...determined by pulling outward on the two sides of the computer, and the other end to the USB hub connector on the computer (cable is capable of supporting either analog or digital input. The monitor will automatically determine which inputs have ...
User Guide
Page 16
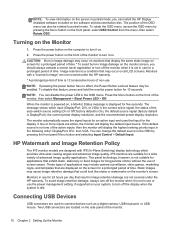
...default is powered on the Monitor 1. Monitors in use of the monitor, then select Management > Bezel Power LED > Off. Connecting USB Devices USB connectors are active, the monitor will display the highest ranking priority input in the following order: DisplayPort, DVI, then VGA. Turning on...monitors are located on the software and documentation disc. The position of time. Two USB connectors are suitable for a prolonged period of the OSD menu can install the HP Display Assistant software included on the side panel of advanced image quality applications. To ...
...default is powered on the Monitor 1. Monitors in use of the monitor, then select Management > Bezel Power LED > Off. Connecting USB Devices USB connectors are active, the monitor will display the highest ranking priority input in the following order: DisplayPort, DVI, then VGA. Turning on...monitors are located on the software and documentation disc. The position of time. Two USB connectors are suitable for a prolonged period of the OSD menu can install the HP Display Assistant software included on the side panel of advanced image quality applications. To ...

User Guide
Page 17
... monitor. 2. CAUTION: Before beginning to Step 4 in Connecting the Cables on the monitor. Disconnect and remove the signal, power, and USB cables from the monitor to the computer to enable the USB 2.0 ports on page 5. Remove the four screws from the pedestal base to the monitor. 1. Refer to disassemble the monitor, be... can remove the monitor panel from the monitor stand. Lay the monitor face down on a wall, a swing arm, or other mounting fixture. Also disconnect all USB cables connected to install the panel on a flat surface covered by a clean, dry cloth. 3.
... monitor. 2. CAUTION: Before beginning to Step 4 in Connecting the Cables on the monitor. Disconnect and remove the signal, power, and USB cables from the monitor to the computer to enable the USB 2.0 ports on page 5. Remove the four screws from the pedestal base to the monitor. 1. Refer to disassemble the monitor, be... can remove the monitor panel from the monitor stand. Lay the monitor face down on a wall, a swing arm, or other mounting fixture. Also disconnect all USB cables connected to install the panel on a flat surface covered by a clean, dry cloth. 3.
Setup Poster
Page 1
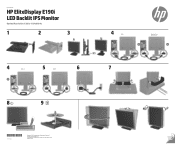
Printed in xxxxx Quick Setup HP EliteDisplay E190i LED Backlit IPS Monitor Optimal Resolution: 1280 x 1024 @ 60 Hz 1 2 3 4 DVI-D 5 USB 6 OR 8 9 4 VGA DisplayPort Select models only. Second Edition, November 2013 The information contained herein is subject to change without notice. OR OR 7 *73818855--BB212* 738185-B22 Copyright © 2013 Hewlett-Packard Development Company, L.P.
Printed in xxxxx Quick Setup HP EliteDisplay E190i LED Backlit IPS Monitor Optimal Resolution: 1280 x 1024 @ 60 Hz 1 2 3 4 DVI-D 5 USB 6 OR 8 9 4 VGA DisplayPort Select models only. Second Edition, November 2013 The information contained herein is subject to change without notice. OR OR 7 *73818855--BB212* 738185-B22 Copyright © 2013 Hewlett-Packard Development Company, L.P.


