User Guide
Page 2
...Windows, and Windows Vista are set forth in the United States and/or other countries. First Edition (September 2013) Document Part Number: 738186-001 The only warranties for technical or editorial errors or omissions contained herein. Nothing herein should be photocopied, reproduced, or translated to another language... by copyright. No part of Hewlett-Packard Company. HP shall not be liable for HP products and services are either trademarks or registered trademarks of Microsoft Corporation in the express warranty statements accompanying such products and services. © 2013 ...
...Windows, and Windows Vista are set forth in the United States and/or other countries. First Edition (September 2013) Document Part Number: 738186-001 The only warranties for technical or editorial errors or omissions contained herein. Nothing herein should be photocopied, reproduced, or translated to another language... by copyright. No part of Hewlett-Packard Company. HP shall not be liable for HP products and services are either trademarks or registered trademarks of Microsoft Corporation in the express warranty statements accompanying such products and services. © 2013 ...

User Guide
Page 3
CAUTION: Text set off in this manner indicates that failure to equipment or loss of life. About This Guide This guide provides information on setting up the monitor, installing drivers, using the on-screen display menu, troubleshooting and technical specifications. NOTE: Text set off in this manner indicates that failure to follow directions could result in damage to follow directions could result in this manner provides important supplemental information. iii Text set off in bodily harm or loss of information. WARNING!
CAUTION: Text set off in this manner indicates that failure to equipment or loss of life. About This Guide This guide provides information on setting up the monitor, installing drivers, using the on-screen display menu, troubleshooting and technical specifications. NOTE: Text set off in this manner indicates that failure to follow directions could result in damage to follow directions could result in this manner provides important supplemental information. iii Text set off in bodily harm or loss of information. WARNING!
User Guide
Page 5
...the Stand to the Monitor ...3 Rear Components ...4 Connecting the Cables ...5 Front Panel Controls ...7 Adjusting the Monitor ...8 Turning on the Monitor ...10 HP Watermark and Image Retention Policy 10 Connecting USB Devices ...10 Removing the Monitor Pedestal Base 11 Mounting the Monitor ...12 Locating the Rating Labels ...12 Installing a Cable Lock ...13 3 Finding More Information ...14 Reference Guides ...14 Product Support ...14 Appendix A Technical Specifications ...15 EliteDisplay E190i ...15 Recognizing Preset Display Resolutions 16 EliteDisplay E190i ...16 Entering User Modes ...16...
...the Stand to the Monitor ...3 Rear Components ...4 Connecting the Cables ...5 Front Panel Controls ...7 Adjusting the Monitor ...8 Turning on the Monitor ...10 HP Watermark and Image Retention Policy 10 Connecting USB Devices ...10 Removing the Monitor Pedestal Base 11 Mounting the Monitor ...12 Locating the Rating Labels ...12 Installing a Cable Lock ...13 3 Finding More Information ...14 Reference Guides ...14 Product Support ...14 Appendix A Technical Specifications ...15 EliteDisplay E190i ...15 Recognizing Preset Display Resolutions 16 EliteDisplay E190i ...16 Entering User Modes ...16...
User Guide
Page 7
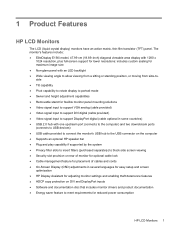
...backlight ● Wide viewing angle to allow viewing from a sitting or standing position, or moving from side-toside ● Tilt capability ● Pivot capability to rotate display to portrait mode ● Swivel and height adjustment capabilities ● Removable stand for flexible monitor panel mounting solutions ● Video signal input to support VGA analog (cable provided) ● Video signal input to support DVI digital (cable provided) ● Video signal input to support DisplayPort digital (cable optional in some countries) ● USB 2.0 hub with one upstream port (connects...
...backlight ● Wide viewing angle to allow viewing from a sitting or standing position, or moving from side-toside ● Tilt capability ● Pivot capability to rotate display to portrait mode ● Swivel and height adjustment capabilities ● Removable stand for flexible monitor panel mounting solutions ● Video signal input to support VGA analog (cable provided) ● Video signal input to support DVI digital (cable provided) ● Video signal input to support DisplayPort digital (cable optional in some countries) ● USB 2.0 hub with one upstream port (connects...

User Guide
Page 9
2 Setting Up the Monitor To set up the monitor, ensure that the power is turned off to the Monitor 1. Lift the monitor from its box and place it face down on the bottom of the stand by hand. Tighten the screw on a flat surface. 2. Attaching the Stand to the monitor, computer system, and other attached devices, then follow the instructions below. Attaching the Stand to the stand. 3. Attach the base to the Monitor 3
2 Setting Up the Monitor To set up the monitor, ensure that the power is turned off to the Monitor 1. Lift the monitor from its box and place it face down on the bottom of the stand by hand. Tighten the screw on a flat surface. 2. Attaching the Stand to the monitor, computer system, and other attached devices, then follow the instructions below. Attaching the Stand to the stand. 3. Attach the base to the Monitor 3
User Guide
Page 10
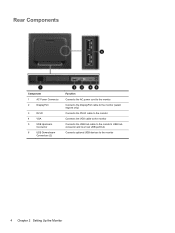
Rear Components Component 1 AC Power Connector 2 DisplayPort 3 DVI-D 4 VGA 5 USB Upstream Connector 6 USB Downstream Connectors (2) Function Connects the AC power cord to the monitor Connects the DisplayPort cable to the monitor (select regions only) Connects the DVI-D cable to the monitor Connects the VGA cable to the monitor Connects the USB hub cable to the monitor's USB hub connector and to a host USB port/hub Connects optional USB devices to the monitor 4 Chapter 2 Setting Up the Monitor
Rear Components Component 1 AC Power Connector 2 DisplayPort 3 DVI-D 4 VGA 5 USB Upstream Connector 6 USB Downstream Connectors (2) Function Connects the AC power cord to the monitor Connects the DisplayPort cable to the monitor (select regions only) Connects the DVI-D cable to the monitor Connects the VGA cable to the monitor Connects the USB hub cable to the monitor's USB hub connector and to a host USB port/hub Connects optional USB devices to the monitor 4 Chapter 2 Setting Up the Monitor
User Guide
Page 11
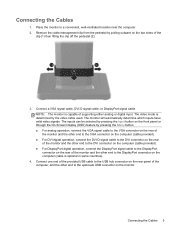
... USB hub connector on the monitor. Connect one end of the provided USB cable to the upstream USB connector on the rear panel of supporting either analog or digital input. Connecting the Cables 5 Connect a VGA signal cable, DVI-D signal cable, or DisplayPort signal cable. The monitor will automatically determine which inputs have valid video signals. Connecting the Cables 1. The inputs can be selected by pressing the Input button on the front panel or through the On-Screen Display (OSD) feature by pressing the Menu button. ● For analog operation, connect the VGA signal cable...
... USB hub connector on the monitor. Connect one end of the provided USB cable to the upstream USB connector on the rear panel of supporting either analog or digital input. Connecting the Cables 5 Connect a VGA signal cable, DVI-D signal cable, or DisplayPort signal cable. The monitor will automatically determine which inputs have valid video signals. Connecting the Cables 1. The inputs can be selected by pressing the Input button on the front panel or through the On-Screen Display (OSD) feature by pressing the Menu button. ● For analog operation, connect the VGA signal cable...

User Guide
Page 12
... the power cord to the AC power connector on or trip over them. Connect one may accidentally step on the back of electric shock or damage to an electrical wall outlet. Do not pull on power cords or cables. 5. WARNING! To reduce the risk of the monitor, and the other end to the equipment: Do not disable the power cord grounding plug. Secure the cables...
... the power cord to the AC power connector on or trip over them. Connect one may accidentally step on the back of electric shock or damage to an electrical wall outlet. Do not pull on power cords or cables. 5. WARNING! To reduce the risk of the monitor, and the other end to the equipment: Do not disable the power cord grounding plug. Secure the cables...
User Guide
Page 13
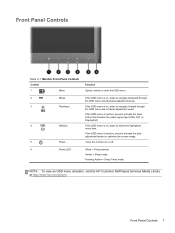
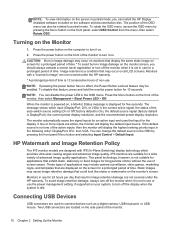
... through the OSD menu and decrease adjustment levels. If the OSD menu is on or off. White = Fully powered. Turns the monitor on , press to optimize the screen image. Flashing Amber = Sleep Timer mode. NOTE: To view an OSD menu simulator, visit the HP Customer Self Repair Services Media Library at http://www.hp.com/go/sml. Front Panel Controls Table 2-1 Monitor Front Panel Controls Control 1 Menu 2 Minus 3 Plus/Input 4 OK/auto 5 Power 6 Power LED Function Opens, selects or exits the OSD menu. If the OSD menu is inactive...
... through the OSD menu and decrease adjustment levels. If the OSD menu is on or off. White = Fully powered. Turns the monitor on , press to optimize the screen image. Flashing Amber = Sleep Timer mode. NOTE: To view an OSD menu simulator, visit the HP Customer Self Repair Services Media Library at http://www.hp.com/go/sml. Front Panel Controls Table 2-1 Monitor Front Panel Controls Control 1 Menu 2 Minus 3 Plus/Input 4 OK/auto 5 Power 6 Power LED Function Opens, selects or exits the OSD menu. If the OSD menu is inactive...
User Guide
Page 14
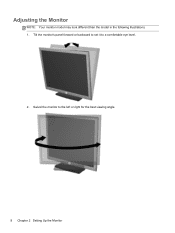
Tilt the monitor's panel forward or backward to set it to the left or right for the best viewing angle. 8 Chapter 2 Setting Up the Monitor Swivel the monitor to a comfortable eye level. 2. Adjusting the Monitor NOTE: Your monitor model may look different than the model in the following illustrations. 1.
Tilt the monitor's panel forward or backward to set it to the left or right for the best viewing angle. 8 Chapter 2 Setting Up the Monitor Swivel the monitor to a comfortable eye level. 2. Adjusting the Monitor NOTE: Your monitor model may look different than the model in the following illustrations. 1.

User Guide
Page 15
... the monitor, install it to the monitor or speaker bar. NOTE: The monitor stand ships with the base when pivoting and potentially cause damage to the full-height position. 4. Adjust the monitor to full height position and tilt the monitor back to the monitor. If you adjust your eye height. The monitor's top bezel edge should be more comfortable for your application. To adjust the display head to full height, remove the lock pin...
... the monitor, install it to the monitor or speaker bar. NOTE: The monitor stand ships with the base when pivoting and potentially cause damage to the full-height position. 4. Adjust the monitor to full height position and tilt the monitor back to the monitor. If you adjust your eye height. The monitor's top bezel edge should be more comfortable for your application. To adjust the display head to full height, remove the lock pin...
User Guide
Page 16
... the use the power management setting, if supported on the monitor screen, you can disable the power LED in the OSD menu. To rotate the OSD menu, access the OSD menu by pressing the front panel Menu button and selecting Input Control > Default Input. These types of applications may include camera surveillance, video games, marketing logos, and templates that result in use or use of the active inputs, then the monitor will display the default input source. Press the power button on . Connecting USB Devices USB connectors...
... the use the power management setting, if supported on the monitor screen, you can disable the power LED in the OSD menu. To rotate the OSD menu, access the OSD menu by pressing the front panel Menu button and selecting Input Control > Default Input. These types of applications may include camera surveillance, video games, marketing logos, and templates that result in use or use of the active inputs, then the monitor will display the default input source. Press the power button on . Connecting USB Devices USB connectors...

User Guide
Page 17
... USB 2.0 ports on the monitor. Removing the Monitor Pedestal Base You can remove the monitor panel from the pedestal base to the monitor. 1. Disconnect and remove the signal, power, and USB cables from the monitor stand. Lay the monitor face down on a wall, a swing arm, or other mounting fixture. Removing the Monitor Pedestal Base 11 Also disconnect all USB cables connected to install the panel on a flat surface covered by a clean, dry cloth. 3. CAUTION: Before beginning to disassemble the monitor, be sure the monitor is turned...
... USB 2.0 ports on the monitor. Removing the Monitor Pedestal Base You can remove the monitor panel from the pedestal base to the monitor. 1. Disconnect and remove the signal, power, and USB cables from the monitor stand. Lay the monitor face down on a wall, a swing arm, or other mounting fixture. Removing the Monitor Pedestal Base 11 Also disconnect all USB cables connected to install the panel on a flat surface covered by a clean, dry cloth. 3. CAUTION: Before beginning to disassemble the monitor, be sure the monitor is turned...
User Guide
Page 18
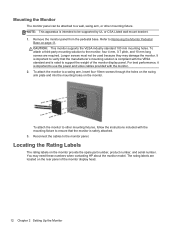
... monitor provide the spare part number, product number, and serial number. Reconnect the cables to the monitor, four 4 mm, 0.7 pitch, and 10 mm long screws are located on page 11. Mounting the Monitor The monitor panel can be used because they may need these numbers when contacting HP about the monitor model. You may damage the monitor. To attach the monitor to Removing the Monitor Pedestal Base on the rear panel of the monitor display panel. Locating the Rating...
... monitor provide the spare part number, product number, and serial number. Reconnect the cables to the monitor, four 4 mm, 0.7 pitch, and 10 mm long screws are located on page 11. Mounting the Monitor The monitor panel can be used because they may need these numbers when contacting HP about the monitor model. You may damage the monitor. To attach the monitor to Removing the Monitor Pedestal Base on the rear panel of the monitor display panel. Locating the Rating...

User Guide
Page 19
Installing a Cable Lock You can secure the monitor to a fixed object with an optional cable lock available from HP. Installing a Cable Lock 13
Installing a Cable Lock You can secure the monitor to a fixed object with an optional cable lock available from HP. Installing a Cable Lock 13
User Guide
Page 20
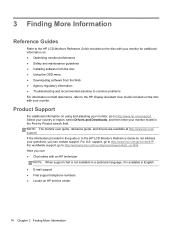
... information on: ● Optimizing monitor performance ● Safety and maintenance guidelines ● Installing software from the disc ● Using the OSD menu ● Downloading software from the Web ● Agency regulatory information ● Troubleshooting and recommended solutions to common problems For information on theft deterrence, refer to the HP Display Assistant User Guide included on using and adjusting your monitor, go to http://www.hp.com/support. If the information...
... information on: ● Optimizing monitor performance ● Safety and maintenance guidelines ● Installing software from the disc ● Using the OSD menu ● Downloading software from the Web ● Agency regulatory information ● Troubleshooting and recommended solutions to common problems For information on theft deterrence, refer to the HP Display Assistant User Guide included on using and adjusting your monitor, go to http://www.hp.com/support. If the information...

User Guide
Page 21
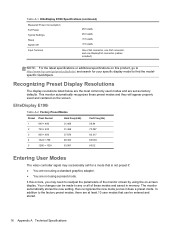
...Specifications NOTE: All specifications represent the typical specifications provided by HP's component manufacturers; EliteDisplay E190i Table A-1 EliteDisplay E190i Specifications Display Type Viewable Image Size Aspect Ratio Tilt Swivel Pivot Maximum Weight (Unpacked) Dimensions (include base) Height (highest position) Height (lowest position) Depth Width Maximum Graphic Resolution Optimum Graphic Resolution Text Mode Dot Pitch Pixels Per Inch Horizontal Frequency Vertical Refresh Rate Environmental Requirements Temperature LED... Relative Humidity Power Source Altitude: Operating...
...Specifications NOTE: All specifications represent the typical specifications provided by HP's component manufacturers; EliteDisplay E190i Table A-1 EliteDisplay E190i Specifications Display Type Viewable Image Size Aspect Ratio Tilt Swivel Pivot Maximum Weight (Unpacked) Dimensions (include base) Height (highest position) Height (lowest position) Depth Width Maximum Graphic Resolution Optimum Graphic Resolution Text Mode Dot Pitch Pixels Per Inch Horizontal Frequency Vertical Refresh Rate Environmental Requirements Temperature LED... Relative Humidity Power Source Altitude: Operating...
User Guide
Page 22
Table A-1 EliteDisplay E190i Specifications (continued) Measured Power Consumption: Full Power Typical Settings Sleep Switch Off 28.0 watts 26.0 watts
Table A-1 EliteDisplay E190i Specifications (continued) Measured Power Consumption: Full Power Typical Settings Sleep Switch Off 28.0 watts 26.0 watts
User Guide
Page 23
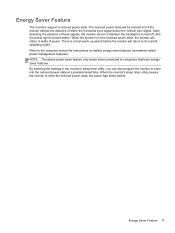
... of these signals, the monitor screen is blanked, the backlight is turned off, and the power light is a brief warm up period before the monitor will utilize .5 watts of either the horizontal sync signal and/or the vertical sync signal. NOTE: The above power saver feature only works when connected to enter the reduced power state, the power light blinks amber. By selecting the settings in the reduced power state, the monitor will return...
... of these signals, the monitor screen is blanked, the backlight is turned off, and the power light is a brief warm up period before the monitor will utilize .5 watts of either the horizontal sync signal and/or the vertical sync signal. NOTE: The above power saver feature only works when connected to enter the reduced power state, the power light blinks amber. By selecting the settings in the reduced power state, the monitor will return...
Setup Poster
Page 1
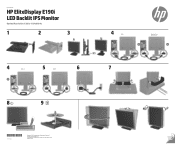
OR OR 7 *73818855--BB212* 738185-B22 Copyright © 2013 Hewlett-Packard Development Company, L.P. Printed in xxxxx Quick Setup HP EliteDisplay E190i LED Backlit IPS Monitor Optimal Resolution: 1280 x 1024 @ 60 Hz 1 2 3 4 DVI-D 5 USB 6 OR 8 9 4 VGA DisplayPort Select models only. Second Edition, November 2013 The information contained herein is subject to change without notice.
OR OR 7 *73818855--BB212* 738185-B22 Copyright © 2013 Hewlett-Packard Development Company, L.P. Printed in xxxxx Quick Setup HP EliteDisplay E190i LED Backlit IPS Monitor Optimal Resolution: 1280 x 1024 @ 60 Hz 1 2 3 4 DVI-D 5 USB 6 OR 8 9 4 VGA DisplayPort Select models only. Second Edition, November 2013 The information contained herein is subject to change without notice.


