
Getting Started HP Notebook
Page 6
... 38 Replacing a drive in the upgrade bay 39 Replacing a hard drive ...39 Replacing an optical drive 41 Adding or replacing memory modules 43 Adding or replacing the memory module underneath the service door 43 Adding or replacing the memory module underneath the keyboard 45 Using the DreamColor display (select models only 50 Updating programs and drivers... ...51 Cleaning the display 51 Cleaning the sides and cover 51 Cleaning the TouchPad and keyboard 52 6 Backup and recovery ...53 Creating recovery media with HP Recovery Disc Creator 54 Creating recovery media ...54 vi
... 38 Replacing a drive in the upgrade bay 39 Replacing a hard drive ...39 Replacing an optical drive 41 Adding or replacing memory modules 43 Adding or replacing the memory module underneath the service door 43 Adding or replacing the memory module underneath the keyboard 45 Using the DreamColor display (select models only 50 Updating programs and drivers... ...51 Cleaning the display 51 Cleaning the sides and cover 51 Cleaning the TouchPad and keyboard 52 6 Backup and recovery ...53 Creating recovery media with HP Recovery Disc Creator 54 Creating recovery media ...54 vi
Getting Started HP Notebook
Page 40
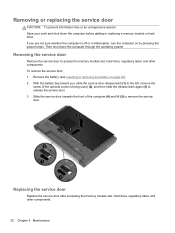
... on by pressing the power button. Replacing the service door Replace the service door after accessing the memory module slot, hard drive, regulatory label, and other components. Then shut down the computer before adding or replacing a memory module or hard drive. Slide the service door towards the front of the computer (4) and lift... the release latch again (3) to remove the service door. To remove the service door: 1. Removing the service door Remove the service door to access the memory module slot, hard drive, regulatory label, and other components. 32 Chapter 5 Maintenance
... on by pressing the power button. Replacing the service door Replace the service door after accessing the memory module slot, hard drive, regulatory label, and other components. Then shut down the computer before adding or replacing a memory module or hard drive. Slide the service door towards the front of the computer (4) and lift... the release latch again (3) to remove the service door. To remove the service door: 1. Removing the service door Remove the service door to access the memory module slot, hard drive, regulatory label, and other components. 32 Chapter 5 Maintenance
Getting Started HP Notebook
Page 51
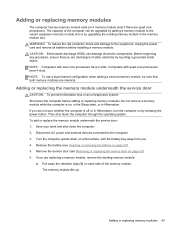
... and remove all batteries before adding or replacing memory modules. NOTE: To use a dual-channel configuration when adding a second memory module, be upgraded by adding a memory module to the vacant expansion memory module slot or by upgrading the existing memory module in the memory module slot. If you are replacing a memory module, remove the existing memory module: a. Remove the service door...
... and remove all batteries before adding or replacing memory modules. NOTE: To use a dual-channel configuration when adding a second memory module, be upgraded by adding a memory module to the vacant expansion memory module slot or by upgrading the existing memory module in the memory module slot. If you are replacing a memory module, remove the existing memory module: a. Remove the service door...

Getting Started HP Notebook
Page 53
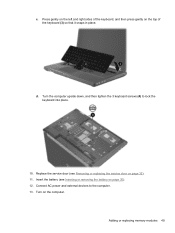
... service door (see Inserting or removing the battery on page 32 9. To replace the memory module underneath the keyboard: 1. With the computer upside down on the computer. Adding or replacing memory modules 45 8. Connect AC power and external devices to the computer. 3. Remove the...(see Removing or replacing the service door on page 30). 5. Adding or replacing the memory module underneath the keyboard CAUTION: To prevent information loss or an unresponsive system: Shut down the computer before adding or replacing memory modules. If you . 4. Turn on a flat surface, with...
... service door (see Inserting or removing the battery on page 32 9. To replace the memory module underneath the keyboard: 1. With the computer upside down on the computer. Adding or replacing memory modules 45 8. Connect AC power and external devices to the computer. 3. Remove the...(see Removing or replacing the service door on page 30). 5. Adding or replacing the memory module underneath the keyboard CAUTION: To prevent information loss or an unresponsive system: Shut down the computer before adding or replacing memory modules. If you . 4. Turn on a flat surface, with...

Getting Started HP Notebook
Page 55
... memory module at a 45-degree angle from the surface of the memory module compartment, press the module (2) into the memory module slot until it is seated. Insert a new memory module: CAUTION: To prevent damage to the memory module, hold the memory module by the edges only. b. b. Do not touch the components on the memory module. 8. a. Adding or replacing memory...
... memory module at a 45-degree angle from the surface of the memory module compartment, press the module (2) into the memory module slot until it is seated. Insert a new memory module: CAUTION: To prevent damage to the memory module, hold the memory module by the edges only. b. b. Do not touch the components on the memory module. 8. a. Adding or replacing memory...
Getting Started HP Notebook
Page 57
Press gently on the left and right sides of the keyboard (3) so that it snaps in place. Insert the battery (see Removing or replacing the service door on the computer. Turn on page 32). 11. c. Adding or replacing memory modules 49 d. Replace the service door (see Inserting or removing the battery on the top of the keyboard, and then press gently on page 30). 12. Turn the computer upside down, and then tighten the 3 keyboard screws (4) to the computer. 13. Connect AC power and external devices to lock the keyboard into place. 10.
Press gently on the left and right sides of the keyboard (3) so that it snaps in place. Insert the battery (see Removing or replacing the service door on the computer. Turn on page 32). 11. c. Adding or replacing memory modules 49 d. Replace the service door (see Inserting or removing the battery on the top of the keyboard, and then press gently on page 30). 12. Turn the computer upside down, and then tighten the 3 keyboard screws (4) to the computer. 13. Connect AC power and external devices to lock the keyboard into place. 10.


