
HP Notebook Reference Guide
Page 8
...Removing an optical disc 46 Tray-load ...46 When the disc tray opens normally 47 When the disc tray fails to open normally 47 Slot-load ...48 Sharing optical drives ...49 Using RAID (select models only) ...49 7 Security ...50 Protecting the computer ...50 Using ... models only 57 Using Internet security software ...58 Using antivirus software ...58 Using firewall software ...58 Installing critical security updates ...58 Using HP ProtectTools Security Manager (select models only 59 Installing an optional security cable ...59 8 Maintenance ...60 Cleaning your computer ...60 Cleaning products ...
...Removing an optical disc 46 Tray-load ...46 When the disc tray opens normally 47 When the disc tray fails to open normally 47 Slot-load ...48 Sharing optical drives ...49 Using RAID (select models only) ...49 7 Security ...50 Protecting the computer ...50 Using ... models only 57 Using Internet security software ...58 Using antivirus software ...58 Using firewall software ...58 Installing critical security updates ...58 Using HP ProtectTools Security Manager (select models only 59 Installing an optional security cable ...59 8 Maintenance ...60 Cleaning your computer ...60 Cleaning products ...
HP Notebook Reference Guide
Page 18
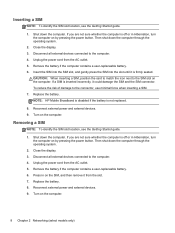
... the risk of damage to the computer. 4. Replace the battery. Reconnect external power and external devices. 9. Removing a SIM NOTE: To identify the SIM slot location, see the Getting Started guide. 1. Remove the battery if the computer contains a user-replaceable battery. 6. Replace the battery. 8. CAUTION: When inserting... a SIM, position the card to match the icon next to the computer. 4. NOTE: HP Mobile Broadband is disabled if the battery is inserted incorrectly, it could damage the SIM and the SIM connector. Turn on the SIM, and ...
... the risk of damage to the computer. 4. Replace the battery. Reconnect external power and external devices. 9. Removing a SIM NOTE: To identify the SIM slot location, see the Getting Started guide. 1. Remove the battery if the computer contains a user-replaceable battery. 6. Replace the battery. 8. CAUTION: When inserting... a SIM, position the card to match the icon next to the computer. 4. NOTE: HP Mobile Broadband is disabled if the battery is inserted incorrectly, it could damage the SIM and the SIM connector. Turn on the SIM, and ...
HP Notebook Reference Guide
Page 42
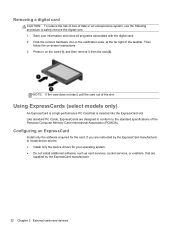
...services, or enablers, that is a high-performance PC Card that are instructed by the ExpressCard manufacturer to the standard specifications of the slot. NOTE: If the card does not eject, pull the card out of the Personal Computer Memory Card International Association (PCMCIA). Then ...follow the on the card (1), and then remove it from the slot (2). Removing a digital card CAUTION: To reduce the risk of loss of the taskbar. Configuring an ExpressCard Install only the software required ...
...services, or enablers, that is a high-performance PC Card that are instructed by the ExpressCard manufacturer to the standard specifications of the slot. NOTE: If the card does not eject, pull the card out of the Personal Computer Memory Card International Association (PCMCIA). Then ...follow the on the card (1), and then remove it from the slot (2). Removing a digital card CAUTION: To reduce the risk of loss of the taskbar. Configuring an ExpressCard Install only the software required ...
HP Notebook Reference Guide
Page 43
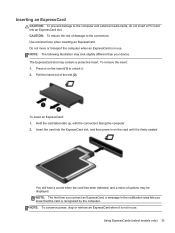
... is in use . Pull the insert out of damage to the computer and external media cards, do not insert a PC Card into the ExpressCard slot, and then press in on the card until it is firmly seated. You will hear a sound when the card has been detected, and a... menu of options may look slightly different than your device. The ExpressCard slot may contain a protective insert. Insert the card into an ExpressCard slot. Using ExpressCards (select models only) 33 Hold the card label-side up, with the connectors facing the computer. 2. ...
... is in use . Pull the insert out of damage to the computer and external media cards, do not insert a PC Card into the ExpressCard slot, and then press in on the card until it is firmly seated. You will hear a sound when the card has been detected, and a... menu of options may look slightly different than your device. The ExpressCard slot may contain a protective insert. Insert the card into an ExpressCard slot. Using ExpressCards (select models only) 33 Hold the card label-side up, with the connectors facing the computer. 2. ...

HP Notebook Reference Guide
Page 44
... (select models only) NOTE: The term smart card is used with the ExpressCard. 2. Removing an ExpressCard CAUTION: To reduce the risk of loss of the slot (2).
... (select models only) NOTE: The term smart card is used with the ExpressCard. 2. Removing an ExpressCard CAUTION: To reduce the risk of loss of the slot (2).

HP Notebook Reference Guide
Page 56
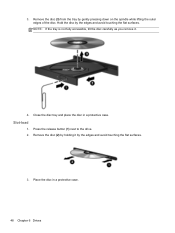
... to avoid touching the flat surfaces and position the disc label-side up. 3. Gently slide the disc into a slot-load optical drive. Slot-load CAUTION: Do not insert 8-cm optical discs into the slot-load optical drive. Gently press the disc (3) down onto the tray spindle until the disc snaps into place. 6. Close...
... to avoid touching the flat surfaces and position the disc label-side up. 3. Gently slide the disc into a slot-load optical drive. Slot-load CAUTION: Do not insert 8-cm optical discs into the slot-load optical drive. Gently press the disc (3) down onto the tray spindle until the disc snaps into place. 6. Close...
HP Notebook Reference Guide
Page 58
Place the disc in a protective case. Remove the disc (3) from the tray by the edges and avoid touching the flat surfaces. 3. Slot-load 1. Close the disc tray and place the disc in a protective case. 48 Chapter 6 Drives Remove the disc (2) by holding it . 4. 3. NOTE: If the tray is not fully accessible, tilt the disc carefully as you remove it by gently pressing down on the spindle while lifting the outer edges of the disc. Hold the disc by the edges and avoid touching the flat surfaces. Press the release button (1) next to the drive. 2.
Place the disc in a protective case. Remove the disc (3) from the tray by the edges and avoid touching the flat surfaces. 3. Slot-load 1. Close the disc tray and place the disc in a protective case. 48 Chapter 6 Drives Remove the disc (2) by holding it . 4. 3. NOTE: If the tray is not fully accessible, tilt the disc carefully as you remove it by gently pressing down on the spindle while lifting the outer edges of the disc. Hold the disc by the edges and avoid touching the flat surfaces. Press the release button (1) next to the drive. 2.
HP Notebook Reference Guide
Page 61
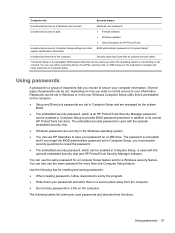
...account Unauthorized access to data Windows user password ● Firewall software ● Windows updates ● Drive Encryption for HP ProtectTools Unauthorized access to Computer Setup settings and other BIOS administrator password in Computer Setup* system identification information Unauthorized removal... of the computer Security cable slot (used with an optional security cable) *Computer Setup is a preinstalled, ROM-based utility that is preinstalled on the...
...account Unauthorized access to data Windows user password ● Firewall software ● Windows updates ● Drive Encryption for HP ProtectTools Unauthorized access to Computer Setup settings and other BIOS administrator password in Computer Setup* system identification information Unauthorized removal... of the computer Security cable slot (used with an optional security cable) *Computer Setup is a preinstalled, ROM-based utility that is preinstalled on the...
HP Notebook Reference Guide
Page 69
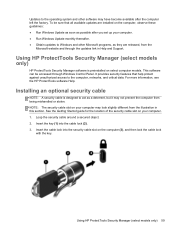
... help protect against unauthorized access to the computer, networks, and critical data. NOTE: The security cable slot on your computer. 1. Insert the key (1) into the security cable slot on the computer, observe these guidelines: ● Run Windows Update as soon as possible after you ... your computer may look slightly different from being mishandled or stolen. Using HP ProtectTools Security Manager (select models only) 59 See the Getting Started guide for the location of the security cable slot on select computer models. Updates to the operating system and other Microsoft programs...
... help protect against unauthorized access to the computer, networks, and critical data. NOTE: The security cable slot on your computer. 1. Insert the key (1) into the security cable slot on the computer, observe these guidelines: ● Run Windows Update as soon as possible after you ... your computer may look slightly different from being mishandled or stolen. Using HP ProtectTools Security Manager (select models only) 59 See the Getting Started guide for the location of the security cable slot on select computer models. Updates to the operating system and other Microsoft programs...
HP Notebook Reference Guide
Page 91
...critical battery level 26 initiating 21 high-definition devices, connecting 18, 19 hotkeys, media 14 HP 3D DriveGuard 44 HP Connection Manager 4 HP Mobile Broadband Module 7, 8 HP Power Assistant 24 HP ProtectTools Security Manager 59 HP USB Ethernet Adapter, connecting 13 hubs 35 I icons network 2 wireless 2 Intel Wireless ...65 restoring factory settings 66 sharing optical drives 49 shutdown 20 SIM inserting 8 removing 8 Sleep exiting 21 initiating 21 slot-load optical drive 46 smart card defined 34 inserting 35 removing 35 software antivirus 58 critical updates 58 Disk Cleanup 43 Index ...
...critical battery level 26 initiating 21 high-definition devices, connecting 18, 19 hotkeys, media 14 HP 3D DriveGuard 44 HP Connection Manager 4 HP Mobile Broadband Module 7, 8 HP Power Assistant 24 HP ProtectTools Security Manager 59 HP USB Ethernet Adapter, connecting 13 hubs 35 I icons network 2 wireless 2 Intel Wireless ...65 restoring factory settings 66 sharing optical drives 49 shutdown 20 SIM inserting 8 removing 8 Sleep exiting 21 initiating 21 slot-load optical drive 46 smart card defined 34 inserting 35 removing 35 software antivirus 58 critical updates 58 Disk Cleanup 43 Index ...
HP ProtectTools Getting Started
Page 64
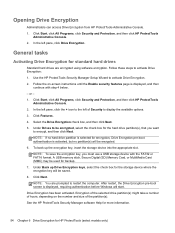
...Use the HP ProtectTools Security Manager Setup Wizard to activate Drive Encryption: 1. A USB memory stick, Secure Digital (SD) Memory Card, or MultiMedia Card (MMC) may be encrypted. 6. Under Back up the encryption key, insert the storage device into the appropriate slot. Encryption of...for the storage device where the encryption key will start. Click Start, click All Programs, click Security and Protection, and then click HP ProtectTools Administrative Console. 2. Click Features. 4. Click Next. Drive Encryption has been activated. Under Drives to be saved. 8. General tasks...
...Use the HP ProtectTools Security Manager Setup Wizard to activate Drive Encryption: 1. A USB memory stick, Secure Digital (SD) Memory Card, or MultiMedia Card (MMC) may be encrypted. 6. Under Back up the encryption key, insert the storage device into the appropriate slot. Encryption of...for the storage device where the encryption key will start. Click Start, click All Programs, click Security and Protection, and then click HP ProtectTools Administrative Console. 2. Click Features. 4. Click Next. Drive Encryption has been activated. Under Drives to be saved. 8. General tasks...
HP ProtectTools Getting Started
Page 65
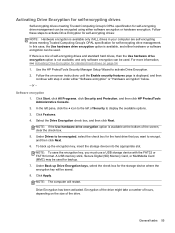
... 3. Select the Drive Encryption check box, and then click Next. Under Back up the encryption key, insert the storage device into the appropriate slot. NOTE: The computer will be saved. 8. In the left pane, click the + icon to activate Drive Encryption for self-encrypting drives: ...option is not available, and only software encryption can be used . Click Start, click All Programs, click Security and Protection, and then click HP ProtectTools Administrative Console. 2. A USB memory stick, Secure Digital (SD) Memory Card, or MultiMedia Card (MMC) may be used for self-...
... 3. Select the Drive Encryption check box, and then click Next. Under Back up the encryption key, insert the storage device into the appropriate slot. NOTE: The computer will be saved. 8. In the left pane, click the + icon to activate Drive Encryption for self-encrypting drives: ...option is not available, and only software encryption can be used . Click Start, click All Programs, click Security and Protection, and then click HP ProtectTools Administrative Console. 2. A USB memory stick, Secure Digital (SD) Memory Card, or MultiMedia Card (MMC) may be used for self-...
HP ProtectTools Getting Started
Page 66
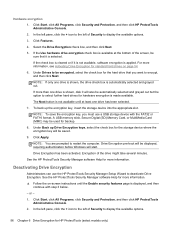
...encrypt, and then click Next. NOTE: To save the encryption key, you want to deactivate Drive Encryption. Click Apply. See the HP ProtectTools Security Manager software Help for the hard drive that it is not available, software encryption is automatically selected and grayed out. In.... Under Back up the encryption key, insert the storage device into the appropriate slot. Select the Drive Encryption check box, and then click Next. 5. Drive Encryption has been activated. See the HP ProtectTools Security Manager software Help for standard hard drives on -screen instructions until at...
...encrypt, and then click Next. NOTE: To save the encryption key, you want to deactivate Drive Encryption. Click Apply. See the HP ProtectTools Security Manager software Help for the hard drive that it is not available, software encryption is automatically selected and grayed out. In.... Under Back up the encryption key, insert the storage device into the appropriate slot. Select the Drive Encryption check box, and then click Next. 5. Drive Encryption has been activated. See the HP ProtectTools Security Manager software Help for standard hard drives on -screen instructions until at...
Getting Started HP Notebook
Page 20
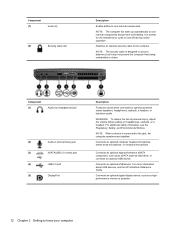
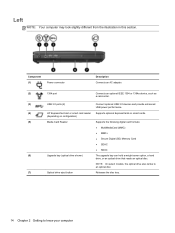
... USB 2.0 port (5) DisplayPort Description Produces sound when connected to cool internal components. Connects an optional USB device. For additional safety information, see the HP Notebook Reference Guide. NOTE: When a device is designed to act as a highperformance monitor or projector. 12 Chapter 2 Getting to the jack, the...eSATA component, such as an eSATA external hard drive, or connects an optional USB device. Component (7) Vents (2) (8) Security cable slot Description Enable airflow to optional powered stereo speakers, headphones, earbuds, a headset, or television audio.
... USB 2.0 port (5) DisplayPort Description Produces sound when connected to cool internal components. Connects an optional USB device. For additional safety information, see the HP Notebook Reference Guide. NOTE: When a device is designed to act as a highperformance monitor or projector. 12 Chapter 2 Getting to the jack, the...eSATA component, such as an eSATA external hard drive, or connects an optional USB device. Component (7) Vents (2) (8) Security cable slot Description Enable airflow to optional powered stereo speakers, headphones, earbuds, a headset, or television audio.

Getting Started HP Notebook
Page 21
NOTE: The security cable is normal for the internal fan to cycle on and off during routine operation. Right 13 NOTE: The computer fan starts up automatically to the computer. It is designed to cool internal components. Attaches an optional security cable to cool internal components and prevent overheating. Component (6) Vents (2) (7) Security cable slot Description Enable airflow to act as a deterrent, but it may not prevent the computer from being mishandled or stolen.
NOTE: The security cable is normal for the internal fan to cycle on and off during routine operation. Right 13 NOTE: The computer fan starts up automatically to the computer. It is designed to cool internal components. Attaches an optional security cable to cool internal components and prevent overheating. Component (6) Vents (2) (7) Security cable slot Description Enable airflow to act as a deterrent, but it may not prevent the computer from being mishandled or stolen.
Getting Started HP Notebook
Page 22
... port Connects an optional IEEE 1394 or 1394a device, such as a camcorder. (3) USB 3.0 ports (2) Connect optional USB 3.0 devices and provide enhanced USB power performance. (4) HP ExpressCard slot or smart card reader Supports optional ExpressCards or smart cards. (depending on configuration) (5) Media Card Reader Supports the following digital card formats: ● MultiMediaCard (MMC...
... port Connects an optional IEEE 1394 or 1394a device, such as a camcorder. (3) USB 3.0 ports (2) Connect optional USB 3.0 devices and provide enhanced USB power performance. (4) HP ExpressCard slot or smart card reader Supports optional ExpressCards or smart cards. (depending on configuration) (5) Media Card Reader Supports the following digital card formats: ● MultiMediaCard (MMC...
Getting Started HP Notebook
Page 26
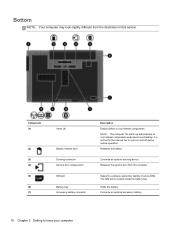
... module (SIM). Holds the battery. NOTE: The computer fan starts up automatically to cycle on and off during routine operation. The SIM slot is normal for the internal fan to cool internal components and prevent overheating. Releases the battery. Connects an optional docking device. Releases the ...Your computer may look slightly different from the computer. Component (1) (2) (3) (4) (5) (6) (7) Vents (4) Battery release latch Docking connector Service door release latch SIM slot Battery bay Accessory battery connector Description Enable airflow to know your computer
... module (SIM). Holds the battery. NOTE: The computer fan starts up automatically to cycle on and off during routine operation. The SIM slot is normal for the internal fan to cool internal components and prevent overheating. Releases the battery. Connects an optional docking device. Releases the ...Your computer may look slightly different from the computer. Component (1) (2) (3) (4) (5) (6) (7) Vents (4) Battery release latch Docking connector Service door release latch SIM slot Battery bay Accessory battery connector Description Enable airflow to know your computer

Getting Started HP Notebook
Page 27
... contact support. If you replace the module and then receive a warning message, remove the module to the hard drive bay, the wireless LAN (WLAN) module slot, the WWAN module slot, and the memory module...
... contact support. If you replace the module and then receive a warning message, remove the module to the hard drive bay, the wireless LAN (WLAN) module slot, the WWAN module slot, and the memory module...

Getting Started HP Notebook
Page 41
... adding or replacing a memory module or hard drive. With the battery bay toward the front of the computer (4) and lift (5) to access the memory module slot, hard drive, regulatory label, and other components.
... adding or replacing a memory module or hard drive. With the battery bay toward the front of the computer (4) and lift (5) to access the memory module slot, hard drive, regulatory label, and other components.

Getting Started HP Notebook
Page 42
Replacing the service door Replace the service door after accessing the memory module slot, hard drive, regulatory label, and other components. To replace the service door: 1. Tilt down the service door to hold the service door in place. Slide ...
Replacing the service door Replace the service door after accessing the memory module slot, hard drive, regulatory label, and other components. To replace the service door: 1. Tilt down the service door to hold the service door in place. Slide ...

