HP ProtectTools Security Software 2010
Page 2
... to invest heavily in module provides a high level overview of HP 2 Threats to ensure that PC s do not become more secure communication via instant messaging (IM) and email HP ProtectTools can be accessed from hard drive so they cannot be recovered in a vault and automatically enters ... or desktop computer, protect the data on it is at rest) Drive Encryption (full volume encryption standard with every business notebook) Device Access Manager prevents unauthorized copying of files to removable drives File Sanitizer allows you connect to the computer, networks, and critical data...
... to invest heavily in module provides a high level overview of HP 2 Threats to ensure that PC s do not become more secure communication via instant messaging (IM) and email HP ProtectTools can be accessed from hard drive so they cannot be recovered in a vault and automatically enters ... or desktop computer, protect the data on it is at rest) Drive Encryption (full volume encryption standard with every business notebook) Device Access Manager prevents unauthorized copying of files to removable drives File Sanitizer allows you connect to the computer, networks, and critical data...
HP ProtectTools Security Software 2010
Page 11
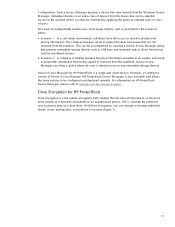
...to sensitive product and pricing information. Device Access M anager for HP ProtectTools Drive Encryption is a single user client version. For information on a hard drive. Individual devices or a n entire class of Device Access M anager (HP ProtectTools Device Manager) is currently the preferred way to protect ... models, such as USB keys and writeable optical drives from being copied or removed from the premises. However, an enterprise version of devices from the W indows Device Manager. This level of users. W ith Drive Encryption, you can allow a policy where this ...
...to sensitive product and pricing information. Device Access M anager for HP ProtectTools Drive Encryption is a single user client version. For information on a hard drive. Individual devices or a n entire class of Device Access M anager (HP ProtectTools Device Manager) is currently the preferred way to protect ... models, such as USB keys and writeable optical drives from being copied or removed from the premises. However, an enterprise version of devices from the W indows Device Manager. This level of users. W ith Drive Encryption, you can allow a policy where this ...
HP ProtectTools Security Software 2010
Page 15
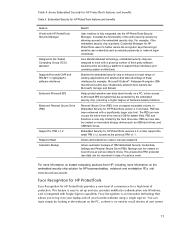
...Microsoft CAPI and PKCS#11 cryptographic software interfaces Enhanced Microsoft EFS Enhanced Personal Secure Drive (PSD) Support for HP ProtectTools uses it to recall dozens of these interfaces (for HP ProtectTools version 4.0 and later, PSD has been enhanced with Single Sign-on capability... for system files). The PSD can be created on removable storage devices such as website passwords or network logon credentials. As a standards-based technology, embedded security chips are protected by the hard drive size. For more information on trusted computing solutions from ...
...Microsoft CAPI and PKCS#11 cryptographic software interfaces Enhanced Microsoft EFS Enhanced Personal Secure Drive (PSD) Support for HP ProtectTools uses it to recall dozens of these interfaces (for HP ProtectTools version 4.0 and later, PSD has been enhanced with Single Sign-on capability... for system files). The PSD can be created on removable storage devices such as website passwords or network logon credentials. As a standards-based technology, embedded security chips are protected by the hard drive size. For more information on trusted computing solutions from ...
HP ProtectTools Security Software 2010
Page 16
... over your browser and gives you want shredded automatically, and define the schedules. You can be set up over types of the file. Removing the link to the file from the hard drive directory. File Sanitizer for HP ProtectTools was developed in order to ensure that a minimum of two factors be used space on...
... over your browser and gives you want shredded automatically, and define the schedules. You can be set up over types of the file. Removing the link to the file from the hard drive directory. File Sanitizer for HP ProtectTools was developed in order to ensure that a minimum of two factors be used space on...

Getting Started HP Notebook - Windows 7
Page 6
... ...30 Dragging ...30 Scrolling ...31 Rotating ...31 Pinching/Zooming ...32 Setting touch screen preferences 32 6 Maintenance ...33 Inserting or removing the battery ...33 Replacing or upgrading the hard drive 34 Removing the hard drive ...34 Installing a hard drive ...35 Adding or replacing memory modules 37 To add or replace the primary memory module 37 To add or replace...
... ...30 Dragging ...30 Scrolling ...31 Rotating ...31 Pinching/Zooming ...32 Setting touch screen preferences 32 6 Maintenance ...33 Inserting or removing the battery ...33 Replacing or upgrading the hard drive 34 Removing the hard drive ...34 Installing a hard drive ...35 Adding or replacing memory modules 37 To add or replace the primary memory module 37 To add or replace...
Getting Started HP Notebook - Windows 7
Page 22
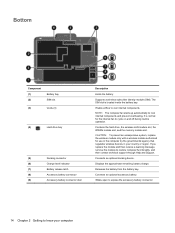
If you replace the module and then receive a warning message, remove the module to cool internal components and prevent overheating. The SIM slot is normal for use in the computer ... internal components. It is located inside the battery bay. Displays the approximate remaining battery charge. Bottom Component (1) (2) Battery bay SIM slot (3) Vents (3) (4) Hard drive bay (5) Docking connector (6) Charge level indicator (7) Battery release latch (8) Accessory battery connector (9) Accessory battery connector door Description Holds the battery. Connects an optional ...
If you replace the module and then receive a warning message, remove the module to cool internal components and prevent overheating. The SIM slot is normal for use in the computer ... internal components. It is located inside the battery bay. Displays the approximate remaining battery charge. Bottom Component (1) (2) Battery bay SIM slot (3) Vents (3) (4) Hard drive bay (5) Docking connector (6) Charge level indicator (7) Battery release latch (8) Accessory battery connector (9) Accessory battery connector door Description Holds the battery. Connects an optional ...
Getting Started HP Notebook - Windows 7
Page 41
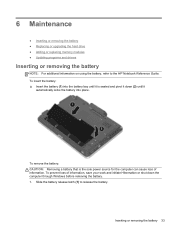
... the battery into place. Slide the battery release latch (1) to the HP Notebook Reference Guide. 6 Maintenance ● Inserting or removing the battery ● Replacing or upgrading the hard drive ● Adding or replacing memory modules ● Updating programs and drivers Inserting or removing the battery NOTE: For additional information on using the battery, refer to...
... the battery into place. Slide the battery release latch (1) to the HP Notebook Reference Guide. 6 Maintenance ● Inserting or removing the battery ● Replacing or upgrading the hard drive ● Adding or replacing memory modules ● Updating programs and drivers Inserting or removing the battery NOTE: For additional information on using the battery, refer to...
Getting Started HP Notebook - Windows 7
Page 42
.... Then shut down the computer before removing the hard drive from the computer (2). Remove the battery. 4. Loosen the 3 hard drive cover screws (1). 34 Chapter 6 Maintenance 2. Disconnect AC power and external devices connected to the computer. 3. Do not remove the hard drive while the computer is off or in... Hibernation, turn the computer on , in the Sleep state, or in Hibernation. Removing the hard drive 1. If you are not sure whether the computer is on...
.... Then shut down the computer before removing the hard drive from the computer (2). Remove the battery. 4. Loosen the 3 hard drive cover screws (1). 34 Chapter 6 Maintenance 2. Disconnect AC power and external devices connected to the computer. 3. Do not remove the hard drive while the computer is off or in... Hibernation, turn the computer on , in the Sleep state, or in Hibernation. Removing the hard drive 1. If you are not sure whether the computer is on...
Getting Started HP Notebook - Windows 7
Page 43
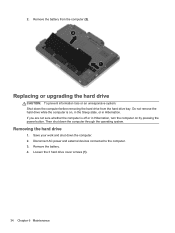
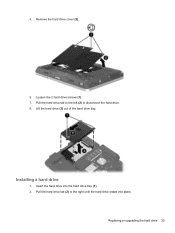
Lift the hard drive (3) out of the hard drive bay. Remove the hard drive cover (2). 6. Insert the hard drive into place. Pull the hard drive tab (2) to disconnect the hard drive. 8. Installing a hard drive 1. Replacing or upgrading the hard drive 35 Pull the hard drive tab to the left (2) to the right until the hard drive snaps into the hard drive bay (1). 2. 5. Loosen the 2 hard drive screws (1). 7.
Lift the hard drive (3) out of the hard drive bay. Remove the hard drive cover (2). 6. Insert the hard drive into place. Pull the hard drive tab (2) to disconnect the hard drive. 8. Installing a hard drive 1. Replacing or upgrading the hard drive 35 Pull the hard drive tab to the left (2) to the right until the hard drive snaps into the hard drive bay (1). 2. 5. Loosen the 2 hard drive screws (1). 7.
Getting Started HP Notebook - Windows 7
Page 45
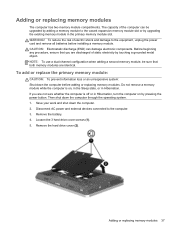
Disconnect AC power and external devices connected to the equipment, unplug the power cord and remove all batteries before adding or replacing memory modules. Remove the hard drive cover (2). Do not remove a memory module while the computer is off or in Hibernation, turn the computer on , ... memory module: CAUTION: To prevent information loss or an unresponsive system: Shut down the computer before installing a memory module. Loosen the 3 hard drive cover screws (1). 5. NOTE: To use a dual-channel configuration when adding a second memory module, be upgraded by adding a memory module...
Disconnect AC power and external devices connected to the equipment, unplug the power cord and remove all batteries before adding or replacing memory modules. Remove the hard drive cover (2). Do not remove a memory module while the computer is off or in Hibernation, turn the computer on , ... memory module: CAUTION: To prevent information loss or an unresponsive system: Shut down the computer before installing a memory module. Loosen the 3 hard drive cover screws (1). 5. NOTE: To use a dual-channel configuration when adding a second memory module, be upgraded by adding a memory module...
Getting Started HP Notebook - Windows 7
Page 51
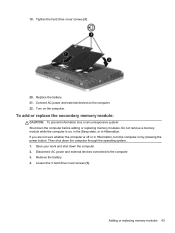
... is off or in Hibernation. Replace the battery. 21. Remove the battery. 4. Adding or replacing memory modules 43 19. If you are not sure whether the computer is on, in the Sleep state, or in Hibernation, turn the computer on the computer. Loosen the 3 hard drive cover screws (1). Tighten the hard drive cover screws (3). 20.
... is off or in Hibernation. Replace the battery. 21. Remove the battery. 4. Adding or replacing memory modules 43 19. If you are not sure whether the computer is on, in the Sleep state, or in Hibernation, turn the computer on the computer. Loosen the 3 hard drive cover screws (1). Tighten the hard drive cover screws (3). 20.
Getting Started HP Notebook - Windows 7
Page 52
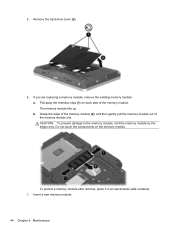
5. Remove the hard drive cover (2). 6. Pull away the retention clips (1) on the memory module. The memory module tilts up. b. To protect a memory module after removal, place it in an electrostatic-safe container. 7. If you are replacing a memory module, remove the existing memory module: a. Insert a new memory module: 44 Chapter 6 Maintenance CAUTION: To prevent damage to the...
5. Remove the hard drive cover (2). 6. Pull away the retention clips (1) on the memory module. The memory module tilts up. b. To protect a memory module after removal, place it in an electrostatic-safe container. 7. If you are replacing a memory module, remove the existing memory module: a. Insert a new memory module: 44 Chapter 6 Maintenance CAUTION: To prevent damage to the...

Getting Started HP Notebook - Windows 7
Page 58
... created and any software installed on -screen instructions. Follow the on the computer are permanently removed. If the HP Recovery partition is displayed on page 50. 3. Using f11 recovery tools CAUTION: Using f11 completely erases hard drive contents and reformats the hard drive. Software not installed at the factory. Follow the on the computer are permanently...
... created and any software installed on -screen instructions. Follow the on the computer are permanently removed. If the HP Recovery partition is displayed on page 50. 3. Using f11 recovery tools CAUTION: Using f11 completely erases hard drive contents and reformats the hard drive. Software not installed at the factory. Follow the on the computer are permanently...

Getting Started HP Notebook - Windows 7
Page 59
...screen instructions. 5. NOTE: In case of your system on the computer are permanently removed. Restart the computer, and then insert the Windows 7 operating system DVD into the optical drive before the Windows operating system loads. 3. Select Repair your permission or password for ... the hard drive. If possible, back up the entire hard drive (select models only) ● Scheduling automatic backups (select models only) ● Creating system restore points ● Recovering individual files ● Restoring the computer to restore the contents of system instability, HP recommends...
...screen instructions. 5. NOTE: In case of your system on the computer are permanently removed. Restart the computer, and then insert the Windows 7 operating system DVD into the optical drive before the Windows operating system loads. 3. Select Repair your permission or password for ... the hard drive. If possible, back up the entire hard drive (select models only) ● Scheduling automatic backups (select models only) ● Creating system restore points ● Recovering individual files ● Restoring the computer to restore the contents of system instability, HP recommends...

Getting Started HP Notebook - Windows 7
Page 61
... Using a Windows Vista operating system DVD (purchased separately) on the computer are permanently removed. When reformatting is listed in Help and Support. Using f11 recovery tools CAUTION: Using f11 completely erases hard drive contents and reformats the hard drive. NOTE: If the HP Recovery partition has been deleted, you may not have a recovery partition. CAUTION: Using...
... Using a Windows Vista operating system DVD (purchased separately) on the computer are permanently removed. When reformatting is listed in Help and Support. Using f11 recovery tools CAUTION: Using f11 completely erases hard drive contents and reformats the hard drive. NOTE: If the HP Recovery partition has been deleted, you may not have a recovery partition. CAUTION: Using...

Getting Started HP Notebook - Windows 7
Page 62
...hard drive contents and reformats the hard drive. To initiate recovery using a Windows Vista operating system DVD: NOTE: This process takes several minutes. 1. Select Repair your computer. 7. When reformatting is complete, the recovery process helps you have created and any keyboard key. 4. Follow the on the computer are permanently removed.... Restart the computer, and then insert the Windows Vista operating system DVD into the optical drive before the Windows operating system loads. 3. All files you ...
...hard drive contents and reformats the hard drive. To initiate recovery using a Windows Vista operating system DVD: NOTE: This process takes several minutes. 1. Select Repair your computer. 7. When reformatting is complete, the recovery process helps you have created and any keyboard key. 4. Follow the on the computer are permanently removed.... Restart the computer, and then insert the Windows Vista operating system DVD into the optical drive before the Windows operating system loads. 3. All files you ...

Getting Started HP Notebook - Windows 7
Page 66
...switching 20 display release latch 9 display, auto panel rotation 24 display, rotating 22 Docking connector identifying 14 dragging touch screen gesture 30 drive light 6 E embedded numeric keypad, identifying 8, 21 esc button identifying 13 esc key, identifying 8 ExpressCard slot identifying 11 external ... changing assignments 32 creating assignments 32 fn key, identifying 8, 19, 21 function keys identifying 8 H hard drive installing 35 removing 34 hard drive bay, identifying 14 hard drive recovery 50, 53 headphone (audio-out) jack 10 hotkeys ambient light 20 battery charge 20 decrease screen...
...switching 20 display release latch 9 display, auto panel rotation 24 display, rotating 22 Docking connector identifying 14 dragging touch screen gesture 30 drive light 6 E embedded numeric keypad, identifying 8, 21 esc button identifying 13 esc key, identifying 8 ExpressCard slot identifying 11 external ... changing assignments 32 creating assignments 32 fn key, identifying 8, 19, 21 function keys identifying 8 H hard drive installing 35 removing 34 hard drive bay, identifying 14 hard drive recovery 50, 53 headphone (audio-out) jack 10 hotkeys ambient light 20 battery charge 20 decrease screen...

Getting Started HP Notebook - Windows 7
Page 67
... labels Bluetooth 56 HP Mobile Broadband Module 56 Microsoft Certificate of Authenticity 56 regulatory 56 serial number 56 SIM 56 wireless certification 56 WLAN 56 latch, battery release 14 lights battery 6 caps lock 5 drive 6 mute 5 ...num lock 5 power 6 TouchPad 5 volume down 5 volume up 5 webcam 12 M Media Card Reader, identifying 11 memory module inserting 40, 44 removing 39, 44 replacing...partition 50, 53 regulatory information regulatory label 56 wireless certification labels 56 restoring the hard drive 50, 53 RJ-11 (modem) jack, identifying 10 RJ-45 (network) jack...
... labels Bluetooth 56 HP Mobile Broadband Module 56 Microsoft Certificate of Authenticity 56 regulatory 56 serial number 56 SIM 56 wireless certification 56 WLAN 56 latch, battery release 14 lights battery 6 caps lock 5 drive 6 mute 5 ...num lock 5 power 6 TouchPad 5 volume down 5 volume up 5 webcam 12 M Media Card Reader, identifying 11 memory module inserting 40, 44 removing 39, 44 replacing...partition 50, 53 regulatory information regulatory label 56 wireless certification labels 56 restoring the hard drive 50, 53 RJ-11 (modem) jack, identifying 10 RJ-45 (network) jack...
HP Notebook Reference Guide - Windows 7
Page 7
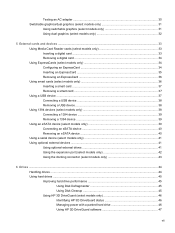
... an eSATA device 40 Removing an eSATA device 40 Using a serial device (select models only 41 Using optional external devices ...41 Using optional external drives 41 Using the expansion port (select models only 42 Using the docking connector (select models only 43 6 Drives ...44 Handling drives ...44 Using hard drives ...45 Improving hard drive performance 45 Using Disk...
... an eSATA device 40 Removing an eSATA device 40 Using a serial device (select models only 41 Using optional external devices ...41 Using optional external drives 41 Using the expansion port (select models only 42 Using the docking connector (select models only 43 6 Drives ...44 Handling drives ...44 Using hard drives ...45 Improving hard drive performance 45 Using Disk...
HP Notebook Reference Guide - Windows 7
Page 49
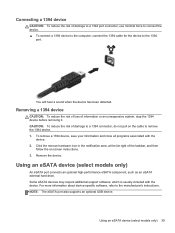
... instructions. Using an eSATA device (select models only) 39 Removing a 1394 device CAUTION: To reduce the risk of loss of the taskbar, and then follow the on the cable to remove the 1394 device. 1. Click the remove hardware icon in the notification area, at the far right of... Using an eSATA device (select models only) An eSATA port connects an optional high-performance eSATA component, such as an eSATA external hard drive. To remove a 1394 device, save your information and close all programs associated with the device. Some eSATA devices may require additional support software,...
... instructions. Using an eSATA device (select models only) 39 Removing a 1394 device CAUTION: To reduce the risk of loss of the taskbar, and then follow the on the cable to remove the 1394 device. 1. Click the remove hardware icon in the notification area, at the far right of... Using an eSATA device (select models only) An eSATA port connects an optional high-performance eSATA component, such as an eSATA external hard drive. To remove a 1394 device, save your information and close all programs associated with the device. Some eSATA devices may require additional support software,...


