
HP Notebook Hard Drives & Solid State Drives Identifying, Preventing, Diagnosing and Recovering from Drive Failures Care and Mai
Page 6
... RIS (Remote Installation Service) installation points include: Adding SATA drivers to installation CDs, building an image, and switching to SATA AHCI mode Using Sysprep with SATA in AHCI or NATIVE mode Adding SATA drivers using WinPE can be located at the following URL: http://bizsupport2.austin.hp.com/bc/docs/support/SupportManual/c01600726/c01600726.pdf. Procedures for notebook PC models that could affect hard disk drive performance and...
... RIS (Remote Installation Service) installation points include: Adding SATA drivers to installation CDs, building an image, and switching to SATA AHCI mode Using Sysprep with SATA in AHCI or NATIVE mode Adding SATA drivers using WinPE can be located at the following URL: http://bizsupport2.austin.hp.com/bc/docs/support/SupportManual/c01600726/c01600726.pdf. Procedures for notebook PC models that could affect hard disk drive performance and...
Start Here
Page 3
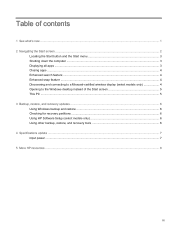
... new ...1 2 Navigating the Start screen ...2 Locating the Start button and the Start menu 3 Shutting down the computer ...3 Displaying all apps ...3 Closing apps ...4 Enhanced search feature ...4 Enhanced snap feature ...4 Discovering and connecting to a Miracast-certified wireless display (select models only 4 Opening to the Windows desktop instead of the Start screen 5 This PC ...5 3 Backup, restore, and recovery updates ...6 Using Windows backup and restore ...6 Checking for recovery partitions ...6 Using HP Software Setup (select models only 6 Using other backup, restore, and recovery...
... new ...1 2 Navigating the Start screen ...2 Locating the Start button and the Start menu 3 Shutting down the computer ...3 Displaying all apps ...3 Closing apps ...4 Enhanced search feature ...4 Enhanced snap feature ...4 Discovering and connecting to a Miracast-certified wireless display (select models only 4 Opening to the Windows desktop instead of the Start screen 5 This PC ...5 3 Backup, restore, and recovery updates ...6 Using Windows backup and restore ...6 Checking for recovery partitions ...6 Using HP Software Setup (select models only 6 Using other backup, restore, and recovery...

Start Here
Page 7
... Start screen. Shut down . 2. Action Using a keyboard and mouse Locate the Start button and the Start menu Point to the lower-left area of the Start screen, and then right-click the Start button to the left on your computer. Swipe from the Start menu, follow the instructions below to display the Start menu. Point to charms, and then click Settings. IMPORTANT: To quickly return to the Start screen, press the Windows key on the TouchPad or touch screen...
... Start screen. Shut down . 2. Action Using a keyboard and mouse Locate the Start button and the Start menu Point to the lower-left area of the Start screen, and then right-click the Start button to the left on your computer. Swipe from the Start menu, follow the instructions below to display the Start menu. Point to charms, and then click Settings. IMPORTANT: To quickly return to the Start screen, press the Windows key on the TouchPad or touch screen...
Start Here
Page 10
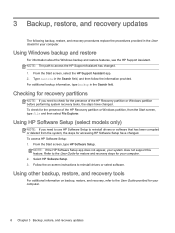
... the HP Recovery partition or Windows partition, from the Start screen, type file and then select File Explorer. Follow the on backup, restore, and recovery, refer to the User Guide for restore and recovery steps for your computer. 3 Backup, restore, and recovery updates The following backup, restore, and recovery procedures replace the procedures provided in the User Guide for your computer. 2. NOTE: If the HP Software Setup app does not appear, your computer. 6 Chapter 3 Backup, restore, and recovery updates Using other backup, restore, and recovery tools...
... the HP Recovery partition or Windows partition, from the Start screen, type file and then select File Explorer. Follow the on backup, restore, and recovery, refer to the User Guide for restore and recovery steps for your computer. 3 Backup, restore, and recovery updates The following backup, restore, and recovery procedures replace the procedures provided in the User Guide for your computer. 2. NOTE: If the HP Software Setup app does not appear, your computer. 6 Chapter 3 Backup, restore, and recovery updates Using other backup, restore, and recovery tools...

HP ENVY m6 Notebook PC Maintenance and Service Guide
Page 35
... model, serial number, product key, and length of warranty, are as many as 4 screws that must be removed, replaced, and/or loosened when servicing Customer Self-Repair parts. There are on -screen instructions. For complete and current information on page 16 for Customer Self-Repair parts. NOTE: HP continually improves and changes product parts. See Service tag on supported parts for your computer, go to access and replace Customer SelfRepair parts successfully...
... model, serial number, product key, and length of warranty, are as many as 4 screws that must be removed, replaced, and/or loosened when servicing Customer Self-Repair parts. There are on -screen instructions. For complete and current information on page 16 for Customer Self-Repair parts. NOTE: HP continually improves and changes product parts. See Service tag on supported parts for your computer, go to access and replace Customer SelfRepair parts successfully...

HP ENVY m6 Notebook PC Maintenance and Service Guide
Page 43
... recent BIOS. 8. Click the Download button, and then follow these steps: 1. Turn off or in Hibernation, turn the computer on each side of the memory module shield and swing it down through the operating system. 2. Spread the retaining tabs (1) on , and then shut it up .) Component replacement procedures 35 Remove the memory module: 1. Under Step 2: Select a Download, click the BIOS link. 7. Remove the service cover (see Battery on -screen instructions.
... recent BIOS. 8. Click the Download button, and then follow these steps: 1. Turn off or in Hibernation, turn the computer on each side of the memory module shield and swing it down through the operating system. 2. Spread the retaining tabs (1) on , and then shut it up .) Component replacement procedures 35 Remove the memory module: 1. Under Step 2: Select a Download, click the BIOS link. 7. Remove the service cover (see Battery on -screen instructions.

HP ENVY m6 Notebook PC Maintenance and Service Guide
Page 45
... unplugging the power cord from the computer. 4. Disconnect all external devices from the computer. 3. Remove the service cover (see Battery on -screen instructions. For complete and current information on , and then shut it down through the operating system. 2. 6 Removal and replacement procedures for Authorized Service Provider parts CAUTION: Components described in Hibernation, turn the computer on supported parts for Authorized Service Provider only parts. NOTE: HP continually improves and changes product parts.
... unplugging the power cord from the computer. 4. Disconnect all external devices from the computer. 3. Remove the service cover (see Battery on -screen instructions. For complete and current information on , and then shut it down through the operating system. 2. 6 Removal and replacement procedures for Authorized Service Provider parts CAUTION: Components described in Hibernation, turn the computer on supported parts for Authorized Service Provider only parts. NOTE: HP continually improves and changes product parts.
HP ENVY m6 Notebook PC Maintenance and Service Guide
Page 75
... your hard drive where the BIOS update is typically Local Disk (C:). 3. b. Follow the on-screen instructions to download your selection to the BIOS version currently installed on battery power, docked in an optional docking device, or connected to reliable external power using the AC adapter. BIOS installation procedures vary. The BIOS installation begins. 5. 5. If the update is more recent than your hard drive designation. Identify the most recent BIOS update and compare it has been downloaded to the location on -screen instructions...
... your hard drive where the BIOS update is typically Local Disk (C:). 3. b. Follow the on-screen instructions to download your selection to the BIOS version currently installed on battery power, docked in an optional docking device, or connected to reliable external power using the AC adapter. BIOS installation procedures vary. The BIOS installation begins. 5. 5. If the update is more recent than your hard drive designation. Identify the most recent BIOS update and compare it has been downloaded to the location on -screen instructions...

HP ENVY m6 Notebook PC Maintenance and Service Guide
Page 80
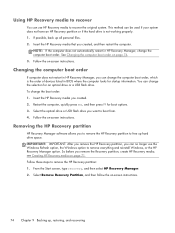
...Recovery media that were installed at the factory. 72 Chapter 9 Backing up, restoring, and recovering Minimized Image Recovery installs only drivers and hardware-enabling applications. For more information, see Removing the HP Recovery partition on -screen instructions. ● If you want to recover the computer's original factory partitioning and content, you can choose the System Recovery option from the HP Recovery partition (select models only) or use the Factory Reset option of HP Recovery Manager to reinstall the individual application or driver. From the Start screen, type...
...Recovery media that were installed at the factory. 72 Chapter 9 Backing up, restoring, and recovering Minimized Image Recovery installs only drivers and hardware-enabling applications. For more information, see Removing the HP Recovery partition on -screen instructions. ● If you want to recover the computer's original factory partitioning and content, you can choose the System Recovery option from the HP Recovery partition (select models only) or use the Factory Reset option of HP Recovery Manager to reinstall the individual application or driver. From the Start screen, type...
HP ENVY m6 Notebook PC Maintenance and Service Guide
Page 82
...in BIOS where the computer looks for startup information. See Changing the computer boot order on page 74. 3. Insert the HP Recovery media you remove the Recovery partition, create HP Recovery media; Select the optical drive or USB flash drive you want to recover the original system. Using HP Recovery media to recover You can use the Windows Refresh option, the Windows option to remove the HP Recovery partition: 1. Follow these steps to remove everything and reinstall Windows, or the HP Recovery Manager option. From the Start screen, type recovery, and then select HP Recovery Manager...
...in BIOS where the computer looks for startup information. See Changing the computer boot order on page 74. 3. Insert the HP Recovery media you remove the Recovery partition, create HP Recovery media; Select the optical drive or USB flash drive you want to recover the original system. Using HP Recovery media to recover You can use the Windows Refresh option, the Windows option to remove the HP Recovery partition: 1. Follow these steps to remove everything and reinstall Windows, or the HP Recovery Manager option. From the Start screen, type recovery, and then select HP Recovery Manager...

HP ENVY m6 Notebook PC Maintenance and Service Guide
Page 87
... display panel 1 Ethernet 2 external media cards 2 graphics 1 hard drive 2 keyboard 3 memory module 2 microphone 2 operating system 3 pointing device 3 ports 3 power requirements 3 processors 1 product name 1 security 3 serviceability 3 video 2 wireless 2 product name 1 R removal/replacement procedures 27, 37 right-side components 12 RJ-45 (network) jack 12 RJ-45 (network) jack status light 12 RTC battery removal 37 spare part number 17, 19 spare part numbers 37 rubber feet removal 39 spare part number 39 Rubber Kit, spare part number 17, 20 S Screw Kit, spare part number 19, 20 security cable...
... display panel 1 Ethernet 2 external media cards 2 graphics 1 hard drive 2 keyboard 3 memory module 2 microphone 2 operating system 3 pointing device 3 ports 3 power requirements 3 processors 1 product name 1 security 3 serviceability 3 video 2 wireless 2 product name 1 R removal/replacement procedures 27, 37 right-side components 12 RJ-45 (network) jack 12 RJ-45 (network) jack status light 12 RTC battery removal 37 spare part number 17, 19 spare part numbers 37 rubber feet removal 39 spare part number 39 Rubber Kit, spare part number 17, 20 S Screw Kit, spare part number 19, 20 security cable...

HP ENVY m6 Notebook PC Maintenance and Service Guide
Page 88
... subwoofer location 13 removal 56 spare part number 16, 20, 56 system board removal 45 spare part numbers 16, 20, 21, 45 W webcam 5 webcam light 5 Windows key 7 wireless antenna locations 5 wireless light 8 wireless, product description 2 WLAN module removal 29 spare part number 17, 20, 29 workstation guidelines 25 T tools required 22 top cover, spare part number 16, 20 TouchPad assembly removal 60 spare part number 16, 20, 60 TouchPad button 9 TouchPad components 9 TouchPad control zone 9 TouchPad zone 9 transporting guidelines 25 U USB 3.0 port 10, 12 V vent 10, 13 video...
... subwoofer location 13 removal 56 spare part number 16, 20, 56 system board removal 45 spare part numbers 16, 20, 21, 45 W webcam 5 webcam light 5 Windows key 7 wireless antenna locations 5 wireless light 8 wireless, product description 2 WLAN module removal 29 spare part number 17, 20, 29 workstation guidelines 25 T tools required 22 top cover, spare part number 16, 20 TouchPad assembly removal 60 spare part number 16, 20, 60 TouchPad button 9 TouchPad components 9 TouchPad control zone 9 TouchPad zone 9 transporting guidelines 25 U USB 3.0 port 10, 12 V vent 10, 13 video...
HP ENVY m6 Notebook PC Maintenance and Service Guide
Page 35
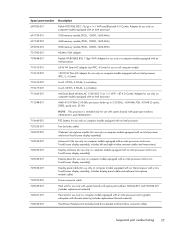
... display panel cable and webcam/microphone module cable) Power connector cable Heat sink for use only with system boards with spare part numbers 760042-501 and 760042-001 (includes replacement material) Heat sink for use only on computer models equipped with an Intel processor and a nonTouchScreen display assembly; includes left and right wireless antenna cables and transceivers) Display enclosure (for use only on computer models equipped with an Intel processor and a nonTouchScreen display...
... display panel cable and webcam/microphone module cable) Power connector cable Heat sink for use only with system boards with spare part numbers 760042-501 and 760042-001 (includes replacement material) Heat sink for use only on computer models equipped with an Intel processor and a nonTouchScreen display assembly; includes left and right wireless antenna cables and transceivers) Display enclosure (for use only on computer models equipped with an Intel processor and a nonTouchScreen display...

HP ENVY m6 Notebook PC Maintenance and Service Guide
Page 44
... to access and replace Customer SelfRepair parts successfully. NOTE: Details about your warranty. This chapter provides removal and replacement procedures for Customer Self-Repair parts. Installing a part not supported by the Customer Self-Repair program may void your computer, including model, serial number, product key, and length of warranty, are as many as 4 screws that must be removed, replaced, and/or loosened when servicing Customer Self-Repair parts. 5 Removal and replacement procedures...
... to access and replace Customer SelfRepair parts successfully. NOTE: Details about your warranty. This chapter provides removal and replacement procedures for Customer Self-Repair parts. Installing a part not supported by the Customer Self-Repair program may void your computer, including model, serial number, product key, and length of warranty, are as many as 4 screws that must be removed, replaced, and/or loosened when servicing Customer Self-Repair parts. 5 Removal and replacement procedures...

HP ENVY m6 Notebook PC Maintenance and Service Guide
Page 52
... all external devices from the computer. 3. Under Step 2: Select a Download, click the BIOS link. 7. If you are accessible. 2. Click the link for the computer model. 5. Remove the service cover (see Battery on page 37). 5. Before removing a memory module, follow the on , and then shut it down through the operating system. 2. Select the operating system, and then click Next. 6. Turn off or in Hibernation, turn the computer on -screen instructions...
... all external devices from the computer. 3. Under Step 2: Select a Download, click the BIOS link. 7. If you are accessible. 2. Click the link for the computer model. 5. Remove the service cover (see Battery on page 37). 5. Before removing a memory module, follow the on , and then shut it down through the operating system. 2. Select the operating system, and then click Next. 6. Turn off or in Hibernation, turn the computer on -screen instructions...

HP ENVY m6 Notebook PC Maintenance and Service Guide
Page 54
... the operating system. 2. There are unsure whether the computer is off the computer. Turn off or in this chapter should only be removed, replaced, and/or loosened when servicing the computer. Disconnect the power from the computer by an authorized service provider. Disconnect all external devices from the computer. 3. For complete and current information on -screen instructions. RTC battery Description For use only...
... the operating system. 2. There are unsure whether the computer is off the computer. Turn off or in this chapter should only be removed, replaced, and/or loosened when servicing the computer. Disconnect the power from the computer by an authorized service provider. Disconnect all external devices from the computer. 3. For complete and current information on -screen instructions. RTC battery Description For use only...

HP ENVY m6 Notebook PC Maintenance and Service Guide
Page 91
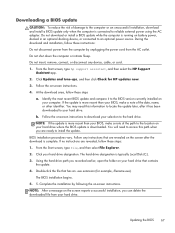
... your BIOS, make a note of the path to the location on -screen instructions to reliable external power using the AC adapter. Follow the on your hard drive that contains the update. 4. Using the hard drive path you can delete the downloaded file from the computer by following the on -screen instructions. 4. Do not download or install a BIOS update while the computer is typically Local Disk (C:). 3. From the Start screen, type hp support assistant, and then select the HP Support Assistant...
... your BIOS, make a note of the path to the location on -screen instructions to reliable external power using the AC adapter. Follow the on your hard drive that contains the update. 4. Using the hard drive path you can delete the downloaded file from the computer by following the on -screen instructions. 4. Do not download or install a BIOS update while the computer is typically Local Disk (C:). 3. From the Start screen, type hp support assistant, and then select the HP Support Assistant...

HP ENVY m6 Notebook PC Maintenance and Service Guide
Page 96
... media that you wish to remove the recovery partition to reclaim hard drive space, HP Recovery Manager offers the Remove Recovery Partition option. Restore and recovery There are several options for restoring from backup, refreshing the computer, and resetting the computer to its original state. Minimized Image Recovery installs only drivers and hardware-enabling applications. If you have not already created recovery media, see Creating HP Recovery media on page 87. ● If you have not already created recovery media, see Recovering using HP Recovery Manager on -screen instructions...
... media that you wish to remove the recovery partition to reclaim hard drive space, HP Recovery Manager offers the Remove Recovery Partition option. Restore and recovery There are several options for restoring from backup, refreshing the computer, and resetting the computer to its original state. Minimized Image Recovery installs only drivers and hardware-enabling applications. If you have not already created recovery media, see Creating HP Recovery media on page 87. ● If you have not already created recovery media, see Recovering using HP Recovery Manager on -screen instructions...

HP ENVY m6 Notebook PC Maintenance and Service Guide
Page 103
... 32 spare part numbers 25 memory card eader 14 memory module product description 3 removal 43 spare part numbers 22, 27, 43 microphone location 9 product description 4 microphone jack 16 model name 1 mute light 12 N network jack 16 num lk key 11 O operating system, product description 7 optical drive precautions 32 spare part number 25, 29 P packaging guidelines 34 plastic parts, service considerations 31 pointing device, product description 6 ports HDMI 14 product description 5 USB 3.0 14, 16 power button 10 power button board removal 78 spare part number 20, 28...
... 32 spare part numbers 25 memory card eader 14 memory module product description 3 removal 43 spare part numbers 22, 27, 43 microphone location 9 product description 4 microphone jack 16 model name 1 mute light 12 N network jack 16 num lk key 11 O operating system, product description 7 optical drive precautions 32 spare part number 25, 29 P packaging guidelines 34 plastic parts, service considerations 31 pointing device, product description 6 ports HDMI 14 product description 5 USB 3.0 14, 16 power button 10 power button board removal 78 spare part number 20, 28...

HP ENVY m6 Notebook PC Maintenance and Service Guide
Page 104
... board removal 60 spare part numbers 20, 29, 30, 60 T tools required 31 top cover, spare part numbers 20, 29, 30 TouchPad assembly removal 76 spare part number 20, 29, 76 TouchPad button 13 TouchPad components 13 TouchPad control zone 13 TouchPad zone 13 transporting guidelines 34 U USB 3.0 port 14, 16 V vent 14, 17 video, product description 4 W webcam 9 webcam light 9 webcam/microphone module removal 58 spare part number 23, 27, 58 Windows key 11 wireless antenna locations 9 removal 58 spare part number 24, 27, 59 wireless light 12 wireless...
... board removal 60 spare part numbers 20, 29, 30, 60 T tools required 31 top cover, spare part numbers 20, 29, 30 TouchPad assembly removal 76 spare part number 20, 29, 76 TouchPad button 13 TouchPad components 13 TouchPad control zone 13 TouchPad zone 13 transporting guidelines 34 U USB 3.0 port 14, 16 V vent 14, 17 video, product description 4 W webcam 9 webcam light 9 webcam/microphone module removal 58 spare part number 23, 27, 58 Windows key 11 wireless antenna locations 9 removal 58 spare part number 24, 27, 59 wireless light 12 wireless...


