
HP Notebook Hard Drives & Solid State Drives Identifying, Preventing, Diagnosing and Recovering from Drive Failures Care and Mai
Page 3
... editing, copying, and deleting of that ultimately result in blue screens and/or continuous reboots. Refer to your software Help for HP ProtectTools, located at the following website: http://h20000.www2.hp.com/bizsupport/TechSupport/SoftwareDescription.jsp?lang=en&cc=us&pro dTypeId=321957...most difficult software problems to trace is written to the hard drive on a "first available space" basis. In this area as blue screens, application lockups, and other occurrences will result, because the HDD has reached the Self-Monitoring, Analysis, and Reporting Technology (S.M.A.R.T.) attribute ...
... editing, copying, and deleting of that ultimately result in blue screens and/or continuous reboots. Refer to your software Help for HP ProtectTools, located at the following website: http://h20000.www2.hp.com/bizsupport/TechSupport/SoftwareDescription.jsp?lang=en&cc=us&pro dTypeId=321957...most difficult software problems to trace is written to the hard drive on a "first available space" basis. In this area as blue screens, application lockups, and other occurrences will result, because the HDD has reached the Self-Monitoring, Analysis, and Reporting Technology (S.M.A.R.T.) attribute ...
HP Notebook Hard Drives & Solid State Drives Identifying, Preventing, Diagnosing and Recovering from Drive Failures Care and Mai
Page 4
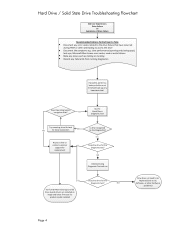
slow performance (opening and closing apps), lock-ups, Microsoft Blue Screen error codes, read or write failures Note any noises such as clicking or clunking Record any Failure IDs from running diagnostics If possible, perform a backup ...
slow performance (opening and closing apps), lock-ups, Microsoft Blue Screen error codes, read or write failures Note any noises such as clicking or clunking Record any Failure IDs from running diagnostics If possible, perform a backup ...
User Guide
Page 18
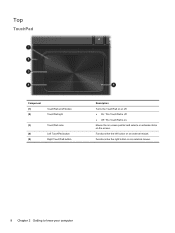
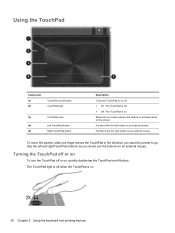
Moves the on-screen pointer and selects or activates items on . Functions like the left button on an external mouse. 8 Chapter 2 Getting to know your computer Top TouchPad Component (1) (2) TouchPad on/off button TouchPad light (3) TouchPad zone (4) Left TouchPad button (5) Right TouchPad button Description Turns the TouchPad on or off. ● On: The TouchPad is off. ● Off: The TouchPad is on the screen. Functions like the right button on an external mouse.
Moves the on-screen pointer and selects or activates items on . Functions like the left button on an external mouse. 8 Chapter 2 Getting to know your computer Top TouchPad Component (1) (2) TouchPad on/off button TouchPad light (3) TouchPad zone (4) Left TouchPad button (5) Right TouchPad button Description Turns the TouchPad on or off. ● On: The TouchPad is off. ● Off: The TouchPad is on the screen. Functions like the right button on an external mouse.
User Guide
Page 33
... the audio settings on your computer, follow these steps: 1. Select Start > Control Panel > Hardware and Sound > Sound. 2. Using video Your HP computer is connected to the correct port on your computer, select Start > Control Panel > Hardware and Sound > Sound. Check the device manufacturer's instructions... port, which allows you have questions. IMPORTANT: Be sure that the external device is a powerful video device that appear on the screen when you to watch streaming video from your desktop. 3. Beats Audio is enabled. Checking the sound To check the audio functions on...
... the audio settings on your computer, follow these steps: 1. Select Start > Control Panel > Hardware and Sound > Sound. 2. Using video Your HP computer is connected to the correct port on your computer, select Start > Control Panel > Hardware and Sound > Sound. Check the device manufacturer's instructions... port, which allows you have questions. IMPORTANT: Be sure that the external device is a powerful video device that appear on the screen when you to watch streaming video from your desktop. 3. Beats Audio is enabled. Checking the sound To check the audio functions on...
User Guide
Page 34
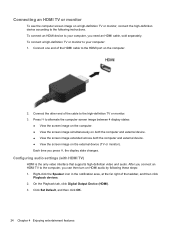
... video and audio. Press f4 to alternate the computer screen image between 4 display states: ● View the screen image on the computer. ● View the screen image simultaneously on both the computer and external device. ● View the screen image extended across both the computer and external device. ...● View the screen image on the computer. 2. Connecting an HDMI TV or monitor To see the computer screen image on a high-definition TV or monitor, connect ...
... video and audio. Press f4 to alternate the computer screen image between 4 display states: ● View the screen image on the computer. ● View the screen image simultaneously on both the computer and external device. ● View the screen image extended across both the computer and external device. ...● View the screen image on the computer. 2. Connecting an HDMI TV or monitor To see the computer screen image on a high-definition TV or monitor, connect ...
User Guide
Page 36
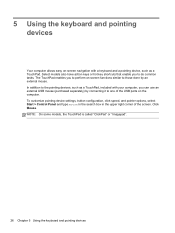
... done by connecting it to do common tasks. Click Mouse. 5 Using the keyboard and pointing devices Your computer allows easy on-screen navigation with your computer, you to one of the screen. NOTE: On some models, the TouchPad is called "ClickPad" or "Imagepad". 26 Chapter 5 Using the keyboard and pointing devices To...
... done by connecting it to do common tasks. Click Mouse. 5 Using the keyboard and pointing devices Your computer allows easy on-screen navigation with your computer, you to one of the screen. NOTE: On some models, the TouchPad is called "ClickPad" or "Imagepad". 26 Chapter 5 Using the keyboard and pointing devices To...

User Guide
Page 37
... are receiving video information from operating properly. To use an action key function, press and hold down the key. f4 Switches the screen image between display devices connected to support. Using the action keys An action key performs an assigned function. The action key feature is... connected to the computer, pressing this key alternates the screen image from the computer display to the monitor display to a simultaneous display on the country or region, your computer. NOTE: Depending on...
... are receiving video information from operating properly. To use an action key function, press and hold down the key. f4 Switches the screen image between display devices connected to support. Using the action keys An action key performs an assigned function. The action key feature is... connected to the computer, pressing this key alternates the screen image from the computer display to the monitor display to a simultaneous display on the country or region, your computer. NOTE: Depending on...

User Guide
Page 39
... to suit your notebook model, the TouchPad surface might be plain or might use visible left and right TouchPad buttons like the corresponding buttons on -screen pointer, slide one finger across the TouchPad in the direction you want the pointer to create a high-precision, gesturefriendly mouse alternative. On the Device Settings...
... to suit your notebook model, the TouchPad surface might be plain or might use visible left and right TouchPad buttons like the corresponding buttons on -screen pointer, slide one finger across the TouchPad in the direction you want the pointer to create a high-precision, gesturefriendly mouse alternative. On the Device Settings...
User Guide
Page 40
... the pointer to go. Turning the TouchPad off or on To turn the TouchPad off or on, quickly double-tap the TouchPad on the screen. To move the pointer, slide one finger across the TouchPad in the direction you would use the buttons on an external mouse. Use the... an external mouse. The TouchPad light is off when the TouchPad is on. Functions like the right button on an external mouse. Moves the on-screen pointer and selects or activates items on /off button. Using the TouchPad Component (1) (2) TouchPad on/off button TouchPad light (3) TouchPad zone (4) Left TouchPad button ...
... the pointer to go. Turning the TouchPad off or on To turn the TouchPad off or on, quickly double-tap the TouchPad on the screen. To move the pointer, slide one finger across the TouchPad in the direction you would use the buttons on an external mouse. Use the... an external mouse. The TouchPad light is off when the TouchPad is on. Functions like the right button on an external mouse. Moves the on-screen pointer and selects or activates items on /off button. Using the TouchPad Component (1) (2) TouchPad on/off button TouchPad light (3) TouchPad zone (4) Left TouchPad button ...
User Guide
Page 41
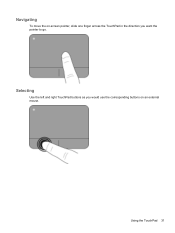
Navigating To move the on-screen pointer, slide one finger across the TouchPad in the direction you would use the corresponding buttons on an external mouse. Using the TouchPad 31 Selecting Use the left and right TouchPad buttons as you want the pointer to go.
Navigating To move the on-screen pointer, slide one finger across the TouchPad in the direction you would use the corresponding buttons on an external mouse. Using the TouchPad 31 Selecting Use the left and right TouchPad buttons as you want the pointer to go.
User Guide
Page 44
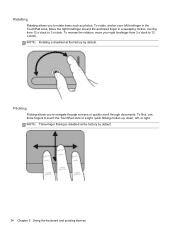
... you to rotate items such as photos. NOTE: Three-finger flicking is disabled at the factory by default. Rotating Rotating allows you to navigate through screens or quickly scroll through documents.
... you to rotate items such as photos. NOTE: Three-finger flicking is disabled at the factory by default. Rotating Rotating allows you to navigate through screens or quickly scroll through documents.
User Guide
Page 46
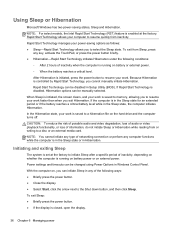
...: For select models, the Intel Rapid Start Technology (RST) feature is saved to memory, allowing you to resume your work . When Sleep is initiated, the screen clears, and your work is enabled at the factory to initiate Sleep after a specific period of inactivity when the computer is running on battery power...
...: For select models, the Intel Rapid Start Technology (RST) feature is saved to memory, allowing you to resume your work . When Sleep is initiated, the screen clears, and your work is enabled at the factory to initiate Sleep after a specific period of inactivity when the computer is running on battery power...

User Guide
Page 47
... reaches a critical battery level. Click Require a password (recommended). Initiating and exiting Hibernation The system is enabled at the factory to the screen where you must enter your user account password, and then follow these steps: 1. NOTE: For select models, the Intel® Rapid Start... turn on and the computer returns to initiate Hibernation after a specific period of inactivity, depending on and the computer displays the screen as it was when you have set at the factory. Rapid Start Technology allows your work. For more information, see Using Sleep...
... reaches a critical battery level. Click Require a password (recommended). Initiating and exiting Hibernation The system is enabled at the factory to the screen where you must enter your user account password, and then follow these steps: 1. NOTE: For select models, the Intel® Rapid Start... turn on and the computer returns to initiate Hibernation after a specific period of inactivity, depending on and the computer displays the screen as it was when you have set at the factory. Rapid Start Technology allows your work. For more information, see Using Sleep...
User Guide
Page 49
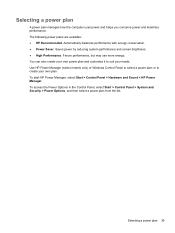
...you conserve power and maximize performance. To start HP Power Manager, select Start > Control Panel > Hardware and Sound > HP Power Manager. Selecting a power plan 39 Automatically balances performance with energy conservation. ● Power Saver. Use HP Power Manager (select models only) or Windows ...and then select a power plan from the list. Saves power by reducing system performance and screen brightness. ● High Performance. The following power plans are available: ● HP Recommended. You can also create your own power plan and customize it to create your needs....
...you conserve power and maximize performance. To start HP Power Manager, select Start > Control Panel > Hardware and Sound > HP Power Manager. Selecting a power plan 39 Automatically balances performance with energy conservation. ● Power Saver. Use HP Power Manager (select models only) or Windows ...and then select a power plan from the list. Saves power by reducing system performance and screen brightness. ● High Performance. The following power plans are available: ● HP Recommended. You can also create your own power plan and customize it to create your needs....
User Guide
Page 55
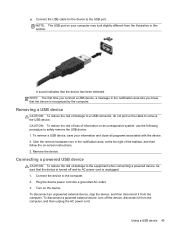
... device, a message in this section. Removing a USB device CAUTION: To reduce the risk of the taskbar, and then follow the on the device. Turn on -screen instructions. 3. A sound indicates that the device has been detected. Remove the device. CAUTION: To reduce the risk of loss of damage to remove the USB...
... device, a message in this section. Removing a USB device CAUTION: To reduce the risk of the taskbar, and then follow the on the device. Turn on -screen instructions. 3. A sound indicates that the device has been detected. Remove the device. CAUTION: To reduce the risk of loss of damage to remove the USB...
User Guide
Page 56
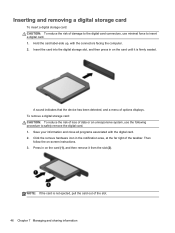
... of loss of the taskbar. NOTE: If the card is firmly seated. Insert the card into the digital storage slot, and then press in on -screen instructions. 3.
... of loss of the taskbar. NOTE: If the card is firmly seated. Insert the card into the digital storage slot, and then press in on -screen instructions. 3.
User Guide
Page 58
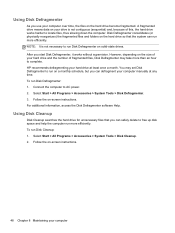
After you can run more than an hour to run Disk Defragmenter on solid-state drives. HP recommends defragmenting your computer manually at least once a month. You may take more efficiently. Select Start > All Programs > Accessories > System ... A fragmented drive means data on the hard drive become fragmented. Disk Defragmenter consolidates (or physically reorganizes) the fragmented files and folders on -screen instructions. NOTE: It is not contiguous (sequential) and, because of fragmented files, Disk Defragmenter may set Disk Defragmenter to complete. For additional ...
After you can run more than an hour to run Disk Defragmenter on solid-state drives. HP recommends defragmenting your computer manually at least once a month. You may take more efficiently. Select Start > All Programs > Accessories > System ... A fragmented drive means data on the hard drive become fragmented. Disk Defragmenter consolidates (or physically reorganizes) the fragmented files and folders on -screen instructions. NOTE: It is not contiguous (sequential) and, because of fragmented files, Disk Defragmenter may set Disk Defragmenter to complete. For additional ...
User Guide
Page 63
... of being locked out of characters that is preinstalled on page 37 for more information. For example, when you set in Windows or in the HP Setup Utility (BIOS) that you choose to secure your computer to require the user password to secure your files, delete confidential files, and then remove... (BIOS) feature and for service, back up your computer information and to access Setup Utility (BIOS) contents. For additional information about Windows passwords, such as screen-saver passwords, select Start > Help and Support.
... of being locked out of characters that is preinstalled on page 37 for more information. For example, when you set in Windows or in the HP Setup Utility (BIOS) that you choose to secure your computer to require the user password to secure your files, delete confidential files, and then remove... (BIOS) feature and for service, back up your computer information and to access Setup Utility (BIOS) contents. For additional information about Windows passwords, such as screen-saver passwords, select Start > Help and Support.
User Guide
Page 64
...NOTE: The administrator password can be used in Setup Utility (BIOS): 1. Use the arrow keys to select Security, and then follow the on-screen instructions. NOTE: A power-on password is displayed, you must be kept up to date. To provide ongoing protection against newly discovered viruses and... password, you potentially expose your computer to computer viruses, spyware, and other online threats. Use the arrow keys and follow the on-screen instructions. While the "Press the ESC key for Startup Menu" message is not displayed as a trial offer. To help protect your computer...
...NOTE: The administrator password can be used in Setup Utility (BIOS): 1. Use the arrow keys to select Security, and then follow the on-screen instructions. NOTE: A power-on password is displayed, you must be kept up to date. To provide ongoing protection against newly discovered viruses and... password, you potentially expose your computer to computer viruses, spyware, and other online threats. Use the arrow keys and follow the on-screen instructions. While the "Press the ESC key for Startup Menu" message is not displayed as a trial offer. To help protect your computer...

User Guide
Page 67
... f10 to navigate in Setup Utility (BIOS) is displayed at the bottom of the screen. 2. Determining the BIOS version To determine whether available BIOS updates contain later BIOS versions than those currently installed on the HP website. Starting Setup Utility (BIOS) To start Setup Utility (BIOS), follow these steps... changes in Setup Utility (BIOS). Setup Utility (BIOS) includes settings for Startup Menu" message is located at the bottom of the screen. Updating the BIOS Updated versions of the BIOS may be available on the computer, you need to know the version of system and...
... f10 to navigate in Setup Utility (BIOS) is displayed at the bottom of the screen. 2. Determining the BIOS version To determine whether available BIOS updates contain later BIOS versions than those currently installed on the HP website. Starting Setup Utility (BIOS) To start Setup Utility (BIOS), follow these steps... changes in Setup Utility (BIOS). Setup Utility (BIOS) includes settings for Startup Menu" message is located at the bottom of the screen. Updating the BIOS Updated versions of the BIOS may be available on the computer, you need to know the version of system and...


