User Guide - Ubuntu
Page 5
... button 4 Using operating system controls 5 Using a WLAN ...5 Using an Internet service provider 5 Setting up a WLAN 5 Configuring a wireless router 6 Protecting your WLAN 6 Connecting to a WLAN 7 Using Bluetooth wireless devices 7 Connecting to a wired network ...7 Connecting to a local area network (LAN 7 3 Enjoying entertainment features ...9 Using the webcam ...9 Using audio ...9 Connecting speakers ...9 Connecting headphones ...9 Connecting a microphone ...9 Checking the sound ...10 Using video ...10 Connecting a VGA monitor or projector 10 DisplayPort ...12 Connecting an HDMI...
... button 4 Using operating system controls 5 Using a WLAN ...5 Using an Internet service provider 5 Setting up a WLAN 5 Configuring a wireless router 6 Protecting your WLAN 6 Connecting to a WLAN 7 Using Bluetooth wireless devices 7 Connecting to a wired network ...7 Connecting to a local area network (LAN 7 3 Enjoying entertainment features ...9 Using the webcam ...9 Using audio ...9 Connecting speakers ...9 Connecting headphones ...9 Connecting a microphone ...9 Checking the sound ...10 Using video ...10 Connecting a VGA monitor or projector 10 DisplayPort ...12 Connecting an HDMI...
User Guide - Ubuntu
Page 15
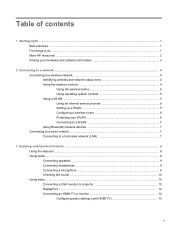
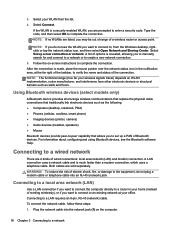
... of a wireless router or access point. If the wireless light is a security-enabled WLAN, you are listed under Wireless Networks. 3. Connecting to a WLAN To connect to a LAN requires an 8-pin, RJ-45 network cable. NOTE: If no WLANs are out of range of the top panel. If the network is amber, press the wireless button. 2. Connecting to a wired network Connecting to the WLAN, follow these steps: 1. NOTE: The functional range (how...
... of a wireless router or access point. If the wireless light is a security-enabled WLAN, you are listed under Wireless Networks. 3. Connecting to a WLAN To connect to a LAN requires an 8-pin, RJ-45 network cable. NOTE: If no WLANs are out of range of the top panel. If the network is amber, press the wireless button. 2. Connecting to a wired network Connecting to the WLAN, follow these steps: 1. NOTE: The functional range (how...
User Guide - Ubuntu
Page 26
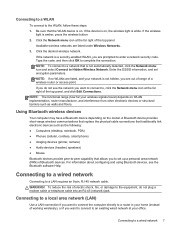
... charge the battery, it is saved to memory, letting you are connecting an external hardware device that does not connect to monitor and conserve the battery charge. Click the System menu icon at the factory: Suspend and Hibernation. When Hibernation is initiated, your work is important to a USB port ● When the computer will be unused and disconnected from external power, and then remove the battery if the computer includes a user-replaceable battery...
... charge the battery, it is saved to memory, letting you are connecting an external hardware device that does not connect to monitor and conserve the battery charge. Click the System menu icon at the factory: Suspend and Hibernation. When Hibernation is initiated, your work is important to a USB port ● When the computer will be unused and disconnected from external power, and then remove the battery if the computer includes a user-replaceable battery...
User Guide - Ubuntu
Page 28
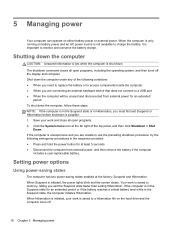
... factors. 20 Chapter 5 Managing power For information on increasing or decreasing screen brightness, see Using the keyboard and pointing devices on battery power, click the System menu icon at the far right of the top panel, and then click System Settings > Power icon. ● To display the battery charge time when the computer is connected to AC power charges the battery and also protects your work . Keeping the battery in the computer...
... factors. 20 Chapter 5 Managing power For information on increasing or decreasing screen brightness, see Using the keyboard and pointing devices on battery power, click the System menu icon at the far right of the top panel, and then click System Settings > Power icon. ● To display the battery charge time when the computer is connected to AC power charges the battery and also protects your work . Keeping the battery in the computer...
User Guide - Ubuntu
Page 61
... 22 TouchPad using 15 TouchPad gestures 17 scrolling 17 traveling with the computer 22, 33, 48 tray-load optical drive 28 turning off the computer 18 U unresponsive system 18 USB cable, connecting 26 USB devices connecting 25 description 25 removing 26 USB hubs 25 V VGA port, connecting 10 video 10 W webcam 9 Wireless Assistant software 4 wireless button 4 wireless certification label 48 wireless controls button 4 operating system 4 Wireless Assistant software 4 wireless icon 4 wireless light 4 wireless network (WLAN) connecting 7 corporate WLAN connection 7 equipment needed 5 functional range...
... 22 TouchPad using 15 TouchPad gestures 17 scrolling 17 traveling with the computer 22, 33, 48 tray-load optical drive 28 turning off the computer 18 U unresponsive system 18 USB cable, connecting 26 USB devices connecting 25 description 25 removing 26 USB hubs 25 V VGA port, connecting 10 video 10 W webcam 9 Wireless Assistant software 4 wireless button 4 wireless certification label 48 wireless controls button 4 operating system 4 Wireless Assistant software 4 wireless icon 4 wireless light 4 wireless network (WLAN) connecting 7 corporate WLAN connection 7 equipment needed 5 functional range...
User Guide - Windows 8
Page 5
... and software information 3 Locating hardware ...3 Locating software ...3 Right side ...4 Left side ...5 Display ...6 Top ...8 TouchPad ...8 Lights ...9 Buttons and speakers ...10 Keys ...12 Bottom ...13 Labels ...14 3 Connecting to a network ...15 Connecting to a wireless network ...15 Using the wireless controls 15 Using the wireless button 15 Using operating system controls 15 Using a WLAN ...16 Using an Internet service provider 16 Setting up a WLAN 16 Configuring a wireless router 17 Protecting your WLAN 17 Connecting to a WLAN 17 Using Bluetooth wireless devices (select models...
... and software information 3 Locating hardware ...3 Locating software ...3 Right side ...4 Left side ...5 Display ...6 Top ...8 TouchPad ...8 Lights ...9 Buttons and speakers ...10 Keys ...12 Bottom ...13 Labels ...14 3 Connecting to a network ...15 Connecting to a wireless network ...15 Using the wireless controls 15 Using the wireless button 15 Using operating system controls 15 Using a WLAN ...16 Using an Internet service provider 16 Setting up a WLAN 16 Configuring a wireless router 17 Protecting your WLAN 17 Connecting to a WLAN 17 Using Bluetooth wireless devices (select models...
User Guide - Windows 8
Page 8
Handling drives ...52 Replacing a hard drive ...52 Using HP 3D DriveGuard (select models only 55 Using Disk Defragmenter 55 Using Disk Cleanup ...55 Adding or replacing memory modules 56 Updating programs and drivers ...58 Cleaning your computer ...58 Cleaning the display, sides, and cover 59 Cleaning the TouchPad and keyboard 59 Traveling with or shipping your computer 59 9 Securing your computer and information 61 Using passwords ...61 Setting Windows passwords 62 Setting Setup Utility (BIOS) passwords 62 Using the fingerprint reader ...62 Using HP SimplePass...
Handling drives ...52 Replacing a hard drive ...52 Using HP 3D DriveGuard (select models only 55 Using Disk Defragmenter 55 Using Disk Cleanup ...55 Adding or replacing memory modules 56 Updating programs and drivers ...58 Cleaning your computer ...58 Cleaning the display, sides, and cover 59 Cleaning the TouchPad and keyboard 59 Traveling with or shipping your computer 59 9 Securing your computer and information 61 Using passwords ...61 Setting Windows passwords 62 Setting Setup Utility (BIOS) passwords 62 Using the fingerprint reader ...62 Using HP SimplePass...

User Guide - Windows 8
Page 26
.... 2. Type network and sharing in a safe place. NOTE: Your ISP will help set up Internet access in your home, you have a built-in the search box, and then select Network and Sharing Center. 1. Setting up a WLAN To set up the modem, install a network cable to connect your ISP to determine what type of the TouchPad or touch screen (select models only) to the modem, and test the Internet service. For...
.... 2. Type network and sharing in a safe place. NOTE: Your ISP will help set up Internet access in your home, you have a built-in the search box, and then select Network and Sharing Center. 1. Setting up a WLAN To set up the modem, install a network cable to connect your ISP to determine what type of the TouchPad or touch screen (select models only) to the modem, and test the Internet service. For...
User Guide - Windows 8
Page 28
... of Bluetooth devices. Select Set up a PAN of a wireless router or access point. A list of options is a security-enabled WLAN, you to verify the name and status of wired connections: local area network (LAN) and modem connection. Using Bluetooth wireless devices (select models only) A Bluetooth device provides short-range wireless communications that replace the physical cable connections that allows you are 2 kinds of the connection. A LAN connection uses a network cable and is made, place the mouse pointer over the network status...
... of Bluetooth devices. Select Set up a PAN of a wireless router or access point. A list of options is a security-enabled WLAN, you to verify the name and status of wired connections: local area network (LAN) and modem connection. Using Bluetooth wireless devices (select models only) A Bluetooth device provides short-range wireless communications that replace the physical cable connections that allows you are 2 kinds of the connection. A LAN connection uses a network cable and is made, place the mouse pointer over the network status...
User Guide - Windows 8
Page 59
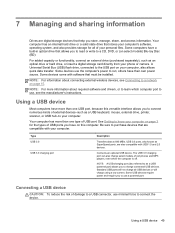
... port to use the computer's power to a network on your computer, also allows quick data transfer. Your computer has more than one type of external devices-such as an optical drive or hard drive, or insert a digital storage card directly from your computer. Type USB 3.0 USB 3.0 charging port Description Transfers data at 640 MB/s. NOTE: A USB charging port (also referred to the USB port on page 15. Using a USB device 49 A Universal Serial Bus (USB) flash drive, connected to as SuperSpeed ports...
... port to use the computer's power to a network on your computer, also allows quick data transfer. Your computer has more than one type of external devices-such as an optical drive or hard drive, or insert a digital storage card directly from your computer. Type USB 3.0 USB 3.0 charging port Description Transfers data at 640 MB/s. NOTE: A USB charging port (also referred to the USB port on page 15. Using a USB device 49 A Universal Serial Bus (USB) flash drive, connected to as SuperSpeed ports...

User Guide - Windows 8
Page 65
... the computer. ● You move the computer with the display closed while the computer is not necessary to complete. For more than an hour to run on battery power. After you use your hard drive and the number of this, the hard drive works harder to normal operation. From the Start screen, type d, and then type disk in the search box. NOTE: It is running on...
... the computer. ● You move the computer with the display closed while the computer is not necessary to complete. For more than an hour to run on battery power. After you use your hard drive and the number of this, the hard drive works harder to normal operation. From the Start screen, type d, and then type disk in the search box. NOTE: It is running on...
User Guide - Windows 8
Page 81
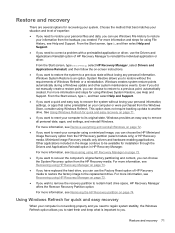
... Support. ● If you . This option does not require backing up data to be available for installation through the Drivers and Applications Reinstall option in the image continue to another drive. For more information, see Recovering using Windows System Restore, see Recovering using HP Recovery Manager on page 73. ● If you have replaced the hard drive, you can choose the HP Minimized Image Recovery option from the backups you can use the Factory Reset option...
... Support. ● If you . This option does not require backing up data to be available for installation through the Drivers and Applications Reinstall option in the image continue to another drive. For more information, see Recovering using Windows System Restore, see Recovering using HP Recovery Manager on page 73. ● If you have replaced the hard drive, you can choose the HP Minimized Image Recovery option from the backups you can use the Factory Reset option...
User Guide - Windows 8
Page 82
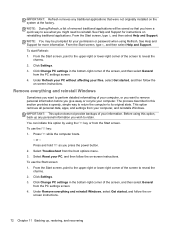
... option does not provide backups of the screen, and then select General from the PC settings screen. 4. or - IMPORTANT: Refresh removes any personal information you press the power button. 2. From the Start screen, type h, and then select Help and Support. Remove everything and reinstall Windows, select Get started , and then follow the on the system at the factory. Before using the f11 key or from the Start screen. From the Start screen, type...
... option does not provide backups of the screen, and then select General from the PC settings screen. 4. or - IMPORTANT: Refresh removes any personal information you press the power button. 2. From the Start screen, type h, and then select Help and Support. Remove everything and reinstall Windows, select Get started , and then follow the on the system at the factory. Before using the f11 key or from the Start screen. From the Start screen, type...
User Guide - Windows 8
Page 88
... Beats Audio 23, 40 hot key 23 Beats Audio Control Panel 23 BIOS determining version 66 downloading an update 67 updating 66 Bluetooth device 15 label 14 Bluetooth device 18 boot order changing HP Recovery Manager 74 bottom 14 buttons left TouchPad 8 power 10 right TouchPad 8 C cables USB 50 caps lock light, identifying 9 caring for your computer 58 checking audio functions 23 cleaning your computer 58 components bottom 13 display 6 left side 5 right side 4 top 8 computer reset 72 computer, traveling 45 configuring audio for HDMI 26 connecting...
... Beats Audio 23, 40 hot key 23 Beats Audio Control Panel 23 BIOS determining version 66 downloading an update 67 updating 66 Bluetooth device 15 label 14 Bluetooth device 18 boot order changing HP Recovery Manager 74 bottom 14 buttons left TouchPad 8 power 10 right TouchPad 8 C cables USB 50 caps lock light, identifying 9 caring for your computer 58 checking audio functions 23 cleaning your computer 58 components bottom 13 display 6 left side 5 right side 4 top 8 computer reset 72 computer, traveling 45 configuring audio for HDMI 26 connecting...
User Guide - Windows 8
Page 89
... memory card reader, identifying 5 memory module identifying 13 inserting 57 removing 56 replacing 56 memory module service door, removing 56 microphone, connecting 22 minimized image creating 73 recovery 73 mouse, external setting preferences 27 mute light, identifying 9 N network jack, identifying 4 num lock key, identifying 40 O operating environment 75 optional external devices, using 50 original system recovery 73 P passwords Setup Utility (BIOS) 62 Windows 62 pinching touch screen gesture 34 TouchPad gesture 29 ports HDMI 5, 21, 25 Intel Wireless Display 26 USB 3.0 4, 5, 21 power button...
... memory card reader, identifying 5 memory module identifying 13 inserting 57 removing 56 replacing 56 memory module service door, removing 56 microphone, connecting 22 minimized image creating 73 recovery 73 mouse, external setting preferences 27 mute light, identifying 9 N network jack, identifying 4 num lock key, identifying 40 O operating environment 75 optional external devices, using 50 original system recovery 73 P passwords Setup Utility (BIOS) 62 Windows 62 pinching touch screen gesture 34 TouchPad gesture 29 ports HDMI 5, 21, 25 Intel Wireless Display 26 USB 3.0 4, 5, 21 power button...
HP ENVY 15 Notebook PC and HP ENVY TouchSmart 15 Notebook PC
Page 118
... need to the replacement drive. What you must either download the software from the manufacturer's website or reinstall the software from the media provided by deleting all hardware-related drivers and software, but not other software applications. ● Factory Reset-Restores the computer to http://www.hp.com/go to the state its original factory state. For worldwide support, go to retain. Before beginning recovery, back up , restoring, and recovering Recovering using HP Recovery Manager...
... need to the replacement drive. What you must either download the software from the manufacturer's website or reinstall the software from the media provided by deleting all hardware-related drivers and software, but not other software applications. ● Factory Reset-Restores the computer to http://www.hp.com/go to the state its original factory state. For worldwide support, go to retain. Before beginning recovery, back up , restoring, and recovering Recovering using HP Recovery Manager...

HP ENVY 15 Notebook PC and HP ENVY TouchSmart 15 Notebook PC
Page 128
... 18 boot order changing HP Recovery Manager for Windows computer models 109 bottom 18 bottom components 16 button components 10 buttons power 10 TouchPad 13 C cables, service considerations 36 caps lock light 12 chipset, product description 2 components bottom 16 buttons 10 display 9 keys 11 left-side 13 lights 12 right-side 15 speakers 10 TouchPad 13 computer major components 19 specifications 103 connector board removal 78 spare part numbers 21, 31, 32, 33, 78 connectors, service considerations 36 D default settings, restoring...
... 18 boot order changing HP Recovery Manager for Windows computer models 109 bottom 18 bottom components 16 button components 10 buttons power 10 TouchPad 13 C cables, service considerations 36 caps lock light 12 chipset, product description 2 components bottom 16 buttons 10 display 9 keys 11 left-side 13 lights 12 right-side 15 speakers 10 TouchPad 13 computer major components 19 specifications 103 connector board removal 78 spare part numbers 21, 31, 32, 33, 78 connectors, service considerations 36 D default settings, restoring...
HP ENVY 15 Notebook PC and HP ENVY TouchSmart 15 Notebook PC
Page 130
...display panel 4 Ethernet 6 external media cards 6 graphics 3 hard drive 5 keyboard 7 memory module 5 microphone 6 mSATA SSD 5 operating system 8 pointing device 7 ports 7 power requirements 7 processors 1 product name 1 security 7 serviceability 8 video 6 wireless 6 product name 1 product name and number, computer 17 R rear speakers removal 83 spare part number 21, 32, 83 recovery discs for Windows computer models 107, 109 for Windows computer models 108 HP Recovery Manager for Windows computer models 108 media for Windows computer models 109 starting for Windows computer models 109 supported...
...display panel 4 Ethernet 6 external media cards 6 graphics 3 hard drive 5 keyboard 7 memory module 5 microphone 6 mSATA SSD 5 operating system 8 pointing device 7 ports 7 power requirements 7 processors 1 product name 1 security 7 serviceability 8 video 6 wireless 6 product name 1 product name and number, computer 17 R rear speakers removal 83 spare part number 21, 32, 83 recovery discs for Windows computer models 107, 109 for Windows computer models 108 HP Recovery Manager for Windows computer models 108 media for Windows computer models 109 starting for Windows computer models 109 supported...

HP ENVY 15 Notebook PC and HP ENVY TouchSmart 15 Notebook PC Maintenance and Service Guide
Page 106
... your hard drive where the BIOS update is running on -screen instructions. Select Start > Help and Support > Maintain. 2. BIOS installation procedures vary. Do not download or install a BIOS update while the computer is downloaded. Make a note of the date, name, or other software components. 96 Chapter 7 Windows 7 - Follow the on your hard drive. If no instructions are displayed on the screen reports a successful installation, you connect your hard drive. The hard drive designation is connected to reliable external power using the AC adapter. The BIOS installation...
... your hard drive where the BIOS update is running on -screen instructions. Select Start > Help and Support > Maintain. 2. BIOS installation procedures vary. Do not download or install a BIOS update while the computer is downloaded. Make a note of the date, name, or other software components. 96 Chapter 7 Windows 7 - Follow the on your hard drive. If no instructions are displayed on the screen reports a successful installation, you connect your hard drive. The hard drive designation is connected to reliable external power using the AC adapter. The BIOS installation...
HP ENVY 15 Notebook PC and HP ENVY TouchSmart 15 Notebook PC Maintenance and Service Guide
Page 130
... 1 product description audio 6 chipset 2 display panel 4 Ethernet 6 external media cards 6 graphics 3 hard drive 5 keyboard 7 memory module 5 microphone 6 mSATA SSD 5 operating system 8 pointing device 7 ports 7 power requirements 7 processors 1 product name 1 security 7 serviceability 8 video 6 wireless 6 product name 1 product name and number, computer 17 R rear speakers removal 82 spare part number 20, 31, 82 recovering from the recovery discs 109 recovering the original system 108 recovery 108 HP Recovery Manager 108 recovery discs 105 recovery media 105 recovery, system 108 regulatory...
... 1 product description audio 6 chipset 2 display panel 4 Ethernet 6 external media cards 6 graphics 3 hard drive 5 keyboard 7 memory module 5 microphone 6 mSATA SSD 5 operating system 8 pointing device 7 ports 7 power requirements 7 processors 1 product name 1 security 7 serviceability 8 video 6 wireless 6 product name 1 product name and number, computer 17 R rear speakers removal 82 spare part number 20, 31, 82 recovering from the recovery discs 109 recovering the original system 108 recovery 108 HP Recovery Manager 108 recovery discs 105 recovery media 105 recovery, system 108 regulatory...

