
Quick Start Guide
Page 8
Settings are Auto, Red-Eye, Flash On, Flash Off. 7 selector-Switches between Picture Capture and Playback (see Picture Capture and Playback on page 17). 6 HP Photosmart E330 series Digital Camera Camera top and back 12 3 English 4 56 7 8 9 11 10 1 Power light. 2 button. 3 Shutter button. 4 Viewfinder. 5 Delete button-Accesses the Delete function while in Playback. 6 Flash button-Accesses the flash settings while in Picture Capture.
Settings are Auto, Red-Eye, Flash On, Flash Off. 7 selector-Switches between Picture Capture and Playback (see Picture Capture and Playback on page 17). 6 HP Photosmart E330 series Digital Camera Camera top and back 12 3 English 4 56 7 8 9 11 10 1 Power light. 2 button. 3 Shutter button. 4 Viewfinder. 5 Delete button-Accesses the Delete function while in Playback. 6 Flash button-Accesses the flash settings while in Picture Capture.

Quick Start Guide
Page 13
... cards before formatting. 1. Use card. Install the software The HP Photosmart Software provides features for modifying stored images (remove red eyes, rotate, crop, resize, and more information: www.hp.com/support. To learn about Windows Vista support for your computer, as well as stated on the camera packaging. Formatting removes all images from the Delete menu...
... cards before formatting. 1. Use card. Install the software The HP Photosmart Software provides features for modifying stored images (remove red eyes, rotate, crop, resize, and more information: www.hp.com/support. To learn about Windows Vista support for your computer, as well as stated on the camera packaging. Formatting removes all images from the Delete menu...

Quick Start Guide
Page 20
... tips. You can select from or , then select Camera Setup. English • Date & Time Imprint • Camera Setup • Camera Help Playback Menu-Allows you to change the camera's behavior. To access this menu, 18 HP Photosmart E330 series Digital Camera You can select from the following options: • Remove Red Eyes • Rotate • Magnify • View Thumbnails •...
... tips. You can select from or , then select Camera Setup. English • Date & Time Imprint • Camera Setup • Camera Help Playback Menu-Allows you to change the camera's behavior. To access this menu, 18 HP Photosmart E330 series Digital Camera You can select from the following options: • Remove Red Eyes • Rotate • Magnify • View Thumbnails •...

User Guide
Page 3
...software ...6 Using your camera ...7 2 Taking pictures and recording video clips Taking pictures ...8 Recording video clips ...9 Instant Review ...9 Digital zoom ...9 3 Setting options for taking pictures and recording video clips Setting the flash ...10 Flash Setting-Red-Eye ...10 Using the...Playback Menu ...14 Removing red eyes ...15 Magnifying images ...15 Viewing thumbnails ...15 Tagging images as Favorites 15 Viewing slideshows ...16 5 Transferring and printing images Transferring images with HP Photosmart Software 17 Transferring images without HP Photosmart Software 18 Connecting to ...
...software ...6 Using your camera ...7 2 Taking pictures and recording video clips Taking pictures ...8 Recording video clips ...9 Instant Review ...9 Digital zoom ...9 3 Setting options for taking pictures and recording video clips Setting the flash ...10 Flash Setting-Red-Eye ...10 Using the...Playback Menu ...14 Removing red eyes ...15 Magnifying images ...15 Viewing thumbnails ...15 Tagging images as Favorites 15 Viewing slideshows ...16 5 Transferring and printing images Transferring images with HP Photosmart Software 17 Transferring images without HP Photosmart Software 18 Connecting to ...

User Guide
Page 8
...Chapter 1 Install and format an optional memory card This camera supports standard, high speed, and high capacity Secure Digital (SD and SDHC) memory cards, 32MB to format the card. To use . To install the HP Photosmart Software, your computer must meet the system requirements as... software The HP Photosmart Software provides features for modifying stored images (remove red eyes, rotate, crop, resize, and more information: www.hp.com/support. Insert the memory card in internal memory. Always format new memory cards before formatting (see Move Images to your camera with new ...
...Chapter 1 Install and format an optional memory card This camera supports standard, high speed, and high capacity Secure Digital (SD and SDHC) memory cards, 32MB to format the card. To use . To install the HP Photosmart Software, your computer must meet the system requirements as... software The HP Photosmart Software provides features for modifying stored images (remove red eyes, rotate, crop, resize, and more information: www.hp.com/support. Insert the memory card in internal memory. Always format new memory cards before formatting (see Move Images to your camera with new ...

User Guide
Page 12
...subjects beyond the flash range or to highlight the desired flash mode, then press . Flash Setting-Red-Eye The red-eye phenomenon is caused when light from the flash reflects off the camera. The flash setting remains in the final image. 3 Setting options for taking pictures and recording video... the image. For information about red-eye, see "Flash Setting-Red-Eye" on the front of pictures rapidly or take a picture using Burst. Flash Off-The camera does not use this setting, make human eyes appear red in the image. Using RedEye causes the camera to flash quickly up to three...
...subjects beyond the flash range or to highlight the desired flash mode, then press . Flash Setting-Red-Eye The red-eye phenomenon is caused when light from the flash reflects off the camera. The flash setting remains in the final image. 3 Setting options for taking pictures and recording video... the image. For information about red-eye, see "Flash Setting-Red-Eye" on the front of pictures rapidly or take a picture using Burst. Flash Off-The camera does not use this setting, make human eyes appear red in the image. Using RedEye causes the camera to flash quickly up to three...
User Guide
Page 16
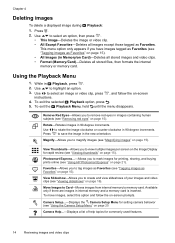
Use to magnify images (see "Using HP Photosmart Express" on page 15). Use to memory card. To exit...clip. • All Except Favorites-Deletes all stored files, then formats the internal memory or memory card. Photosmart Express...-Allows you to tag images as Favorites (see "Viewing thumbnails" on page 15). Move Images to ... Display for commonly used features. 14 Reviewing images and video clips Camera Setup...-Displays the Camera Setup Menu for setting camera behavior (see "Removing red eyes" on page 25 Camera Help...-Displays a list of your images and video clips (see ...
Use to magnify images (see "Using HP Photosmart Express" on page 15). Use to memory card. To exit...clip. • All Except Favorites-Deletes all stored files, then formats the internal memory or memory card. Photosmart Express...-Allows you to tag images as Favorites (see "Viewing thumbnails" on page 15). Move Images to ... Display for commonly used features. 14 Reviewing images and video clips Camera Setup...-Displays the Camera Setup Menu for setting camera behavior (see "Removing red eyes" on page 25 Camera Help...-Displays a list of your images and video clips (see ...

User Guide
Page 17
.... Press to return to 4x. 2. Using the Playback Menu 15 The currently displayed image is for viewing purposes only; Remove Red Eyes is only available for pictures taken with the changes and returns to view the highlighted image on page 10. Use and to remove... tagged as Favorites for printing or viewing as a group. Tagging images as Favorites Tagging an image as a Favorite allows you select Remove Red Eyes, the camera processes the current picture to pan around the magnified image. 3. From the Playback Menu, select Magnify. it does not permanently alter the image....
.... Press to return to 4x. 2. Using the Playback Menu 15 The currently displayed image is for viewing purposes only; Remove Red Eyes is only available for pictures taken with the changes and returns to view the highlighted image on page 10. Use and to remove... tagged as Favorites for printing or viewing as a group. Tagging images as Favorites Tagging an image as a Favorite allows you select Remove Red Eyes, the camera processes the current picture to pan around the magnified image. 3. From the Playback Menu, select Magnify. it does not permanently alter the image....
User Guide
Page 40
...& Time Imprint 12 Delete button 3 digital zoom 9 dimensions 37 direct print 19 Display Brightness 25 E e-mail images 23 F Favorites 15 38 flash red-eye reduction 10 setting 10 Flash button 3 focal length 36 format memory card 6 G getting assistance 32 H HP Photosmart Express 21 HP Photosmart Software 6 I Image Display 3 Image... 11 Language 5, 25 M magnifying images 15 memory capacity 37 card 6, 8, 36 card door 4 Menu/OK button 3 menus Camera Setup 25 Photosmart Express 21 Picture Capture 11 Playback 14 Move Images to Card 14 N Night Portrait mode 11 number of pictures 37 pictures remaining ...
...& Time Imprint 12 Delete button 3 digital zoom 9 dimensions 37 direct print 19 Display Brightness 25 E e-mail images 23 F Favorites 15 38 flash red-eye reduction 10 setting 10 Flash button 3 focal length 36 format memory card 6 G getting assistance 32 H HP Photosmart Express 21 HP Photosmart Software 6 I Image Display 3 Image... 11 Language 5, 25 M magnifying images 15 memory capacity 37 card 6, 8, 36 card door 4 Menu/OK button 3 menus Camera Setup 25 Photosmart Express 21 Picture Capture 11 Playback 14 Move Images to Card 14 N Night Portrait mode 11 number of pictures 37 pictures remaining ...