
Bluetooth Wireless Technology Basics
Page 2
... personal digital assistants (PDAs), cameras, and printers. Although infrared communication existed at Ericsson in 1998 to establish Bluetooth connections using HP products. These BWT-enabled products are sitting, with everyone in a wireless personal area network (WPAN). This paper provides an ... members of the Bluetooth SIG are Ericsson, Intel, IBM, Nokia, and Toshiba. Therefore, Ericsson chose to use an inexpensive, low-power radio built into a radio technology that incorporate BWT. If you can work on your office, don't fret. Bluetooth wireless technology is...
... personal digital assistants (PDAs), cameras, and printers. Although infrared communication existed at Ericsson in 1998 to establish Bluetooth connections using HP products. These BWT-enabled products are sitting, with everyone in a wireless personal area network (WPAN). This paper provides an ... members of the Bluetooth SIG are Ericsson, Intel, IBM, Nokia, and Toshiba. Therefore, Ericsson chose to use an inexpensive, low-power radio built into a radio technology that incorporate BWT. If you can work on your office, don't fret. Bluetooth wireless technology is...
Bluetooth Wireless Technology Basics
Page 10
...My Bluetooth Places, and then select Unpair Device from the shortcut menu. To unpair a device, rightclick the device icon in the unrestricted 2.4-GHz ISM band, numerous manufacturers can manually pair your world and change forever the way you pair two devices, they connect (a password, or...Bluetooth Places and selecting Pair Device from the shortcut menu. Pairing Pairing is stopped. • One or both of the devices is not powered on. • A service connection is interrupted or the service is a bonding procedure that cannot be successfully exchanged). Paired devices exchange ...
...My Bluetooth Places, and then select Unpair Device from the shortcut menu. To unpair a device, rightclick the device icon in the unrestricted 2.4-GHz ISM band, numerous manufacturers can manually pair your world and change forever the way you pair two devices, they connect (a password, or...Bluetooth Places and selecting Pair Device from the shortcut menu. Pairing Pairing is stopped. • One or both of the devices is not powered on. • A service connection is interrupted or the service is a bonding procedure that cannot be successfully exchanged). Paired devices exchange ...

Backup and Recovery - Windows Vista
Page 6
...RW, and BD-RE (rewritable Blu-ray) discs, are not compatible with the Recovery Manager software. ● The computer must be connected to AC power during this process. ● Only one set of recovery discs can be required, whereas only a few DVDs or BDs are required. 2 Creating recovery ...computer does not include an internal optical drive, you can use CDs, up the computer for the first time. NOTE: If your computer from the HP Web site. The next time you open Recovery Manager, you are purchased separately. NOTE: If you will need high-quality DVD-R, double-layer DVD...
...RW, and BD-RE (rewritable Blu-ray) discs, are not compatible with the Recovery Manager software. ● The computer must be connected to AC power during this process. ● Only one set of recovery discs can be required, whereas only a few DVDs or BDs are required. 2 Creating recovery ...computer does not include an internal optical drive, you can use CDs, up the computer for the first time. NOTE: If your computer from the HP Web site. The next time you open Recovery Manager, you are purchased separately. NOTE: If you will need high-quality DVD-R, double-layer DVD...
Backup and Recovery - Windows Vista
Page 8
...keep them in case of recovery discs: 1. Click Advanced Options. Click Recovery disc creation, and then click Next. 4. Follow the on battery power, you will need high quality CD-R, DVD-R, DVD-R with double-layer support, DVD+R, or DVD+R with the Recovery Manager software. ●...on -screen instructions. 2 Recovering system information Note the following guidelines before creating recovery discs: ● You will be prompted to AC power during this process. ● Only one set of system instability or failure. Creating recovery discs After setting up (boot) the computer and...
...keep them in case of recovery discs: 1. Click Advanced Options. Click Recovery disc creation, and then click Next. 4. Follow the on battery power, you will need high quality CD-R, DVD-R, DVD-R with double-layer support, DVD+R, or DVD+R with the Recovery Manager software. ●...on -screen instructions. 2 Recovering system information Note the following guidelines before creating recovery discs: ● You will be prompted to AC power during this process. ● Only one set of system instability or failure. Creating recovery discs After setting up (boot) the computer and...
Drives - Windows Vista
Page 5
Table of contents 1 Identifying installed drives 2 Handling drives 3 Using an optical drive Inserting an optical disc ...5 Removing an optical disc when running on battery or external power 6 Removing an optical disc when no computer power is available 7 4 Improving hard drive performance Using Disk Defragmenter ...8 Using Disk Cleanup ...8 5 Replacing the hard drive Index ...12 v
Table of contents 1 Identifying installed drives 2 Handling drives 3 Using an optical drive Inserting an optical disc ...5 Removing an optical disc when running on battery or external power 6 Removing an optical disc when no computer power is available 7 4 Improving hard drive performance Using Disk Defragmenter ...8 Using Disk Cleanup ...8 5 Replacing the hard drive Index ...12 v
Drives - Windows Vista
Page 8
Do not use x-rays instead of power, be sure that must be handled with care. Do not type on luggage, such as conveyor belts, use excessive force when inserting a drive into a drive ...
Do not use x-rays instead of power, be sure that must be handled with care. Do not type on luggage, such as conveyor belts, use excessive force when inserting a drive into a drive ...
Drives - Windows Vista
Page 12
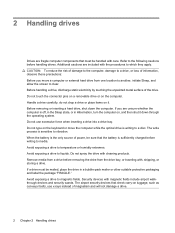
Hold the disc by gently pressing down on the spindle while lifting the outer edges of the disc. NOTE: If the tray is not fully accessible, tilt the disc carefully as you remove it stops. 2. Close the media tray and place the disc in a protective case. 6 Chapter 3 Using an optical drive Removing an optical disc when running on the drive bezel to release the media tray, and then gently pull out the tray (2) until it . 3. Press the release button (1) on battery or external power 1. Remove the disc (3) from the tray by the edges and avoid touching the flat surfaces.
Hold the disc by gently pressing down on the spindle while lifting the outer edges of the disc. NOTE: If the tray is not fully accessible, tilt the disc carefully as you remove it stops. 2. Close the media tray and place the disc in a protective case. 6 Chapter 3 Using an optical drive Removing an optical disc when running on the drive bezel to release the media tray, and then gently pull out the tray (2) until it . 3. Press the release button (1) on battery or external power 1. Remove the disc (3) from the tray by the edges and avoid touching the flat surfaces.
Drives - Windows Vista
Page 13
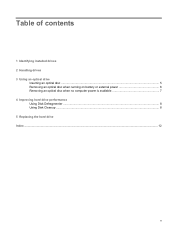
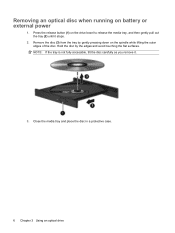
NOTE: If the tray is not fully accessible, tilt the disc carefully as you remove it stops. 3. Removing an optical disc when no computer power is available 1. Insert the end of a paper clip (1) into the release access in the front bezel of the disc. Press in a protective case. Hold the ... down on the paper clip until the tray is released, and then pull out the tray (2) until it . 4. Removing an optical disc when no computer power is available 7 Remove the disc (3) from the tray by the edges and avoid touching the flat surfaces. Close the media tray and place the disc...
NOTE: If the tray is not fully accessible, tilt the disc carefully as you remove it stops. 3. Removing an optical disc when no computer power is available 1. Insert the end of a paper clip (1) into the release access in the front bezel of the disc. Press in a protective case. Hold the ... down on the paper clip until the tray is released, and then pull out the tray (2) until it . 4. Removing an optical disc when no computer power is available 7 Remove the disc (3) from the tray by the edges and avoid touching the flat surfaces. Close the media tray and place the disc...
Drives - Windows Vista
Page 15
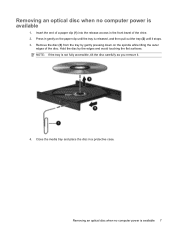
... inside of the hard drive compartment. If you are not sure whether the computer is marked with the number 2 on by pressing the power button. Turn the computer upside down the computer through the operating system. If your work. 2. To remove the hard drive: 1. Disconnect... all external devices connected to the computer. 4. Unplug the power cord from the illustrations in Hibernation. 5 Replacing the hard drive NOTE: Your computer may contain a second hard drive. A secondary hard drive bay ...
... inside of the hard drive compartment. If you are not sure whether the computer is marked with the number 2 on by pressing the power button. Turn the computer upside down the computer through the operating system. If your work. 2. To remove the hard drive: 1. Disconnect... all external devices connected to the computer. 4. Unplug the power cord from the illustrations in Hibernation. 5 Replacing the hard drive NOTE: Your computer may contain a second hard drive. A secondary hard drive bay ...
Drives - Windows Vista
Page 18
... 8 disk performance 8 drives caring for 2 hard drive 9, 11 optical drive 3 See also hard drive; optical drive DVD inserting 5 removing, with power 6 removing, without power 7 DVD drive 3 O optical disc inserting 5 removing, with power 6 removing, without power 7 optical drive 3 S software Disk Cleanup 8 Disk Defragmenter 8 H hard disk drive installing 11 removing 9 replacing 9 hard drive installing 11 removing...
... 8 disk performance 8 drives caring for 2 hard drive 9, 11 optical drive 3 See also hard drive; optical drive DVD inserting 5 removing, with power 6 removing, without power 7 DVD drive 3 O optical disc inserting 5 removing, with power 6 removing, without power 7 optical drive 3 S software Disk Cleanup 8 Disk Defragmenter 8 H hard disk drive installing 11 removing 9 replacing 9 hard drive installing 11 removing...
External Media Cards - Windows Vista
Page 11
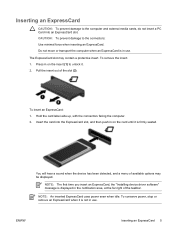
...the card into an ExpressCard slot. To remove the insert: 1. Pull the insert out of available options may contain a protective insert. To conserve power, stop or remove an ExpressCard when it . 2. To insert an ExpressCard: 1. You will hear a sound when the device has been detected,... and a menu of the slot (2). NOTE: An inserted ExpressCard uses power even when idle. Press in on the card until it is firmly seated. ENWW Inserting an ExpressCard 5 Inserting an ExpressCard CAUTION: To prevent damage ...
...the card into an ExpressCard slot. To remove the insert: 1. Pull the insert out of available options may contain a protective insert. To conserve power, stop or remove an ExpressCard when it . 2. To insert an ExpressCard: 1. You will hear a sound when the device has been detected,... and a menu of the slot (2). NOTE: An inserted ExpressCard uses power even when idle. Press in on the card until it is firmly seated. ENWW Inserting an ExpressCard 5 Inserting an ExpressCard CAUTION: To prevent damage ...

Memory Modules - Windows Vista
Page 7
...or replace a memory module: 1. Replacing a memory module The computer has one memory module compartment, which is located on by pressing the power button. The memory capacity of static electricity by upgrading the existing memory module in the memory module slot. CAUTION: Electrostatic discharge (ESD) ... components. Save your work and close all external devices connected to the computer. 5. To reduce the risk of the computer. Unplug the power cord from the computer. 8. NOTE: To use a dual-channel configuration when adding a second memory module, be increased by touching a ...
...or replace a memory module: 1. Replacing a memory module The computer has one memory module compartment, which is located on by pressing the power button. The memory capacity of static electricity by upgrading the existing memory module in the memory module slot. CAUTION: Electrostatic discharge (ESD) ... components. Save your work and close all external devices connected to the computer. 5. To reduce the risk of the computer. Unplug the power cord from the computer. 8. NOTE: To use a dual-channel configuration when adding a second memory module, be increased by touching a ...

Memory Modules - Windows Vista
Page 10
Reconnect external power and external devices. 17. Turn on the computer. 4 Replacing a memory module ENWW 16.
Reconnect external power and external devices. 17. Turn on the computer. 4 Replacing a memory module ENWW 16.

Security - Windows Vista
Page 5
... computer 2 Using passwords Setting passwords in Windows ...3 Setting passwords in Setup Utility ...3 Administrator password ...3 Managing an administrator password 4 Entering an administrator password 4 Power-on password ...4 Managing a power-on password 4 Entering a power-on password 5 3 Using antivirus software 4 Using firewall software 5 Installing critical security updates 6 Installing an optional security cable 7 Using the fingerprint reader (select...
... computer 2 Using passwords Setting passwords in Windows ...3 Setting passwords in Setup Utility ...3 Administrator password ...3 Managing an administrator password 4 Entering an administrator password 4 Power-on password ...4 Managing a power-on password 4 Entering a power-on password 5 3 Using antivirus software 4 Using firewall software 5 Installing critical security updates 6 Installing an optional security cable 7 Using the fingerprint reader (select...

Security - Windows Vista
Page 7
Follow the procedures in this guide to use of the computer ● QuickLock ● Power-on password Computer viruses Unauthorized access to data Norton Internet Security software ● Firewall software ● Windows updates Unauthorized access to Setup Utility, BIOS settings, ...
Follow the procedures in this guide to use of the computer ● QuickLock ● Power-on password Computer viruses Unauthorized access to data Norton Internet Security software ● Firewall software ● Windows updates Unauthorized access to Setup Utility, BIOS settings, ...

Security - Windows Vista
Page 9
... to the computer contents. ● After this password is set, you must enter it must be used to a Windows user account. Power-on password* CAUTION: If you forget your power-on password, you cannot turn on or restart the computer, or exit Hibernation. *For details about each time you access Setup Utility...
... to the computer contents. ● After this password is set, you must enter it must be used to a Windows user account. Power-on password* CAUTION: If you forget your power-on password, you cannot turn on or restart the computer, or exit Hibernation. *For details about each time you access Setup Utility...
Security - Windows Vista
Page 10
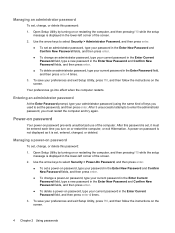
...screen. 4 Chapter 2 Using passwords Your preferences go into effect when the computer restarts. After this password: 1. Use the arrow keys to set a power-on password, type your password in the Enter New Password and Confirm New Password fields, and then press enter. ● To change , or ...delete this password is set , change a power-on the screen. Power-on password Your power-on or restarting the computer, and then pressing f10 while the setup message is displayed in the Enter Current Password field, ...
...screen. 4 Chapter 2 Using passwords Your preferences go into effect when the computer restarts. After this password: 1. Use the arrow keys to set a power-on password, type your password in the Enter New Password and Confirm New Password fields, and then press enter. ● To change , or ...delete this password is set , change a power-on the screen. Power-on password Your power-on or restarting the computer, and then pressing f10 while the setup message is displayed in the Enter Current Password field, ...

Security - Windows Vista
Page 11
Setting passwords in Setup Utility 5 After 3 unsuccessful attempts to set the password), and then press enter. Entering a power-on password At the Enter Password prompt, type your password (using the same keys you used to enter the password, you must restart the computer and try again. Your preferences go into effect when the computer restarts.
Setting passwords in Setup Utility 5 After 3 unsuccessful attempts to set the password), and then press enter. Entering a power-on password At the Enter Password prompt, type your password (using the same keys you used to enter the password, you must restart the computer and try again. Your preferences go into effect when the computer restarts.

Security - Windows Vista
Page 20
... password 5 entering an administrator password 4 F fingerprint reader 10 fingerprint reader location 11 firewall software 7 M managing a power-on password 4 managing an administrator password 4 P passwords administrator 3 power-on 4 set in Setup Utility 3 set in Windows 3 power-on password entering 5 managing 4 Q QuickLock 3 R registering fingerprints 12 S security features 1 passwords 2 security cable 9 Setup Utility passwords set in 3 software...
... password 5 entering an administrator password 4 F fingerprint reader 10 fingerprint reader location 11 firewall software 7 M managing a power-on password 4 managing an administrator password 4 P passwords administrator 3 power-on 4 set in Setup Utility 3 set in Windows 3 power-on password entering 5 managing 4 Q QuickLock 3 R registering fingerprints 12 S security features 1 passwords 2 security cable 9 Setup Utility passwords set in 3 software...

Setup Utility - Windows Vista
Page 9
... overview of the Setup Utility menu items listed in this chapter may not be supported by your computer. Main menu 5 Security menu Select Administrator password Power-On Password To Do This Enter, change the system time and date. ● View identification information about the computer. ● View specification information about the... version (select models only). Main menu Select System information To Do This ● View and change , or delete an administrator password. Enter, change, or delete a power-on password. NOTE: Some of Setup Utility options.
... overview of the Setup Utility menu items listed in this chapter may not be supported by your computer. Main menu 5 Security menu Select Administrator password Power-On Password To Do This Enter, change the system time and date. ● View identification information about the computer. ● View specification information about the... version (select models only). Main menu Select System information To Do This ● View and change , or delete an administrator password. Enter, change, or delete a power-on password. NOTE: Some of Setup Utility options.


