Service Guide
Page 6
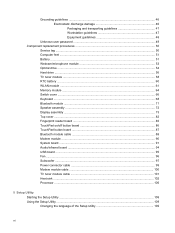
... 47 Equipment guidelines 48 Unknown user password 49 Component replacement procedures 50 Service tag ...50 Computer feet ...51 Battery ...51 Webcam/microphone module 53 Optical drive ...54 Hard drive ...56 TV tuner module ...58 RTC battery ...60 WLAN module ...61 Memory module ...64 Switch cover ...66 Keyboard ...68 Bluetooth module ...71 Speaker assembly...
... 47 Equipment guidelines 48 Unknown user password 49 Component replacement procedures 50 Service tag ...50 Computer feet ...51 Battery ...51 Webcam/microphone module 53 Optical drive ...54 Hard drive ...56 TV tuner module ...58 RTC battery ...60 WLAN module ...61 Memory module ...64 Switch cover ...66 Keyboard ...68 Bluetooth module ...71 Speaker assembly...

Service Guide
Page 7
... menu 111 Diagnostics menu ...112 6 Specifications Computer specifications ...113 17.0-inch, SXGA+ display specifications 114 17.0-inch WXGA display specifications 115 Hard drive specifications ...116 Blu-ray Disc ROM Drive with SuperMulti DVD±R/RW Double-Layer 117 DVD±RW and CD-RW SuperMulti Double-Layer Combo... Drive specifications 118 System DMA specifications, AMD ...119 System DMA specifications, Intel ...119 System interrupt specifications, AMD with graphics subsystems with ...
... menu 111 Diagnostics menu ...112 6 Specifications Computer specifications ...113 17.0-inch, SXGA+ display specifications 114 17.0-inch WXGA display specifications 115 Hard drive specifications ...116 Blu-ray Disc ROM Drive with SuperMulti DVD±R/RW Double-Layer 117 DVD±RW and CD-RW SuperMulti Double-Layer Combo... Drive specifications 118 System DMA specifications, AMD ...119 System DMA specifications, Intel ...119 System interrupt specifications, AMD with graphics subsystems with ...
Service Guide
Page 11
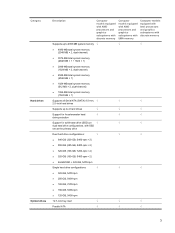
...; √ √ 2.5-inch hard drives Supports up to 2 hard drives √ √ √ Support for Accelerometer hard √ √ √ drive protection Support for solid-state drive (SSD) on √ √ √ dual hard drive configurations, with SSD set as the primary drive Dual hard drive configurations: √ √ &#...rpm × 2) ● 320-GB (160-GB, 5400-rpm × 2) ● 64-GB SSD + 320-GB, 5400-rpm Single hard drive configurations: √ √ √ ● 320-GB, 5400-rpm ● 250-GB, 5400-rpm ● 160-GB, 7200-rpm...
...; √ √ 2.5-inch hard drives Supports up to 2 hard drives √ √ √ Support for Accelerometer hard √ √ √ drive protection Support for solid-state drive (SSD) on √ √ √ dual hard drive configurations, with SSD set as the primary drive Dual hard drive configurations: √ √ &#...rpm × 2) ● 320-GB (160-GB, 5400-rpm × 2) ● 64-GB SSD + 320-GB, 5400-rpm Single hard drive configurations: √ √ √ ● 320-GB, 5400-rpm ● 250-GB, 5400-rpm ● 160-GB, 7200-rpm...
Service Guide
Page 14
... (32 bit) √ √ √ Windows Vista Ultimate (64 bit) √ √ √ Serviceability AC adapter √ √ √ Battery (system) √ √ √ Hard drives (2) √ √ √ Memory module √ √ √ Optical drive √ √ √ TV tuner module √ √ √ WLAN module √ √ √ 6 Chapter 1 Product description
... (32 bit) √ √ √ Windows Vista Ultimate (64 bit) √ √ √ Serviceability AC adapter √ √ √ Battery (system) √ √ √ Hard drives (2) √ √ √ Memory module √ √ √ Optical drive √ √ √ TV tuner module √ √ √ WLAN module √ √ √ 6 Chapter 1 Product description
Service Guide
Page 21
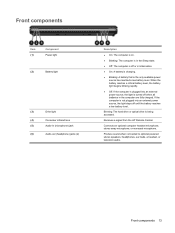
...HP Remote Control. Produce sound when connected to optional powered stereo speakers, headphones, ear buds, a headset, or television audio. Front components 13 Connects an optional computer headset microphone, stereo array microphone, or monaural microphone. Blinking: The hard drive or optical drive... is being accessed. Front components Item (1) Component Power light (2) Battery light (3) Drive light (4) Consumer infrared lens (5) Audio-in (microphone) jack (6)...
...HP Remote Control. Produce sound when connected to optional powered stereo speakers, headphones, ear buds, a headset, or television audio. Front components 13 Connects an optional computer headset microphone, stereo array microphone, or monaural microphone. Blinking: The hard drive or optical drive... is being accessed. Front components Item (1) Component Power light (2) Battery light (3) Drive light (4) Consumer infrared lens (5) Audio-in (microphone) jack (6)...
Service Guide
Page 23
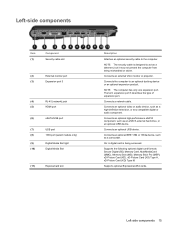
... 3 describes the type of expansion port. Connects the computer to the computer. Connects an optional IEEE 1394 or 1394a device, such as an eSATA external hard drive, or an optional USB device. Supports the following optional digital card formats: Secure Digital (SD) Memory Card, MultiMediaCard (MMC), Memory Stick (MS), Memory Stick Pro...
... 3 describes the type of expansion port. Connects the computer to the computer. Connects an optional IEEE 1394 or 1394a device, such as an eSATA external hard drive, or an optional USB device. Supports the following optional digital card formats: Secure Digital (SD) Memory Card, MultiMediaCard (MMC), Memory Stick (MS), Memory Stick Pro...
Service Guide
Page 24
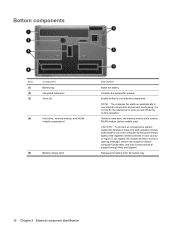
Enable airflow to restore computer functionality, and then contact technical support through Help and Support. Holds the hard drive, the memory module slots, and the WLAN module (select models only). CAUTION: To prevent an unresponsive system,... agency that regulates wireless devices in your country or region. Bottom components Item (1) (2) (3) Component Battery bay Integrated subwoofer Vents (5) (4) Hard drive, memory module, and WLAN module compartment (5) Battery release latch Description Holds the battery. Contains the subwoofer speaker. Releases the battery from the...
Enable airflow to restore computer functionality, and then contact technical support through Help and Support. Holds the hard drive, the memory module slots, and the WLAN module (select models only). CAUTION: To prevent an unresponsive system,... agency that regulates wireless devices in your country or region. Bottom components Item (1) (2) (3) Component Battery bay Integrated subwoofer Vents (5) (4) Hard drive, memory module, and WLAN module compartment (5) Battery release latch Description Holds the battery. Contains the subwoofer speaker. Releases the battery from the...
Service Guide
Page 34
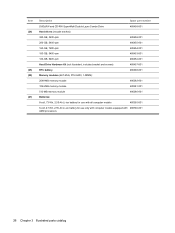
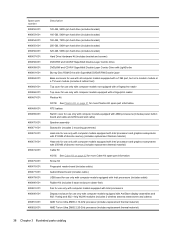
Item (24) (25) (26) (27) Description Spare part number DVD±RW and CD-RW SuperMulti Double-Layer Combo Drive 480458-001 Hard drives (include bracket): 320-GB, 5400-rpm 480456-001 250-GB, 5400-rpm 480455-001 160-GB, 7200-rpm 480454-001 160-GB, 5400-rpm 480453-...001 120-GB, 5400-rpm 480452-001 Hard Drive Hardware Kit (not illustrated, includes bracket and screws) 480457-001 RTC battery 480468-001 Memory modules (667-MHz, PC2-6400, 1-DIMM): 2048-MB memory module...
Item (24) (25) (26) (27) Description Spare part number DVD±RW and CD-RW SuperMulti Double-Layer Combo Drive 480458-001 Hard drives (include bracket): 320-GB, 5400-rpm 480456-001 250-GB, 5400-rpm 480455-001 160-GB, 7200-rpm 480454-001 160-GB, 5400-rpm 480453-...001 120-GB, 5400-rpm 480452-001 Hard Drive Hardware Kit (not illustrated, includes bracket and screws) 480457-001 RTC battery 480468-001 Memory modules (667-MHz, PC2-6400, 1-DIMM): 2048-MB memory module...
Service Guide
Page 41
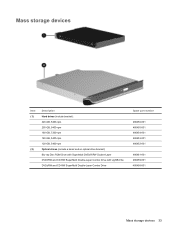
Mass storage devices Item (1) (2) Description Hard drives (include bracket): 320-GB, 5400-rpm 250-GB, 5400-rpm 160-GB, 7200-rpm 160-GB, 5400-rpm 120-GB, 5400-rpm Optical drives (include a bezel and an optical drive bracket): Blu-ray Disc ROM Drive with SuperMulti DVD±R/RW Double-Layer DVD±RW and CD-RW SuperMulti Double-Layer Combo Drive with LightScribe DVD±RW and CD-RW SuperMulti Double-Layer Combo Drive Spare part number 480456-001 480455-001 480454-001 480453-001 480452-001 480461-001 480459-001 480458-001 Mass storage devices 33
Mass storage devices Item (1) (2) Description Hard drives (include bracket): 320-GB, 5400-rpm 250-GB, 5400-rpm 160-GB, 7200-rpm 160-GB, 5400-rpm 120-GB, 5400-rpm Optical drives (include a bezel and an optical drive bracket): Blu-ray Disc ROM Drive with SuperMulti DVD±R/RW Double-Layer DVD±RW and CD-RW SuperMulti Double-Layer Combo Drive with LightScribe DVD±RW and CD-RW SuperMulti Double-Layer Combo Drive Spare part number 480456-001 480455-001 480454-001 480453-001 480452-001 480461-001 480459-001 480458-001 Mass storage devices 33
Service Guide
Page 46
... WLAN modules (includes 2 wireless antenna transceivers and cables) AMD Turion Ultra ZM80 2.10-GHz processor (includes replacement thermal material) AMD Turion Ultra ZM82 2.20-GHz processor (includes replacement thermal material) 38 Chapter 3 Illustrated parts catalog Spare part number 480452-...001 Description 120-GB, 5400-rpm hard drive (includes bracket) 160-GB, 5400-rpm hard drive (includes bracket) 160-GB, 7200-rpm hard drive (includes bracket) 250-GB, 5400-rpm hard drive (includes bracket) 320-GB, 5400-rpm hard drive (includes bracket) Hard Drive Hardware Kit (includes bracket and screws...
... WLAN modules (includes 2 wireless antenna transceivers and cables) AMD Turion Ultra ZM80 2.10-GHz processor (includes replacement thermal material) AMD Turion Ultra ZM82 2.20-GHz processor (includes replacement thermal material) 38 Chapter 3 Illustrated parts catalog Spare part number 480452-...001 Description 120-GB, 5400-rpm hard drive (includes bracket) 160-GB, 5400-rpm hard drive (includes bracket) 160-GB, 7200-rpm hard drive (includes bracket) 250-GB, 5400-rpm hard drive (includes bracket) 320-GB, 5400-rpm hard drive (includes bracket) Hard Drive Hardware Kit (includes bracket and screws...

Service Guide
Page 53
... cannot be caught or snagged by the connector whenever possible. In all cases, avoid bending, twisting, or tearing cables. these precautions: Before removing or inserting a hard drive, shut down through the operating system. Cables must be handled with extreme care; Handle flex cables with extreme care to unseat or seat the cables...
... cannot be caught or snagged by the connector whenever possible. In all cases, avoid bending, twisting, or tearing cables. these precautions: Before removing or inserting a hard drive, shut down through the operating system. Cables must be handled with extreme care; Handle flex cables with extreme care to unseat or seat the cables...
Service Guide
Page 64
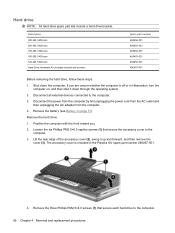
... 480456-001 480455-001 480454-001 480453-001 480452-001 480457-001 Before removing the hard drive, follow these steps: 1. Loosen the six Phillips PM2.5×6.0 captive screws (1) that secure each hard drive to the computer. 56 Chapter 4 Removal and replacement procedures Remove the battery (see Battery... first unplugging the power cord from the AC outlet and then unplugging the AC adapter from the computer. 4. Remove the hard drive: 1. Disconnect all external devices connected to the computer. 3. Remove the three Phillips PM2.5×4.0 screws (1) that secure the accessory cover...
... 480456-001 480455-001 480454-001 480453-001 480452-001 480457-001 Before removing the hard drive, follow these steps: 1. Loosen the six Phillips PM2.5×6.0 captive screws (1) that secure each hard drive to the computer. 56 Chapter 4 Removal and replacement procedures Remove the battery (see Battery... first unplugging the power cord from the AC outlet and then unplugging the AC adapter from the computer. 4. Remove the hard drive: 1. Disconnect all external devices connected to the computer. 3. Remove the three Phillips PM2.5×4.0 screws (1) that secure the accessory cover...
Service Guide
Page 65
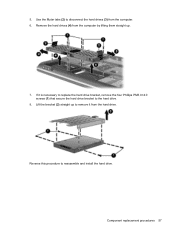
Use the Mylar tabs (2) to disconnect the hard drives (3) from the computer by lifting them straight up to remove it is necessary to replace the hard drive bracket, remove the four Phillips PM3.0×4.0 screws (1) that secure the hard drive bracket to reassemble and install the hard drive. Reverse this procedure to the hard drive. 8. Component replacement procedures 57 If it from the hard drive. Lift the bracket (2) straight up . 7. 5. Remove the hard drives (4) from the computer. 6.
Use the Mylar tabs (2) to disconnect the hard drives (3) from the computer by lifting them straight up to remove it is necessary to replace the hard drive bracket, remove the four Phillips PM3.0×4.0 screws (1) that secure the hard drive bracket to reassemble and install the hard drive. Reverse this procedure to the hard drive. 8. Component replacement procedures 57 If it from the hard drive. Lift the bracket (2) straight up . 7. 5. Remove the hard drives (4) from the computer. 6.
Service Guide
Page 66
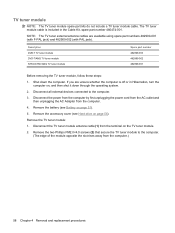
... first unplugging the power cord from the AC outlet and then unplugging the AC Adapter from the terminal on page 51). 5. Remove the battery (see Hard drive on , and then shut it down the computer. Description DVB-T TV tuner module DVD-T/ANG TV tuner module NTSC/ATSC/ANG TV tuner module Spare...
... first unplugging the power cord from the AC outlet and then unplugging the AC Adapter from the terminal on page 51). 5. Remove the battery (see Hard drive on , and then shut it down the computer. Description DVB-T TV tuner module DVD-T/ANG TV tuner module NTSC/ATSC/ANG TV tuner module Spare...
Service Guide
Page 68
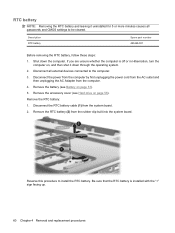
... installed with the "+" sign facing up. 60 Chapter 4 Removal and replacement procedures Disconnect all passwords and CMOS settings to be cleared. Remove the battery (see Hard drive on page 56). Disconnect the power from the computer by first unplugging the power cord from the AC outlet and then unplugging the AC Adapter...
... installed with the "+" sign facing up. 60 Chapter 4 Removal and replacement procedures Disconnect all passwords and CMOS settings to be cleared. Remove the battery (see Hard drive on page 56). Disconnect the power from the computer by first unplugging the power cord from the AC outlet and then unplugging the AC Adapter...
Service Guide
Page 71
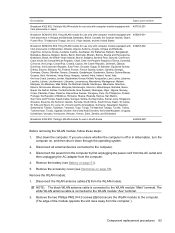
... computer by first unplugging the power cord from the AC outlet and then unplugging the AC adapter from the WLAN module. Remove the battery (see Hard drive on page 56). NOTE: The black WLAN antenna cable is connected to the computer. (The edge of Moldova, Romania, Russia, Rwanda, Samoa, San Marino, Sao...
... computer by first unplugging the power cord from the AC outlet and then unplugging the AC adapter from the WLAN module. Remove the battery (see Hard drive on page 56). NOTE: The black WLAN antenna cable is connected to the computer. (The edge of Moldova, Romania, Russia, Rwanda, Samoa, San Marino, Sao...
Service Guide
Page 72
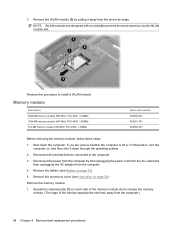
... opposite the slot rises away from the slot at an angle. Remove the memory module: 1. Shut down through the operating system. 2. Remove the battery (see Hard drive on page 51). 5. Spread the retaining tabs (1) on , and then shut it away from the computer.) 64 Chapter 4 Removal and replacement procedures Disconnect the power...
... opposite the slot rises away from the slot at an angle. Remove the memory module: 1. Shut down through the operating system. 2. Remove the battery (see Hard drive on page 51). 5. Spread the retaining tabs (1) on , and then shut it away from the computer.) 64 Chapter 4 Removal and replacement procedures Disconnect the power...

Service Guide
Page 76
... use only with computer models equipped with all external devices connected to the computer. 3. Shut down through the operating system. 2. Remove the accessory cover (see Hard drive on , and then shut it down the computer. Disconnect the power from the computer by first unplugging the power cord from the AC outlet and...
... use only with computer models equipped with all external devices connected to the computer. 3. Shut down through the operating system. 2. Remove the accessory cover (see Hard drive on , and then shut it down the computer. Disconnect the power from the computer by first unplugging the power cord from the AC outlet and...

Service Guide
Page 90
...adapter from the computer. 4. Remove the four Phillips PM2.5×13.0 screws that secure the top cover to the computer. 3. Hard drive (see Optical drive on page 54) c. Shut down the computer. Disconnect all external devices connected to the computer. 82 Chapter 4 Removal and replacement ...procedures Optical drive (see Hard drive on page 56) b. Switch cover (see Battery on page 51). 5. Turn the computer upside down, with a fingerprint reader Spare...
...adapter from the computer. 4. Remove the four Phillips PM2.5×13.0 screws that secure the top cover to the computer. 3. Hard drive (see Optical drive on page 54) c. Shut down the computer. Disconnect all external devices connected to the computer. 82 Chapter 4 Removal and replacement ...procedures Optical drive (see Hard drive on page 56) b. Switch cover (see Battery on page 51). 5. Turn the computer upside down, with a fingerprint reader Spare...
Service Guide
Page 93
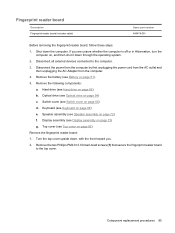
... Top cover on page 66) d. Top cover (see Optical drive on , and then shut it down through the operating system. 2. Remove the following components: a. Shut down , with the front toward you are unsure whether the...215;3.0 broad-head screws (1) that secure the fingerprint reader board to the computer. 3. Keyboard (see Speaker assembly on page 73) g. Hard drive (see Battery on page 51). 5. Remove the battery (see Hard drive on page 68) e. Fingerprint reader board Description Fingerprint reader board (includes cable) Spare part number 480476-001 Before removing the fingerprint...
... Top cover on page 66) d. Top cover (see Optical drive on , and then shut it down through the operating system. 2. Remove the following components: a. Shut down , with the front toward you are unsure whether the...215;3.0 broad-head screws (1) that secure the fingerprint reader board to the computer. 3. Keyboard (see Speaker assembly on page 73) g. Hard drive (see Battery on page 51). 5. Remove the battery (see Hard drive on page 68) e. Fingerprint reader board Description Fingerprint reader board (includes cable) Spare part number 480476-001 Before removing the fingerprint...

