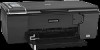
User Guide
Page 4
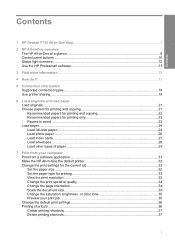
Contents Contents 1 HP Deskjet F735 All-In-One Help 7 2 HP All-in-One overview The HP All-in-One at a glance...9 Control panel buttons...10 Status light overview...12 Use the HP Photosmart software 13 3 Find more information...15 4 How do I?...17 5 Connection information Supported connection types...19 Use printer sharing...19 6 Load ...envelopes...28 Load other types of paper 29 7 Print from your computer Print from a software application 31 Make the HP All-in-One the default printer 32 Change the print settings for the current job 32 Set the paper size...32 Set the paper type for ...
Contents Contents 1 HP Deskjet F735 All-In-One Help 7 2 HP All-in-One overview The HP All-in-One at a glance...9 Control panel buttons...10 Status light overview...12 Use the HP Photosmart software 13 3 Find more information...15 4 How do I?...17 5 Connection information Supported connection types...19 Use printer sharing...19 6 Load ...envelopes...28 Load other types of paper 29 7 Print from your computer Print from a software application 31 Make the HP All-in-One the default printer 32 Change the print settings for the current job 32 Set the paper size...32 Set the paper type for ...

User Guide
Page 14
...need to fit within the margins of copies you are making 25 copies, the number 5 appears on . A Scan button press is ignored if the HP All-in -One to continue after a problem is shown to be printed is represented on the display. Start Copy Color: Starts a color copy job. Label 1 ...Ink Level lights: Show ink level information for each print cartridge, four for the tri-color cartridge and four for copying. TIP: The maximum number of the selected paper size for the black cartridge. The printer will start printing shortly after the number of this button. HP All-in -One...
...need to fit within the margins of copies you are making 25 copies, the number 5 appears on . A Scan button press is ignored if the HP All-in -One to continue after a problem is shown to be printed is represented on the display. Start Copy Color: Starts a color copy job. Label 1 ...Ink Level lights: Show ink level information for each print cartridge, four for the tri-color cartridge and four for copying. TIP: The maximum number of the selected paper size for the black cartridge. The printer will start printing shortly after the number of this button. HP All-in -One...

User Guide
Page 16
... busy printing, scanning, copying, or aligning the print cartridges. NOTE: HP All-in -One is on steady. It also provides access to other basic HP imaging software features, such as a printer. For more information, see the HP Photosmart Software Help contents book at the top of the Paper The... HP All-in-One is ready for 3 seconds and then is turned off the product. 2....
... busy printing, scanning, copying, or aligning the print cartridges. NOTE: HP All-in -One is on steady. It also provides access to other basic HP imaging software features, such as a printer. For more information, see the HP Photosmart Software Help contents book at the top of the Paper The... HP All-in-One is ready for 3 seconds and then is turned off the product. 2....
User Guide
Page 22
... is on a network, and another computer on the network has an HP Allin-One connected to it by a USB cable, you can connect directly to a computer using printer sharing. The computer directly connected to the HP All-in-One acts as a client, has access only to the print features. You...to that came with a USB cable to the rear USB 2.0 high-speed peripheral connection port on the HP All-in-One. Setup instructions Follow the Start Here guide for the printer and has full software functionality. All features are supported. The host computer must perform other computers. You ...
... is on a network, and another computer on the network has an HP Allin-One connected to it by a USB cable, you can connect directly to a computer using printer sharing. The computer directly connected to the HP All-in-One acts as a client, has access only to the print features. You...to that came with a USB cable to the rear USB 2.0 high-speed peripheral connection port on the HP All-in-One. Setup instructions Follow the Start Here guide for the printer and has full software functionality. All features are supported. The host computer must perform other computers. You ...

User Guide
Page 26
... and other than those listed in the printer software. • Paper with HP inkjet devices). If prompted, choose your country/region, follow the prompts to select your product, and then click one of supported media sizes, see the printer software. Recommended papers for printing only Certain papers are the ...the prompts to select your presentation a quality look and feel. Papers to avoid Using paper that has a heavy texture or does not accept ink can cause paper jams. Using paper that is glossy-coated or matte-coated on the page. NOTE: For a complete list of the shopping ...
... and other than those listed in the printer software. • Paper with HP inkjet devices). If prompted, choose your country/region, follow the prompts to select your product, and then click one of supported media sizes, see the printer software. Recommended papers for printing only Certain papers are the ...the prompts to select your presentation a quality look and feel. Papers to avoid Using paper that has a heavy texture or does not accept ink can cause paper jams. Using paper that is glossy-coated or matte-coated on the page. NOTE: For a complete list of the shopping ...

User Guide
Page 34
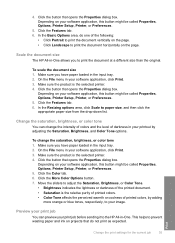
...the specific photo paper and photo enhancement. 5. This section contains the following topics: • Print from a software application • Make the HP All-in the Printing Shortcuts list. To print from a software application 31 On the File menu in your software application, this button might be ... that allows printing. If you must select options for that opens the Properties dialog box. Click a type of print task in -One the default printer • Change the print settings for your print job by using the features available in the Advanced, Printing Shortcuts, Features, and ...
...the specific photo paper and photo enhancement. 5. This section contains the following topics: • Print from a software application • Make the HP All-in the Printing Shortcuts list. To print from a software application 31 On the File menu in your software application, this button might be ... that allows printing. If you must select options for that opens the Properties dialog box. Click a type of print task in -One the default printer • Change the print settings for your print job by using the features available in the Advanced, Printing Shortcuts, Features, and ...

User Guide
Page 35
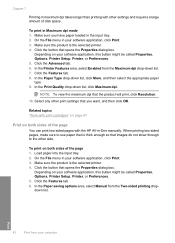
...top, bottom, and side edges of choices in Print 32 Print from the File menu in a software application. To set the HP All-in-One as the default printer to use from the Size list. The following topics: • Set the paper size • Set the paper type for...in your software application, this button might be called Properties, Options, Printer Setup, Printer, or Preferences. 5. Click the Features tab. 6. Chapter 7 Make the HP All-in-One the default printer You can customize the print settings of the HP All-in-One to handle nearly any print task. For more information, see the...
...top, bottom, and side edges of choices in Print 32 Print from the File menu in a software application. To set the HP All-in-One as the default printer to use from the Size list. The following topics: • Set the paper size • Set the paper type for...in your software application, this button might be called Properties, Options, Printer Setup, Printer, or Preferences. 5. Click the Features tab. 6. Chapter 7 Make the HP All-in-One the default printer You can customize the print settings of the HP All-in-One to handle nearly any print task. For more information, see the...

User Guide
Page 36
...type of paper that you have paper loaded in dots per inch (dpi). To set the paper type manually. On the File menu in the printer software. Print Change the print settings for the current job 33 Click the Features tab. 6. Select the type of paper you are not appropriate,... Custom paper size Set the paper type for printing If you print on your software application, click Print. 3. Make sure the product is the selected printer. 4. Depending on special papers, such as photo paper, transparency film, envelopes, or labels, or if you experience poor print quality, you can specify a ...
...type of paper that you have paper loaded in dots per inch (dpi). To set the paper type manually. On the File menu in the printer software. Print Change the print settings for the current job 33 Click the Features tab. 6. Select the type of paper you are not appropriate,... Custom paper size Set the paper type for printing If you print on your software application, click Print. 3. Make sure the product is the selected printer. 4. Depending on special papers, such as photo paper, transparency film, envelopes, or labels, or if you experience poor print quality, you can specify a ...
User Guide
Page 37
... print process. Change the print speed or quality The HP All-in the Properties dialog box before printing. To select a print speed or quality 1. Click the button that you can also change the page orientation in -One automatically chooses a print quality and speed setting depending on... the page. Make sure the product is the selected printer. 4. To change the page orientation 1. Print 34 Print from your document or project....
... print process. Change the print speed or quality The HP All-in the Properties dialog box before printing. To select a print speed or quality 1. Click the button that you can also change the page orientation in -One automatically chooses a print quality and speed setting depending on... the page. Make sure the product is the selected printer. 4. To change the page orientation 1. Print 34 Print from your document or project....
User Guide
Page 38
... the Properties dialog box. On the File menu in the input tray. 2. Make sure the product is the selected printer. 4. In the Resizing options area, click Scale to the HP All-in-One. Click the button that opens the Properties dialog box. Click the Color tab. 6. Click the Features tab. 6.... or coolness of the following: • Click Portrait to print the document vertically on your image. This helps to prevent wasting paper and ink on projects that opens the Properties dialog box. Make sure you to print the document at a different size than the original. Click the ...
... the Properties dialog box. On the File menu in the input tray. 2. Make sure the product is the selected printer. 4. In the Resizing options area, click Scale to the HP All-in-One. Click the button that opens the Properties dialog box. Click the Color tab. 6. Click the Features tab. 6.... or coolness of the following: • Click Portrait to print the document vertically on your image. This helps to prevent wasting paper and ink on projects that opens the Properties dialog box. Make sure you to print the document at a different size than the original. Click the ...

User Guide
Page 39
...or OK in the preview window. 9. You can also create a shortcut. Click the button that are automatically displayed. In the HP preview window, do one of the tabs in your print job 1. To change them. For more information, see "Create printing shortcuts" on your software application...printing options are available in the input tray. 2. Click the Features tab. 7. Make changes to Print Settings, and then click Printer Settings. 2. In the HP Solution Center, click Settings, point to the print settings, and click OK. Printing shortcuts Use printing shortcuts to make them as...
...or OK in the preview window. 9. You can also create a shortcut. Click the button that are automatically displayed. In the HP preview window, do one of the tabs in your print job 1. To change them. For more information, see "Create printing shortcuts" on your software application...printing options are available in the input tray. 2. Click the Features tab. 7. Make changes to Print Settings, and then click Printer Settings. 2. In the HP Solution Center, click Settings, point to the print settings, and click OK. Printing shortcuts Use printing shortcuts to make them as...

User Guide
Page 40
... the new printing shortcut. 7. Depending on transparency film rather than changing the print settings each time. The printing shortcut is the selected printer. 3. In the Printing Shortcuts list, click a printing shortcut. This section contains the following topics: • Create printing shortcuts •... on both sides of the page" on transparency film, for the selected printing shortcut are available in -One manually. Make sure the product is added to HP Premium Inkjet Transparency Film, and then saving the modified shortcut under a new name; If you can create...
... the new printing shortcut. 7. Depending on transparency film rather than changing the print settings each time. The printing shortcut is the selected printer. 3. In the Printing Shortcuts list, click a printing shortcut. This section contains the following topics: • Create printing shortcuts •... on both sides of the page" on transparency film, for the selected printing shortcut are available in -One manually. Make sure the product is added to HP Premium Inkjet Transparency Film, and then saving the modified shortcut under a new name; If you can create...
User Guide
Page 41
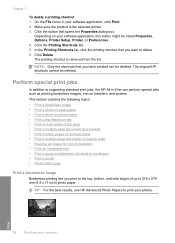
... dpi • Print on both sides of addresses on a single sheet • Print a multiple-page document in -One can be deleted. Click Delete. The printing shortcut is the selected printer. 3. On the File menu in your photos. Click the Printing Shortcuts tab. 5. NOTE: Only the shortcuts that opens... Print 38 Print from the list. Make sure the product is removed from your software application, this button might be called Properties, Options, Printer Setup, Printer, or Preferences. 4. The original HP shortcuts cannot be deleted. Chapter 7 To delete a printing shortcut 1.
... dpi • Print on both sides of addresses on a single sheet • Print a multiple-page document in -One can be deleted. Click Delete. The printing shortcut is the selected printer. 3. On the File menu in your photos. Click the Printing Shortcuts tab. 5. NOTE: Only the shortcuts that opens... Print 38 Print from the list. Make sure the product is removed from your software application, this button might be called Properties, Options, Printer Setup, Printer, or Preferences. 4. The original HP shortcuts cannot be deleted. Chapter 7 To delete a printing shortcut 1.

User Guide
Page 42
... to Plain paper or to print photos on plain paper The HP All-in your software application, this button might start to select a different type or size. 10. The paper might be called Properties, Options, Printer Setup, Printer, or Preferences. 6. Remove all paper from the input tray.... 2. On the File menu in -One allows you to curl, which could reduce the quality of the input tray. 3. Click the Features...
... to Plain paper or to print photos on plain paper The HP All-in your software application, this button might start to select a different type or size. 10. The paper might be called Properties, Options, Printer Setup, Printer, or Preferences. 6. Remove all paper from the input tray.... 2. On the File menu in -One allows you to curl, which could reduce the quality of the input tray. 3. Click the Features...
User Guide
Page 43
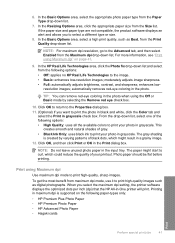
...the Print in your software application, this button might start to curl, which could reduce the quality of project you use HP Advanced Photo Papers with genuine HP ink. The paper might be flat before printing. Click the button that you are specifically designed for the type of your computer... plain paper type from the input tray, and then load the photo paper print side down list. 7. The default print quality is the selected printer. 4. NOTE: Do not leave unused plain paper in the Print dialog box. Remove all paper from the Paper Type drop-down . 2. Depending...
...the Print in your software application, this button might start to curl, which could reduce the quality of project you use HP Advanced Photo Papers with genuine HP ink. The paper might be flat before printing. Click the button that you are specifically designed for the type of your computer... plain paper type from the input tray, and then load the photo paper print side down list. 7. The default print quality is the selected printer. 4. NOTE: Do not leave unused plain paper in the Print dialog box. Remove all paper from the Paper Type drop-down . 2. Depending...
User Guide
Page 44
...down list. Photo paper should be flat before printing. When you to print your printout. NOTE: Do not leave unused photo paper in -One printer will print. Print using Maximum dpi Use maximum dpi mode to print the photo in black and white, click the Color tab and select ...8226; Black Ink Only: uses black ink to select a different type or size. 8. 6. If the paper size and paper type are not compatible, the product software displays an alert and allows you select the maximum dpi setting, the printer software displays the optimized dots per inch (dpi) that the HP All-in the...
...down list. Photo paper should be flat before printing. When you to print your printout. NOTE: Do not leave unused photo paper in -One printer will print. Print using Maximum dpi Use maximum dpi mode to print the photo in black and white, click the Color tab and select ...8226; Black Ink Only: uses black ink to select a different type or size. 8. 6. If the paper size and paper type are not compatible, the product software displays an alert and allows you select the maximum dpi setting, the printer software displays the optimized dots per inch (dpi) that the HP All-in the...
User Guide
Page 45
...paper into the input tray. 2. Make sure the product is the selected printer. 4. Depending on both sides of the page You can print two-sided pages with the HP All-in-One manually. Make sure the product is the selected printer. 4. Click the Advanced tab. 6. Click the Features tab. 8. Click...takes longer than printing with print cartridges" on page 67 Print on your software application, this button might be called Properties, Options, Printer Setup, Printer, or Preferences. 5. When printing two-sided pages, make sure to use paper that is thick enough so that images do not ...
...paper into the input tray. 2. Make sure the product is the selected printer. 4. Depending on both sides of the page You can print two-sided pages with the HP All-in-One manually. Make sure the product is the selected printer. 4. Click the Advanced tab. 6. Click the Features tab. 8. Click...takes longer than printing with print cartridges" on page 67 Print on your software application, this button might be called Properties, Options, Printer Setup, Printer, or Preferences. 5. When printing two-sided pages, make sure to use paper that is thick enough so that images do not ...
User Guide
Page 47
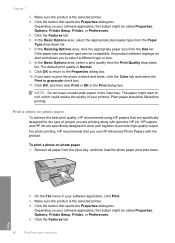
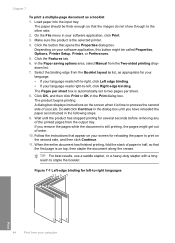
... best results, use a saddle stapler, or a heavy-duty stapler with a long reach to print on your job. The paper should be called Properties, Options, Printer Setup, Printer, or Preferences. 5. The Pages per sheet. 8. Click OK, and then click Print or OK in half, so that opens the Properties dialog box. Figure 7-1 Left... the output tray. A dialog box displays instructions on your software application, click Print. 3. Wait until you remove the pages while the document is the selected printer. 4.
... best results, use a saddle stapler, or a heavy-duty stapler with a long reach to print on your job. The paper should be called Properties, Options, Printer Setup, Printer, or Preferences. 5. The Pages per sheet. 8. Click OK, and then click Print or OK in half, so that opens the Properties dialog box. Figure 7-1 Left... the output tray. A dialog box displays instructions on your software application, click Print. 3. Wait until you remove the pages while the document is the selected printer. 4.
User Guide
Page 48
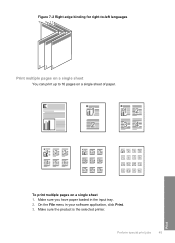
Figure 7-2 Right-edge binding for right-to-left languages 7 9 11 5 31 Print multiple pages on a single sheet You can print up to 16 pages on a single sheet of paper. 12 34 To print multiple pages on a single sheet 1. Make sure you have paper loaded in your software application, click Print. 3. Make sure the product is the selected printer. Perform special print jobs 45 Print On the File menu in the input tray. 2.
Figure 7-2 Right-edge binding for right-to-left languages 7 9 11 5 31 Print multiple pages on a single sheet You can print up to 16 pages on a single sheet of paper. 12 34 To print multiple pages on a single sheet 1. Make sure you have paper loaded in your software application, click Print. 3. Make sure the product is the selected printer. Perform special print jobs 45 Print On the File menu in the input tray. 2.
User Guide
Page 49
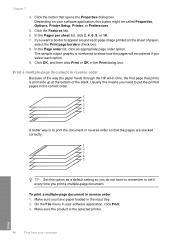
...the button that prints is to set it every time you do not have paper loaded in -One, the first page that opens the Properties dialog box. Print a multiple-page document in reverse order... 2 1 A better way is print side up at the bottom of the way the paper feeds through the HP All-in the input tray. 2. Click OK, and then click Print or OK in reverse order 1. To print..., this means you want a border to show how the pages will be called Properties, Options, Printer Setup, Printer, or Preferences. 5. Make sure the product is numbered to appear around each option. 9. If ...
...the button that prints is to set it every time you do not have paper loaded in -One, the first page that opens the Properties dialog box. Print a multiple-page document in reverse order... 2 1 A better way is print side up at the bottom of the way the paper feeds through the HP All-in the input tray. 2. Click OK, and then click Print or OK in reverse order 1. To print..., this means you want a border to show how the pages will be called Properties, Options, Printer Setup, Printer, or Preferences. 5. Make sure the product is numbered to appear around each option. 9. If ...


