

User Guide
Page 3
Table of contents 1 HP DeskJet GT 5810 series Help ...1 2 Get started ...2 Printer parts ...3 Get to know the ink tank system ...5 Control panel features ...6 Control panel lights and display icons status ...8 Load media ...13 Load an original on the scanner glass ...17 Paper basics ...18 Open the HP printer software (Windows) ... Tips for print success ...30 4 Copy and scan ...33 Copy documents ...34 Scan using the HP printer software ...35 Tips for copy and scan success ...38 5 Manage ink and printhead ...39 Ink valve ...40 Ink levels ...41 Refill Ink Tanks ...42 Order ink supplies ...45 Print...
Table of contents 1 HP DeskJet GT 5810 series Help ...1 2 Get started ...2 Printer parts ...3 Get to know the ink tank system ...5 Control panel features ...6 Control panel lights and display icons status ...8 Load media ...13 Load an original on the scanner glass ...17 Paper basics ...18 Open the HP printer software (Windows) ... Tips for print success ...30 4 Copy and scan ...33 Copy documents ...34 Scan using the HP printer software ...35 Tips for copy and scan success ...38 5 Manage ink and printhead ...39 Ink valve ...40 Ink levels ...41 Refill Ink Tanks ...42 Order ink supplies ...45 Print...

User Guide
Page 4
6 Connect your printer ...48 Connect your printer to your computer with a USB cable (non-network connection 49 7 Solve a problem ...50 Jams and paper-feed issues ...51 Printhead issues ...59 Printing issues ...65 Copy issues ...74 Scan issues ...75 Printer hardware issues ...76 Control panel error codes ...77 HP support ...78 Appendix A Technical information ...80 HP Company notices ...81 Specifications ...82 Environmental product stewardship program ...84 Regulatory notices ...91 Index ...95 iv ENWW
6 Connect your printer ...48 Connect your printer to your computer with a USB cable (non-network connection 49 7 Solve a problem ...50 Jams and paper-feed issues ...51 Printhead issues ...59 Printing issues ...65 Copy issues ...74 Scan issues ...75 Printer hardware issues ...76 Control panel error codes ...77 HP support ...78 Appendix A Technical information ...80 HP Company notices ...81 Specifications ...82 Environmental product stewardship program ...84 Regulatory notices ...91 Index ...95 iv ENWW

User Guide
Page 5
1 HP DeskJet GT 5810 series Help Learn how to use your HP DeskJet GT 5810 series . ● Get started on page 2 ● Print on page 24 ● Copy and scan on page 33 ● Manage ink and printhead on page 39 ● Connect your printer on page 48 ● Solve a problem on page 50 ● Technical information on page 80 ENWW 1
1 HP DeskJet GT 5810 series Help Learn how to use your HP DeskJet GT 5810 series . ● Get started on page 2 ● Print on page 24 ● Copy and scan on page 33 ● Manage ink and printhead on page 39 ● Connect your printer on page 48 ● Solve a problem on page 50 ● Technical information on page 80 ENWW 1

User Guide
Page 7
Printer parts 1 Paper-width guide 2 Input tray 3 Input tray shield 4 Scanner lid 5 Scanner glass 6 Output tray extender (also referred to as the tray extender) 7 Output tray 8 Front door 9 Ink valve 10 Ink tank 11 Ink tank caps 12 Ink tank lid 13 Control panel 14 Printhead access door ENWW Printer parts 3
Printer parts 1 Paper-width guide 2 Input tray 3 Input tray shield 4 Scanner lid 5 Scanner glass 6 Output tray extender (also referred to as the tray extender) 7 Output tray 8 Front door 9 Ink valve 10 Ink tank 11 Ink tank caps 12 Ink tank lid 13 Control panel 14 Printhead access door ENWW Printer parts 3

User Guide
Page 8
15 Printheads 16 Printhead latch 17 Power connection 18 USB port 4 Chapter 2 Get started ENWW
15 Printheads 16 Printhead latch 17 Power connection 18 USB port 4 Chapter 2 Get started ENWW
User Guide
Page 9
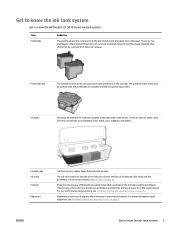
... tanks Ink tanks are external ink reservoirs located at the right side of aligning the printheads to improve print quality. Each ink tank corresponds to know the HP DeskJet GT 5810 series ink tank system. The ink valve switch on page 40 Priming is a process of the printer. This ...process occurs when you install new printheads and start the priming process from the print carriage. Once the printheads are the components in the ...
... tanks Ink tanks are external ink reservoirs located at the right side of aligning the printheads to improve print quality. Each ink tank corresponds to know the HP DeskJet GT 5810 series ink tank system. The ink valve switch on page 40 Priming is a process of the printer. This ...process occurs when you install new printheads and start the priming process from the print carriage. Once the printheads are the components in the ...

User Guide
Page 10
Copying will start two seconds after a disruption (for 3 seconds. Printhead Alert light: Indicates printhead problems. 6 Chapter 2 Get started ENWW Resume light: Indicates the printer is in a warning or error state. Start Copy ... Description Control Panel Display : Indicates number of black-and-white copies, press the button multiple times. To increase the number of copies, printhead priming status, media errors, and printhead problems. Cancel button: Stops the current operation. Resume button: Resumes a job after the last button press. To increase the number of ...
Copying will start two seconds after a disruption (for 3 seconds. Printhead Alert light: Indicates printhead problems. 6 Chapter 2 Get started ENWW Resume light: Indicates the printer is in a warning or error state. Start Copy ... Description Control Panel Display : Indicates number of black-and-white copies, press the button multiple times. To increase the number of copies, printhead priming status, media errors, and printhead problems. Cancel button: Stops the current operation. Resume button: Resumes a job after the last button press. To increase the number of ...

User Guide
Page 11
Paper Error icon: Indicates a paper-related error. Control panel display icons Icon Description Number of copies icon: Shows the number of copies when you are copying documents, changes to the black printhead ENWW Control panel features 7 Error icon: Indicates an error. Printhead icons: The left printhead icon flashing shows an error related to the tri-color printhead, and the right icon flashing shows an error related to the letter P when the printer needs priming, and alternates between the letter E and a number when the printer is in an error state.
Paper Error icon: Indicates a paper-related error. Control panel display icons Icon Description Number of copies icon: Shows the number of copies when you are copying documents, changes to the black printhead ENWW Control panel features 7 Error icon: Indicates an error. Printhead icons: The left printhead icon flashing shows an error related to the tri-color printhead, and the right icon flashing shows an error related to the letter P when the printer needs priming, and alternates between the letter E and a number when the printer is in an error state.

User Guide
Page 12
Indicates the printer is powered off if not connected to generate an on -screen messages from the computer. Printhead icons and Printhead Alert light ● The Error icon, one of inactivity. The printer is in an error state that you do not see any on-... If you can resolve by following the on -screen message. Control panel lights and display icons status ● Power button light ● Printhead icons and Printhead Alert light ● Printhead priming and alignment icons ● Error icon, Paper Error icon, and Resume light ● Number of copies icon ● Ink system ...
Indicates the printer is powered off if not connected to generate an on -screen messages from the computer. Printhead icons and Printhead Alert light ● The Error icon, one of inactivity. The printer is in an error state that you do not see any on-... If you can resolve by following the on -screen message. Control panel lights and display icons status ● Power button light ● Printhead icons and Printhead Alert light ● Printhead priming and alignment icons ● Error icon, Paper Error icon, and Resume light ● Number of copies icon ● Ink system ...

User Guide
Page 13
... sure that you install pritheads during initial printer setup. If both printheads are using the correct HP printheads for help. Both printheads are installed in the printer, install the printheads. - If both Printhead icons, and the Printhead Alert light are blinking. If one of the printheads is no plug or plastic tape on the control panel display are...
... sure that you install pritheads during initial printer setup. If both printheads are using the correct HP printheads for help. Both printheads are installed in the printer, install the printheads. - If both Printhead icons, and the Printhead Alert light are blinking. If one of the printheads is no plug or plastic tape on the control panel display are...

User Guide
Page 14
... 13. If alignment event occurs as part of copies icon becomes a blinking A. Cause The printer receives a printing job, and detects that the new printheads are installed and the ink system is ready for 3 seconds to rotating lines once alignment is complete. - Press and hold the Resume button ( )...icon, and Resume light The Error icon, the Paper Error icon, and the Resume light are filled above the minimum line, and the blue printhead latch is closed firmly. Alignment status icon ● The Number of the priming process during initial printer setup, the solid "A" changes to ...
... 13. If alignment event occurs as part of copies icon becomes a blinking A. Cause The printer receives a printing job, and detects that the new printheads are installed and the ink system is ready for 3 seconds to rotating lines once alignment is complete. - Press and hold the Resume button ( )...icon, and Resume light The Error icon, the Paper Error icon, and the Resume light are filled above the minimum line, and the blue printhead latch is closed firmly. Alignment status icon ● The Number of the priming process during initial printer setup, the solid "A" changes to ...

User Guide
Page 15
...● The Number of copies icon is alternating between the letter E and the number 4. CAUTION: You must not open the printhead latch during this process if printheads have been primed with ink. Cause There is not working . ● The Number of copies icon is not obstructed. If... the problem persists, contact HP. For more information. ENWW Control panel lights and display icons status 11 Solution Open the printhead access door and make sure the carriage is alternating between the letter E and the number 6....
...● The Number of copies icon is alternating between the letter E and the number 4. CAUTION: You must not open the printhead latch during this process if printheads have been primed with ink. Cause There is not working . ● The Number of copies icon is not obstructed. If... the problem persists, contact HP. For more information. ENWW Control panel lights and display icons status 11 Solution Open the printhead access door and make sure the carriage is alternating between the letter E and the number 6....

User Guide
Page 16
... door completely, and then close it immediately. otherwise, the printer may require new printheads to function. 12 Chapter 2 Get started ENWW Cause The printer is required. Turn on the printer. This process helps remove ink buildup and maintains the ... the power cord back in an error state. Solution Reset the printer. 1. If the problem persists, contact HP. Cause The printer detects that ink system maintenance is in . 4. CAUTION: Do not open the blue printhead latch during this process; Unplug the power cord. 3. Ink system maintenance icon The Number of the printer...
... door completely, and then close it immediately. otherwise, the printer may require new printheads to function. 12 Chapter 2 Get started ENWW Cause The printer is required. Turn on the printer. This process helps remove ink buildup and maintains the ... the power cord back in an error state. Solution Reset the printer. 1. If the problem persists, contact HP. Cause The printer detects that ink system maintenance is in . 4. CAUTION: Do not open the blue printhead latch during this process; Unplug the power cord. 3. Ink system maintenance icon The Number of the printer...

User Guide
Page 34
... at the unlocked position, the paper should have the appropriate settings. For more information. Printhead and ink tips ● Use original HP printheads. ● Install both the black and tri-color printheads correctly. Printer settings tips Printer settings tips (Windows) ● To change default print ...not acceptable, see Printing issues on page 65 for print success ● Printhead and ink tips ● Paper loading tips ● Printer settings tips ● Notes To print successfully, the HP printheads should be functioning properly, the ink tanks should be filled with side to...
... at the unlocked position, the paper should have the appropriate settings. For more information. Printhead and ink tips ● Use original HP printheads. ● Install both the black and tri-color printheads correctly. Printer settings tips Printer settings tips (Windows) ● To change default print ...not acceptable, see Printing issues on page 65 for print success ● Printhead and ink tips ● Paper loading tips ● Printer settings tips ● Notes To print successfully, the HP printheads should be functioning properly, the ink tanks should be filled with side to...

User Guide
Page 36
Notes ● Original HP printheads and ink are designed and tested with HP printers and papers to help you easily produce great results, time after time. NOTE: HP cannot guarantee the quality or reliability of using a non-HP supply will not be covered under warranty. 32 Chapter 3 Print ENWW Product service or repairs required as a result of non-HP supplies.
Notes ● Original HP printheads and ink are designed and tested with HP printers and papers to help you easily produce great results, time after time. NOTE: HP cannot guarantee the quality or reliability of using a non-HP supply will not be covered under warranty. 32 Chapter 3 Print ENWW Product service or repairs required as a result of non-HP supplies.

User Guide
Page 43
5 Manage ink and printhead This section contains the following topics: ● Ink valve ● Ink levels ● Refill Ink Tanks ● Order ink supplies ● Print with black ink only ● Tips for working with ink and printhead ENWW 39
5 Manage ink and printhead This section contains the following topics: ● Ink valve ● Ink levels ● Refill Ink Tanks ● Order ink supplies ● Print with black ink only ● Tips for working with ink and printhead ENWW 39

User Guide
Page 44
Turn the valve completely to the right (horizontal position) to unlock. 40 Chapter 5 Manage ink and printhead ENWW After moving the product and before you attempt to move or tilt the printer. Ink valve To prevent ink leakage, make sure the ink valve is locked before you print, make sure the ink valve is unlocked, allowing the printer to function properly. Turn the valve completely to the left (vertical position) to lock.
Turn the valve completely to the right (horizontal position) to unlock. 40 Chapter 5 Manage ink and printhead ENWW After moving the product and before you attempt to move or tilt the printer. Ink valve To prevent ink leakage, make sure the ink valve is locked before you print, make sure the ink valve is unlocked, allowing the printer to function properly. Turn the valve completely to the left (vertical position) to lock.

User Guide
Page 46
Twist to refill. 3. Remove the cap of the ink tank you plan to remove the cap of the ink bottle, remove the seal from the bottle, install the cap back onto the bottle, and then pull open the top part of the cap. 42 Chapter 5 Manage ink and printhead ENWW Lift the ink tank lid. 2. Refill Ink Tanks To refill the ink tanks 1.
Twist to refill. 3. Remove the cap of the ink tank you plan to remove the cap of the ink bottle, remove the seal from the bottle, install the cap back onto the bottle, and then pull open the top part of the cap. 42 Chapter 5 Manage ink and printhead ENWW Lift the ink tank lid. 2. Refill Ink Tanks To refill the ink tanks 1.

User Guide
Page 48
● Do not tilt, shake, or squeeze the ink bottle when it is open in case ink leaks. ● Store the ink bottles in a cool, dark place. 44 Chapter 5 Manage ink and printhead ENWW
● Do not tilt, shake, or squeeze the ink bottle when it is open in case ink leaks. ● Store the ink bottles in a cool, dark place. 44 Chapter 5 Manage ink and printhead ENWW

User Guide
Page 50
..., Printer Properties, Printer, or Preferences. 4. If you to another. 4. From the pop-up menu, choose Grayscale, and then click Print. 46 Chapter 5 Manage ink and printhead ENWW Select Black Ink Only, and then click OK. Depending on the Print dialog, click Show Details. Print in all tanks are no lower than...
..., Printer Properties, Printer, or Preferences. 4. If you to another. 4. From the pop-up menu, choose Grayscale, and then click Print. 46 Chapter 5 Manage ink and printhead ENWW Select Black Ink Only, and then click OK. Depending on the Print dialog, click Show Details. Print in all tanks are no lower than...

