Service Manual
Page 6
...and Media Bin (Optional 3Ć6 Installing the Plotter/Printer 3Ć10 Using the Plotter 3Ć10 DesignJet 750C/750C Plus/755CM Front Panel 3Ć10 DesignJet 700 Front Panel 3Ć11 ThirdĆParty Inks and OffĆAxis Ink Systems 3Ć11 Configuring... Plot 3Ć12 Example of the Current Configuration Sheet 3Ć13 4 Preventive Maintenance Moisture on the Plotter/Printer 4Ć2 Noisy Carriage Bushing 4Ć2 Belt Swelling 4Ć2 Cleaning the Plotter 4Ć2 General Cleaning 4Ć2 Cleaning the Drive Roller 4Ć3 Scheduled Maintenance 4Ć4 Level ...
...and Media Bin (Optional 3Ć6 Installing the Plotter/Printer 3Ć10 Using the Plotter 3Ć10 DesignJet 750C/750C Plus/755CM Front Panel 3Ć10 DesignJet 700 Front Panel 3Ć11 ThirdĆParty Inks and OffĆAxis Ink Systems 3Ć11 Configuring... Plot 3Ć12 Example of the Current Configuration Sheet 3Ć13 4 Preventive Maintenance Moisture on the Plotter/Printer 4Ć2 Noisy Carriage Bushing 4Ć2 Belt Swelling 4Ć2 Cleaning the Plotter 4Ć2 General Cleaning 4Ć2 Cleaning the Drive Roller 4Ć3 Scheduled Maintenance 4Ć4 Level ...
Service Manual
Page 8
...262;18 Removing the Window Sensor 6Ć20 Removing the PinchĆWheel Sensor 6Ć21 Removing the Media Sensor 6Ć22 Removing the Carriage (YĆAxis) Motor 6Ć24 Removing the Media (XĆAxis) Motor 6Ć25 Removing the Encoder Strip 6Ć27 Reinstalling the ... YĆTensioner Housing 6Ć31 Removing the YĆAxis Motor Holder 6Ć32 Removing the Cutter 6Ć33 Removing the Cartridge Carriage and Drive Belt 6Ć34 Removing the Trailing Cable 6Ć36 Reinstalling the Trailing Cable 6Ć39 Removing the Starguard Assembly 6Ć40 Removing the...
...262;18 Removing the Window Sensor 6Ć20 Removing the PinchĆWheel Sensor 6Ć21 Removing the Media Sensor 6Ć22 Removing the Carriage (YĆAxis) Motor 6Ć24 Removing the Media (XĆAxis) Motor 6Ć25 Removing the Encoder Strip 6Ć27 Reinstalling the ... YĆTensioner Housing 6Ć31 Removing the YĆAxis Motor Holder 6Ć32 Removing the Cutter 6Ć33 Removing the Cartridge Carriage and Drive Belt 6Ć34 Removing the Trailing Cable 6Ć36 Reinstalling the Trailing Cable 6Ć39 Removing the Starguard Assembly 6Ć40 Removing the...
Service Manual
Page 38
... slider path along which the bushing moves. Cleaning intervals are determined by the plotter environment and by the types of the carriage, and from the power source prior to performing any cleaning. To recover from moisture condensation, turn the plotter off, and... soft lintĆfree cloth. 4-2 Preventive Maintenance C4705-90000 Belt Swelling To prevent new belts from swelling incorrectly, keep it again. (Other environmental specifications ' chapter 2.) Noisy Carriage Bushing To prevent noisy movement of the carriage, remove aluminum or dust particles from the bushing at the ...
... slider path along which the bushing moves. Cleaning intervals are determined by the plotter environment and by the types of the carriage, and from the power source prior to performing any cleaning. To recover from moisture condensation, turn the plotter off, and... soft lintĆfree cloth. 4-2 Preventive Maintenance C4705-90000 Belt Swelling To prevent new belts from swelling incorrectly, keep it again. (Other environmental specifications ' chapter 2.) Noisy Carriage Bushing To prevent noisy movement of the carriage, remove aluminum or dust particles from the bushing at the ...
Service Manual
Page 47
... power necessary to fire the cartridges under the plotter's right endcover. It is electrically connected to the carriage via a drive belt. When the carriage motor rotates, it moves the carriage assembly. C4705-90000 Functional Overview 5-5 Cartridges A line sensor on the carriage PCA provides the servo processor with information used to fire the cartridges. Mechanical Overview...
... power necessary to fire the cartridges under the plotter's right endcover. It is electrically connected to the carriage via a drive belt. When the carriage motor rotates, it moves the carriage assembly. C4705-90000 Functional Overview 5-5 Cartridges A line sensor on the carriage PCA provides the servo processor with information used to fire the cartridges. Mechanical Overview...
Service Manual
Page 54
...262;18 Removing the Window Sensor 6Ć20 Removing the PinchĆWheel Sensor 6Ć21 Removing the Media Sensor 6Ć22 Removing the Carriage (YĆAxis) Motor 6Ć24 Removing the Media (XĆAxis) Motor 6Ć25 Removing the Encoder Strip 6Ć27 Reinstalling the ... YĆTensioner Housing 6Ć31 Removing the YĆAxis Motor Holder 6Ć32 Removing the Cutter 6Ć33 Removing the Cartridge Carriage and Drive Belt 6Ć34 Removing the Trailing Cable 6Ć36 Reinstalling the Trailing Cable 6Ć39 Removing the Starguard Assembly 6Ć40 Removing the...
...262;18 Removing the Window Sensor 6Ć20 Removing the PinchĆWheel Sensor 6Ć21 Removing the Media Sensor 6Ć22 Removing the Carriage (YĆAxis) Motor 6Ć24 Removing the Media (XĆAxis) Motor 6Ć25 Removing the Encoder Strip 6Ć27 Reinstalling the ... YĆTensioner Housing 6Ć31 Removing the YĆAxis Motor Holder 6Ć32 Removing the Cutter 6Ć33 Removing the Cartridge Carriage and Drive Belt 6Ć34 Removing the Trailing Cable 6Ć36 Reinstalling the Trailing Cable 6Ć39 Removing the Starguard Assembly 6Ć40 Removing the...
Service Manual
Page 76
Tx 15 6-24 Removal and Replacement Reassembling: Position the YĆaxis drive belt before positioning the screws, and ensure that attach the carriageĆmotor to the structure. C4705-90000 Removing the Carriage (YĆAxis) Motor 1 Remove the electronicsĆenclosure cover ' page 6Ć5. 2 ...endcover ' page 6Ć17. 5 Disconnect the carriageĆmotor cable from the main PCA (connector labelled Y). Hold the motor in a secure position. Y-Carriage motor 6 Remove the two screws that the belt is correctly positioned around the carriageĆmotor gear and the lower part of the...
Tx 15 6-24 Removal and Replacement Reassembling: Position the YĆaxis drive belt before positioning the screws, and ensure that attach the carriageĆmotor to the structure. C4705-90000 Removing the Carriage (YĆAxis) Motor 1 Remove the electronicsĆenclosure cover ' page 6Ć5. 2 ...endcover ' page 6Ć17. 5 Disconnect the carriageĆmotor cable from the main PCA (connector labelled Y). Hold the motor in a secure position. Y-Carriage motor 6 Remove the two screws that the belt is correctly positioned around the carriageĆmotor gear and the lower part of the...
Service Manual
Page 86
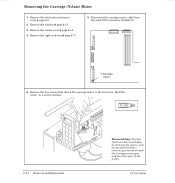
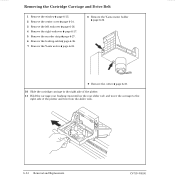
Removing the Cartridge Carriage and Drive Belt 1 Remove the window ' page 6Ć13. 2 Remove the center cover ' page 6Ć14. 3 Remove the left endcover ' page 6Ć16. 4 Remove the right endcover ' page 6&#... holder ' page 6Ć32. 9 Remove the cutter ' page 6Ć33. 10 Slide the cartridge carriage to the right side of the plotter. 11 Hold the carriage rear bushing (mounted on the rear slider rod) and move the carriage to the right side of the plotter and free from the slider rods. 6-34 Removal...
Removing the Cartridge Carriage and Drive Belt 1 Remove the window ' page 6Ć13. 2 Remove the center cover ' page 6Ć14. 3 Remove the left endcover ' page 6Ć16. 4 Remove the right endcover ' page 6&#... holder ' page 6Ć32. 9 Remove the cutter ' page 6Ć33. 10 Slide the cartridge carriage to the right side of the plotter. 11 Hold the carriage rear bushing (mounted on the rear slider rod) and move the carriage to the right side of the plotter and free from the slider rods. 6-34 Removal...

Service Manual
Page 87
12 Separate the rear bushing and spring from the carriage assembly and carefully remove the carriage assembly and main drive belt from the plotter. 13 Remove the drive belt from the carriage assembly. D Accuracy calibration ' page 7Ć6. C4705-90000 Removal and Replacement 6-35 Calibration: After reassembling the plotter, perform: D Pen alignment test ' page 8Ć40. D LineĆsensor calibration ' page 7Ć5. D DropĆdetect calibration ' page 7Ć4.
12 Separate the rear bushing and spring from the carriage assembly and carefully remove the carriage assembly and main drive belt from the plotter. 13 Remove the drive belt from the carriage assembly. D Accuracy calibration ' page 7Ć6. C4705-90000 Removal and Replacement 6-35 Calibration: After reassembling the plotter, perform: D Pen alignment test ' page 8Ć40. D LineĆsensor calibration ' page 7Ć5. D DropĆdetect calibration ' page 7Ć4.
Service Manual
Page 91
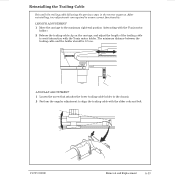
... attaches the lower trailingĆcable holder to the chassis. 2 Perform the angular adjustment to avoid interaction with the slider rods and belt. Reinstalling the Trailing Cable Reinstall the trailing cable following the previous steps in the reverse sequence. C4705-90000 Removal and Replacement 6-39... the holder should be 0.5 cm. After reinstalling, two adjustments are required to ensure correct functionality: LENGTH ADJUSTMENT 1 Move the carriage to the maximum rightĆend position (interacting with the YĆaxis motor holder). 2 Release the trailingĆcable clip on the...
... attaches the lower trailingĆcable holder to the chassis. 2 Perform the angular adjustment to avoid interaction with the slider rods and belt. Reinstalling the Trailing Cable Reinstall the trailing cable following the previous steps in the reverse sequence. C4705-90000 Removal and Replacement 6-39... the holder should be 0.5 cm. After reinstalling, two adjustments are required to ensure correct functionality: LENGTH ADJUSTMENT 1 Move the carriage to the maximum rightĆend position (interacting with the YĆaxis motor holder). 2 Release the trailingĆcable clip on the...
Service Manual
Page 173
...Ink spilling. Worn wipers: If the wipers in their bags with dissicant until you have made a repair, consider whether any of its DesignJet series plotters or printers. You must use of apparent cartridge failure may wear prematurely if the plotter is to produce blueĆline copies... The vapor is found to be covered under HP's warranty or maintenance contract. Storing: Keep new belts in the service station are damaged, the plotter cannot position the carriage correctly during cartridge checking. If a failure or damage to such HP products is very corrosive and can fool the sensor...
...Ink spilling. Worn wipers: If the wipers in their bags with dissicant until you have made a repair, consider whether any of its DesignJet series plotters or printers. You must use of apparent cartridge failure may wear prematurely if the plotter is to produce blueĆline copies... The vapor is found to be covered under HP's warranty or maintenance contract. Storing: Keep new belts in the service station are damaged, the plotter cannot position the carriage correctly during cartridge checking. If a failure or damage to such HP products is very corrosive and can fool the sensor...

Service Manual
Page 213
... the rear bushing and preload spring from the carriage and carefully remove the carriage and main drive belt from the plotter. 9 Remove the drive belt from the carriage. 10 Install the new pen carriage following the above instructions in the reverse order.... Administrative Information Classification: Modification Recommended Standards: 1 Hour Labor Action Category: On Failure Location Category: OnĆSite Service Inventory: N/A Used Parts: Returned to SME/HP Grenoble HP...
... the rear bushing and preload spring from the carriage and carefully remove the carriage and main drive belt from the plotter. 9 Remove the drive belt from the carriage. 10 Install the new pen carriage following the above instructions in the reverse order.... Administrative Information Classification: Modification Recommended Standards: 1 Hour Labor Action Category: On Failure Location Category: OnĆSite Service Inventory: N/A Used Parts: Returned to SME/HP Grenoble HP...
Service Manual
Page 219
... bushing and preload spring from the carriage and carefully remove the carriage and main drive belt from the plotter. 9 Remove the drive belt from the carriage. 10 Install the new pen carriage following the above instructions in the reverse order. 7 Grasp the carriage rear preload bushing and move the carriage to SME/HP Grenoble HP Responsible Until: 15 December 1997...
... bushing and preload spring from the carriage and carefully remove the carriage and main drive belt from the plotter. 9 Remove the drive belt from the carriage. 10 Install the new pen carriage following the above instructions in the reverse order. 7 Grasp the carriage rear preload bushing and move the carriage to SME/HP Grenoble HP Responsible Until: 15 December 1997...
Service Manual
Page 220
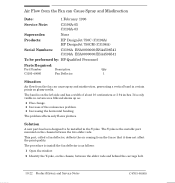
... up as follows: 1 Open the window. 2 Identify the YĆyoke, on the chassis between the slider rods and behind the carriage belt. 10-22 Product History and Service Notes C4705-90000 D Increasing the horizontal banding. It is the metallic part mounted on the chassis,...fan can Cause Spray and Misdirection Date: 1 February 1996 Service Note: C3196AĆ05 C3198AĆ03 Supersedes: None Products: HP DesignJet 750C (C3196A) HP DesignJet 750CM (C3198A) Serial Numbers: C3196A ESA0000000/ESA4508541 C3198A ESA0000000/ESA4508541 To be installed in the YĆyoke. Air Flow from ...
... up as follows: 1 Open the window. 2 Identify the YĆyoke, on the chassis between the slider rods and behind the carriage belt. 10-22 Product History and Service Notes C4705-90000 D Increasing the horizontal banding. It is the metallic part mounted on the chassis,...fan can Cause Spray and Misdirection Date: 1 February 1996 Service Note: C3196AĆ05 C3198AĆ03 Supersedes: None Products: HP DesignJet 750C (C3196A) HP DesignJet 750CM (C3198A) Serial Numbers: C3196A ESA0000000/ESA4508541 C3198A ESA0000000/ESA4508541 To be installed in the YĆyoke. Air Flow from ...
Service Manual
Page 234
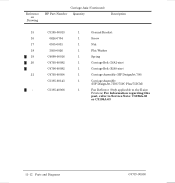
... 1 Nut 18 3050Ć0026 1 Flat Washer 19 C4699Ć00016 1 Spring 20 C4705Ć60082 1 Carriage Belt (D/A1Ćsize) C4706Ć60082 1 Carriage Belt (E/A0Ćsize) 21 C4705Ć60054 1 Carriage Assembly (HP DesignJet 700) C3195Ć60143 1 Carriage Assembly (HP DesignJet 750C/750C Plus/755CM) Ć C3195Ć40066 1 Fan Deflector (Only applicable to the EĆsize...
... 1 Nut 18 3050Ć0026 1 Flat Washer 19 C4699Ć00016 1 Spring 20 C4705Ć60082 1 Carriage Belt (D/A1Ćsize) C4706Ć60082 1 Carriage Belt (E/A0Ćsize) 21 C4705Ć60054 1 Carriage Assembly (HP DesignJet 700) C3195Ć60143 1 Carriage Assembly (HP DesignJet 750C/750C Plus/755CM) Ć C3195Ć40066 1 Fan Deflector (Only applicable to the EĆsize...
Service Manual
Page 244
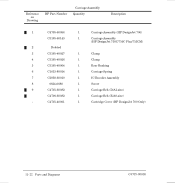
...Ć60054 1 Carriage Assembly (HP DesignJet 700) C3195Ć60143 1 Carriage Assembly (HP DesignJet 750C/750C Plus/755CM) 2 Deleted 3 C3195Ć40027 1 Clamp 4 C3195Ć40026 1 Clamp 5 C3195Ć40064 1 Rear Bushing 6 C1633Ć80014 1 Carriage Spring 7 C2858Ć60010 1 IC Encoder Assembly 8 0624Ć0680 1 Screw 9 C4705Ć60082 1 Carriage Belt (D/A1Ćsize) C4706Ć60082 1 Carriage Belt (E/A0Ć...
...Ć60054 1 Carriage Assembly (HP DesignJet 700) C3195Ć60143 1 Carriage Assembly (HP DesignJet 750C/750C Plus/755CM) 2 Deleted 3 C3195Ć40027 1 Clamp 4 C3195Ć40026 1 Clamp 5 C3195Ć40064 1 Rear Bushing 6 C1633Ć80014 1 Carriage Spring 7 C2858Ć60010 1 IC Encoder Assembly 8 0624Ć0680 1 Screw 9 C4705Ć60082 1 Carriage Belt (D/A1Ćsize) C4706Ć60082 1 Carriage Belt (E/A0Ć...

Service Manual
Page 278
...2Ć3 action keys, 3Ć10, 3Ć11 addressable dpi, GlossaryĆ2 adjustments, 7Ć2 align cartridges, 8Ć55 ammonia, causing belt damage, 8Ć55 Apple LocalTalk, 1Ć3 application notes, part number, 11Ć35 applications of plotter, 1Ć2 area fill PQ plot..., service test, 8Ć35 ASIC, GlossaryĆ2 ASIC (Application Specific Integrated Circuit) Carriage, 5Ć4 Pen Interface, 5Ć4 Data, 5Ć5 Print Control, 5Ć9 Data, 5Ć9 Processor Support, 5Ć4 assembly instructions, 3Ć2 ...
...2Ć3 action keys, 3Ć10, 3Ć11 addressable dpi, GlossaryĆ2 adjustments, 7Ć2 align cartridges, 8Ć55 ammonia, causing belt damage, 8Ć55 Apple LocalTalk, 1Ć3 application notes, part number, 11Ć35 applications of plotter, 1Ć2 area fill PQ plot..., service test, 8Ć35 ASIC, GlossaryĆ2 ASIC (Application Specific Integrated Circuit) Carriage, 5Ć4 Pen Interface, 5Ć4 Data, 5Ć5 Print Control, 5Ć9 Data, 5Ć9 Processor Support, 5Ć4 assembly instructions, 3Ć2 ...
Service Manual
Page 279
self test, introduction, 8Ć2 diazo copiers, wearing belt, 8Ć55 dimensions, plotter, 2Ć3 dip, GlossaryĆ2 dirt on, carriage bushing, 4Ć2 dirty carriage bushing, 8Ć55 encoder strip, 9Ć14 display, vacuumĆfluorescent, 5Ć10 display data, ...controller, 5Ć4 DRAM SIMM, 11Ć36 Drive Belt, 6Ć34 drive belt, premature wearing, 8Ć55 drive roller, GlossaryĆ3 Driver, motor, Y-axis, 5Ć4 driver, GlossaryĆ3 Drivers, Pen, 5Ć5 drivers, software, 1Ć2 Index-3 carriageĆaxis mechanism, 5Ć5 cartridge, GlossaryĆ2 part...
self test, introduction, 8Ć2 diazo copiers, wearing belt, 8Ć55 dimensions, plotter, 2Ć3 dip, GlossaryĆ2 dirt on, carriage bushing, 4Ć2 dirty carriage bushing, 8Ć55 encoder strip, 9Ć14 display, vacuumĆfluorescent, 5Ć10 display data, ...controller, 5Ć4 DRAM SIMM, 11Ć36 Drive Belt, 6Ć34 drive belt, premature wearing, 8Ć55 drive roller, GlossaryĆ3 Driver, motor, Y-axis, 5Ć4 driver, GlossaryĆ3 Drivers, Pen, 5Ć5 drivers, software, 1Ć2 Index-3 carriageĆaxis mechanism, 5Ć5 cartridge, GlossaryĆ2 part...
Service Manual
Page 281
HP external controller, 1Ć3 HP JetDirect EX, 1Ć3 HPĆGL, 1Ć2 HPĆGL/2, 1Ć2, GlossaryĆ3 HPĆRTL, 1Ć2, GlossaryĆ3 humidity, 2Ć3 I IC, GlossaryĆ3 IEEE, GlossaryĆ3 Indicators, LED, 5Ć10 ... GlossaryĆ4 calibration, 7Ć5 description, 5Ć9 Linear Encoder, 5Ć4 liquids, 6Ć3 M main drive belt, removing, 6Ć34 main PCA description, 5Ć8 removing, 6Ć9 service test, 8Ć25 mainĆcarriage com, service test, 8Ć26 mains, 6Ć3 maintenance preventive, 4Ć1 scheduled, 4Ć4 margins, 1Ć...
HP external controller, 1Ć3 HP JetDirect EX, 1Ć3 HPĆGL, 1Ć2 HPĆGL/2, 1Ć2, GlossaryĆ3 HPĆRTL, 1Ć2, GlossaryĆ3 humidity, 2Ć3 I IC, GlossaryĆ3 IEEE, GlossaryĆ3 Indicators, LED, 5Ć10 ... GlossaryĆ4 calibration, 7Ć5 description, 5Ć9 Linear Encoder, 5Ć4 liquids, 6Ć3 M main drive belt, removing, 6Ć34 main PCA description, 5Ć8 removing, 6Ć9 service test, 8Ć25 mainĆcarriage com, service test, 8Ć26 mains, 6Ć3 maintenance preventive, 4Ć1 scheduled, 4Ć4 margins, 1Ć...
Service Manual
Page 284
..., 6Ć5 encoder strip, 6Ć27 entry platen, 6Ć53 fan, 6Ć12 frontĆpanel assembly, 6Ć18 left endcover, 6Ć16 main drive belt, 6Ć34 main PCA, 6Ć9 media diverter, 6Ć56 media motor (XĆAxis), 6Ć25 media sensor, 6Ć22 memory module (DRAM SIMM), 6Ć...262;39 EEROM, 8Ć21 EEROM clear counters, 8Ć22 EEROM model type, 8Ć23 entering, 7Ć3, 8Ć20 Main PCA, 8Ć25 mainĆcarriage communication, 8Ć26 mark position, 8Ć44 media sensor, 8Ć50 MIO, 8Ć24 mono PQ plot, 8Ć33 nozzle print test, 8Ć32 ...
..., 6Ć5 encoder strip, 6Ć27 entry platen, 6Ć53 fan, 6Ć12 frontĆpanel assembly, 6Ć18 left endcover, 6Ć16 main drive belt, 6Ć34 main PCA, 6Ć9 media diverter, 6Ć56 media motor (XĆAxis), 6Ć25 media sensor, 6Ć22 memory module (DRAM SIMM), 6Ć...262;39 EEROM, 8Ć21 EEROM clear counters, 8Ć22 EEROM model type, 8Ć23 entering, 7Ć3, 8Ć20 Main PCA, 8Ć25 mainĆcarriage communication, 8Ć26 mark position, 8Ć44 media sensor, 8Ć50 MIO, 8Ć24 mono PQ plot, 8Ć33 nozzle print test, 8Ć32 ...


