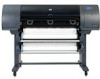
Designjet 4500 Printhead - HP
Designjet 4500 Printhead
Related Manual Pages


Similar Questions

Replacing Hp Fb550 Printheads
how to replace hp fb550 printheads pkease
how to replace hp fb550 printheads pkease
(Posted by bunnysandhu 2 years ago)

Hp 8000 Printhead Damage
My HP 8000 Printer, the printhead center "brownish" strip, is de-attached from one end ofthe printhe...
My HP 8000 Printer, the printhead center "brownish" strip, is de-attached from one end ofthe printhe...
(Posted by vendors 12 years ago)

Black Printhead Stop Printing
I have a problem with the black color on a designjet 8000sr large format printer, begin printing ok ...
I have a problem with the black color on a designjet 8000sr large format printer, begin printing ok ...
(Posted by octavioval 13 years ago)
Related Terms
The following terms were also used when searching for Designjet 4500 Printhead - HP:- designjet 4500
- hp designjet 4500
- hp designjet 4500 scanner
- designjet 4500 scanner
- hp designjet 4500 printer
- hp designjet 4500mfp
- designjet 4500mfp
- designjet 4500 plotter
- hp designjet 4500 plotter
- hp designjet 4500 mfp
- designjet 4500 ps
- hp designjet 4500 ps
- designjet 4500 printer
- hp designjet 4500 driver
- designjet 4500 mfp
- hp designjet 4500 printer series
- hp designjet 4500 service manual
- hp designjet 4500 stacker
- designjet 4500 driver
- designjet 4500 service manual
- designjet 4500 ink
- hp designjet 4500 error codes
- hp designjet 4500 ink
- hp designjet 4500 manual
- designjet 4500 error codes
- designjet 4500 manual
- designjet 4500 printer series
- designjet 4500 review
- hp designjet 4500 service manual free
- designjet 4500 parts
- designjet 4500 problem
- designjet 4500 series software
- designjet 4500 stacker
- designjet 4500 user manual
- designjet 4500 -gl 2
- designjet 4500 -gl/2
- designjet 4500 24:10 error
- designjet 4500 79.04 error
- designjet 4500 86.01 error
- designjet 4500 banding
- designjet 4500 beeping
- designjet 4500 belt
- designjet 4500 carriage belt
- designjet 4500 custom paper size
- designjet 4500 default password
- designjet 4500 disassembly
- designjet 4500 display blank
- designjet 4500 driver windows 7
- designjet 4500 drivers
- designjet 4500 encoder strip
- designjet 4500 error 79 04
- designjet 4500 error 79-04
- designjet 4500 error 79.04
- designjet 4500 error 81.01
- designjet 4500 error 86.01
- designjet 4500 error code 79-04
- designjet 4500 firmware
- designjet 4500 firmware update
- designjet 4500 for sale
- designjet 4500 front path will not open
- designjet 4500 hard drive
- designjet 4500 help
- designjet 4500 hp
- designjet 4500 hp-gl/2
- designjet 4500 ink cartridges
- designjet 4500 keeps jamming
- designjet 4500 leaking ink
- designjet 4500 load paper to calibrate
- designjet 4500 maintenance kit
- designjet 4500 manual pdf
- designjet 4500 master reset
- designjet 4500 mfp driver
- designjet 4500 mfp plotter
- designjet 4500 mfp service manual
- designjet 4500 offline
- designjet 4500 osx 10.6.8
- designjet 4500 paper
- designjet 4500 paper jam
- designjet 4500 paper jam error
- designjet 4500 parts list
- designjet 4500 plotter cable
- designjet 4500 plotter driver
- designjet 4500 plotter drivers
- designjet 4500 plotter issues
- designjet 4500 plotter manual
- designjet 4500 plotter price
- designjet 4500 plotter printer
- designjet 4500 power supply
- designjet 4500 preventive
- designjet 4500 price
- designjet 4500 print heads
- designjet 4500 printer manual
- designjet 4500 printhead
- designjet 4500 printhead cleaner
- designjet 4500 procedures before moving
- designjet 4500 ps driver
- designjet 4500 ps driver download
- designjet 4500 ps drivers
- designjet 4500 ps mac driver
- designjet 4500 ps windows 7 drivers
- designjet 4500 scaling issues
- designjet 4500 scanner calibration errors
- designjet 4500 scanner calibration sheet
- designjet 4500 scanner drivers
- designjet 4500 scanner error messages
- designjet 4500 scanner firmware
- designjet 4500 scanner lamp
- designjet 4500 scanner maintenance kit
- designjet 4500 scanner maintenance kit #1
- designjet 4500 scanner manual
- designjet 4500 scanner part replacement
- designjet 4500 scanner parts
- designjet 4500 scanner parts glass plate
- designjet 4500 scanner password
- designjet 4500 scanner price
- designjet 4500 scanner series
- designjet 4500 scanner service manual
- designjet 4500 scanner software
- designjet 4500 scanner windows 7
- designjet 4500 service manual free
- designjet 4500 service manual pdf
- designjet 4500 service mode
- designjet 4500 specifications
- designjet 4500 stops printing
- designjet 4500 supplies
- designjet 4500 support
- designjet 4500 windows 7 drivers
- designjet 4500ps
- designjet 4500ps driver
- designjet 4500ps drivers
- designjet 4500ps parts
- designjet 4500ps plotter
- hewlett packard designjet 4500
- hp designjet 4500 beeping
- hp designjet 4500 carriage belt
- hp designjet 4500 default password
- hp designjet 4500 disassembly
- hp designjet 4500 driver windows 7
- hp designjet 4500 drivers
- hp designjet 4500 error 79.04
- hp designjet 4500 error 81.01
- hp designjet 4500 error code 79-04
- hp designjet 4500 firmware
- hp designjet 4500 for sale
- hp designjet 4500 hard drive
- hp designjet 4500 help
- hp designjet 4500 hp-gl 2
- hp designjet 4500 hp-gl/2
- hp designjet 4500 ink cartridges
- hp designjet 4500 keeps jamming
- hp designjet 4500 leaking ink
- hp designjet 4500 load paper to calibrate
- hp designjet 4500 maintenance kit
- hp designjet 4500 manual pdf
- hp designjet 4500 master reset
- hp designjet 4500 mfp driver
- hp designjet 4500 mfp service manual
- hp designjet 4500 offline
- hp designjet 4500 paper
- hp designjet 4500 paper jam error
- hp designjet 4500 parts
- hp designjet 4500 parts list
- hp designjet 4500 plotter driver
- hp designjet 4500 plotter drivers
- hp designjet 4500 plotter issues
- hp designjet 4500 plotter manual
- hp designjet 4500 plotter price
- hp designjet 4500 plotter printer
- hp designjet 4500 price
- hp designjet 4500 print heads
- hp designjet 4500 printer manual
- hp designjet 4500 printhead
- hp designjet 4500 printhead cleaner
- hp designjet 4500 ps driver
- hp designjet 4500 ps driver download
- hp designjet 4500 ps drivers
- hp designjet 4500 ps mac driver
- hp designjet 4500 ps plotter
- hp designjet 4500 ps windows 7 drivers
- hp designjet 4500 review
- hp designjet 4500 scaling issues
- hp designjet 4500 scanner calibration errors
- hp designjet 4500 scanner calibration sheet
- hp designjet 4500 scanner drivers
- hp designjet 4500 scanner error messages
- hp designjet 4500 scanner lamp
- hp designjet 4500 scanner maintenance kit
- hp designjet 4500 scanner maintenance kit #1
- hp designjet 4500 scanner manual
- hp designjet 4500 scanner part replacement
- hp designjet 4500 scanner parts
- hp designjet 4500 scanner parts glass plate
- hp designjet 4500 scanner price
- hp designjet 4500 scanner series
- hp designjet 4500 scanner service manual
- hp designjet 4500 scanner software
- hp designjet 4500 series software
- hp designjet 4500 specifications
- hp designjet 4500 support
- hp designjet 4500 user manual
- hp designjet 4500 windows 7 drivers
- hp designjet 4500ps
- hp designjet 4500ps driver
- hp designjet 4500ps drivers
- hp designjet 4500ps parts
- hp designjet 4500ps plotter