Designjet 4000 Latch - HP
Designjet 4000 Latch
Related Manual Pages


Similar Questions

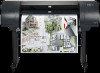
How Will I Replace The Cartridge With Latch Lock In There?
(Posted by akongmabait13 10 years ago)
How Will I Remove The Cartridge From Hp Deskjet 6940 With Latch Lock Inside?
Latch lock is in, and i can't move the head of cartridge so that i can be able to replace the cartri...
Latch lock is in, and i can't move the head of cartridge so that i can be able to replace the cartri...
(Posted by akongmabait13 10 years ago)