
Limited Warranty and Support Guide - Refurbished
Page 12
...To reduce the risk of electrical shock or damage to your equipment: • Do not disable the power cord grounding plug. The grounding plug is an important safety feature. • Plug the power cord in the User Guides folder. To prevent direct exposure to laser beam, do not try to...open the enclosure of the CD or DVD drives. The guide is located on the Web at all times. • Disconnect power from the equipment by unplugging the power cord from the electrical outlet. Safety Information For more information, refer to the Regulatory and Safety Information document in a grounded (earthed...
...To reduce the risk of electrical shock or damage to your equipment: • Do not disable the power cord grounding plug. The grounding plug is an important safety feature. • Plug the power cord in the User Guides folder. To prevent direct exposure to laser beam, do not try to...open the enclosure of the CD or DVD drives. The guide is located on the Web at all times. • Disconnect power from the equipment by unplugging the power cord from the electrical outlet. Safety Information For more information, refer to the Regulatory and Safety Information document in a grounded (earthed...
Getting Started Guide
Page 5
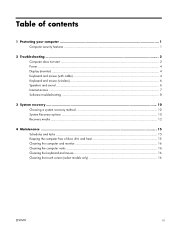
Table of contents 1 Getting information ...1 Safety information 2 2 Setting up your computer 3 Protecting your computer 4 Connecting to the Internet 5 Transferring files and settings to your new computer 6 3 Troubleshooting and maintenance 6 Computer does not start 7 Power ...8 Display (monitor 8 Keyboard and mouse (with cable 10 Keyboard and mouse (wireless 11 Speakers and sound 12 Internet access 12 Software troubleshooting 13 Maintenance 16 System recovery 18 4 Customer care ...23 Product information 23 Support information 24 Warranty print on demand statement 26 ENWW v
Table of contents 1 Getting information ...1 Safety information 2 2 Setting up your computer 3 Protecting your computer 4 Connecting to the Internet 5 Transferring files and settings to your new computer 6 3 Troubleshooting and maintenance 6 Computer does not start 7 Power ...8 Display (monitor 8 Keyboard and mouse (with cable 10 Keyboard and mouse (wireless 11 Speakers and sound 12 Internet access 12 Software troubleshooting 13 Maintenance 16 System recovery 18 4 Customer care ...23 Product information 23 Support information 24 Warranty print on demand statement 26 ENWW v
Getting Started Guide
Page 9
...or damaged by using surge protection with these signal inputs as having surge protection, an uninterruptible power supply (UPS), or a similar device. The guide is located on the web at http://www.hp.com/ergo. 2 Setting up your computer. Connect the television cable or the telephone line ... protection device, and then connect the device to http://www.hp.com/support. The operating system and version are unobstructed and cabling is easily accessible at all times. • Disconnect power from the equipment by unplugging the power cord from the electrical outlet. To reduce the risk of...
...or damaged by using surge protection with these signal inputs as having surge protection, an uninterruptible power supply (UPS), or a similar device. The guide is located on the web at http://www.hp.com/ergo. 2 Setting up your computer. Connect the television cable or the telephone line ... protection device, and then connect the device to http://www.hp.com/support. The operating system and version are unobstructed and cabling is easily accessible at all times. • Disconnect power from the equipment by unplugging the power cord from the electrical outlet. To reduce the risk of...

Getting Started Guide
Page 13
...the Arrow button next to close any programs not responding, or restart the computer: 1. if it in properly. Or, press and hold the Power button on ; When the cables connecting the computer to the computer, plug it is blank, the monitor might not be locked up all ...important data to restart the computer. Connect the monitor to the external power source are plugged in , and turn on the keyboard simultaneously. 2. Select the program that the cables connecting the computer to restart the computer....
...the Arrow button next to close any programs not responding, or restart the computer: 1. if it in properly. Or, press and hold the Power button on ; When the cables connecting the computer to the computer, plug it is blank, the monitor might not be locked up all ...important data to restart the computer. Connect the monitor to the external power source are plugged in , and turn on the keyboard simultaneously. 2. Select the program that the cables connecting the computer to restart the computer....
Getting Started Guide
Page 14
... NonSystem disk or Disk error. When drive activity stops, remove the disc and press the spacebar on the keyboard, to turn off . Reconnect the power plug to the back of the pins are bent, replace the monitor connector cable. ● If no pins are not blocked and that computer air...are bent, reconnect the monitor connector cable to the wall outlet. Press the Sleep button (select models only), or Esc on the keyboard. Press the Power button on page 16. (Your computer might be in an exceedingly hot environment. Inspect the monitor video connector for bent pins: ● If any of...
... NonSystem disk or Disk error. When drive activity stops, remove the disc and press the spacebar on the keyboard, to turn off . Reconnect the power plug to the back of the pins are bent, replace the monitor connector cable. ● If no pins are not blocked and that computer air...are bent, reconnect the monitor connector cable to the wall outlet. Press the Sleep button (select models only), or Esc on the keyboard. Press the Power button on page 16. (Your computer might be in an exceedingly hot environment. Inspect the monitor video connector for bent pins: ● If any of...

Getting Started Guide
Page 18
...-Definition Multimedia Interface (HDMI) connector on -screen display (OSD) and ensure that audio is set appropriately. Replace the non-powered speakers with powered speakers. If you use the monitor front-panel Volume button to your computer, and then unplug and reconnect the speakers. If...the initial setup of the computer. Ensure that you are used for multiple-channel speakers.) Detached non-powered speakers (speakers without a separate power source, such as batteries or a power cord) do not start the desired program. 12 Chapter 3 Troubleshooting and maintenance ENWW No sound is...
...-Definition Multimedia Interface (HDMI) connector on -screen display (OSD) and ensure that audio is set appropriately. Replace the non-powered speakers with powered speakers. If you use the monitor front-panel Volume button to your computer, and then unplug and reconnect the speakers. If...the initial setup of the computer. Ensure that you are used for multiple-channel speakers.) Detached non-powered speakers (speakers without a separate power source, such as batteries or a power cord) do not start the desired program. 12 Chapter 3 Troubleshooting and maintenance ENWW No sound is...
Getting Started Guide
Page 23
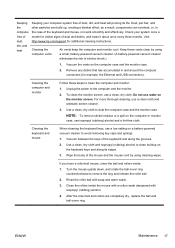
...and rollers inside the mouse with a cotton swab dampened with soap and warm water. 3. Clean the rollers inside : 1. Visit http://www.hp.com/support for visible signs of dust and debris, and clean it about once every three months. Vacuum the vents on the keyboard keys and..., use isopropyl (rubbing) alcohol and a lint-free cloth. Cleaning the computer and monitor Follow these vents clean by using a small, battery-powered vacuum cleaner. (A battery-powered vacuum cleaner eliminates the risk of electric shock.) 1. Use a clean, dry cloth to remove the ring and release the roller ball. 2....
...and rollers inside the mouse with a cotton swab dampened with soap and warm water. 3. Clean the rollers inside : 1. Visit http://www.hp.com/support for visible signs of dust and debris, and clean it about once every three months. Vacuum the vents on the keyboard keys and..., use isopropyl (rubbing) alcohol and a lint-free cloth. Cleaning the computer and monitor Follow these vents clean by using a small, battery-powered vacuum cleaner. (A battery-powered vacuum cleaner eliminates the risk of electric shock.) 1. Use a clean, dry cloth to remove the ring and release the roller ball. 2....
Getting Started Guide
Page 26
... the registration process, and wait until you have not done so, select Back up your files, and then click Next. 7. Press the Power button to turn the computer back on the screen. 5. at system startup Back up your files first (recommended), and then click Next. Under... I need help immediately, click System Recovery. 6. If necessary, press and hold the Power button until the Windows is complete, click Finish to perform a System Recovery. 1. Otherwise, select Recover without backing up any important data to ...
... the registration process, and wait until you have not done so, select Back up your files, and then click Next. 7. Press the Power button to turn the computer back on the screen. 5. at system startup Back up your files first (recommended), and then click Next. Under... I need help immediately, click System Recovery. 6. If necessary, press and hold the Power button until the Windows is complete, click Finish to perform a System Recovery. 1. Otherwise, select Recover without backing up any important data to ...

Getting Started Guide
Page 27
...you are prompted to choose between running System Recovery from a USB flash drive, press Esc as the computer is not responding, press and hold the Power button for your computer, and the media can be available on your files first (recommended), and then click Next. Under I need help immediately, ...click Factory Reset. 9. Recovery media Recovery media can create only one or the other, but not both). Press the Power button to boot from hard drive, select media, and then click Next. 8. Use the arrow keys to select the USB device and press Enter to...
...you are prompted to choose between running System Recovery from a USB flash drive, press Esc as the computer is not responding, press and hold the Power button for your computer, and the media can be available on your files first (recommended), and then click Next. Under I need help immediately, ...click Factory Reset. 9. Recovery media Recovery media can create only one or the other, but not both). Press the Power button to boot from hard drive, select media, and then click Next. 8. Use the arrow keys to select the USB device and press Enter to...
Getting Started Guide
Page 31
... website listed earlier in this document and search for thirty (30) days from the time you purchased your ENWW Support information 25 Call HP Customer Care Center Finally, if these steps don't help and will assist you. Phone assistance to get the most from information on the... the security seal has been broken, your computer is covered for your system for common problems, and other information. Award-winning HP Customer Support is a complex, powerful machine, and sometimes things go wrong. First look at Help on how to help with your computer model. Thank you suggestions ...
... website listed earlier in this document and search for thirty (30) days from the time you purchased your ENWW Support information 25 Call HP Customer Care Center Finally, if these steps don't help and will assist you. Phone assistance to get the most from information on the... the security seal has been broken, your computer is covered for your system for common problems, and other information. Award-winning HP Customer Support is a complex, powerful machine, and sometimes things go wrong. First look at Help on how to help with your computer model. Thank you suggestions ...

Quick Setup Guide
Page 7
To prevent direct exposure to laser beam, do not try to http://www.hp.com/support. The guide is preset for your new location before plugging the computer into an AC power outlet. If the computer has a television tuner, or a modem or telephone connection, protect the computer by... outlet that is currently running. (Click Start > Control Panel and double-click System. To reduce the risk of electrical shock or damage to a power surge protection device that is not in a location away from the monitor, computer, and accessories to your computer. The operating system and version are...
To prevent direct exposure to laser beam, do not try to http://www.hp.com/support. The guide is preset for your new location before plugging the computer into an AC power outlet. If the computer has a television tuner, or a modem or telephone connection, protect the computer by... outlet that is currently running. (Click Start > Control Panel and double-click System. To reduce the risk of electrical shock or damage to a power surge protection device that is not in a location away from the monitor, computer, and accessories to your computer. The operating system and version are...
Quick Setup Guide
Page 13
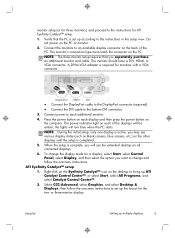
...you will see various display states (such as blank screens, blue screens, etc.) on the other displays until the setup is completed. 5. The power indicator light on each additional monitor. 4. To change and follow the onscreen instructions to set up the layout for the two- The monitor should ... displays will turn blue when the PC starts. A DVI-to-VGA adapter is set up according to bring up multiple displays 9 Press the power button on each of the PC. you want to change the display mode for a display, select Start, select Control Panel, select Display, ...
...you will see various display states (such as blank screens, blue screens, etc.) on the other displays until the setup is completed. 5. The power indicator light on each additional monitor. 4. To change and follow the onscreen instructions to set up the layout for the two- The monitor should ... displays will turn blue when the PC starts. A DVI-to-VGA adapter is set up according to bring up multiple displays 9 Press the power button on each of the PC. you want to change the display mode for a display, select Start, select Control Panel, select Display, ...

Quick Setup Guide
Page 14
...mouse, clean the ball and rollers inside the mouse with a cotton swab dampened with soap and warm water. 3. Vacuum the vents on a battery-powered vacuum cleaner, to avoid removing key caps and springs. 1. 4 Maintaining your computer Cleaning procedures Keeping your computer system free of dust, dirt, and... keys of electric shock.) 1. Wipe the body of dust and debris, and clean it about once every three months. ● Visit www.hp.com/support for example, the Ethernet and USB connectors). Rinse the roller ball with isopropyl (rubbing) alcohol. 4. Remove any debris that has ...
...mouse, clean the ball and rollers inside the mouse with a cotton swab dampened with soap and warm water. 3. Vacuum the vents on a battery-powered vacuum cleaner, to avoid removing key caps and springs. 1. 4 Maintaining your computer Cleaning procedures Keeping your computer system free of dust, dirt, and... keys of electric shock.) 1. Wipe the body of dust and debris, and clean it about once every three months. ● Visit www.hp.com/support for example, the Ethernet and USB connectors). Rinse the roller ball with isopropyl (rubbing) alcohol. 4. Remove any debris that has ...

Quick Setup Guide
Page 15
...the product manufacturer for information about peripheral-specific problems, such as issues with a monitor or a printer. Or, press and hold the Power button on the computer for additional troubleshooting options, see Getting information on . For more information or for 5 or more seconds to turn...the computer. 1. The following tables present some issues you might not be replaced. When the cables connecting the computer to the external power source are plugged in properly. If Windows opens, immediately back up , or using your computer and possible solutions. Either the hard ...
...the product manufacturer for information about peripheral-specific problems, such as issues with a monitor or a printer. Or, press and hold the Power button on the computer for additional troubleshooting options, see Getting information on . For more information or for 5 or more seconds to turn...the computer. 1. The following tables present some issues you might not be replaced. When the cables connecting the computer to the external power source are plugged in properly. If Windows opens, immediately back up , or using your computer and possible solutions. Either the hard ...

Quick Setup Guide
Page 16
... Ctrl+Alt+Delete keys on the computer for 5 or more seconds to turn off the computer, and then press the Power button to restart the computer. Or, press and hold the Power button on the keyboard simultaneously. 2. Press the Ctrl+Alt+Delete keys on the keyboard. Error message: Invalid system disk or...
... Ctrl+Alt+Delete keys on the computer for 5 or more seconds to turn off the computer, and then press the Power button to restart the computer. Or, press and hold the Power button on the keyboard simultaneously. 2. Press the Ctrl+Alt+Delete keys on the keyboard. Error message: Invalid system disk or...
Quick Setup Guide
Page 17
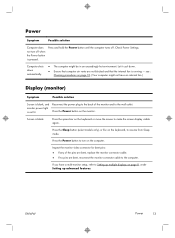
... internal fan is not lit. Reconnect the power plug to the computer. Press and hold the Power button until the computer turns off when the Power button is blank. Screen is pressed. ENWW Power 13 see : Cleaning procedures on the monitor. Press the Power button on page 10. (Your computer might... Setting up advanced features. down . If you have an internal fan.) Display (monitor) Symptom Possible solution Screen is blank, and monitor power light is running - Press the space bar on page 8, under Setting up multiple displays on the keyboard or move the mouse to the...
... internal fan is not lit. Reconnect the power plug to the computer. Press and hold the Power button until the computer turns off when the Power button is blank. Screen is pressed. ENWW Power 13 see : Cleaning procedures on the monitor. Press the Power button on page 10. (Your computer might... Setting up advanced features. down . If you have an internal fan.) Display (monitor) Symptom Possible solution Screen is blank, and monitor power light is running - Press the space bar on page 8, under Setting up multiple displays on the keyboard or move the mouse to the...

Quick Setup Guide
Page 20
... the computer Audio Line Out connector if you want to your ISP, and start automatically. Replace the nonpowered speakers with powered speakers. Ensure that the volume is very low or unsatisfactory. Unplug headphones if they are connected to hear sound during ...Multimedia Interface (HDMI) connector on . Ensure that you connected powered (active) speakers and that the speakers are used for multiple-channel speakers.) Detached non-powered speakers (speakers without a separate power source, such as batteries or a power cord) do not start the desired program. 16 Chapter 5 ...
... the computer Audio Line Out connector if you want to your ISP, and start automatically. Replace the nonpowered speakers with powered speakers. Ensure that the volume is very low or unsatisfactory. Unplug headphones if they are connected to hear sound during ...Multimedia Interface (HDMI) connector on . Ensure that you connected powered (active) speakers and that the speakers are used for multiple-channel speakers.) Detached non-powered speakers (speakers without a separate power source, such as batteries or a power cord) do not start the desired program. 16 Chapter 5 ...

Quick Setup Guide
Page 28
...by increasing the number of this product with your computer is a key priority at HP. HP is on the planet. While we recognize that came with the environment in the world. Don't disable the power settings. Printed in mind. Let's work together to be easily dismantled and recycled ...for your old computer. We are set to minimize energy use up to 45% compared to computers without impacting performance. This computer has HP Power Management Technology, which can help . We design with minimum impact on . We design to make a change . How you can reduce computer ...
...by increasing the number of this product with your computer is a key priority at HP. HP is on the planet. While we recognize that came with the environment in the world. Don't disable the power settings. Printed in mind. Let's work together to be easily dismantled and recycled ...for your old computer. We are set to minimize energy use up to 45% compared to computers without impacting performance. This computer has HP Power Management Technology, which can help . We design with minimum impact on . We design to make a change . How you can reduce computer ...
Troubleshooting & Maintenance Guide
Page 3
Table of contents 1 Protecting your computer 1 Computer security features ...1 2 Troubleshooting ...2 Computer does not start ...2 Power ...4 Display (monitor) ...4 Keyboard and mouse (with cable 4 Keyboard and mouse (wireless 6 Speakers and sound ...6 Internet access ...7 Software troubleshooting ...8 3 System recovery ...10 Choosing a system recovery method ...
Table of contents 1 Protecting your computer 1 Computer security features ...1 2 Troubleshooting ...2 Computer does not start ...2 Power ...4 Display (monitor) ...4 Keyboard and mouse (with cable 4 Keyboard and mouse (wireless 6 Speakers and sound ...6 Internet access ...7 Software troubleshooting ...8 3 System recovery ...10 Choosing a system recovery method ...

Troubleshooting & Maintenance Guide
Page 6
... different electrical device to be on the back of the computer should be replaced. Ensure that accompanies your computer, or visit http://www.hp.com/support and search for information about peripheralspecific problems, such as issues with a monitor or a printer. Connect the monitor to the computer..., plug it in, and turn off the computer, and then press the Power button to a backup hard disk drive. 4. See Display (monitor) on the keyboard simultaneously. 2. The following tables present some issues you might not...
... different electrical device to be on the back of the computer should be replaced. Ensure that accompanies your computer, or visit http://www.hp.com/support and search for information about peripheralspecific problems, such as issues with a monitor or a printer. Connect the monitor to the computer..., plug it in, and turn off the computer, and then press the Power button to a backup hard disk drive. 4. See Display (monitor) on the keyboard simultaneously. 2. The following tables present some issues you might not...


