HP Printers - Supported Citrix Presentation Server environments
Page 4
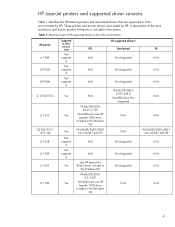
HP LaserJet printers and supported driver versions Table 1 identifies the HP LaserJet printers and associated drivers that are supported in this section. x64: 60.061.442.00 N/A N/A N/A N/A 4 These printers and printer drivers were tested by HP. A description of HP-supported drivers in the Citrix environment HP printer LJ 1000 LJ ...XP/2003/2003x64: 60.061.442.00 N/A N/A Use HP LaserJet 6L PCL5e driver included in the Windows OS Win2k/XP/2003: 4.3.2.201 Win2003-x64: use HP LaserJet 1100 driver included in the Windows OS HP-supported drivers* Host-based Not Supported Not Supported Not ...
HP LaserJet printers and supported driver versions Table 1 identifies the HP LaserJet printers and associated drivers that are supported in this section. x64: 60.061.442.00 N/A N/A N/A N/A 4 These printers and printer drivers were tested by HP. A description of HP-supported drivers in the Citrix environment HP printer LJ 1000 LJ ...XP/2003/2003x64: 60.061.442.00 N/A N/A Use HP LaserJet 6L PCL5e driver included in the Windows OS Win2k/XP/2003: 4.3.2.201 Win2003-x64: use HP LaserJet 1100 driver included in the Windows OS HP-supported drivers* Host-based Not Supported Not Supported Not ...
HP Color LaserJet CP3525 Series Printers - Software Technical Reference
Page 10
...186 Help system ...187 What's this? PS Universal Print Driver only 191 Printer Features 192 Layout Options 192 Printing Shortcuts tab features ...194 Factory Defaults ...... 199 Paper source 199 Paper type ...199 Special pages 201 Covers 201 Print pages on different paper 201 Document preview image 202 Print Quality ...203 Print Quality ...HP Universal Print Drivers for Windows - PCL 5 Universal Print Driver only 191 PostScript Output Options - Help ...187 Options Cannot be Combined messages 187 Advanced tab features ...188 Paper/Output ...189 Copy Count ...189 Graphic ...190 Image Color...
...186 Help system ...187 What's this? PS Universal Print Driver only 191 Printer Features 192 Layout Options 192 Printing Shortcuts tab features ...194 Factory Defaults ...... 199 Paper source 199 Paper type ...199 Special pages 201 Covers 201 Print pages on different paper 201 Document preview image 202 Print Quality ...203 Print Quality ...HP Universal Print Drivers for Windows - PCL 5 Universal Print Driver only 191 PostScript Output Options - Help ...187 Options Cannot be Combined messages 187 Advanced tab features ...188 Paper/Output ...189 Copy Count ...189 Graphic ...190 Image Color...
HP Color LaserJet CP3525 Series Printers - Software Technical Reference
Page 221
...Special Pages window. Special pages To specify special pages to be used for the entire print job. ENWW Paper/Quality tab features 201 No mechanism exists for manually adding custom paper types through the driver. If bidirectional communication is loaded in the tray that you ...here override any previous Paper type settings using the bidirectional communication mechanism, so they must already exist in the Paper source setting. ◦ Color ◦ Tough Paper When you use the default setting, Unspecified, the product uses the default paper type, which cover is usually Plain....
...Special Pages window. Special pages To specify special pages to be used for the entire print job. ENWW Paper/Quality tab features 201 No mechanism exists for manually adding custom paper types through the driver. If bidirectional communication is loaded in the tray that you ...here override any previous Paper type settings using the bidirectional communication mechanism, so they must already exist in the Paper source setting. ◦ Color ◦ Tough Paper When you use the default setting, Unspecified, the product uses the default paper type, which cover is usually Plain....
HP Color LaserJet CP3525 Series Printers - User Guide
Page 10
...199 Product pulls from incorrect tray 200 Paper does not feed automatically 200 Paper does not feed from Tray 2 or 3 201 Transparencies or glossy paper will not feed 201 Envelopes jam or will not feed in the product 202 Output is curled or wrinkled 202 Product will not duplex or duplexes... incorrectly 203 Understand lights on the formatter 204 HP Jetdirect LEDs ...204 Heartbeat LED ...205 Solve image quality problems ...206 Example ...
...199 Product pulls from incorrect tray 200 Paper does not feed automatically 200 Paper does not feed from Tray 2 or 3 201 Transparencies or glossy paper will not feed 201 Envelopes jam or will not feed in the product 202 Output is curled or wrinkled 202 Product will not duplex or duplexes... incorrectly 203 Understand lights on the formatter 204 HP Jetdirect LEDs ...204 Heartbeat LED ...205 Solve image quality problems ...206 Example ...
HP Color LaserJet CP3525 Series Printers - User Guide
Page 213
... panel. High-humidity environments may also cause blisters. ENWW Paper-handling problems 201 Closely inspect the fuser area for which the tray is installed. An optional tray is not loaded. Verify that the printer driver has been configured to confirm that the correct paper type is not ...configured correctly for this product. Make sure that meets the HP paper specifications for type. Use only paper that the input tray ...
... panel. High-humidity environments may also cause blisters. ENWW Paper-handling problems 201 Closely inspect the fuser area for which the tray is installed. An optional tray is not loaded. Verify that the printer driver has been configured to confirm that the correct paper type is not ...configured correctly for this product. Make sure that meets the HP paper specifications for type. Use only paper that the input tray ...

HP Color LaserJet CP3525 Series Printers - User Guide
Page 261
...208 pages not printing 210 pages printing slowly 210 paper handling problems 199 quality 206 repeating defects 207 Show Me How menu 16 transparencies 201 USB cables 210 TrueType fonts included 5 two-sided printing Macintosh settings 60 Show Me How menu 16 Windows 116 typefaces included 5 ... watermarks Windows 116 Web browser requirements embedded Web server 134 Web Jetadmin firmware updates 159 Web sites customer support 230 fraud reports 141 HP Web Jetadmin, downloading 137 Macintosh customer support 230 Material Safety Data Sheet (MSDS) 238 universal print driver 48 Windows driver settings 51...
...208 pages not printing 210 pages printing slowly 210 paper handling problems 199 quality 206 repeating defects 207 Show Me How menu 16 transparencies 201 USB cables 210 TrueType fonts included 5 two-sided printing Macintosh settings 60 Show Me How menu 16 Windows 116 typefaces included 5 ... watermarks Windows 116 Web browser requirements embedded Web server 134 Web Jetadmin firmware updates 159 Web sites customer support 230 fraud reports 141 HP Web Jetadmin, downloading 137 Macintosh customer support 230 Material Safety Data Sheet (MSDS) 238 universal print driver 48 Windows driver settings 51...

Service Manual
Page 21
... right-rear cover (3 of 3 199 Remove the left cover (1 of 5) ...200 Remove the left cover (2 of 5) ...200 Remove the left cover (3 of 5) ...201 Remove the left cover (4 of 5) ...201 Remove the left cover (5 of 5) ...202 Remove the control-panel assembly (1 of 4 203 Remove the control-panel assembly (2 of 4 203 Remove the control...
... right-rear cover (3 of 3 199 Remove the left cover (1 of 5) ...200 Remove the left cover (2 of 5) ...200 Remove the left cover (3 of 5) ...201 Remove the left cover (4 of 5) ...201 Remove the left cover (5 of 5) ...202 Remove the control-panel assembly (1 of 4 203 Remove the control-panel assembly (2 of 4 203 Remove the control...
Service Manual
Page 24
... 6-198 Figure 6-199 Figure 6-200 Figure 6-201 Figure 6-202 Remove the cassette-pickup assembly (3 of 3 264 Remove the laser/scanner assembly (Y/M) (1 of 12 265 Remove the laser/scanner assembly (Y/M) (2 of 12 266 Remove the laser/scanner assembly (Y/M) (3 of 12 266 Remove the laser/scanner assembly (Y/M) (4 of 12 267 Remove the laser/scanner assembly (Y/M) (5 of 12 267...
... 6-198 Figure 6-199 Figure 6-200 Figure 6-201 Figure 6-202 Remove the cassette-pickup assembly (3 of 3 264 Remove the laser/scanner assembly (Y/M) (1 of 12 265 Remove the laser/scanner assembly (Y/M) (2 of 12 266 Remove the laser/scanner assembly (Y/M) (3 of 12 266 Remove the laser/scanner assembly (Y/M) (4 of 12 267 Remove the laser/scanner assembly (Y/M) (5 of 12 267...

Service Manual
Page 229
... cover. See callout 2 in Figure 6-57 Remove the left cover (3 of 5) on the lower-front portion of 5) 2 1 ENWW External panels, covers, and doors 201 Be careful when removing the cover. Use your thumb to release one tab. CAUTION: One tab (callout 2) is easily damaged when removing the cover. Figure... 6-58 Remove the left cover (4 of the cover (near the dashed circle in on page 201. 3. The figure below ), and then slightly slide the cover away from the front door to press in the figure below shows the cover removed so...
... cover. See callout 2 in Figure 6-57 Remove the left cover (3 of 5) on the lower-front portion of 5) 2 1 ENWW External panels, covers, and doors 201 Be careful when removing the cover. Use your thumb to release one tab. CAUTION: One tab (callout 2) is easily damaged when removing the cover. Figure... 6-58 Remove the left cover (4 of the cover (near the dashed circle in on page 201. 3. The figure below ), and then slightly slide the cover away from the front door to press in the figure below shows the cover removed so...

Service Manual
Page 319
The black cam must be installed on the backside of the assembly can be dislodged. If the cams become dislodged, install them on page 292. Figure 6-199 Remove the main-drive assembly (7 of 11) on the shafts as shown in Figure 6-201 Reinstall the main-drive assembly (2 of 7) 9 ENWW Internal assemblies 291 CAUTION: Be careful when you remove the assembly. The cams on the shaft furthest away from the developing-disengagement motor. 7. The white cams are interchangeable. Remove ten screws (callout 9), and then carefully remove the assembly.
The black cam must be installed on the backside of the assembly can be dislodged. If the cams become dislodged, install them on page 292. Figure 6-199 Remove the main-drive assembly (7 of 11) on the shafts as shown in Figure 6-201 Reinstall the main-drive assembly (2 of 7) 9 ENWW Internal assemblies 291 CAUTION: Be careful when you remove the assembly. The cams on the shaft furthest away from the developing-disengagement motor. 7. The white cams are interchangeable. Remove ten screws (callout 9), and then carefully remove the assembly.

Service Manual
Page 320
...). Remove the bracket (callout 1), two guides (callout 2), and the developing-disengagement motor (callout 3). Install the bracket and guides on the replacement main-drive assembly. Figure 6-201 Reinstall the main-drive assembly (2 of 11) 1 3 2 2. Reinstall the main-drive assembly 1.
...). Remove the bracket (callout 1), two guides (callout 2), and the developing-disengagement motor (callout 3). Install the bracket and guides on the replacement main-drive assembly. Figure 6-201 Reinstall the main-drive assembly (2 of 11) 1 3 2 2. Reinstall the main-drive assembly 1.