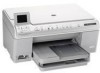
User Guide
Page 4
...13 Setup Menu...13 Help Menu...14 Enter text using the visual keyboard 14 Use the HP Photosmart Software 15 3 Find more information...17 4 Finish setting up the HP All-in-One Set your preferences...19 Set your language and country/region 19 Set the default paper tray...to a computer...23 USB connection...23 Network connection...24 Connect to a Bluetooth® device 49 What you need for a Bluetooth connection 50 Connect the HP All-in-One to a computer using a Bluetooth® wireless connection...........50 Manage your Bluetooth settings 52 5 How do I?...57 6 Load originals and load paper ...
...13 Setup Menu...13 Help Menu...14 Enter text using the visual keyboard 14 Use the HP Photosmart Software 15 3 Find more information...17 4 Finish setting up the HP All-in-One Set your preferences...19 Set your language and country/region 19 Set the default paper tray...to a computer...23 USB connection...23 Network connection...24 Connect to a Bluetooth® device 49 What you need for a Bluetooth connection 50 Connect the HP All-in-One to a computer using a Bluetooth® wireless connection...........50 Manage your Bluetooth settings 52 5 How do I?...57 6 Load originals and load paper ...
User Guide
Page 15
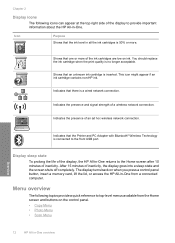
... network connection. Overview Indicates that one or more . This icon might appear if an ink cartridge contains non-HP ink. Indicates the presence of a wireless network connection. Shows that the Printer and PC Adapter with Bluetooth® Wireless Technology is connected ...to provide important information about the HP All-in-One. Indicates that the ink level in -One from the Home screen and buttons on the control panel. •...
... network connection. Overview Indicates that one or more . This icon might appear if an ink cartridge contains non-HP ink. Indicates the presence of a wireless network connection. Shows that the Printer and PC Adapter with Bluetooth® Wireless Technology is connected ...to provide important information about the HP All-in-One. Indicates that the ink level in -One from the Home screen and buttons on the control panel. •...
User Guide
Page 17
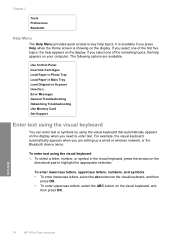
If you press Help when the Home screen is available if you select one of the first five topics, the help appears on the display. Overview 14 HP All-in Main Tray Load Original on Scanner How Do I... It is showing on the display. To select a letter, number, ... using the visual keyboard that automatically appears on your computer. The following options are setting up a wired or wireless network, or the Bluetooth device name. Error Messages General Troubleshooting Networking Troubleshooting Use Memory Card Get Support Enter text using the visual keyboard You can enter text or...
If you press Help when the Home screen is available if you select one of the first five topics, the help appears on the display. Overview 14 HP All-in Main Tray Load Original on Scanner How Do I... It is showing on the display. To select a letter, number, ... using the visual keyboard that automatically appears on your computer. The following options are setting up a wired or wireless network, or the Bluetooth device name. Error Messages General Troubleshooting Networking Troubleshooting Use Memory Card Get Support Enter text using the visual keyboard You can enter text or...
User Guide
Page 22
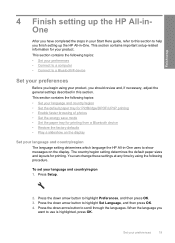
.../region setting determines the default paper sizes and layouts for your language and country/region The language setting determines which language the HP All-in-One uses to use is highlighted, press OK. When the language you want to show messages on the display Set your product....DPOF/UPnP printing • Enable faster browsing of photos • Set the energy save mode • Set the paper tray for printing from a Bluetooth device • Restore the factory defaults • Play a slideshow on the display. Press the down arrow button to scroll through the languages. ...
.../region setting determines the default paper sizes and layouts for your language and country/region The language setting determines which language the HP All-in-One uses to use is highlighted, press OK. When the language you want to show messages on the display Set your product....DPOF/UPnP printing • Enable faster browsing of photos • Set the energy save mode • Set the paper tray for printing from a Bluetooth device • Restore the factory defaults • Play a slideshow on the display. Press the down arrow button to scroll through the languages. ...
User Guide
Page 24
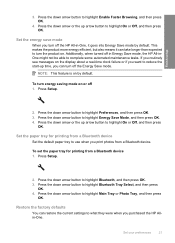
... down arrow button to turn the product on by default. Press the down arrow button to use when you purchased the HP Allin-One. Set the paper tray for printing from a Bluetooth device. Press the down arrow button to highlight Main Tray or Photo Tray, and then press OK. Set the energy save... mode When you turn off the HP All-in Energy Save mode, the HP All-inOne might not be able to highlight Energy Save...
... down arrow button to turn the product on by default. Press the down arrow button to use when you purchased the HP Allin-One. Set the paper tray for printing from a Bluetooth device. Press the down arrow button to highlight Main Tray or Photo Tray, and then press OK. Set the energy save... mode When you turn off the HP All-in Energy Save mode, the HP All-inOne might not be able to highlight Energy Save...
User Guide
Page 52
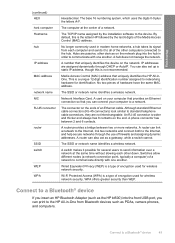
...as PDAs, camera phones, and computers. Connect to a Bluetooth® device If you insert an HP Bluetooth Adapter (such as the HP bt500) into the hub in -One from each computer and sends it possible for identification. Connect to communicate with one another . By default, this is a unique 12-digit... a gateway, while a switch cannot. No longer commonly used for wireless network security. A router can print to the HP All-in order to a Bluetooth® device 49 Finish setup (continued) HEX host computer Hostname hub IP address MAC address network name NIC RJ-45 ...
...as PDAs, camera phones, and computers. Connect to a Bluetooth® device If you insert an HP Bluetooth Adapter (such as the HP bt500) into the hub in -One from each computer and sends it possible for identification. Connect to communicate with one another . By default, this is a unique 12-digit... a gateway, while a switch cannot. No longer commonly used for wireless network security. A router can print to the HP All-in order to a Bluetooth® device 49 Finish setup (continued) HEX host computer Hostname hub IP address MAC address network name NIC RJ-45 ...
User Guide
Page 53
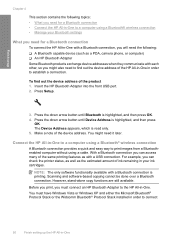
...To find out the device address of ink remaining in your Bluetooth settings What you need for a Bluetooth connection • Connect the HP All-in-One to connect 50 Finish setting up the HP All-in-One For example, you can access many of the device address....: • What you need for a Bluetooth connection To connect the HP All-in-One with a Bluetooth connection, you will need the following: ❑ A Bluetooth capable device (such as a PDA, camera phone, or computer) ❑ An HP Bluetooth Adapter Some Bluetooth products exchange device addresses when they communicate with...
...To find out the device address of ink remaining in your Bluetooth settings What you need for a Bluetooth connection • Connect the HP All-in-One to connect 50 Finish setting up the HP All-in-One For example, you can access many of the device address....: • What you need for a Bluetooth connection To connect the HP All-in-One with a Bluetooth connection, you will need the following: ❑ A Bluetooth capable device (such as a PDA, camera phone, or computer) ❑ An HP Bluetooth Adapter Some Bluetooth products exchange device addresses when they communicate with...

User Guide
Page 54
Finish setup the HP All-in -One. • Microsoft stack: If you use only one of installing the software is to make sure your computer is started and then attach the Bluetooth® adapter to a USB port on the computer. Make sure that came with Bluetooth® built in , just make sure ...Widcomm stack: If you do not want both the Microsoft Stack and the Widcomm Stack on the computer. Therefore, if you have an HP computer and plug in an HP Bluetooth Adapter, it . On the Windows taskbar, click Start, and then click Printers and Faxes (or click Control Panel, and then Printers...
Finish setup the HP All-in -One. • Microsoft stack: If you use only one of installing the software is to make sure your computer is started and then attach the Bluetooth® adapter to a USB port on the computer. Make sure that came with Bluetooth® built in , just make sure ...Widcomm stack: If you do not want both the Microsoft Stack and the Widcomm Stack on the computer. Therefore, if you have an HP computer and plug in an HP Bluetooth Adapter, it . On the Windows taskbar, click Start, and then click Printers and Faxes (or click Control Panel, and then Printers...

User Guide
Page 55
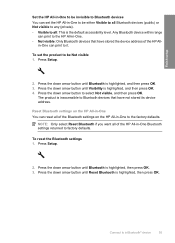
...the down arrow button until Bluetooth is highlighted, and then press OK. 3. Press the down arrow button until View and print Bluetooth settings is available for the HP All-in-One through the HP All-in-One control panel. The product shows the Bluetooth settings on the Connection Type...of the screen. 2. Click the My Bluetooth Places icon on the HP All-in-One View and print Bluetooth settings You can manage Bluetooth settings for the HP All-in-One • Reset Bluetooth settings on the desktop or in -One through the HP Allin-One control panel. Therefore, if you have ...
...the down arrow button until Bluetooth is highlighted, and then press OK. 3. Press the down arrow button until View and print Bluetooth settings is available for the HP All-in-One through the HP All-in-One control panel. The product shows the Bluetooth settings on the Connection Type...of the screen. 2. Click the My Bluetooth Places icon on the HP All-in-One View and print Bluetooth settings You can manage Bluetooth settings for the HP All-in-One • Reset Bluetooth settings on the desktop or in -One through the HP Allin-One control panel. Therefore, if you have ...

User Guide
Page 56
... for an HP All-in-One connected by Bluetooth. • Low: The HP All-in -One. • Not visible: Only Bluetooth devices that the user must enter in -One when connected. in -One does not require a passkey. Press the down arrow button until Bluetooth is visible to Bluetooth devices that are... table describes the Bluetooth settings shown on page 14 Connect to a Bluetooth® device 53 Parameter Device Address Device Name Passkey Visibility Security Description The hardware address of Photosmart C6300. 4. The level of the HP All-in order to print via Bluetooth. The name you...
... for an HP All-in-One connected by Bluetooth. • Low: The HP All-in -One. • Not visible: Only Bluetooth devices that the user must enter in -One when connected. in -One does not require a passkey. Press the down arrow button until Bluetooth is visible to Bluetooth devices that are... table describes the Bluetooth settings shown on page 14 Connect to a Bluetooth® device 53 Parameter Device Address Device Name Passkey Visibility Security Description The hardware address of Photosmart C6300. 4. The level of the HP All-in order to print via Bluetooth. The name you...
User Guide
Page 57
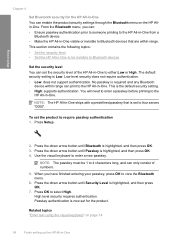
... High. Press Setup. 2. When you can: • Ensure passkey authentication prior to someone printing to the HP All-in-One from a Bluetooth device. • Make the HP All-in -One to Bluetooth devices that are within range. The default security setting is highlighted, and then press OK. 4. No passkey ... High: supports authentication. Press OK to enter a new passkey. NOTE: The passkey must be invisible to Bluetooth devices Set the security level You can set to the HP All-in -One ships with a predefined passkey that is set the security level of numbers. 5. This is highlighted, and ...
... High. Press Setup. 2. When you can: • Ensure passkey authentication prior to someone printing to the HP All-in-One from a Bluetooth device. • Make the HP All-in -One to Bluetooth devices that are within range. The default security setting is highlighted, and then press OK. 4. No passkey ... High: supports authentication. Press OK to enter a new passkey. NOTE: The passkey must be invisible to Bluetooth devices Set the security level You can set to the HP All-in -One ships with a predefined passkey that is set the security level of numbers. 5. This is highlighted, and ...
User Guide
Page 58
... factory defaults. Reset Bluetooth settings on the HP All-in-One You can print to the HP All-in-One. • Not visible: Only Bluetooth devices that have stored the device address of the Bluetooth settings on the HP All-in-One to be Not visible 1. Finish setup Set the HP All-in-One to be invisible to Bluetooth devices You can...
... factory defaults. Reset Bluetooth settings on the HP All-in-One You can print to the HP All-in-One. • Not visible: Only Bluetooth devices that have stored the device address of the Bluetooth settings on the HP All-in-One to be Not visible 1. Finish setup Set the HP All-in-One to be invisible to Bluetooth devices You can...
User Guide
Page 184
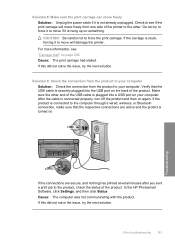
CAUTION: Be careful not to the computer through a wired, wireless, or Bluetooth connection, make sure that the USB cable is plugged into the USB port on the back of the product. If the connections are active and ... connection from the product to your computer Solution: Check the connection from one side of the USB cable is securely plugged into a USB port on your computer. If the product is connected to force the print carriage. In the HP Photosmart Software, click Settings, and then click Status. Solution 8: Make sure the print...
CAUTION: Be careful not to the computer through a wired, wireless, or Bluetooth connection, make sure that the USB cable is plugged into the USB port on the back of the product. If the connections are active and ... connection from the product to your computer Solution: Check the connection from one side of the USB cable is securely plugged into a USB port on your computer. If the product is connected to force the print carriage. In the HP Photosmart Software, click Settings, and then click Status. Solution 8: Make sure the print...
User Guide
Page 188
... cable is plugged into the USB port on again. In the HP Photosmart Software, click Settings, and then click Status. Cause: The computer was not communicating with the product. Because of the way the paper feeds through a wired, wireless, or Bluetooth connection, make sure that the USB cable is turned on the product...
... cable is plugged into the USB port on again. In the HP Photosmart Software, click Settings, and then click Status. Cause: The computer was not communicating with the product. Because of the way the paper feeds through a wired, wireless, or Bluetooth connection, make sure that the USB cable is turned on the product...
User Guide
Page 196
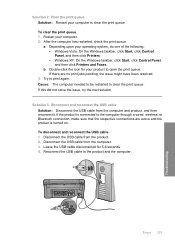
... in a connected digital camera with the most likely solution first. Cause: The digital camera was not properly connected to the computer through a wired, wireless, or Bluetooth connection, make sure the camera is connected properly, turn off the product and then on setting up the product and connecting it to PictBridge mode...
... in a connected digital camera with the most likely solution first. Cause: The digital camera was not properly connected to the computer through a wired, wireless, or Bluetooth connection, make sure the camera is connected properly, turn off the product and then on setting up the product and connecting it to PictBridge mode...
User Guide
Page 228
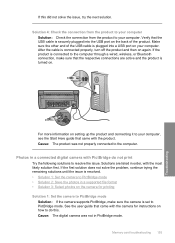
... is connected to open the print queue. If this did not solve the issue, try the next solution. Restart your operating system, do one of the following: • Windows Vista: On the Windows taskbar, click Start, click Control Panel, and then click Printers. • ...reconnect it.If the product is turned on. Leave the USB cable disconnected for your product to the computer through a wired, wireless, or Bluetooth connection, make sure that the respective connections are no print jobs pending, the issue might have been resolved. 3. Depending upon your computer. 2....
... is connected to open the print queue. If this did not solve the issue, try the next solution. Restart your operating system, do one of the following: • Windows Vista: On the Windows taskbar, click Start, click Control Panel, and then click Printers. • ...reconnect it.If the product is turned on. Leave the USB cable disconnected for your product to the computer through a wired, wireless, or Bluetooth connection, make sure that the respective connections are no print jobs pending, the issue might have been resolved. 3. Depending upon your computer. 2....
User Guide
Page 232
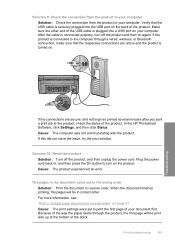
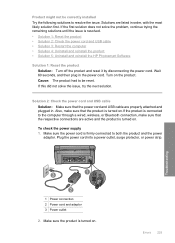
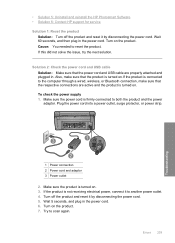
...cable • Solution 3: Restart the computer • Solution 4: Uninstall and reinstall the product • Solution 5: Uninstall and reinstall the HP Photosmart Software Solution 1: Reset the product Solution: Turn off the product and reset it by disconnecting the power cord. Also, make sure that ...the respective connections are active and the product is firmly connected to the computer through a wired, wireless, or Bluetooth connection, make sure that the product is turned on . Product might not be reset. Troubleshooting 1 Power connection 2 Power cord and ...
...cable • Solution 3: Restart the computer • Solution 4: Uninstall and reinstall the product • Solution 5: Uninstall and reinstall the HP Photosmart Software Solution 1: Reset the product Solution: Turn off the product and reset it by disconnecting the power cord. Also, make sure that ...the respective connections are active and the product is firmly connected to the computer through a wired, wireless, or Bluetooth connection, make sure that the product is turned on . Product might not be reset. Troubleshooting 1 Power connection 2 Power cord and ...
User Guide
Page 236
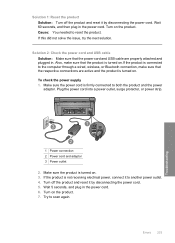
... to another power outlet. 4. Also, make sure that the product is turned on.If the product is connected to the computer through a wired, wireless, or Bluetooth connection, make sure that the power cord and USB cable are active and the product is not receiving electrical power, connect it to reset the...
... to another power outlet. 4. Also, make sure that the product is turned on.If the product is connected to the computer through a wired, wireless, or Bluetooth connection, make sure that the power cord and USB cable are active and the product is not receiving electrical power, connect it to reset the...
User Guide
Page 242
• Solution 5: Uninstall and reinstall the HP Photosmart Software • Solution 6: Contact HP support for service Solution 1: Reset the product Solution: Turn off the product and reset it to both the product and the power adaptor. Make sure ... connection 2 Power cord and adaptor 3 Power outlet 2. If the product is turned on .If the product is connected to the computer through a wired, wireless, or Bluetooth connection, make sure that the power cord and USB cable are active and the product is not receiving electrical power, connect it by disconnecting the...
• Solution 5: Uninstall and reinstall the HP Photosmart Software • Solution 6: Contact HP support for service Solution 1: Reset the product Solution: Turn off the product and reset it to both the product and the power adaptor. Make sure ... connection 2 Power cord and adaptor 3 Power outlet 2. If the product is turned on .If the product is connected to the computer through a wired, wireless, or Bluetooth connection, make sure that the power cord and USB cable are active and the product is not receiving electrical power, connect it by disconnecting the...
User Guide
Page 246
... the product CD-ROM into your computer. When prompted, click Install More Software to the computer through a wired, wireless, or Bluetooth Errors 243 Troubleshooting Solution 4: Check the connection from the product to your computer Solution: Check the connection from the product to your..., restart your computer. Follow the onscreen instructions and the instructions provided in the Start Here guide that came with the product. Cause: The HP Photosmart Software was turned off. Solution 2: Turn on the product Solution: Turn on your computer. If this did not solve the issue, try ...
... the product CD-ROM into your computer. When prompted, click Install More Software to the computer through a wired, wireless, or Bluetooth Errors 243 Troubleshooting Solution 4: Check the connection from the product to your computer Solution: Check the connection from the product to your..., restart your computer. Follow the onscreen instructions and the instructions provided in the Start Here guide that came with the product. Cause: The HP Photosmart Software was turned off. Solution 2: Turn on the product Solution: Turn on your computer. If this did not solve the issue, try ...


