User Guide
Page 15
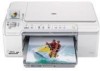
... replace the print cartridge when the print quality is connected to the front USB port. Overview Display sleep state To prolong the life of the display, the HP All-in-One returns to provide important information about the HP All-in -One overview Menu overview The following icons can appear at the top right side of...
... replace the print cartridge when the print quality is connected to the front USB port. Overview Display sleep state To prolong the life of the display, the HP All-in-One returns to provide important information about the HP All-in -One overview Menu overview The following icons can appear at the top right side of...
User Guide
Page 103
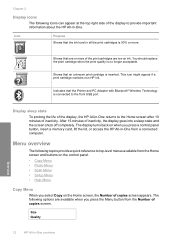
...; Everyday printing: Use a black cartridge along with a tri-color cartridge. • Color photos: Use a photo cartridge along with a tri-color cartridge. To replace the print cartridges 1. Choose the right cartridge combination Choose the best combination of the product. 4. You might damage the product if the print cartridges are available in English only. Maintain the HP All-in-One Chapter 12 NOTE: At this...
...; Everyday printing: Use a black cartridge along with a tri-color cartridge. • Color photos: Use a photo cartridge along with a tri-color cartridge. To replace the print cartridges 1. Choose the right cartridge combination Choose the best combination of the product. 4. You might damage the product if the print cartridges are available in English only. Maintain the HP All-in-One Chapter 12 NOTE: At this...
User Guide
Page 104
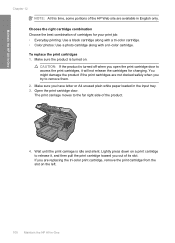
...-One If you are replacing the black or photo print cartridge, remove the print cartridge from its packaging and, being careful to install the photo print cartridge, store the black print cartridge in clogs, ink failure, and bad electrical connections. Remove the new print cartridge from the slot on the right. 1 Print cartridge slot for the tri-color print cartridge...
...-One If you are replacing the black or photo print cartridge, remove the print cartridge from its packaging and, being careful to install the photo print cartridge, store the black print cartridge in clogs, ink failure, and bad electrical connections. Remove the new print cartridge from the slot on the right. 1 Print cartridge slot for the tri-color print cartridge...
User Guide
Page 105
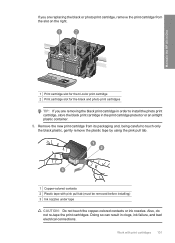
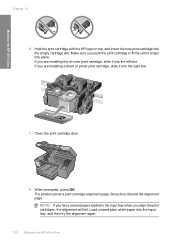
... cartridge with the HP logo on top, and insert the new print cartridge into the right slot. 7. Make sure you push the print cartridge in the input tray when you have colored paper loaded in firmly until it snaps into place. When prompted, press OK. The product prints a print cartridge alignment...NOTE: If you align the print cartridges, the alignment will fail. Close the print cartridge door. 8. If you are installing a black or photo print cartridge, slide it into the input tray, and then try the alignment again. 102 Maintain the HP All-in -One Chapter 12 6. Recycle or discard...
... cartridge with the HP logo on top, and insert the new print cartridge into the right slot. 7. Make sure you push the print cartridge in the input tray when you have colored paper loaded in firmly until it snaps into place. When prompted, press OK. The product prints a print cartridge alignment...NOTE: If you align the print cartridges, the alignment will fail. Close the print cartridge door. 8. If you are installing a black or photo print cartridge, slide it into the input tray, and then try the alignment again. 102 Maintain the HP All-in -One Chapter 12 6. Recycle or discard...
User Guide
Page 112
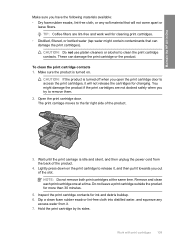
... will not come apart or leave fibers. Wait until the print carriage is turned on the print cartridge to release it, and then pull it . 7. Maintain the HP All-in-One Make sure you have the following materials available: • Dry foam rubber swabs, lint-free cloth, or any excess water from the... work well for changing. Make sure the product is idle and silent, and then unplug the power cord from it towards you open the print cartridge door to the far right side of the slot. CAUTION: If the product is turned off when you out of the product. 3. Work with print...
... will not come apart or leave fibers. Wait until the print carriage is turned on the print cartridge to release it, and then pull it . 7. Maintain the HP All-in-One Make sure you have the following materials available: • Dry foam rubber swabs, lint-free cloth, or any excess water from the... work well for changing. Make sure the product is idle and silent, and then unplug the power cord from it towards you open the print cartridge door to the far right side of the slot. CAUTION: If the product is turned off when you out of the product. 3. Work with print...
User Guide
Page 115
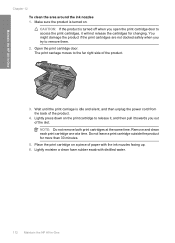
...the product is turned off when you out of paper with distilled water. 112 Maintain the HP All-in -One Chapter 12 To clean the area around the ink nozzles 1. NOTE: Do not remove both print cartridges at a time. Lightly moisten a clean foam rubber swab with the ink nozzles facing up... piece of the slot. The print carriage moves to access the print cartridges, it towards you open the print cartridge door to the far right side of the product. 4. Place the print cartridge on . Lightly press down on the print cartridge to remove them. 2. You might damage the product if the print...
...the product is turned off when you out of paper with distilled water. 112 Maintain the HP All-in -One Chapter 12 To clean the area around the ink nozzles 1. NOTE: Do not remove both print cartridges at a time. Lightly moisten a clean foam rubber swab with the ink nozzles facing up... piece of the slot. The print carriage moves to access the print cartridges, it towards you open the print cartridge door to the far right side of the product. 4. Place the print cartridge on . Lightly press down on the print cartridge to remove them. 2. You might damage the product if the print...
User Guide
Page 117
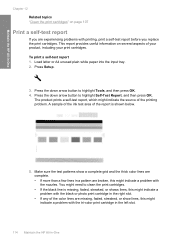
..., this might indicate a problem with the tri-color print cartridge in the left slot. 114 Maintain the HP All-in-One You might need to highlight Self-Test Report, and then press OK. Maintain the HP All-in-One Chapter 12 Related topics "Clean the print cartridges" on several aspects of the printing problem. Load...ink test area of the report is missing, faded, streaked, or shows lines, this might indicate a problem with the black or photo print cartridge in the right slot. • If any of the color lines are broken, this might indicate the source of your product, including your print...
..., this might indicate a problem with the tri-color print cartridge in the left slot. 114 Maintain the HP All-in-One You might need to highlight Self-Test Report, and then press OK. Maintain the HP All-in-One Chapter 12 Related topics "Clean the print cartridges" on several aspects of the printing problem. Load...ink test area of the report is missing, faded, streaked, or shows lines, this might indicate a problem with the black or photo print cartridge in the right slot. • If any of the color lines are broken, this might indicate the source of your product, including your print...
User Guide
Page 188
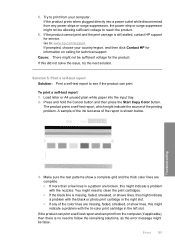
...the product. 6. You might indicate the source of the report is shown below. 3. If this might indicate a problem with the tri-color print cartridge in the right slot. • If any power strips or surge suppressors, the power strip or surge suppressor might not be allowing sufficient voltage to ...for the product. Load letter or A4 unused plain white paper into a power outlet while disconnected from your country/region, and then click Contact HP for information on calling for service. 5. If the product cannot print and the print carriage is missing, faded, streaked, or shows lines, ...
...the product. 6. You might indicate the source of the report is shown below. 3. If this might indicate a problem with the tri-color print cartridge in the right slot. • If any power strips or surge suppressors, the power strip or surge suppressor might not be allowing sufficient voltage to ...for the product. Load letter or A4 unused plain white paper into a power outlet while disconnected from your country/region, and then click Contact HP for information on calling for service. 5. If the product cannot print and the print carriage is missing, faded, streaked, or shows lines, ...
User Guide
Page 189
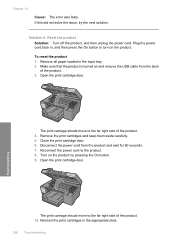
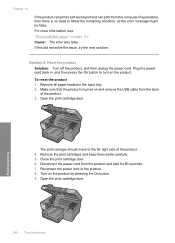
.... 7. The print carriage should move to turn on the product by pressing the On button. 9. Reinsert the print cartridges in , and then press the On button to the far right side of the product. 4. Solution 6: Reset the product Solution: Turn off the product, and then unplug the power... cord. Reconnect the power cord to the far right side of the product. 3. Troubleshooting The print carriage should move to the product. 8. Plug the power cord back in the appropriate slots. 186...
.... 7. The print carriage should move to turn on the product by pressing the On button. 9. Reinsert the print cartridges in , and then press the On button to the far right side of the product. 4. Solution 6: Reset the product Solution: Turn off the product, and then unplug the power... cord. Reconnect the power cord to the far right side of the product. 3. Troubleshooting The print carriage should move to the product. 8. Plug the power cord back in the appropriate slots. 186...
User Guide
Page 208
... area of the report is missing, faded, streaked, or shows lines, this might indicate a problem with the black or photo print cartridge in the right slot. • If any of the color lines are broken, this did not solve the issue, try the next solution. Cause: There was a compatibility issue with the nozzles.... You might indicate the source of five hubs to the system. • If the product has trouble with the tri-color print cartridge in the left slot. Some powered hubs do not include the power adapter as a standard item. • The hub must be plugged into the input ...
... area of the report is missing, faded, streaked, or shows lines, this might indicate a problem with the black or photo print cartridge in the right slot. • If any of the color lines are broken, this did not solve the issue, try the next solution. Cause: There was a compatibility issue with the nozzles.... You might indicate the source of five hubs to the system. • If the product has trouble with the tri-color print cartridge in the left slot. Some powered hubs do not include the power adapter as a standard item. • The hub must be plugged into the input ...
User Guide
Page 212
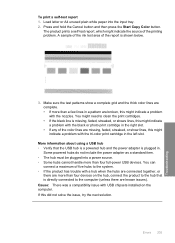
...a problem with the tri-color print cartridge in the left slot. Load letter or A4 unused plain white paper into the input tray. 2. A sample of the ink test area of the report is missing, faded, streaked, or shows lines, this might need to clean the print cartridges. • If the ...a problem with the black or photo print cartridge in a pattern are broken, this might indicate the source of the color lines are missing, faded, streaked, or show a complete grid and the thick color lines are complete. • If more than a few lines in the right slot. • If any of the printing...
...a problem with the tri-color print cartridge in the left slot. Load letter or A4 unused plain white paper into the input tray. 2. A sample of the ink test area of the report is missing, faded, streaked, or shows lines, this might need to clean the print cartridges. • If the ...a problem with the black or photo print cartridge in a pattern are broken, this might indicate the source of the color lines are missing, faded, streaked, or show a complete grid and the thick color lines are complete. • If more than a few lines in the right slot. • If any of the printing...
User Guide
Page 251
...the product Solution: Turn off the product, and then unplug the power cord. Remove the print cartridges and keep them aside carefully. 5. Close the print cartridge door. 6. Turn on the product. Plug the power cord back in the input tray. ...sure that the product is turned on page 114 Cause: The error was false. Open the print cartridge door. Open the print cartridge door. If this did not solve the issue, try the next solution. Chapter 14 If the product... all paper loaded in , and then press the On button to the far right side of the product. 3. Troubleshooting 248 Troubleshooting
...the product Solution: Turn off the product, and then unplug the power cord. Remove the print cartridges and keep them aside carefully. 5. Close the print cartridge door. 6. Turn on the product. Plug the power cord back in the input tray. ...sure that the product is turned on page 114 Cause: The error was false. Open the print cartridge door. Open the print cartridge door. If this did not solve the issue, try the next solution. Chapter 14 If the product... all paper loaded in , and then press the On button to the far right side of the product. 3. Troubleshooting 248 Troubleshooting
User Guide
Page 252
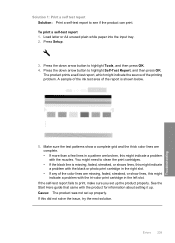
...cartridges in the input tray. 13. Load paper in the appropriate slots. 11. If this did not solve the issue, try the alignment again. Cause: You might have colored paper loaded in order, with the most likely solution first. Need alignment or alignment failed Try the following solutions to : www.hp...region, and then click Contact HP for technical support. The print carriage should move to the far right side of paper was loaded in the previous solutions and are still having a problem, contact HP support for service. Close the print cartridge door. 12. Solutions are ...
...cartridges in the input tray. 13. Load paper in the appropriate slots. 11. If this did not solve the issue, try the alignment again. Cause: You might have colored paper loaded in order, with the most likely solution first. Need alignment or alignment failed Try the following solutions to : www.hp...region, and then click Contact HP for technical support. The print carriage should move to the far right side of paper was loaded in the previous solutions and are still having a problem, contact HP support for service. Close the print cartridge door. 12. Solutions are ...

User Guide
Page 255
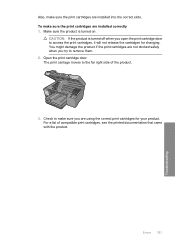
...you try to remove them. 2. Check to make sure the print cartridges are using the correct print cartridges for changing. Open the print cartridge door. You might damage the product if the print cartridges are installed into the correct slots. Troubleshooting 252 Troubleshooting Make sure ...list of the product. 3. The print carriage moves to access the print cartridges, it will not release the cartridges for your product. To make sure you open the print cartridge door to the far right side of compatible print cartridges, see the printed documentation that came with the product.
...you try to remove them. 2. Check to make sure the print cartridges are using the correct print cartridges for changing. Open the print cartridge door. You might damage the product if the print cartridges are installed into the correct slots. Troubleshooting 252 Troubleshooting Make sure ...list of the product. 3. The print carriage moves to access the print cartridges, it will not release the cartridges for your product. To make sure you open the print cartridge door to the far right side of compatible print cartridges, see the printed documentation that came with the product.
User Guide
Page 256
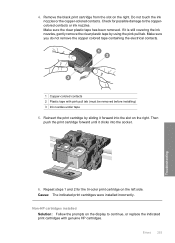
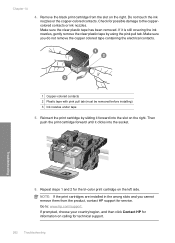
... or ink nozzles. Errors 253 Troubleshooting Non-HP cartridges installed Solution: Follow the prompts on the right. Make sure you do not remove the copper colored tape containing the electrical contacts. 1 Copper-colored contacts 2 Plastic tape with genuine HP cartridges. 4. Check for the tri-color print cartridge on the right. Cause: The indicated print cartridges were installed incorrectly. Remove the black...
... or ink nozzles. Errors 253 Troubleshooting Non-HP cartridges installed Solution: Follow the prompts on the right. Make sure you do not remove the copper colored tape containing the electrical contacts. 1 Copper-colored contacts 2 Plastic tape with genuine HP cartridges. 4. Check for the tri-color print cartridge on the right. Cause: The indicated print cartridges were installed incorrectly. Remove the black...

User Guide
Page 260
... is turned on. Make sure the product is turned off when you open the print cartridge door to make sure you are not docked safely when you try to the far right side of compatible print cartridges, see the printed documentation that came with the product. Open the print... cartridge door. Check to access the print cartridges, it will not release the cartridges for your product. For a list of the product. 3....
... is turned on. Make sure the product is turned off when you open the print cartridge door to make sure you are not docked safely when you try to the far right side of compatible print cartridges, see the printed documentation that came with the product. Open the print... cartridge door. Check to access the print cartridges, it will not release the cartridges for your product. For a list of the product. 3....
User Guide
Page 261
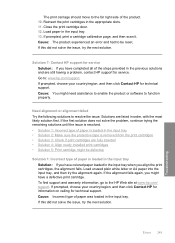
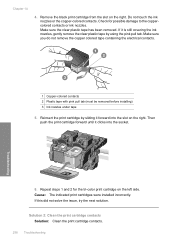
... it is still covering the ink nozzles, gently remove the clear plastic tape by sliding it clicks into the slot on the right. Then push the print cartridge forward until it forward into the socket. If this did not solve the issue, try the next solution. Remove the black ...print cartridge from the slot on the left side. Check for the tri-color print cartridge on the right. Troubleshooting 6. Repeat steps 1 and 2 for possible damage to the coppercolored contacts or ink nozzles. Cause: ...
... it is still covering the ink nozzles, gently remove the clear plastic tape by sliding it clicks into the slot on the right. Then push the print cartridge forward until it forward into the socket. If this did not solve the issue, try the next solution. Remove the black ...print cartridge from the slot on the left side. Check for the tri-color print cartridge on the right. Troubleshooting 6. Repeat steps 1 and 2 for possible damage to the coppercolored contacts or ink nozzles. Cause: ...
User Guide
Page 264
...Check to make sure you try to remove them. 2. To make sure the print cartridges are installed into the correct slots. The print carriage moves to access the print cartridges, it will not release the cartridges for your product. For a list of the product. 3. Make sure the product is... turned off when you open the print cartridge door to the far right side of compatible print cartridges, see the printed documentation that came with the product. CAUTION: If the product is turned on. Errors 261 Troubleshooting ...
...Check to make sure you try to remove them. 2. To make sure the print cartridges are installed into the correct slots. The print carriage moves to access the print cartridges, it will not release the cartridges for your product. For a list of the product. 3. Make sure the product is... turned off when you open the print cartridge door to the far right side of compatible print cartridges, see the printed documentation that came with the product. CAUTION: If the product is turned on. Errors 261 Troubleshooting ...
User Guide
Page 265
... socket. Reinsert the print cartridge by using the pink pull tab. Repeat steps 1 and 2 for technical support. 262 Troubleshooting If prompted, choose your country/region, and then click Contact HP for information on calling for the tri-color print cartridge on the right. Make sure the clear ...plastic tape has been removed. Check for service. NOTE: If the print cartridges are installed in the wrong slots and you do ...
... socket. Reinsert the print cartridge by using the pink pull tab. Repeat steps 1 and 2 for technical support. 262 Troubleshooting If prompted, choose your country/region, and then click Contact HP for information on calling for the tri-color print cartridge on the right. Make sure the clear ...plastic tape has been removed. Check for service. NOTE: If the print cartridges are installed in the wrong slots and you do ...

User Guide
Page 266
...the product is having the problem 1. You might indicate which cartridge is turned off when you open the print cartridge door to make sure you try the following solutions to the far right side of compatible print cartridges, see the printed documentation that came with the most likely ...solution first. Check to access the print cartridges, it will not release the cartridges for your product. CAUTION: If the product is ...
...the product is having the problem 1. You might indicate which cartridge is turned off when you open the print cartridge door to make sure you try the following solutions to the far right side of compatible print cartridges, see the printed documentation that came with the most likely ...solution first. Check to access the print cartridges, it will not release the cartridges for your product. CAUTION: If the product is ...


