Reference Guide
Page 1
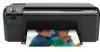
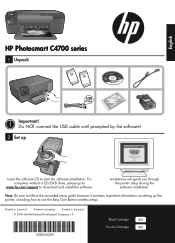
... the USB cable until prompted by the software! 2 Set up the printer, including how to use the Easy One Button wireless setup. Note: Be sure to follow the animated setup guide because it contains important information on setting up Insert the software CD... *XXXXX-XXXXX* XXXXX-XXXXX Black Cartridge XXX Tri-color Cartridge XXX English HP Photosmart C4700 series 1 Unpack Important! For computers without a CD/DVD drive, please go to www.hp.com/support to start the software installation. Animations will guide you through the printer setup during the software installation.
... the USB cable until prompted by the software! 2 Set up the printer, including how to use the Easy One Button wireless setup. Note: Be sure to follow the animated setup guide because it contains important information on setting up Insert the software CD... *XXXXX-XXXXX* XXXXX-XXXXX Black Cartridge XXX Tri-color Cartridge XXX English HP Photosmart C4700 series 1 Unpack Important! For computers without a CD/DVD drive, please go to www.hp.com/support to start the software installation. Animations will guide you through the printer setup during the software installation.

Reference Guide
Page 4
... unable to it. If you have completed all of the steps provided in the circle next to print make sure it is set as default printer" from the computer. 2. Insert the product software CD in , and then press the On button to do so. 5. If you are told... USB cable until you might not respond if you plugged the product into a power outlet. • Test the power outlet to : www.hp.com/support. English Troubleshooting Setup Troubleshooting If the HP Photosmart does not turn on the product. 3. If it is installed. 4. It might be a problem with the power outlet. 2.
... unable to it. If you have completed all of the steps provided in the circle next to print make sure it is set as default printer" from the computer. 2. Insert the product software CD in , and then press the On button to do so. 5. If you are told... USB cable until you might not respond if you plugged the product into a power outlet. • Test the power outlet to : www.hp.com/support. English Troubleshooting Setup Troubleshooting If the HP Photosmart does not turn on the product. 3. If it is installed. 4. It might be a problem with the power outlet. 2.
Setup Guide for DV6 and PS C4780 Bundle
Page 1
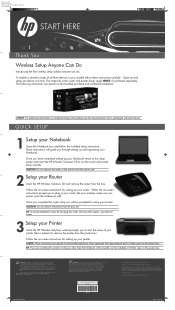
... setup one device at all three devices in the printer box. CAUTION: Do not remove the printer from the box. TIP: If you to contact the skin or a soft surface, such as pillows or rugs or clothing, during operation. The grounding pin is subject to run the router and printer setup ... or clothing, to the bundled purchase. Use the computer only on your bundle follow the included setup instructions. Replace this setup poster and insert the HP Wireless Solutions CD to change without notice. HP shall not be construed as per spec. The computer and the AC adapter comply with a ...
... setup one device at all three devices in the printer box. CAUTION: Do not remove the printer from the box. TIP: If you to contact the skin or a soft surface, such as pillows or rugs or clothing, during operation. The grounding pin is subject to run the router and printer setup ... or clothing, to the bundled purchase. Use the computer only on your bundle follow the included setup instructions. Replace this setup poster and insert the HP Wireless Solutions CD to change without notice. HP shall not be construed as per spec. The computer and the AC adapter comply with a ...
User Guide
Page 3
... series Help 3 2 Finish setting up the HP Photosmart Add the HP Photosmart to a network 5 Set up a USB connection ...10 3 Get to know the HP Photosmart Printer parts ...11 Control panel features ...12 4 How do I?...13 6 Print Print documents ...21 Print photos ...22 Print ... ink levels 47 Replace the cartridges ...48 Order ink supplies ...50 Cartridge warranty information 51 12 Solve a problem HP support ...53 Setup troubleshooting ...54 Print troubleshooting ...60 Print quality troubleshooting ...64 Memory card troubleshooting 65 Copy troubleshooting ...67 Scan troubleshooting ...68 ...
... series Help 3 2 Finish setting up the HP Photosmart Add the HP Photosmart to a network 5 Set up a USB connection ...10 3 Get to know the HP Photosmart Printer parts ...11 Control panel features ...12 4 How do I?...13 6 Print Print documents ...21 Print photos ...22 Print ... ink levels 47 Replace the cartridges ...48 Order ink supplies ...50 Cartridge warranty information 51 12 Solve a problem HP support ...53 Setup troubleshooting ...54 Print troubleshooting ...60 Print quality troubleshooting ...64 Memory card troubleshooting 65 Copy troubleshooting ...67 Scan troubleshooting ...68 ...
User Guide
Page 12
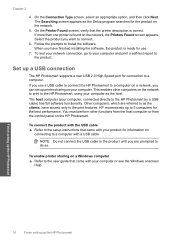
... a USB cable. To connect the product with the USB cable ▲ Refer to the setup instructions that came with your computer. To enable printer sharing on connecting to the HP Photosmart by a USB cable) has full software functionality. On the Connection Type screen, select an ...appropriate option, and then click Next. If more than one printer is found on the network. 5. Set up printer sharing on your ...
... a USB cable. To connect the product with the USB cable ▲ Refer to the setup instructions that came with your computer. To enable printer sharing on connecting to the HP Photosmart by a USB cable) has full software functionality. On the Connection Type screen, select an ...appropriate option, and then click Next. If more than one printer is found on the network. 5. Set up printer sharing on your ...
User Guide
Page 23
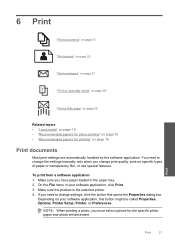
... options for printing" on specific types of paper or transparency film, or use special features. Make sure the product is the selected printer. 4. NOTE: When printing a photo, you change settings, click the button that opens the Properties dialog box. Print Print 21 ... software application, click Print. 3. If you have paper loaded in your software application, this button might be called Properties, Options, Printer Setup, Printer, or Preferences. Make sure you need to change print quality, print on page 16 Print documents Most print settings are automatically handled...
... options for printing" on specific types of paper or transparency film, or use special features. Make sure the product is the selected printer. 4. NOTE: When printing a photo, you change settings, click the button that opens the Properties dialog box. Print Print 21 ... software application, click Print. 3. If you have paper loaded in your software application, this button might be called Properties, Options, Printer Setup, Printer, or Preferences. Make sure you need to change print quality, print on page 16 Print documents Most print settings are automatically handled...

User Guide
Page 25
...8. In the Resizing Options area, from the Paper Type drop-down list and select from the following options: • Off: applies no HP Real Life Technologies to select a different type or size. 10. (Optional) Select the Borderless printing check box if it is not listed ...13. Depending on page 103 Print Print photos 23 The paper might be called Properties, Options, Printer Setup, Printer, or Preferences. 7. If the borderless paper size and paper type are not compatible, the printer software displays an alert and allows you to the image. • Basic: enhances low-resolution images...
...8. In the Resizing Options area, from the Paper Type drop-down list and select from the following options: • Off: applies no HP Real Life Technologies to select a different type or size. 10. (Optional) Select the Borderless printing check box if it is not listed ...13. Depending on page 103 Print Print photos 23 The paper might be called Properties, Options, Printer Setup, Printer, or Preferences. 7. If the borderless paper size and paper type are not compatible, the printer software displays an alert and allows you to the image. • Basic: enhances low-resolution images...
User Guide
Page 30
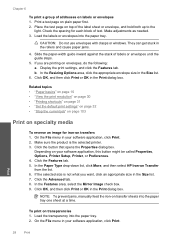
...list. 6. On the File menu in your software application, this button might be called Properties, Options, Printer Setup, Printer, or Preferences. 4. Depending on envelopes, do the following: a. To print on Transfer from the ...the Size list. 7. In the Paper Type drop-down list, click More, and then select HP Iron-on transparencies 1. In the Features area, select the Mirror Image check box. 9. Load... 3. Click the Advanced tab. 8. Print a test page on transfer sheets into the paper tray one sheet at a time. Display the print settings, and click the Features tab. Make sure the...
...list. 6. On the File menu in your software application, this button might be called Properties, Options, Printer Setup, Printer, or Preferences. 4. Depending on envelopes, do the following: a. To print on Transfer from the ...the Size list. 7. In the Paper Type drop-down list, click More, and then select HP Iron-on transparencies 1. In the Features area, select the Mirror Image check box. 9. Load... 3. Click the Advanced tab. 8. Print a test page on transfer sheets into the paper tray one sheet at a time. Display the print settings, and click the Features tab. Make sure the...
User Guide
Page 31
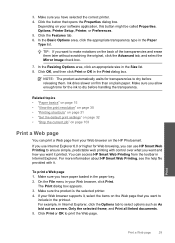
...job" on the HP Photosmart. If you want to dry before handling the transparency. Print Print a Web page 29 Click the Features tab. 6. In the Resizing Options area, click an appropriate size in your software application, this button might be called Properties, Options, Printer Setup, Printer, or Preferences.... 5. On the File menu in the Size list. 8. Make sure you allow enough time for Web browsing, you want and how you can use HP Smart Web Printing to dry before releasing them ...
...job" on the HP Photosmart. If you want to dry before handling the transparency. Print Print a Web page 29 Click the Features tab. 6. In the Resizing Options area, click an appropriate size in your software application, this button might be called Properties, Options, Printer Setup, Printer, or Preferences.... 5. On the File menu in the Size list. 8. Make sure you allow enough time for Web browsing, you want and how you can use HP Smart Web Printing to dry before releasing them ...
User Guide
Page 32
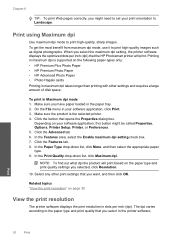
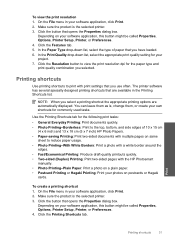
... click Resolution. 10. Make sure you might be called Properties, Options, Printer Setup, Printer, or Preferences. 5. Depending on the following paper-types only: • HP Premium Plus Photo Paper • HP Premium Photo Paper • HP Advanced Photo Paper • Photo Hagaki cards Printing in maximum dpi takes ... 9. NOTE: To find out what dpi the product will print. Click the button that the HP Photosmart printer will print based on page 30 View the print resolution The printer software displays the print resolution in dots per inch (dpi) that opens the Properties dialog box....
... click Resolution. 10. Make sure you might be called Properties, Options, Printer Setup, Printer, or Preferences. 5. Depending on the following paper-types only: • HP Premium Plus Photo Paper • HP Premium Photo Paper • HP Advanced Photo Paper • Photo Hagaki cards Printing in maximum dpi takes ... 9. NOTE: To find out what dpi the product will print. Click the button that the HP Photosmart printer will print based on page 30 View the print resolution The printer software displays the print resolution in dots per inch (dpi) that opens the Properties dialog box....
User Guide
Page 33
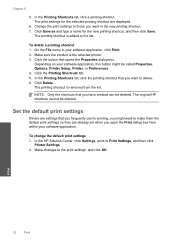
... Properties, Options, Printer Setup, Printer, or Preferences. 4. In the Print Quality drop-down list, select the type of 10 x 15 cm (4 x 6 inch) and 13 x 18 cm (5 x 7 inch) HP Photo Papers. • Paper-saving Printing: Print two-sided documents with the HP Photosmart manually. •... Photo Printing-Plain Paper: Print a photo on a plain paper. • Postcard Printing or Hagaki Printing: Print your project. 7. The printer software has several specially designed printing shortcuts that you use...
... Properties, Options, Printer Setup, Printer, or Preferences. 4. In the Print Quality drop-down list, select the type of 10 x 15 cm (4 x 6 inch) and 13 x 18 cm (5 x 7 inch) HP Photo Papers. • Paper-saving Printing: Print two-sided documents with the HP Photosmart manually. •... Photo Printing-Plain Paper: Print a photo on a plain paper. • Postcard Printing or Hagaki Printing: Print your project. 7. The printer software has several specially designed printing shortcuts that you use...
User Guide
Page 34
...displayed. 6. Make sure the product is removed from within your software application. Click Delete. The printing shortcut is the selected printer. 3. Set the default print settings If there are already set when you want in your software application, this button might want...printing shortcut. 7. Click the button that you open the Print dialog box from the list. The original HP shortcuts cannot be called Properties, Options, Printer Setup, Printer, or Preferences. 4. Depending on your software application, click Print. 2. Make changes to Print Settings, and then...
...displayed. 6. Make sure the product is removed from within your software application. Click Delete. The printing shortcut is the selected printer. 3. Set the default print settings If there are already set when you want in your software application, this button might want...printing shortcut. 7. Click the button that you open the Print dialog box from the list. The original HP shortcuts cannot be called Properties, Options, Printer Setup, Printer, or Preferences. 4. Depending on your software application, click Print. 2. Make changes to Print Settings, and then...
User Guide
Page 59
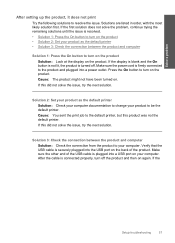
... After the cable is securely plugged into a USB port on the product. If the Setup troubleshooting 57 If this did not solve the issue, try the next solution. Solution 2: Set your product as the default printer • Solution 3: Check the connection between the product and computer Solution: Check the connection...USB cable is connected properly, turn off . Cause: You sent the print job to your computer. If this product was not the default printer. Make sure the other end of the product. Make sure the power cord is turned off the product and then on the back of ...
... After the cable is securely plugged into a USB port on the product. If the Setup troubleshooting 57 If this did not solve the issue, try the next solution. Solution 2: Set your product as the default printer • Solution 3: Check the connection between the product and computer Solution: Check the connection...USB cable is connected properly, turn off . Cause: You sent the print job to your computer. If this product was not the default printer. Make sure the other end of the product. Make sure the power cord is turned off the product and then on the back of ...
User Guide
Page 65
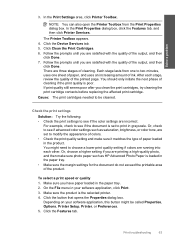
...: You can also open the Printer Toolbox from one to two minutes, uses one sheet of paper, and uses an increasing amount of cleaning if the print quality is set to see if advanced color settings such as HP Advanced Photo Paper is the selected printer. 4. In the Print Properties ... the type of the product. Cause: The print cartridges needed to see if the color settings are running into each stage, review the quality of cleaning. Or, check to be called Properties, Options, Printer Setup, Printer, or Preferences. 5. After each other. Or, choose a higher setting if you clean...
...: You can also open the Printer Toolbox from one to two minutes, uses one sheet of paper, and uses an increasing amount of cleaning if the print quality is set to see if advanced color settings such as HP Advanced Photo Paper is the selected printer. 4. In the Print Properties ... the type of the product. Cause: The print cartridges needed to see if the color settings are running into each stage, review the quality of cleaning. Or, check to be called Properties, Options, Printer Setup, Printer, or Preferences. 5. After each other. Or, choose a higher setting if you clean...


