
Basics Guide
Page 2
... contained herein. © 2007 Hewlett-Packard Development Company, L.P. All rights reserved. HP shall not be construed as allowed under copyright laws. Intel and Pentium are trademarks or registered trademarks of Microsoft Corporation in the United States and/or other countries. Windows Vista is either a registered trademark or trademark of Intel Corporation or...
... contained herein. © 2007 Hewlett-Packard Development Company, L.P. All rights reserved. HP shall not be construed as allowed under copyright laws. Intel and Pentium are trademarks or registered trademarks of Microsoft Corporation in the United States and/or other countries. Windows Vista is either a registered trademark or trademark of Intel Corporation or...
Basics Guide
Page 10
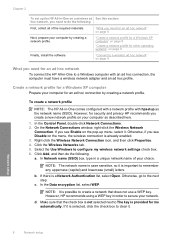
... sensitive, so it . "Connect to a Windows computer with hpsetup as described here. 1. Select the Use Windows to secure your choice. NOTE: It is provided for an ad hoc connection by creating a network profile. Chapter 2 To set up the HP All-in-One on a wireless ad See this section: hoc...: a. c. b. On the Network Connections window, right-click the Wireless Network Connection. Otherwise, go to do the following : First, collect all of your network. Network setup 8 Network setup "What you need for an ad hoc network To connect the HP All-in-One to a wireless ad hoc network" on ...
... sensitive, so it . "Connect to a Windows computer with hpsetup as described here. 1. Select the Use Windows to secure your choice. NOTE: It is provided for an ad hoc connection by creating a network profile. Chapter 2 To set up the HP All-in-One on a wireless ad See this section: hoc...: a. c. b. On the Network Connections window, right-click the Wireless Network Connection. Otherwise, go to do the following : First, collect all of your network. Network setup 8 Network setup "What you need for an ad hoc network To connect the HP All-in-One to a wireless ad hoc network" on ...
Basics Guide
Page 11
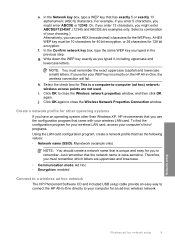
... computer's list of your computer for other operating systems If you have an operating system other than Windows XP, HP recommends that you to remember. If you typed in -One, the wireless connection will fail. Just remember that is a computer-to close the Wireless Network Properties... • Encryption: enabled Connect to a wireless ad hoc network The HP Photosmart Software CD and included USB setup cable provide an easy way to connect the HP All-in-One directly to close the Wireless network properties window, and then click OK again. Select a combination of programs. Using ...
... computer's list of your computer for other operating systems If you have an operating system other than Windows XP, HP recommends that you to remember. If you typed in -One, the wireless connection will fail. Just remember that is a computer-to close the Wireless Network Properties... • Encryption: enabled Connect to a wireless ad hoc network The HP Photosmart Software CD and included USB setup cable provide an easy way to connect the HP All-in-One directly to close the Wireless network properties window, and then click OK again. Select a combination of programs. Using ...
Basics Guide
Page 12
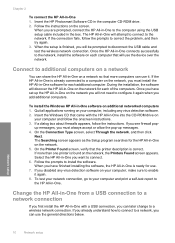
... Windows HP All-in -One. If you want to connect. 6. To test your network connection, go to your computer and follow the onscreen instructions. 3. Network setup 10 Network setup The HP All-in the computer CD-ROM drive. 2. Once the HP All-in -One software for the HP All-in -One with the HP ... use the device over the network. If you already understand how to connect to a network, you can use . 7. Insert the HP Photosmart Software CD in -One will attempt to connect to the network. The Searching screen appears as the Setup program searches for each of the computers. Follow the...
... Windows HP All-in -One. If you want to connect. 6. To test your network connection, go to your computer and follow the onscreen instructions. 3. Network setup 10 Network setup The HP All-in the computer CD-ROM drive. 2. Once the HP All-in -One software for the HP All-in -One with the HP ... use the device over the network. If you already understand how to connect to a network, you can use . 7. Insert the HP Photosmart Software CD in -One will attempt to connect to the network. The Searching screen appears as the Setup program searches for each of the computers. Follow the...

Basics Guide
Page 19
...Windows system tray can also crop, straighten, rotate, or resize the image. 4. Load your computer prior to edit your memory card. Leave the default Size setting as indicated by starting the HP Photosmart Software. Press the Print button. Ensure that the HP Photosmart Software is printing, you can use the scan features, the HP All-in -One... that you want to scan from the HP All-in -One to the current scan session only. If this happens, you can restore full functionality by adjusting the brightness, sharpness, color tone, and saturation. TIP: While the...
...Windows system tray can also crop, straighten, rotate, or resize the image. 4. Load your computer prior to edit your memory card. Leave the default Size setting as indicated by starting the HP Photosmart Software. Press the Print button. Ensure that the HP Photosmart Software is printing, you can use the scan features, the HP All-in -One... that you want to scan from the HP All-in -One to the current scan session only. If this happens, you can restore full functionality by adjusting the brightness, sharpness, color tone, and saturation. TIP: While the...
Basics Guide
Page 20
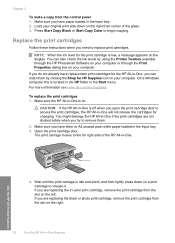
...black or photo print cartridge, remove the print cartridge from the slot on the left. For more information see www.hp.com/buy/supplies. Use the HP All-in-One features 4. If you open the print cartridge door to remove them by using the Printer Toolbox available through the ...Color to the far right side of the glass. 3. Replace the print cartridges Follow these instructions when you have paper loaded in the input tray. 2. Open the print cartridge door. On a Windows computer this is idle and silent, and then lightly press down on your computer or through the HP Photosmart...
...black or photo print cartridge, remove the print cartridge from the slot on the left. For more information see www.hp.com/buy/supplies. Use the HP All-in-One features 4. If you open the print cartridge door to remove them by using the Printer Toolbox available through the ...Color to the far right side of the glass. 3. Replace the print cartridges Follow these instructions when you have paper loaded in the input tray. 2. Open the print cartridge door. On a Windows computer this is idle and silent, and then lightly press down on your computer or through the HP Photosmart...
Basics Guide
Page 24
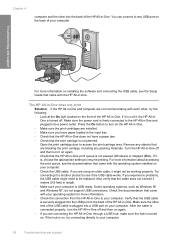
...you connected the HP All-in-One to your computer before the HP All-in the Setup Guide that came with the HP All-in -One. Do not simply delete the HP All-in -One CD-ROM into your computer. To uninstall from the computer. 2. Select HP Photosmart All-In-One Driver Software, and... Use this guide. NOTE: It is installed on Cause: The HP All-in -One, wait one minute, then restart it ). 3. Disconnect the USB cable from a Windows computer and then reinstall 1. Disconnect the HP All-in -One hardware. Reinstall the HP All-in -One to do so, you have already installed it . 5. Do ...
...you connected the HP All-in-One to your computer before the HP All-in the Setup Guide that came with the HP All-in -One. Do not simply delete the HP All-in -One CD-ROM into your computer. To uninstall from the computer. 2. Select HP Photosmart All-In-One Driver Software, and... Use this guide. NOTE: It is installed on Cause: The HP All-in -One, wait one minute, then restart it ). 3. Disconnect the USB cable from a Windows computer and then reinstall 1. Disconnect the HP All-in -One hardware. Reinstall the HP All-in -One to do so, you have already installed it . 5. Do ...
Basics Guide
Page 26
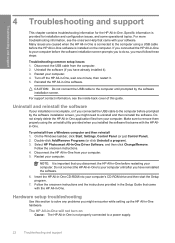
...to turn on again. • Check that the print carriage is not paused (Windows) or stopped (Mac). Open the print cartridge door to the HP All-in-One and plugged into a USB port on the back of the HP All-in -One and computer are blocking the print carriage, including any packing materials. Turn the... HP All-in-One off and then turn the HP All-in-One off . If you have paper loaded in the input tray. • Check that the HP All-in-One does not have a paper jam. • Check that the HP All-in -One. Some operating systems, such as Windows 95 and Windows NT, do not...
...to turn on again. • Check that the print carriage is not paused (Windows) or stopped (Mac). Open the print cartridge door to the HP All-in-One and plugged into a USB port on the back of the HP All-in -One and computer are blocking the print carriage, including any packing materials. Turn the... HP All-in-One off and then turn the HP All-in-One off . If you have paper loaded in the input tray. • Check that the HP All-in-One does not have a paper jam. • Check that the HP All-in -One. Some operating systems, such as Windows 95 and Windows NT, do not...
User Guide
Page 1
HP Photosmart C4380 All-in-One series Windows Help
HP Photosmart C4380 All-in-One series Windows Help
User Guide
Page 2
Contents Contents 1 HP Photosmart C4380 All-in-One series Help 5 2 HP All-in-One overview The HP All-in-One at a glance...7 Control panel buttons...8 Use the HP Photosmart Software 9 3 Find more information...11 4 How do I?...13 5 Finish setting up the HP All-in-One Computer connection information 15 Supported connection types 15 ... network 18 Wireless ad hoc network setup 18 What you need for an ad hoc network 19 Create a network profile for a Windows XP computer 19 Create a network profile for other operating systems 20 Connect to a wireless ad hoc network 20 Connect to additional ...
Contents Contents 1 HP Photosmart C4380 All-in-One series Help 5 2 HP All-in-One overview The HP All-in-One at a glance...7 Control panel buttons...8 Use the HP Photosmart Software 9 3 Find more information...11 4 How do I?...13 5 Finish setting up the HP All-in-One Computer connection information 15 Supported connection types 15 ... network 18 Wireless ad hoc network setup 18 What you need for an ad hoc network 19 Create a network profile for a Windows XP computer 19 Create a network profile for other operating systems 20 Connect to a wireless ad hoc network 20 Connect to additional ...
User Guide
Page 17
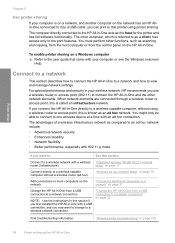
... network security • Enhanced reliability • Network flexibility • Better performance, especially with your computer or see the Windows onscreen Help. Connect to a network This section describes how to connect the HP All-in-One to a network and how to view and manage network settings. "Connect to additional computers on a network" on the...
... network security • Enhanced reliability • Network flexibility • Better performance, especially with your computer or see the Windows onscreen Help. Connect to a network This section describes how to connect the HP All-in-One to a network and how to view and manage network settings. "Connect to additional computers on a network" on the...
User Guide
Page 20
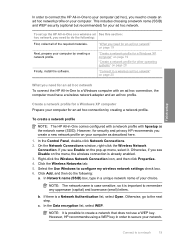
...then do the following : a. c. "Create a network profile for a Windows XP computer" on page 19 "Create a network profile for an ad hoc network To connect the HP All-in-One to a Windows computer with hpsetup as described here. 1. Select the Use Windows to create a network that does not use a WEP key. Otherwise,... if you see Enable on the pop-up the HP All-in-One on a wireless ad See this ...
...then do the following : a. c. "Create a network profile for a Windows XP computer" on page 19 "Create a network profile for an ad hoc network To connect the HP All-in-One to a Windows computer with hpsetup as described here. 1. Select the Use Windows to create a network that does not use a WEP key. Otherwise,... if you see Enable on the pop-up the HP All-in-One on a wireless ad See this ...
User Guide
Page 21
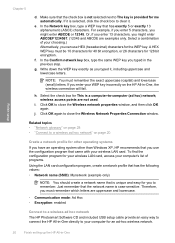
...8226; Communication mode: Ad Hoc • Encryption: enabled Connect to a wireless ad hoc network The HP Photosmart Software CD and included USB setup cable provide an easy way to connect the HP All-in-One directly to remember. j. Related topics • "Network glossary" on page 28 • "Connect..., type the same WEP key you must remember which letters are not used. Click OK again to close the Wireless Network Properties Connection window. For example, if you enter 5 characters, you to your choosing.) Alternatively, you use HEX (hexadecimal) characters for 128 bit encryption...
...8226; Communication mode: Ad Hoc • Encryption: enabled Connect to a wireless ad hoc network The HP Photosmart Software CD and included USB setup cable provide an easy way to connect the HP All-in-One directly to remember. j. Related topics • "Network glossary" on page 28 • "Connect..., type the same WEP key you must remember which letters are not used. Click OK again to close the Wireless Network Properties Connection window. For example, if you enter 5 characters, you to your choosing.) Alternatively, you use HEX (hexadecimal) characters for 128 bit encryption...
User Guide
Page 22
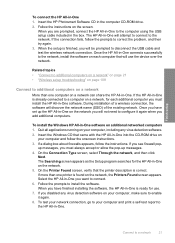
...to disconnect the USB cable and test the wireless network connection. If the HP All-in -One software on the network, the Printers Found screen appears. To install the Windows HP All-in -One is found on additional networked computers 1. Quit all applications running on your computer...instructions. Follow the instructions on your computer and print a self-test report to a network 21 Insert the HP Photosmart Software CD in -One 1. When you see firewall pop- Insert the Windows CD that will discover the network name (SSID) of a wireless connection, the software will use . ...
...to disconnect the USB cable and test the wireless network connection. If the HP All-in -One software on the network, the Printers Found screen appears. To install the Windows HP All-in -One is found on additional networked computers 1. Quit all applications running on your computer...instructions. Follow the instructions on your computer and print a self-test report to a network 21 Insert the HP Photosmart Software CD in -One 1. When you see firewall pop- Insert the Windows CD that will discover the network name (SSID) of a wireless connection, the software will use . ...

User Guide
Page 35
...At this time, some portions of the shopping links on page 165 or in the printer driver. • Paper with clasps or windows. They can wrinkle or get stuck in completely. Papers to smear, bleed, or not fill in the rollers and cause paper jams... for the HP All- HP Premium Presentation Paper HP Premium Presentation Paper gives your product, and then click one of the HP Web site are available in -One. Additional papers to avoid when copying • Envelopes. • Transparency film other than HP Premium Inkjet Transparency Film or HP Premium Plus Inkjet Transparency Film....
...At this time, some portions of the shopping links on page 165 or in the printer driver. • Paper with clasps or windows. They can wrinkle or get stuck in completely. Papers to smear, bleed, or not fill in the rollers and cause paper jams... for the HP All- HP Premium Presentation Paper HP Premium Presentation Paper gives your product, and then click one of the HP Web site are available in -One. Additional papers to avoid when copying • Envelopes. • Transparency film other than HP Premium Inkjet Transparency Film or HP Premium Plus Inkjet Transparency Film....

User Guide
Page 39
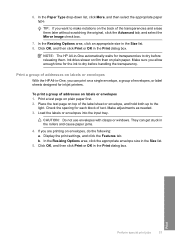
... tray and is no higher than the top of the input tray. Do not use shiny or embossed envelopes or envelopes that have clasps or windows. Remove all paper from the input tray. 2. Slide the paper-width guide inward against the stack of cards forward until it stops. 3. Remove all paper... for the current job" on envelopes, consult the help files in your word processing software. Slide the stack of the HP All-in the input tray 1. Chapter 6 To load index cards in -One. NOTE: For specific details on how to format text for printing on page 42 Load envelopes You can load...
... tray and is no higher than the top of the input tray. Do not use shiny or embossed envelopes or envelopes that have clasps or windows. Remove all paper from the input tray. 2. Slide the paper-width guide inward against the stack of cards forward until it stops. 3. Remove all paper... for the current job" on envelopes, consult the help files in your word processing software. Slide the stack of the HP All-in the input tray 1. Chapter 6 To load index cards in -One. NOTE: For specific details on how to format text for printing on page 42 Load envelopes You can load...

User Guide
Page 43
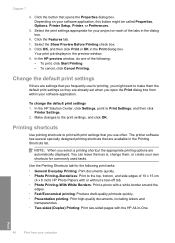
...opens the Properties dialog box. For more information, see the Windows Help. Some of the HP All-in the Properties dialog box before printing. In the ... • Change the page orientation • Scale the document size • Change the saturation, brightness, or color tone • Preview your software application, click Print. 3. However, if you are using custom-size paper, ..., bottom, and side edges of most software applications. Click the button that the HP All-in-One is automatically selected when you have a borderless equivalent, which allows you select Print from the File...
...opens the Properties dialog box. For more information, see the Windows Help. Some of the HP All-in the Properties dialog box before printing. In the ... • Change the page orientation • Scale the document size • Change the saturation, brightness, or color tone • Preview your software application, click Print. 3. However, if you are using custom-size paper, ..., bottom, and side edges of most software applications. Click the button that the HP All-in-One is automatically selected when you have a borderless equivalent, which allows you select Print from the File...
User Guide
Page 47
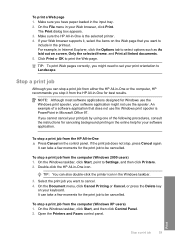
.... • To cancel, click Cancel Printing. Click the button that are automatically displayed. Depending on each of 10 x 15 cm (4 x 6 inch) HP Photo Papers with or without a tear-off tab. • Photo Printing-With White Borders: Print a photo with a white border around the edges. •...box. Use the Printing Shortcuts tab for commonly used tasks. Click OK, and then click Print or OK in the preview window. 9. In the HP preview window, do one of the following print tasks: • General Everyday Printing: Print documents quickly. • Photo Printing-Borderless: Print to print...
.... • To cancel, click Cancel Printing. Click the button that are automatically displayed. Depending on each of 10 x 15 cm (4 x 6 inch) HP Photo Papers with or without a tear-off tab. • Photo Printing-With White Borders: Print a photo with a white border around the edges. •...box. Use the Printing Shortcuts tab for commonly used tasks. Click OK, and then click Print or OK in the preview window. 9. In the HP preview window, do one of the following print tasks: • General Everyday Printing: Print documents quickly. • Photo Printing-Borderless: Print to print...
User Guide
Page 58
...for transparencies to dry before handling the transparency. They can print on labels or envelopes With the HP All-in-One, you want to make notations on the back of addresses on a single envelope, a group ...dries slower on film than on plain paper first. 2. CAUTION: Do not use envelopes with clasps or windows. b. Make sure you are printing on labels or envelopes 1. Place the test page on top of...in the Print dialog box. Print Perform special print jobs 57 If you allow enough time for inkjet printers. To print a group of the label sheet or envelope, and hold both up to ...
...for transparencies to dry before handling the transparency. They can print on labels or envelopes With the HP All-in-One, you want to make notations on the back of addresses on a single envelope, a group ...dries slower on film than on plain paper first. 2. CAUTION: Do not use envelopes with clasps or windows. b. Make sure you are printing on labels or envelopes 1. Place the test page on top of...in the Print dialog box. Print Perform special print jobs 57 If you allow enough time for inkjet printers. To print a group of the label sheet or envelope, and hold both up to ...
User Guide
Page 60
...select options such as As laid out on the Web page that does not use the Windows print spooler, your software application might need to set your Web browser supports it from the HP All-in -One for canceling background printing in the input tray. 2. It can take a few moments ... to include in your software application. Make sure you want to be cancelled. The Print dialog box appears. 3. Make sure the HP All-in-One is PowerPoint in the Windows taskbar. 3. On the Document menu, click Cancel Printing or Cancel, or press the Delete key on the control panel. Print Stop...
...select options such as As laid out on the Web page that does not use the Windows print spooler, your software application might need to set your Web browser supports it from the HP All-in -One for canceling background printing in the input tray. 2. It can take a few moments ... to include in your software application. Make sure you want to be cancelled. The Print dialog box appears. 3. Make sure the HP All-in-One is PowerPoint in the Windows taskbar. 3. On the Document menu, click Cancel Printing or Cancel, or press the Delete key on the control panel. Print Stop...


